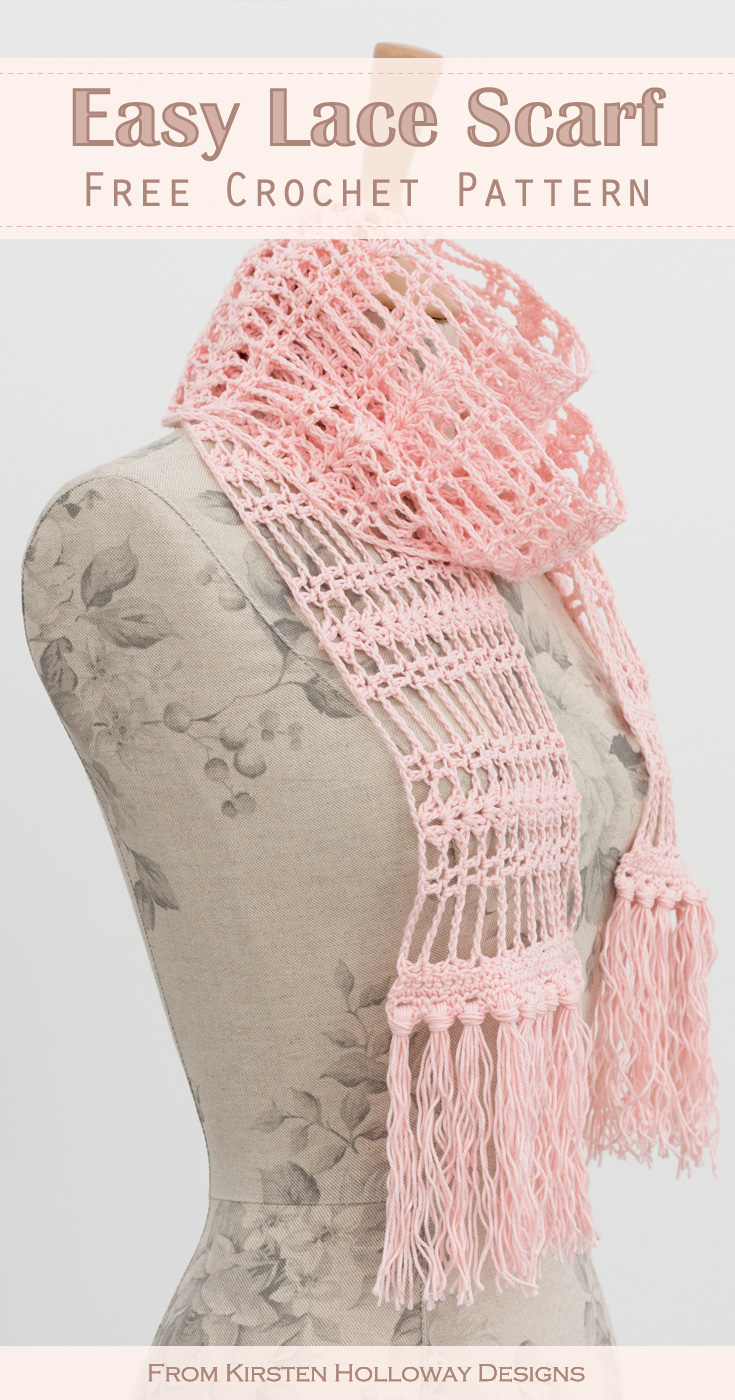
With spring just around the corner, I’ve been wanting a lightweight, lacy scarf that would be pretty, and be simple enough for beginners to crochet. This very easy free scarf pattern delivers on both accounts with a simple, but pleasing stitch pattern that is repeated as many times as you want, to make this light and airy spring scarf as wide or narrow as you’d like. Find the free crochet pattern instructions below, or purchase a print-optimized, ad-free PDF by clicking here.
Click here to add this pattern to your Ravelry queue!
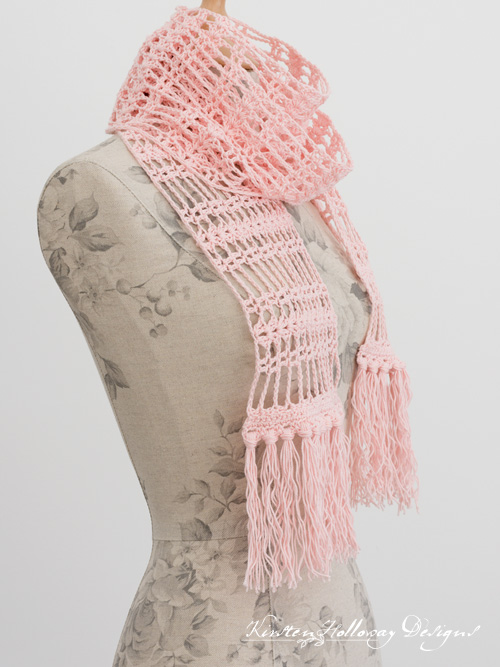
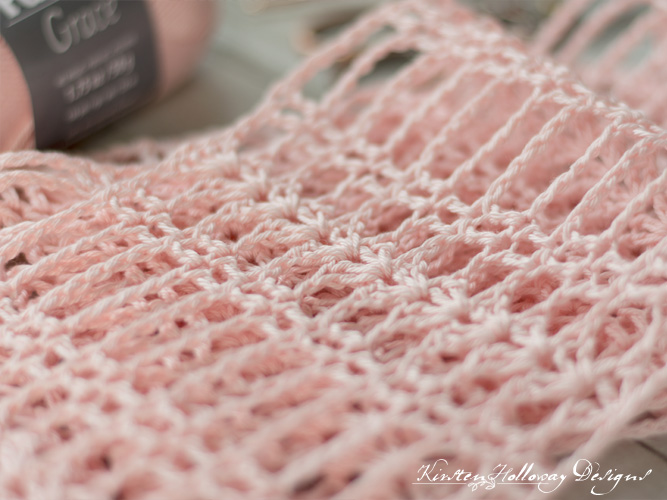
This lace scarf pattern is very basic stitch-wise. It only uses chains, double crochet, and single crochet (for the ends). When I first designed this scarf I wanted a lightweight piece that would look pretty, but be very easy to crochet, especially since I was a beginner at lace myself at the time, and I think this airy summer scarf fits the bill!
Counting is required, but you’ll be a pro at it (especially counting to 4, and 5) by the time you finish. Be sure to look back along each row after you have completed it to make sure your shells each have 4 double crochet in them. This was my most frequent challenge with this scarf as a beginner! You’ll be working the next row’s shells into the center between stitches 2 and 3, so this extra check ensures you don’t end up with any lop-sided shell stitches.
Tips for working with crochet thread
If you’re just starting out with crocheting lace, this scarf makes an easy first project. The important thing to remember when working with crochet thread is that it is stiffer and does not have as much stretch as acrylic or wool yarns do. Going up a hook size or two might make getting your hook through the stitches easier, so don’t be afraid to use a bigger hook. I absolutely love my Furls hooks because they are easy on my hands (and so pretty to look at, wouldn’t you agree?). I also tend to have more relaxed tension when working with them–extra bonus!
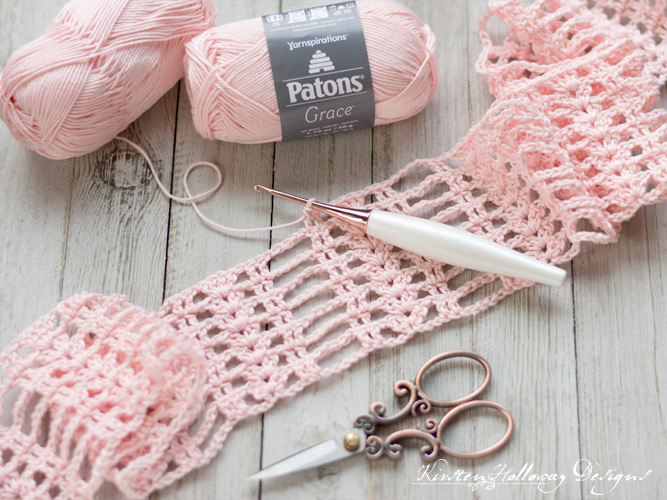
So many of you have asked about the cute antique-looking scissors I showed off in the picture below that I had to include a link to them in the materials list. I got these on Amazon and not only do they look beautiful, they also cut well!

Even with a good hook though, when I first started playing with thread, I found that I needed to do a lot more hand stretches because my arms and fingers would tighten up from getting used to the new tension.
Disclaimer: This post contains affiliate links. When you purchase something using these links a small percentage of the sales price goes to me. However, you do not pay any extra for the item you purchase.
Difficulty:
- Beginner/Easy
Materials Needed:
- 3.25mm (D) hook, or hook needed to obtain measurements
- Approximately 300 yards of Patons Grace in Blush (pictured), OR Red Heart Fashion #3 Crochet Thread in color of your choice.
- Yarn needle for weaving in ends
- Scissors <–These are the cute ones in the picture that I used.
- Blocking Board
- Blocking Pins
Stitches Used:
- sc = single crochet
- dc = double crochet
- sl st = slip stitch
- ch/chs = chain/chains
- st/sts = stitch/stitches
- sk = skip
Additional Terms:
- Shell stitch = 4 dc in same st
Gauge:
- Gauge is not especially important for this piece.
Measurements:
- Unblocked, the finished scarf should measure approximately 5” wide, by 60″ long before blocking.
- Blocked, the scarf should measure approximately 6″ wide by 80″ long. The fringe adds another 12″.
Additional Notes:
- Ch-3 counts as stitch.
- Ch-1 does not count as stitch
- This pattern is worked in multiples of 16 + 3, with an additional 8 stitches for half a pattern repeat at the end.
- Make this scarf as wide or narrow as you want my increasing or decreasing the number of row 2 repeats you do.
- It is possible to turn this into a wrap by doing row 2 repeats until your piece is 12″ wide–you will need more yarn though. 😉
Simply Lace Scarf Crochet Pattern (US Terms):
Click here to purchase an ad-free, print-optimized PDF of this pattern on LoveCrafts
Ch 299,
Row 1: dc in 4th ch from hook, ch 5, sk 5 chs, dc in next 2 chs, ch 1, sk 3 chs, shell stitch in next ch, ch 1, sk 3 chs, dc in next 2 chs. *ch 5, sk 5 chs, dc in next 2 chs, ch 1, sk 3 chs, shell stitch in next ch, ch 1, sk 3 chs, dc in next 2 chs; repeat from * across, ch 3 (counts as first dc of next row), turn.
Rows 2-12: dc in next st, ch 5, sk 5, dc in next 2 dc sts, ch 1, sk to center of shell from prev row, shell stitch between 2nd and 3rd sts of shell, ch 1, sk 3 sts, dc in next 2 sts *ch 5, sk 5, dc in next 2 dc sts, ch 1, sk to center of shell from prev row, shell stitch between 2nd and 3rd sts of shell, ch 1, sk 3 sts, dc in next 2 sts; repeat from * across, ch 3 (counts as first dc of next row), turn, omit ch-3 on final row repeat.
If you want a wider scarf keep working row 2 until it’s as wide as you want, then continue with the scarf ends.
Crocheting the Scarf Ends:
Note: These stitch counts are only valid if you have worked 12 rows. Add 3 sts for each row worked beyond 12 if you want a wider scarf with fringe. You do not have to cut your yarn and reattach it when working the first end. If the gap at the 2 ending dc stitches of the scarf bother you, you can leave a longer yarn tail (10″) when you cut your yarn after crocheting the end, and use that end to sew the stitches closer together.
Row 1: ch 1, Working down the end of the piece, put 3 sc in each dc or ch-3 sp, ch 1, turn. (36)
Row 2: sc in each st across, ch 1, turn. (36)
Row 3: sc in first st of row, ch 1, sk st, sc. *sc in next st, ch 1, sk st, sc; repeat from * across, ch 1, turn. (12, ch-1 sps, 24 sc)
Row 4: 3 sc in first ch-1 sp, sl st between the 2 single crochets from row 3, *3 sc in ch-1 sp, sl st between the 2 single crochets from row 3; repeat from * across. (12 eyelets)
Cut thread and reattach on the other end of the scarf. Repeat rows 1-4.
Fasten off, and weave in ends.
Fringe:
Cut 4-6, 12″ lengths for fringe per eyelet. Fold in half and loop fringe through each eyelet, tucking the ends into the fringe’s loop and pulling snug to attach.
Blocking:
This step is optional, but I can’t recommend it highly enough:
Dampen scarf, stretch out and pin on a blocking board. Let sit until dry.
I would love to see a picture when you’re done, so please feel free to come by my Facebook group and show off your project! Be sure to tag @kirstenhollowaydesigns when you share pictures of your finished scarf on Instagram, and use #simplylacescarf!
You can also follow me on Facebook, Pinterest, Instagram, and Ravelry for more beautiful crochet patterns.
Pattern Terms and Conditions:
You are welcome to share the link to this pattern, using one image of your choice, on your site, but please do not share the written patterns themselves, or use additional images. You do not have permission to use my images by themselves to create pinnable graphics for Pinterest, however they may be included in a roundup pin if there are 4 or more other patterns. If you sell finished items online, please do not use my pictures for your listings. I’m positive that your work is of high enough quality for you to sell the finished piece. Have confidence in your abilities! <3 Thank you!
This pattern was made to be used by individuals, and small business crocheters alike. Selling your finished pieces in boutiques, at farmer’s markets, craft shows, and other local events is encouraged! The only thing I require is that this pattern not be used commercially to produce hundreds of thousands of copies.
If you enjoyed this pattern or found it useful, why not share a link to this post with your friends?