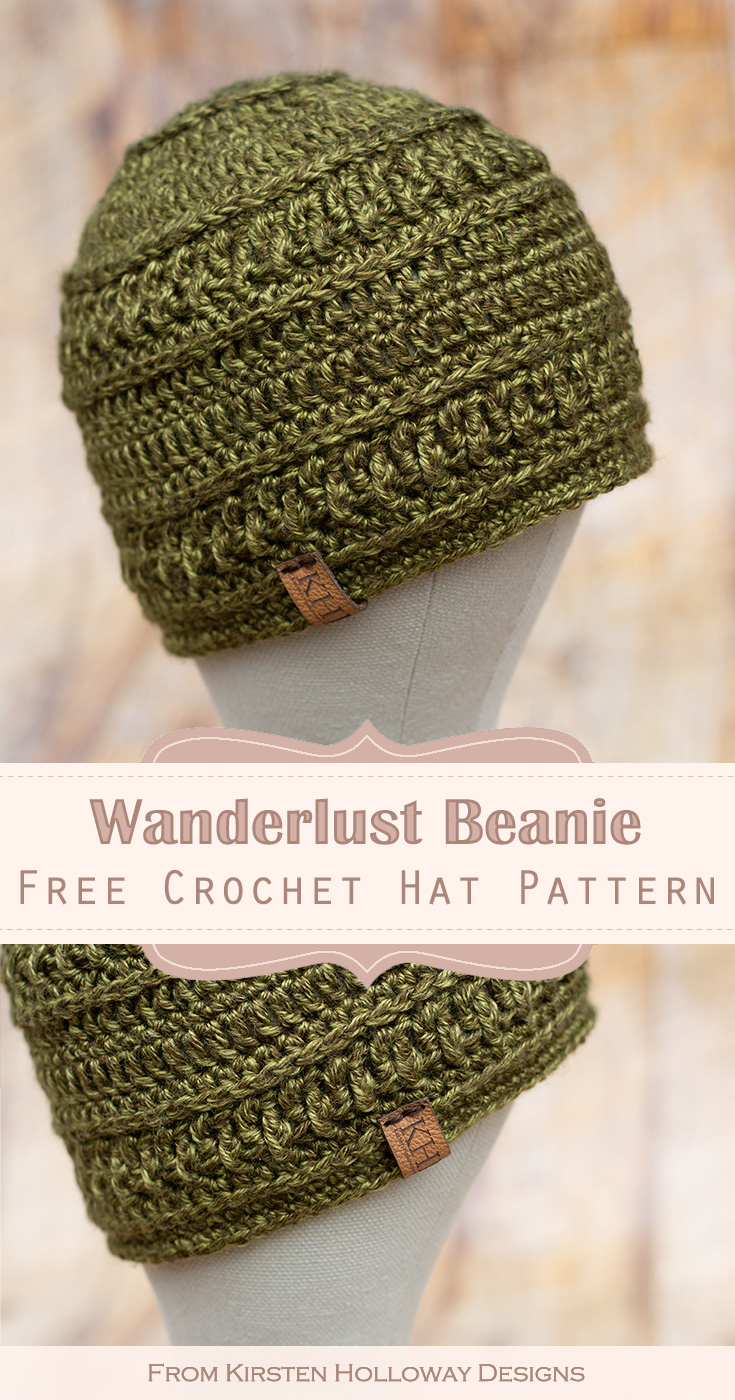
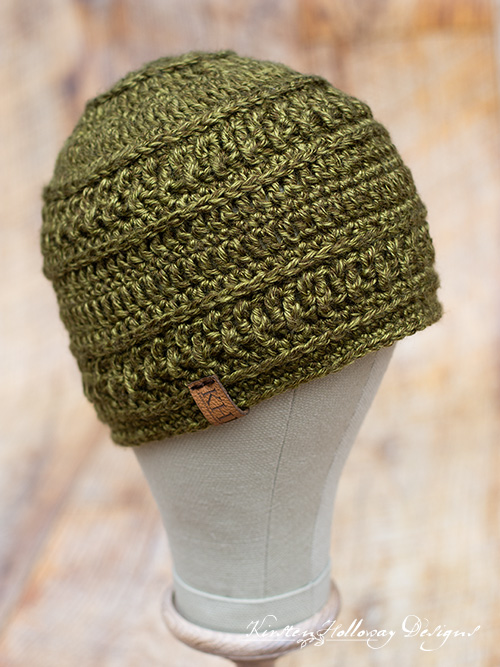
The wanderlust beanie is a unisex crochet hat pattern designed for those wild at heart individuals who feel called to explore, to travel, and to blaze new trails. I designed this easy hat pattern for men with a light worsted weight yarn, so it will be soft and cozy, yet cool enough for summer evenings. Find the free crochet pattern instructions below, or purchase a print-optimized, ad-free PDF by clicking here.
Not only would this simple men’s beanie serve you well on a camping or hiking trip, it would also make an excellent piece to donate to charitable organizations that provide chemo caps hats for cancer patients.
Large, Men’s Crochet Hat Pattern
I originally designed this easy crochet hat pattern to be for men. My husband wears extra large hats and it is very hard to find beanies that fit him properly. That being said, the crochet pattern is just as usable for women–you may want to go down a hook size however! The stitch pattern in this free beanie is fairly easy, so it is an excellent crochet pattern for those who have mastered the basics (single, half-double, and double crochet), and want to play around with them in new ways.
Make it a set:
- Crochet a matching Wanderlust scarf
- Or, make matching Wanderlust hats for the kids and toddlers in your family. Pay special attention to the notes on the required yarn!
- The matching mitten pattern for men is over here!
Click here to add this pattern to your Ravelry queue!
Here’s what you’ll need so you can create your own wanderlust beanie:
Disclaimer: This post contains affiliate links. If you purchase something using these links, then a small amount of the sales price goes to me to help keep this site, and the patterns on it free. However, you do not pay any extra for the item you purchase.
Difficulty:
Easy
Materials Needed:
Men’s Size: 5.5mm (I) hook, or hook needed to obtain gauge
Women’s Size: 5mm (H) hook
225 yards of Lion Brand Heartland yarn in “Joshua Tree”
scissors
yarn needle
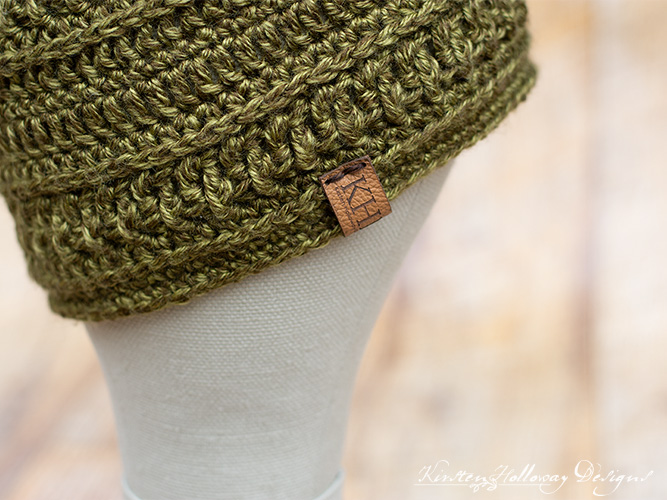
Optional: leather or fabric tag of your choosing. All This Wood has some excellent options, and can do custom orders.
Stitches Used:
ch = chain
sl st = slip stitch
sc = single crochet
hdc = half double crochet
dc = double crochet
FPdc = front post double crochet
BPdc = back post double crochet
Additional Terms:
Working in the 3rd loop of hdc. Look at the top of the stitch, and locate the sideways “V”, bend the stitch to look at the back, and you should see another “V”. You’ll be working into the back loop of that “V”, this is called the 3rd loop.
Gauge:
14 hdc stitches in 4″ Note: don’t snug your stitches down when you make them.
Measurements:
Men’s Size: 10″ wide x 9″ tall, unstretched.
Additional Notes:
–Click here for smaller sizes for toddlers and children!
-ch 1 at beginning of round does not count as a stitch.
-Final st of round will be worked in the join when increasing.
-While I originally designed this as a men’s beanie, the pattern is just as usable for women. You will probably want to go down a hook size, since this hat, as written, will fit a 25″ head (so long as you meet gauge).
Wanderlust Beanie (US Terms):
Click here to purchase an ad-free, print-optimized PDF of this pattern on LoveCrafts
OR
Pick up the printable version of this pattern on Etsy instead
Round 1: 12 dc in magic circle, join with sl st to first dc. (12)
Round 2: ch 1, dc in first st, FPdc around same st, *dc in next st, FPdc around same st; repeat from * around, join with sl st to first dc. Note: Each stitch should have a regular dc worked in the top, and a FPdc worked around it. (24)

Round 3: ch 1, 2 hdc in first st, hdc in next st *2 hdc in next st, hdc in next st; repeat from * around, join with sl st to first hdc. (36)
Round 4: ch 1, working all sts for this round in 3rd loop of hdc, 2 dc in first st, dc in next 2 sts *2 dc in next st, dc in next 2 sts; repeat from * around, join with sl st to first dc. (48)
Round 5: ch 1, 2 sc in first st, sc in next 3 sts *2 sc in next st, sc in next 3 sts; repeat from * around, join with sl st to first sc. (60)
Round 6: ch 1, 2 dc in first st, dc in next 4 sts *2 dc in next st, dc in next 4 sts; repeat from * around, join with sl st to first dc. (72)
Round 7: ch 1, hdc in each st around, join with sl st to first hdc. (72)
Round 8: ch 1, working all sts for this round in the 3rd loop of hdc, sc in each st around, join with sl st to first sc. (72)
Round 9: ch 1, FPdc around first st, BPdc around next st *FPdc around next st, BPdc around the next st; repeat from * around, join with sl st to first FPdc. (72)
You will be alternating here and working FP stitches around the BP stitches from the previous round, and vice-versa. This is intentional.
Round 10: ch 1, BPdc around first FPdc, FPdc around next BPdc *BPdc around next FPdc, FPdc around next BPdc; repeat from * around, join with sl st to first BPdc. (72)
Round 11: ch 1, hdc in each st around, join with sl st to first hdc. (72)
Round 12: ch 1, working all sts for this round in the 3rd loop of hdc, dc in each st around, join with sl st to first dc. (72)
Round 13: ch 1, sc in each st around, join with sl st to first sc. (72)
Round 14: ch 1, dc in each st around, join with sl st to first dc. (72)
Repeat rounds 7-11 one time, then continue with the final 3 rounds
If you want to crochet a slouchy version of this hat, repeat rounds 7-14, then repeat rounds 7-11, and continue as written.
Rounds 20: ch 1, working all sts for this round in the 3rd loop of hdc, sc in each st around, join with sl st to first sc. (72)
Rounds 21-22: ch 1, sc in each st around, join with sl st to first sc. (72)
Note: If you want a slightly longer beanie, do another repeat of rounds 21-22.
Fasten off, and weave in ends.
Optional finishing notes:
Take a pre-made tag and sew it to the hat using yarn or a heavy duty thread.
Looking for more crochet hat patterns for men? Take a look at this free pattern.
Want more gorgeous crochet patterns, and a little encouragement for your day? Sign up for my newsletter here! That way you’ll never miss out on special events, or freebies I’m offering.
JOIN ME ON SOCIAL MEDIA
I would love to see a picture when you’re done, so please feel free to come by my Facebook group and show off your project! Be sure to tag @kirstenhollowaydesigns when you share pictures of your finished hat on Instagram, and use #wanderlustbeanie!
You can also follow me on Facebook, Pinterest, Instagram, and Ravelry for more beautiful crochet patterns.
PATTERN TERMS AND CONDITIONS:
You are welcome to share the link to this pattern, using one image of your choice, on your site, but please do not share the written patterns themselves, this includes my Ravelry downloads or translations of these patterns, or use additional images. You do not have permission to use my images by themselves to create pinnable graphics for Pinterest, however they may be included in a roundup pin if there are 4 or more other patterns. If you sell finished items online, please do not use my pictures for your listings. I’m positive that your work is of high enough quality for you to sell the finished piece. Have confidence in your abilities! <3 Thank you!
This pattern was made to be used by individuals, and small business crocheters alike. Selling your finished pieces in boutiques, at farmer’s markets, craft shows, and other local events is encouraged! The only thing I require is that this pattern not be used commercially to produce hundreds of thousands of copies.
If you enjoyed this pattern or found it useful, why not share a link to this post with your friends?


Hey Kirsten! Thank you so much for the pattern, I just started working on it. I’m making hats for my two older brothers for Christmas.
I was wondering where if the slip stitches count as stitches? Or do you move forward to a new “first stitch” each time? Do I start crocheting into the same stitch I just slip stitched into when I start a new round or do I go to the next stitch? Let me know if the question makes sense!
Hi Sunny,
You will crochet into the same stitch as the join after you finish the increase rounds at the top of the hat. The slip stitches themselves are not considered stitches so much in this pattern. 😊
Thank you so much!
It’s missing rounds 15-19?? It stops at round 14 and jumps to round 20. I’m too new at the crocheting to figure out what other rounds to use to finish the hat.
The pattern tells you to repeat rounds 7-11 (which will be rounds 15-19). After that you will be on round 20. 😊 I hope that helps!
Rnd 3 keeps coming up with 32 and rnd 2 has 24 like it supposed to…I’m not sure what I’m doing wrong….
Hi Megan,
It’s probably because you are not increasing frequently enough. You will work 2 hdc in every other stitch. These will be separated by 1 hdc between. So to give you a little visual (V=2 stitches, I=1 stitch): VIVIVIVIVIVIVIVI but it will be in a circle. 🙂 I hope that helps!
Ty so much! It helped a lot!
You’re welcome!
Thanks for the great pattern! I made it a little smaller for my BF and it looks great! I made it in 2 colors with the 2nd color for row 8-10, both times. I thought it was the best place for it. I’ll be making some to sell at craft shows and on my website. I be sure to link to your page. 🙂
So glad you enjoyed crocheting this hat, Liz! 😊
Hi there. I would love to make this pattern. I’m wondering if I need 225 yards of aran weight if I’m making it for myself. My head measures 22″. My mom gave me some beautiful wool from WY but I only have 160 yards.
You will probably need a bit more yarn for this project than you have, but you’re welcome to give it a shot. You may be able to use a different color mixed in the yarn you got from your mom, but no guarantees. 😅
Can this be worked in a spiral to avoid the join?
No, there’s so much texture that the spiral method would make it look really strange. You could fasten off each round and work an invisible join in each round if you want to, however. I recommend pulling your joins snug to minimize the seam if you are not doing that already. 😊
Thanks so much for the quick reply. Love your patterns!!
You’re very welcome, Loraine!
I made this hat for my teen. Came out well. The matching mittens also came out well (had trouble with the cuff). They took about 3 days for the set.
I was wondering if you can adjust the 2 patterns for a toddler/child?
Hi Brandi,
You can find the instructions for the toddler and child-sized hat pattern here: https://kirstenhollowaydesigns.com/2019/01/free-crochet-hat-pattern-wanderlust-beanie-for-toddlers-and-kids
I would imagine you could follow the mitten patterns using the same yarn that this calls for and end up with a set of mittens that would fit a child. I’d also recommend going down a hook size. I hope that helps!
Hi need a little help, the second round has got me ….I follow it and only end up with 22 DC. I don’t know what I am doing wrong.
Hi Denise,
Do you have 12 dc in your first round? Or do you only have 11? That could make it so you end up with 22 dc instead of the 24 you need. 😅 Each stitch shouold have a FPdc and a dc worked into it which doubles your stitch count from 12 to 24. I hope that helps!
I had 12 but it said 1st and last stich would not have both DC and fpdc. Perhaps I read it wrong. But I adjusted accordingly and kept going 😀
Sorry for the confusion. 😅 The first stitch of the round only gets the FPdc and its counterpart (the dc) gets worked in the join. I probably need to adjust things a little bit in this second round so that it is clearer and easier to understand. Refresh the page in a few minutes and these slight adjustments should be there: Each stitch in round 1 will get a dc, immediately followed be a FPdc around the same stitch. 😊
My husband is so so incredibly picky when it comes to clothing or accessories. I made this hat for him and was worried about whether or not he would like it, but he ended up loving it. Thank you for this pattern! And thank you just in general for this whole site, I have so many of your projects bookmarked. I also appreciate the fact that you are so open to sharing with small businesses and crafters, it is very kind of you. Happy Holidays!
You’re very welcome! I’m thrilled to hear that the hat was a success and your husband loves it!
Nikki,
It’s a lot of fun being part of the community and I’m honored that there are crafters who like my designs enough to crochet them both for themselves and others. 😊 Holidays and Merry Christmas!
Hey, the stitch count after every round, is that including the stitch you’ve just sl st into? Hope this makes sense
You will be joining to the first stitch of the round, so yes, don’t forget to count it. The slip stitch itself does not count as a stitch though. I hope that helps! 😊
Hi! I’m loving these patterns! We decided on the Wanderlust Beanie for my guy and I’m ocd’ing on the start. 🙂 I know what a magic circle is but the first step is 12 ddc in magic circle. What do you start the magic circle with? I’m thinking a chain of 14 or 15 and then double crochet around?
Thanks, so much!
Hi Ellen,
The magic circle is basically an unfinished slip knot that you work into then cinch to close. Try watching this video and see if it helps: https://www.youtube.com/watch?v=sLUaywX0-WE 🙂
I found it last night and it did! Thank you. It’s not started with a chain at all. Brilliant! I’m sure I’ll be back. lol
I’m so glad it was helpful!
Thank you for this beautiful hat pattern! I am using your pattern to make chemo caps for donation.
You’re welcome! That’s awesome that you are crocheting this hat for a good cause!
Hey there great textured beanie for men. Why are they’re no decreases on this
It’s a top-down beanie so it starts with a flat circle that increases until it’s wide enough to fit a man’s head. There’s no need for decreases since it’s straight all the way down. 😊
This pattern is wonderful! It is very well written and easy to follow. It is basic, but visually interesting and can be worked with such a variety of yarns. I’ve been using a G hook and it’s been a perfect size. I’ve finished three of these (the first I added a faux-fur Pom on top…adorable!) and am working on a fourth now. I hope to make a good number to begin selling some crocheted items to help make ends meet as a newly single mom. Thanks so much for the great pattern!
I’m glad you are loving this hat pattern! I
also hope the beanies you make sell well! 😊
I would like to make this hat for my niece who is going through chemo. Is this a good hat to make as a chemo hat?
It should be just fine. You will probably want to use a smaller hook than the one the pattern calls for if making it for a woman. The hat is designed to fit a man’s head up to 25″ around using the recommended yarn and hook tension. 🙂
I’m using a H hook it measured 4 in. for 14 d hc. So do you think I should use the h or go down another hook size. I really like this hat by the way.
It sounds like you are meeting gauge so I’d stay with the H hook. 🙂
Ok thank you😊👍
My first textured beanie! It’s beautiful! Thank you for the pattern!
You’re welcome! I’m glad you enjoyed it!
My Dad has a pretty big head. How can I make this pattern larger?
You can use a larger hook and a thicker yarn if you like. If you crochet loosely though, and you are using the recommended yarn, this hat should turn out plenty big enough. It easily fits my husband’s 25″ head. 😅
Any chance you will be making mittens in this pattern? I’ve made the hat and just love it! Would like some mittens go match 🙂
Thank you for the suggestion! I’ll have to think about it. 🙂
I was going to ask the same thing! I would love fingerless gloves with the fold over mittens in this design!
A matching fingerless glove would be awesome!
Great pattern, thank you!!
You’re very welcome!
I don’t under stand 4rd third loop of of next St what do you mean?
Please help thank you
Gloria,
Here is a video that shows where to find the 3rd loop of a hdc stitch. https://www.facebook.com/kirstenhollowaydesigns/videos/1884031391814874/ The video shows it being worked in rows instead of in rounds like this hat but the idea is the same. You will be working at the back of the stitch, but since the hat is in rounds the 3rd loop will not be facing you like it would if this hat were worked in rows. I hope that helps!
This is beautiful. Where can I buy it, and the scarf, in the UK? I mean, this is so neat. Exactly my style. And the colour? Light blond hair here. I gotta hate it 😩👌😂
This us a crochet pattern only, not a finished product. You can purchase the instructions on Ravelry, or LoveCrafts but you’ll need to find someone local to stitch it for you. I use US crochet terms which are different than UK terms, which is important info to know for the person crocheting the scarf and hat for you. I hope that helps answer your question!
I enjoyed this pattern. I began to worry when the circle began to pickle. I kept going and I like it. I increased 2 rounds of 7-8 rows instead of increasing at the end. It turned out kinda wide instead of narrow. It worked out for the guy ( big head). I will try again but this time I will not increase till the end. I had fun! Thank you.
I’m glad you got the hat to work out despite the accidental puckering. I hope your next one goes more smoothly!
Hi 🙂 I love this pattern, it looks so good. I am stuck on round 4. I double checked my stitch count on round 3 and it is at 36 but then I keep ending round 4 with 54 stitches and the pattern says it should be 48, not sure where i’m going wrong, I’ve tried it 3 times now 🙁
Hi Joslynn,
You’ll want to increase after every 2 stitches. If you increase every other stitch you’ll end up with more than you should, which might be the problem here. 🙂
I hope that helps!
Thank you! i may have read the instructions wrong, or not implemented them correctly, I will double check. Thanks again and for the quick response 🙂
You’re welcome! I hope it works out for you!
Hi Kirsten,
I absolutely love this pattern! However, I am from Holland and I don’t quite understand what is meant with #4 worsted weight yarn. Here in Holland, we only have yarn with a certain amount of mm in thickness and I can’t figure out for the life of me which yarn I should use! I tried to make the beanie with 5mm yarn and a 6mm hook, but it turned out way too small. Do you have any idea which thickness I should use?
Hi Eva,
Worsted is similar to aran weight or 10 ply yarn. Does your label mention either of those things?
I have some gauge information listed to help as well, so if you can make a gauge swatch where your hdc stitches match mine in 4 inches, that may be another guide you can use.
Hi Kirsten.
This was my very 1st crochet attempt (I’ve only been knitting for about 4 weeks / mostly just dish cloths to practice stitchs).
I was searching for something for Fathers Day & saw the photo of this great men’s hat and decided to try to make it for my Pop. I
Where does it say the gauge should be in hdc? I searched and searched for the gauge stitch, gave up and finally just used an sc stitch. How do you usually figure out which stitch to use for the gauge?
Anyway, the gauge came out perfect in sc (after buying a hook, yarn, needle, and researching how to crochet and what the heck a gauge is 🙂
The hat came out beautiful !! Thank you for making this wonderful hat pattern! I’m headed back to the store for yarn for a matching scarf. ,
BTW your website is terrific and you do a fantastic job with your photos and staging/backdrops. Really gives feeling to the individual projects. Makes me want to make them all. Thank you.
Andi,
I’m so glad you like what’s on the site, and enjoyed making the hat pattern! I have updated the gauge section to specifically say hdc, but I believe I was also able to hit that gauge in sc as well.
Thank you so much ????
You’re welcome!
How could you turn this into one of the beanies where you can pull your ponytail through? Do you just crochet around a ponytail holder instead of completing the full top part? Thanks! Love the hat! Excited to follow the link to the scarf!
You can try leaving out the first 2 rounds and start the 3rd either around a ponytail holder or chain (whichever you prefer). I hope that helps!
Hi! I was wondering, am I supposed to turn my work at the begging of each row? thanks!
No, this hat is worked in joined rounds. 🙂
I seem to be loosing a stitch starting in round 3. I start by chaining 1, then place 1 hdc in the stitch directly next to the chain 1 (together, the chain 1 and first hdc count as “2 hdcs in the first stitch” ) then I continue on with the round as instructed (alternating 1 hdc and 2 hdcs in each stitch until I reach the end of the round where I join with the first stitch. what am I doing wrong?
You will need to place 2 hdc sts in the first st. The ch-1 does not count as a st in this pattern. You should end on a single hdc, so put that in the join if you are still short a stitch.
I am on Round 9 and am wondering if I missed something. The ridge that was created in Round 8 by SC in the third loop of the HDCs is getting hidden by the FPDC and BPDC. In the picture the ridge of SC is visible but when you go back and forth between the FPDC and BPDC you cover it up. Is there a step missing or am I missing something obvious?
You will be working this round around the sc stitches you just made. The sc stitches should be what make the ridge appear, but the ridge is actually the top of the hdc stitches from round 7 not the sc themselves.
I would like to do this pattern as ear warmers…there are hardly any earwarmers for me online.So you have a suggestion on what row I should start with? I want to make the earwarmers and the scarf pattern made as a cowl ( I see there are already directions for that) for my sil and dgs for Christmas then for my ds and other dgs and I’ll be making some of the hats for donating. Thank you for the patterns!
This is a fairly wide pattern repeat, so I don’t know how suitable this would be for an ear warmer, and I dont have time to write a custom pattern right now. You could leave off the increase rounds and start with a chain of 72 at round 7 and see if that works. It may end up coming out more like a messy bun hat though which isn’t what most men want.
Hey! I love this pattern, the stitches come together so beautifully. Unfortunately my hat turned out way too wide but way too short. What am I doing wrong? I counted my stitches in every row and I feel like all my stitches were the same tightness. I want to redo it but need to know where I went wrong so I can fix it. Any suggestions would be great! Thanks!
Hi Paige,
If you tug your yarn down after making the stitches that may be the problem. I have very loose tension so my stitches are fairly tall. You can do one more pattern repeat as called for in the directions for the design if you don’t want to tear the whole thing out. I hope that helps!
Good morning! I found this his morning and I love it. I hope I can figure it out. I’ve been crocheting for about 10 years with standard stiches, but have never done some of these stitches. For example I don’t know where the 3rd loop of the half double stitch is. I’m so glad you had the video, because I wasn’t understanding that row’s instructions eiher. I’m a fast study if I can see how things are done.
I’m flying to Europe tonight, and I was hoping to make it on the plane. If you see this before 4 pm that would be wonderful!!! LoL LoL
***If I need to add more rows, at what row do I begin the pattern again? I don’t really want to just add more flat rows at the bottom.***
My crochet stitches are always too “short” in everything I make, especially hats. I always have to add more rows to cover my ears.
Thanks, and Happy Thanksgiving!
Hi Elle,
You should be able to repeat rounds 7-11 again for a bit of extra length. 🙂
Happy Thanksgiving! I hope you have a good flight!
Hello there,
This is a lovely pattern. Is this a slouchy beanie? Or fitted?
Thank you,
Donna
Thank you, Donna! It is a fitted beanie. I may release a slouchy version soon though!
I just want to say thank you for this pattern! I adore this hat and you somehow made the pattern simple enough for even me!(I’m slightly pattern-illiterate)
That’s awesome, Erica! I’m glad you were able to “get it”. 😀
Are we working in the 3rd and 4th loops of the HDC or just the 3rd loop?
Only the 3rd loop at the back of the stitch. This will create the little ridge that bumps out. ☺
This is one amazing pattern. Just finished making it. The texture in this hat makes it. Thanks for the great pattern.
You’re very welcome, Kathy!
I would love to make this as a messy bun hat, do you know how to adapt the instructions to do that?
Hi Michelle,
You could try leaving off the first two rounds and start at the 3rd. You would chain the required number of stitches (36) and join it to create a circle, then work round 3 into the chain instead of the previous rounds stitches. You could also work the stitches into an elastic if you wanted the top opening to be more stretchy. I hope that helps!
Hey so I am having problems understanding the second row and clicking on the link for the rose hat video took me to a page saying that post wasn’t available is there any video on the pattern or any help would be appreciated
Hi Jesi,
Here is the link to the Facebook video that shows how to do the first two rounds: https://m.facebook.com/story.php?story_fbid=1860871137464233&id=1461358747415476
I hope this works for you!
Hi Kirsten. I have a question. I have made about 6 of these beautiful hats. I’m finding that I am getting a seam line. Can you tell me how I can make the join more invisible? Thank you so very much.
There are a couple of ways of minimizing the seam. Chaining 1 instead of two at the beginning of a round helps, but if that still an issue, you can try starting each round in the same stitch as your join, and make sure to pull your slip stitch joins tight. YouTube is another good resource. You could probably find some videos on invisible crochet joins there. 🙂 I hope that helps!
Love this pattern, thanks so much for sharing your work. Just finished making it for my daughter. Now ready to tackle your Snow Country Ski Hat; just a little intimidated by all the stitches but really want to see if I can make it. Thanks again for sharing your patterns!
You’re welcome! I’m glad you enjoyed the pattern! The Snow Country Ski Hat is a lot more difficult than this design, but if you are comfortable with the shell stitch, and diamond stitch, you should be able to figure it out fairly quickly. 🙂
Hi, I absolutely love this beanie pattern but I have a question. When you make the magic ring and start double crocheting into it, do you first need to ch1 or ch2 and then start your first double crochet into the ring? Or just go right in with the double crochet? I noticed when I got to round 6 my beanie started to wave just a little bit and I wasn’t sure if it was because I made my single crochet’s from the previous round a little too tight or if it was because I did not ch1 or ch2 at the beginning in the magic ring before starting my double crochets. Thanks!!
I typically chain 1 at the beginning of each round, then join with a sl st to the first stitch of the round (not the chain). If it’s waving, check your stitch counts. It should be fairly flat until you are done increasing, and then it should start to “cup” and form the hat shape. 🙂 I hope that helps!
Hello, I simply love this pattern and wish to use a bulky (5) yarn and 10.00mm hook. Can you tell me how to accomplish this? Thank you so much.
Hi Deborah, thank you! The hat is already fairly large as it is, so the pattern would have to be changed pretty significantly to make it with bulky yarn and such a large hook. At this point I don’t plan to do any rewriting, however you are welcome to play around with the pattern to see if you can find something that will work. 🙂 Getting a hold of worsted weight yarn and a 5.5mm hook would be my reccomendation though. 🙂 Good luck!
Hi! So I’ve almost completed the beanie oblivious to my faults… once you get to round 6, (72) stitches were supposed to be made “in each stitch around”. Me being kinda lazy I just didn’t count them but I know I’ve done a lot more than 72 stitches in each round following the “in every stitch” rule.. so if I go back to round 6, how would I crochet in the next rounds so that my stitch counts stays at 72 so it’s not just a flat piece? Thank You!
Hi Elaina, you’ll want to skip the join if you put your first stitch in the very first stitch of the round, if you typically skip the first stitch of the round, put your final stitch in the join at the end–it works either way. You’ll also want to make sure you’re not putting two stitches in any one stitch. If you stick with one single stitch in each stitch around you should eventually notice the circle start to “cup” and become more hat shaped. 🙂 I hope that helps!
Thank you for this fabulous looking pattern !!! I am going to try to make one for my step-son for Christmas !!!
You’re welcome, Anita! Good luck with it!
Hi, I’m just wondering… for the gauge you have “14 stitches in 4 inches”… 14 of what kind of stitch?
Thanks!
Hi Adrianna, it’s for either the sc or dc stitches. Both are the same when I measure them in my sample. 🙂
Kirsten,
Thank you for the great free patterns. I worked up your Wanderlust hat today for myself by just not expanding it to 72 stitches. Added a little scallop on the edge and I have a pretty cute hat!! Thanks so much. i will be watching you on Pintrest.
peace
Lin,
You’re very welcome! That sounds cute! 😀
Hello and thanks so much for this and the matching scarf pattern. I made it for my 27 year old son with Caron Cakes and it turned out amazing!
Have a blessed day!
Thanks Tammy
You’re welcome, Tammy! I’m so glad to hear that!
Thank you! Made one in camouflage for hubby. I thought it might hide all that wonderful texture, but it actually turned out ok, but I’m just heading to Michael’s to get wool for one for myself!! Love the wool you’ve used here!
You’re welcome, Carmen! I’m glad it worked out ok, and showed the texture! Have fun making yours!
Love the look of this hat, especially for men! 🙂 How would I go about making more of a slouch fit? I have an interested client with this style but more slouch. Thanks! 🙂
Hi Kat,
Try working rounds 12-14 again (after you finish the second round 7-11 repeat), and then do one more round 7-11 repeat. After that you can finish the hat as written. It should add another band of texture and make the hat more slouchy. 🙂
Hi!
My husband has a 23″ head… what do I need to do differently to make this hat for him?
Thank you so much for sharing this pattern!!! I’m new in crocheting so hopefully I do it right 🙂
It should fit a 23″ head with no problem (the hat pictured fits my husband, and his head is almost 25″ around). However, if you crochet tightly, you may want to go up a hook size from what is listed. Good luck!
I messed up somehow 🙁 was too small 🙁 I think it was at round 2… or the magical circle was too small somehow. what does it mean by the note in round two? Do I have to do another round for what it says?
That hat was beautiful!! Just made it too small 🙁
I’m a newbie… so I’m positive it is my fault 🙁 do you have a video by any chance of making this beanie? Or step by step images?
Thank you very much! Hope you had a great weekend!
Hi Katherine, the note in round 2 is basically saying you need to have two stitches worked in (or around the post) of each stitch from round 1. This will double your stitch count and make a ridged circle for the top of the hat. I don’t have a video for this hat, however, if you head over to my Facebook page http://www.facebook.com/kirstenhollowaydesigns.com there should be a video that shows how to start the first two rounds of my La Vie an Rose hat, and this hat starts the same way. Hopefully that will give you a better idea of what the pattern is asking for. Good luck! 🙂
Thank you very much! Will give it a look.
I appreciate how helpful you are 🙂
The directions for round two say: FPDC around first DC, DC in next stitch. Is this a mistake? The note says FPDC and DC in the same stitch. There are only 12 stitches in round 1 so to end up with 24 in round 2 you would need to ignore the first part of the direction and FPDC and DC in every stitch
It is correct. The first st only gets a FPdc initially. You add the dc that goes with it at the very end of the round, in the join.
Ahh, I see what is going on. My “same” and “next” in the repeat section needed to trade places. It’s updated now. 😅
Hello,
I have a Q : R8 is made of sc and NOT dc ? Because R9 is FPdc and BPdc and to do this in back /front of sc is not confortable.
Thank you.
Round 8 is made with sc and NOT dc to keep the stitch pattern looking the way I originally envisioned it. 🙂
Aha. Thank you. ??
So do you do the FPDC and BPDC two rows below ?
You will alternate front post and back post stitches for two rows to create the texture. I’m sorry, I don’t know what you are referring to when you say two rows below?
Sorry this message sent to soon. I did want to add that I really like your blog and I am going to try to figure out where I can work with this second attempt.
If everyone else had success, I am certain i will as well
thank you again,
Heidi
I’m sorry you’re having trouble with this. Are you using #4 worsted weight for this? If you are, and it’s still turning out too big, try going down a hook size or two.
Good luck!
Its ok. I am a ding dong and probably using wrong weight yarn. I am going to do it again. Ocd is to blame. lol.
Thank you and I will let you know how well it went soon!
Your work is great, 😀
Heidi
No worries! Sometimes strange things happen! I look forward to hearing how it turned out! 😀
I made couple adjustments. Realized it probably was the weight of yarn. Turned out great!
Thank you again , blessings Kirsten. ?
Wonderful! I’m so glad to hear it worked this time! 😀
I have used the correct sized hook and the have taken apart and done this pattern twice.
Altho beautiful variation to the stitching, the hat is still too big!
It always measures 13 ” width.
I have reduced to 62 stitches and still too big.
I can’t understand/
Thank you
Thank you for sharing this wonderful pattern! I was so intrigued by the different stitches being used, I immediately set out to make one. Having recently receiving a request for a black hat, I decided that this pattern would be perfect. I used Red Heart Soft yarn, and the hat came out beautifully. There will be many more hats of different colors and yarn in my future.
You’re very welcome! I’m glad you’re happy with the way your hat turned out!
Hi. Loving your pattern, but I have a quick question. Does the chain 1 count as a stitch or no???
Hi Natasha,
The ch-1 at the beginning of a round never counts as a stitch. 🙂
Love your patterns
Thank you so much, Beverly!
how would I adjust this pattern to a woman. I love the pattern, but need the pattern to fit a woman
Try going down a hook size and see if that works. 🙂
I have made this hat in many different colors and yarn weights. I was asked to make a messy bun hat so I started with round 4 by HDC 36x around a hair tie. It worked great! thanks for this pattern.
You’re very welcome! I’m glad you’ve been having fun with it!
do you have a picture of this? I’d love to see it!
Great pattern. Thanks for sharing.
You’re welcome!
Many Thanks. I really like this for the men.
You’re welcome!
Thank you!
You’re welcome!
hello, my name is bobbie and i love your work. can you please tell me where i can find the wood piece you put on the side of the hat? it really gives a nice finished look to the hat. thank you so much .
Hi Bobbie, I recommend All This Wood on Etsy. They have a beautiful selection of tags in wood, leather, and cork. You can get custom images printed on them as well. 🙂
https://www.etsy.com/shop/AllThisWood
Love the hat!! Where do you get your tags for the hats?
Thank you! I created this one myself, but a lot of people use “All This Wood” on Etsy. They make wood, leather, and cork tags. 🙂
I am so happy with this pattern ! It was easy and the hat fit very nicely ! Thank you so much for sharing this pattern! I plan on making this pattern for my project of making hats for homeless ! I donated 25 so far but I love this pattern plan to use it in my project !
You’re welcome, Edna! I know the recipients will be very thankful for your generosity. 🙂
I’m having a problem understanding what I do after I do the sc in the 3rd loop of round 8. In round 9 it says to do the front & back post dc. Do I do them in the previous round 8 sc?
Yes, you will work the post stitches around the sc.
This pattern is so cute. Would it be possible to make this using a #5 yarn without having it come out way too big?
Thank you!
No, I used a light #4 worsted weight and it will fit a 25″ head, so a chunky weight yarn would make it huge! 😅