Crochet a unique, “art yarn” scrappy scarf using novelty yarns you have at home using this free pattern. This tutorial will give you tips to create your own one-of-a-kind, beautiful “art yarn” inspired scarf on a budget. Find the free crochet pattern instructions and tutorial below, or purchase a print-optimized, ad-free PDF by clicking here.
Recently I’ve been looking at art yarn/scrappy scarves on Pinterest. If you love texture and color as much as I do, these are a must see! “Art yarn” is basically yarn that is custom made with all kinds of colors and textures of wool, and even fabric fibers. It tends to be uneven in the way it’s spun, which only adds to the charm. Because of the unique way in which these yarns come together, and the amount of time it takes a spinner to create it, these yarns tend to run a little on the spendy side at times, but if you have the funds, I definitely recommend purchasing some.
Click here to add this to your Ravelry queue!
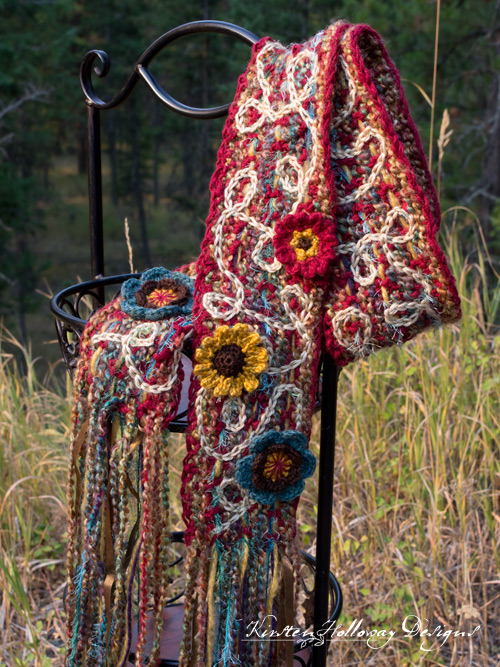
Making a creative, DIY “art-yarn” scarf on a budget
Unfortunately, my budget for fancy new yarn isn’t real big right now, and this inspired me to come up with a new way of creating something similar, potentially with all those odds and ends of novelty yarn that are left over from various unique pieces, but are probably things that aren’t used on a weekly or monthly basis (fun fur anyone?). Novelty yarns are awesome, don’t get me wrong, but finding a project to use up the last few left-over yards can be tricky, and who wants to get rid of perfectly good yarn that might have a use at some point in the next 5-10 years? Amiright?
Ok good, now that we’re on the same page, let’s get in to what this project is, (and what it isn’t).
What this is:
This is a loose tutorial for how I created the scarf that is pictured. I’ve included the descriptions of the yarn I used where I was able to, but some of this was yarn that didn’t have a label, so I am not able to include everything.
Now for what this is not: It is not instructions for how to *exactly* recreate what I have. I didn’t draw a diagram for the loops and swirls, I don’t tell you exactly what to weave where-that is totally up to you. Your scarf probably won’t turn out exactly like mine, and that’s ok! This is the time to let your creativity soar! Don’t be afraid, you’ve got this. 😀
Use scraps and novelty yarn you already have on hand
Let’s dive in! First, you’ll want to dig out all of those scraps and un-used novelty yarns so you can see them all in one place (a brightly lit room is ideal for this step. Pick out colors that contrast or complement each other, and at the same time look for different textures that will add interest I used at least 6 different styles/weights of yarn in my scrappy scarf. If you want to make texture the focus of your piece, use colors that are similar. If you prefer your scarf to be all about the colors you may not need to use as wide of a variety of different yarn weights, though I definitely recommend using at least 3 styles. Feel free to also add bits of ribbon or strips of material. These look especially nice on the “fringe” part of your scarf. I’ve included some suggestions below, but you’re the artist and this is your scarf, so have fun!
Disclaimer: This post contains affiliate links. When you purchase something using these links a small amount of the sales price goes to me to help keep this site, and the patterns on it free. You do not pay any extra for the item you purchase.
Materials Needed:
Scarf:
9mm hook
yarn needle with a large eye for weaving yarn through scarf
scissors
100-125 yards #3 light weight yarn (I used a maroon yarn that may have been re-purposed from a sweater. It looks like a cotton-acrylic blend)
50 yards #5 chunky yarn (I used Lion Brand Homespun in “Fiesta” which has since been discontinued). Note: You can choose to go with one colorway, or use multiple chunky or worsted weight yarns–the more you have woven through, the more luxurious and unique your scarf will look.
Additional suggested yarns:
–Fun fur/Foxy (I used Red Heart Foxy in “Aquarium”. This line is discontinued, but Lion Brand has a similar style, or you may find some on Etsy or eBay)
-A different #5 chunky yarn (I used Yarn Bee Tender Touch in “Amber”) Note: Again, this is only a suggestion, you can use any kind of yarn, chunky, worsted, dk, and as much of it as will fit through the spaces.
-A fun speckled, metallic strand, or otherwise interesting worsted weight yarn (I used an acrylic, purple fleck yarn, again, no label, but I suspect it may have been a Red Heart variety that has been discontinued).
-Leftover bits of ribbon, lace, or fabric scraps if you have those laying around
Flowers:
3.25mm hook
Small amount of worsted weight yarn in up to 4 colors of your choice
small amount of crochet thread in a complementing or contrasting color for the center of flower #1
yarn needle
scissors
Stitches Used:
ch = chain
sl st = slip stitch
sc = single crochet
hdc = half double crochet
dc = double crochet
2dc cluster
Additional Terms:
Granule Stitch (also known as Picot Single Crochet): Insert hook, yo, pull up a loop, *yo, draw through 1 loop* 3 times to make a ch 3, then yo, and draw through both loops on the hook.
Measurements:
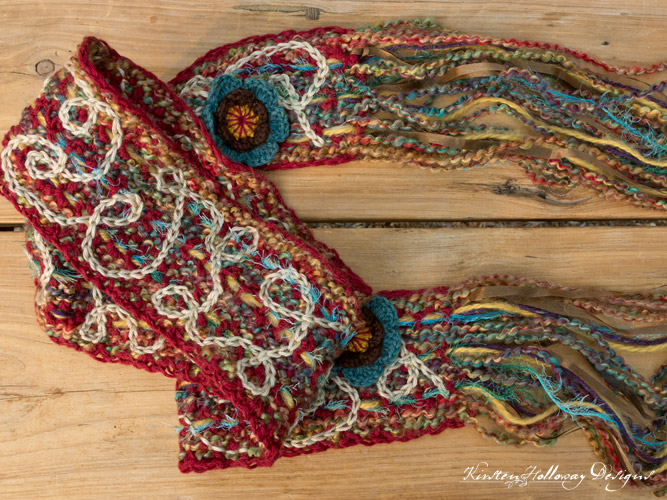
8 ft long, including fringe, by 5″ wide
Gauge:
Gauge is not extremely important
Additional Notes:
If you used a heavier yarn to begin with, you could turn this into a belt
This pattern can easily be made longer or shorter to fit your needs
Your scarf will be unique to your own yarn collection, and that’s what makes this pattern so special!
Art Yarn Scrappy Scarf Crochet Pattern (US Terms):
Click here to purchase an ad-free, print-optimized PDF of this pattern on LoveCrafts
In this section you will be making the mesh that you are going to weave your yarn through. I’ve included detailed notes further down in the pattern
Row 1: Ch 146, skip 3 chains (counts as first dc), dc in 4th ch from hook, dc in each remaining st to end of row, ch 3 (counts as first dc of row 2), turn. (144)
Rows 2-5: dc in each st across, ch 3, turn. (144)
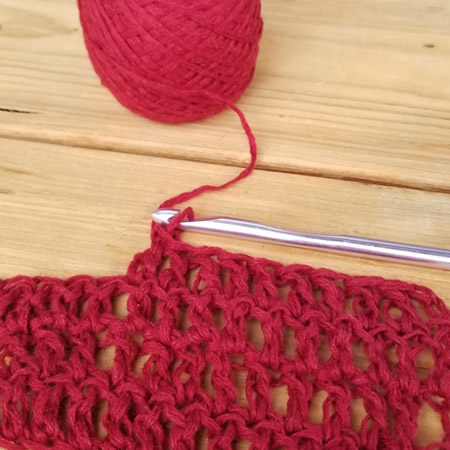
Once you finish row 5 your scarf should measure about 6′ long x 5″ tall, and be very loose and floppy with plenty of stretch. If you want a wider scarf now is your opportunity to add more rows.
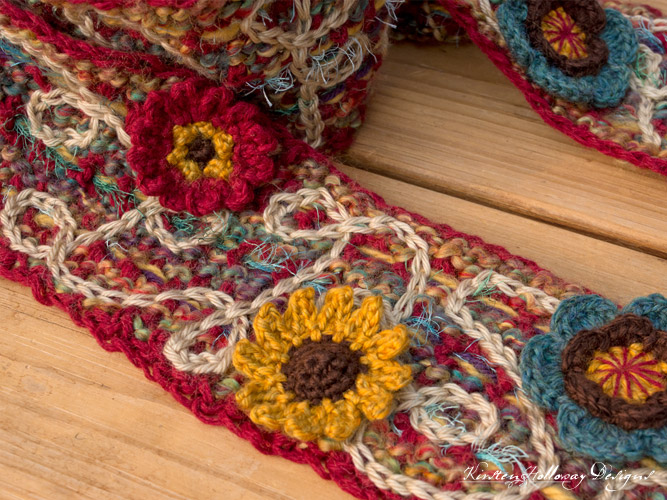
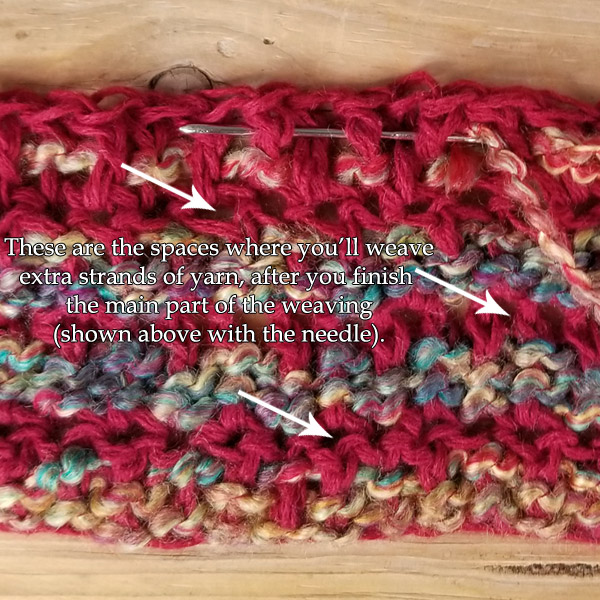
The mesh is probably not especially pretty looking, but it doesn’t have to be. We will “pretty it up” in a moment by weaving bulky#5 yarn over and under the dc stitches (I used Lion Brand Homespun in “Fiesta”, but you can use whatever you have on hand) using a large-eyed needle (I used the larger of the yarn needles that came in my set).
Weaving:
If you ever made pot-holders out of stretchy nylon loops as a kid, you already know how to weave! Over, under, over, under, using the dc stitches as your warp (see image below). Switch to under, over, under, over on the next strand. I used 4, 96″ strands of yarn for each dc row, and after doing that, I wove the other kinds of novelty yarn (fur, other chunky yarn, and interesting worsted weight yarn) through the spaces at the top of the rows (noted with arrows in the picture below). If you made your dc stitches loose enough, these spaces should be very visible. Note: Do NOT weave all strands of yarn the same way for each row. Each strand must alternate with the one before it. This way your yarn will not work its way out as you wear your scarf.
Once you are done weaving, pick up a complimenting or contrasting color of worsted weight yarn, and slip-stitch a pattern of loops and swirls along your scarf. I used Caron Simply Soft in “Bone”. This part is rather time consuming, but there really is no right or wrong way to do it.
Once you have your slip-stitched pattern finished, you can start adding flowers to your scarf! Here are the 3 flowers on mine. You can use your favorite flower pattern instead, if you prefer. Small flowers will look best for this width of scarf, especially if you plan to put more than one or two on. I’ve labeled the color changes for each flower, but what colors you use, and what order you use them in, are up to you. I recommend sticking to no more than 4 colors for these flowers.
Adding flowers to your scrappy scarf:
Flower Measurements:
Using a 3.25 mm hook,
Flower 1 measures 2 3/4″ across
Flower 2 measures 2″ across
Flower 3 measures 2 1/4″ across
Colors I used:
Lion Brand Heartland in “Yellowstone”
Caron Simply Soft in “Chocolate”
Patons Classic Wool in “Sea Green Heather”
#10 crochet thread in “Burgundy”
Flower 1:
With first color,
Round 1: 12 dc in magic circle, join with sl st to first dc. (12)
With second color,
Round 2: 5 hdc in first stitch, sl st in the next *5 hdc in next stitch, sl st in next st; repeat from * around, final sl st counts as join. (6 petals)
Turn your flower over and work this next step across the back side. Don’t forget to turn it back over so the front side is facing you after you end the round.
Round 3: working into back of flower, *ch 3, sl st into bottom center of petal from previous round; repeat from * across, final sl st counts as join. (6 ch-3 sps)
With third color,
Round 4: with front side facing, *working in next ch-3 sp, (hdc, 5 dc, hdc, sl st); repeat from * around, final sl st counts as join. (6 petals)
With fourth color (crochet thread, in my case),
sew up through the center of your flower, and back through the top of each dc stitch
Fasten off, and weave in ends
Flower 2:
With first color,
Round 1: 6 sc in magic circle, join with sl st to first sc. (6)
With second color,
Round 2: ch 1, [granule stitch, sc], move to next stitch, *[granule stitch, sc], move to next stitch; repeat from * around, join with sl st to first granule st. (12)
With third color,
Round 3: (ch 2, 2 dc cluster, ch 2, sl st, ch 2) in first stitch, *(2 dc cluster, ch 2, sl st, ch 2) in next stitch; repeat from * around, omitting last ch-2 in final repeat, final sl st counts as join. (12 petals)
Fasten off, and weave in ends.
Flower 3 (Sunflower/daisy):
With first color,
Round 1: 6 sc in magic circle, join with sl st to first sc. (6)
Round 2: ch 1, 2 sc in first st, sc in next st, *2 sc in next st, sc in next st; repeat from * around, join with sl st to first sc. (9)
Round 3: ch 1, 2 sc in first st, sc in next 2 sts, *2 sc in next st, sc in next 2 sts; repeat from * around, join with sl st to first sc. (12)
In round 4 you will be creating the long thin petals of the sunflower (or daisy, if you prefer). Each petal starts out with a chain, then you will work back down the chain. Each stitch from round 3 will have a long, thin petal worked into it when you are done.
With second color,
Round 4: ch 4, sc in second ch from hook, sc in next chain, hdc in next ch, sl st in next stitch from round 3, *ch 4, sc into second ch from hook, sc in next chain, hdc in the next, sl st in the next stitch from round 3; repeat from * around, final sl st counts as join. (12 petals)
Fasten off, and weave in ends.
Sew flowers to scarf with a color of thread or yarn that will complement the colors you already have (I used the same maroon color that I started crocheting the scarf with).
Fringe:
You should already have a good bit of fringe left over from weaving your yarn through the mesh, but here’s the place to make it more interesting!
Loop extra bits of ribbon, lace or strips of material through the ends of the dc mesh to make your fringe more luscious.
Want more gorgeous crochet patterns, and a little encouragement for your day? Sign up for my newsletter here! That way you’ll never miss out on special events, or freebies I’m offering.
JOIN ME ON SOCIAL MEDIA
I would love to see a picture when you’re done, so please feel free to come by my Facebook group and show off your project! Be sure to tag @kirstenhollowaydesigns when you share pictures of your finished scarf on Instagram for a chance to be featured, and use #artnsoulscrappyscarf!
You can also follow me on Facebook, Pinterest, Instagram, and Ravelry for more beautiful crochet patterns.
PATTERN TERMS AND CONDITIONS:
You are welcome to share the link to this pattern, using one image of your choice, on your site, but please do not share the written patterns themselves, this includes my Ravelry downloads or translations of these patterns, or use additional images. You do not have permission to use my images by themselves to create pinnable graphics for Pinterest, however they may be included in a roundup pin if there are 4 or more other patterns. If you sell finished items online, please do not use my pictures for your listings. I’m positive that your work is of high enough quality for you to sell the finished piece. Have confidence in your abilities! <3 Thank you!
This pattern was made to be used by individuals, and small business crocheters alike. Selling your finished pieces in boutiques, at farmer’s markets, craft shows, and other local events is encouraged! The only thing I require is that this pattern not be used commercially to produce hundreds of thousands of copies.
If you enjoyed this pattern or found it useful, why not share a link to this post with your friends


