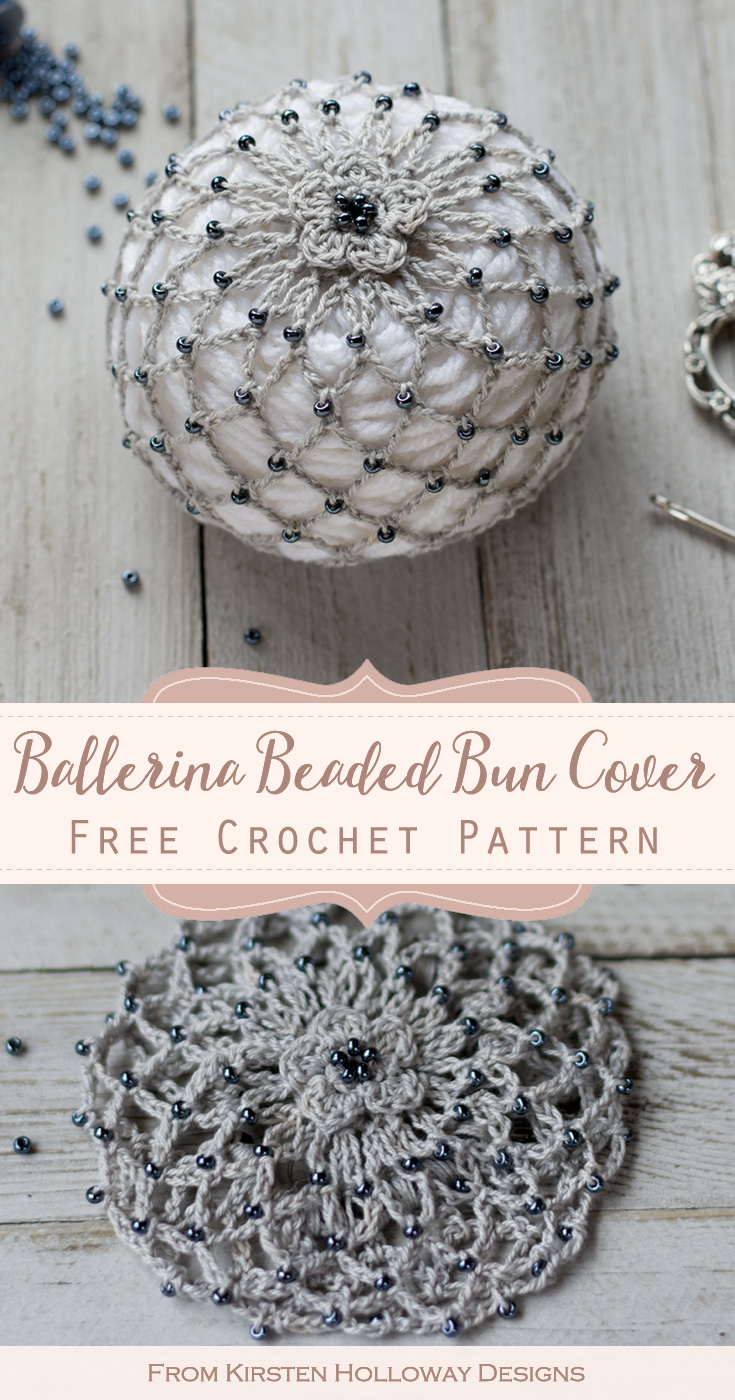
This cute, and simple crochet bun cover pattern is perfect hair accessory to make for ballerinas and dancers of all ages. It brings to mind images of ballet class, and tiny dancers frolicking around the room in tutus–so precious and sweet! Find the free crochet pattern instructions below, or purchase a print-optimized, ad-free PDF by clicking here.
Click here to add this pattern to your Ravelry queue!
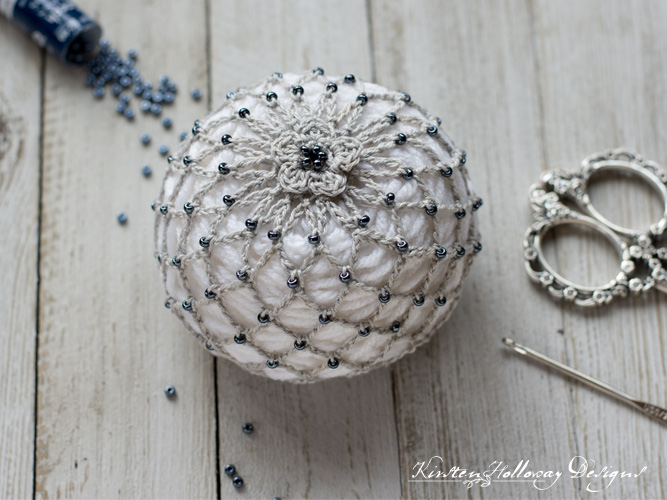
Bun covers are classic, elegant, and practical as they prevent hair “flyaways” at the dance studio. This crochet cover is small, and light weight with plenty of stretch, meaning it should last for years as your ballerina grows up. This cover also makes a beautiful accessory to wear for church, school programs or any time you need to add a little sparkle to your day.
The small cover is approximately 3.25″ across, and was designed to fit children with medium to long hair. It can also fit adults with short to medium length hair. The Medium cover is approximately 4″ across and should work for adults with long hair, and/or kids that plan to use a hair donut to make a bun. The Large/X-Large cover measures approximately 4.5″ across. Make it if you have thick, heavy, long hair, and/or if you plan to use a large hair donut to make your bun.
I recommend using a thick elastic band at the bottom of these bun covers as they are more durable than the thin elastic bands. You may wish to pin the base of the cover to your hair as well, but if you secure your bun with bobby pins before putting the bun cover on this thick elastic band should hold it in place pretty well.
Disclaimer: This post contains affiliate links. When you purchase something using these links a small amount of the sales price goes to me to help keep this site, and the patterns on it free. You do not pay any extra for the item you purchase.
Difficulty:
- Easy
Materials Needed:
- Size “1” or 2.35 mm steel hook
- Approximately 15-25 yds #10 crochet thread in grey, silver, white, or color of your choice
- I recommend Aunt Lydia’s #10 Crochet thread for this project
- Yarn needle
- Medium 4mm hair elastic <–click here if you need to pick some up.
- Sewing needle
- Sewing thread in a color that matches your crochet thread
- Czech Glass Seed Beads 8/0, in “Iris Sphinx”, or color of your choice, from Bead Treasures @ Hobby Lobby
- (Optional): Hair “Donut” Bun Maker for creating the perfect bun if you have fine or thin hair
Stitches Used:
- ch = chain
- sl st = slip stitch
- sc = single crochet
- hdc = half double crochet
- dc = double crochet
- sp/sps = space/spaces
Measurements:
- Small (Kids): Approximately 3.25″ across
- Medium: Approximately 4″ across
- Large/X-Large: Approximately 4.5″ across
Gauge:
- Gauge isn’t especially important
Additional Notes:
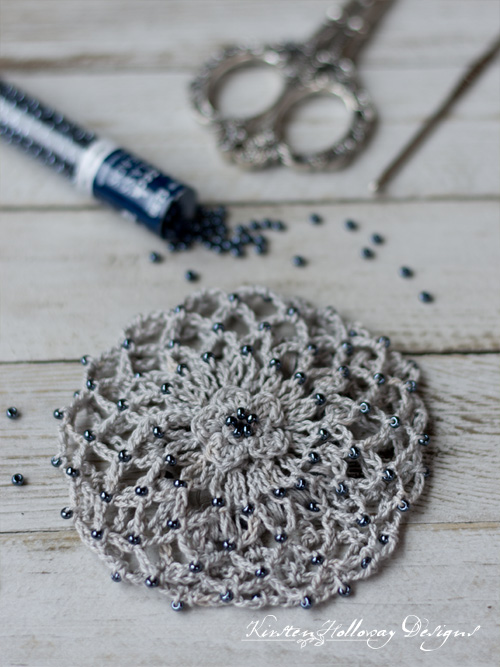
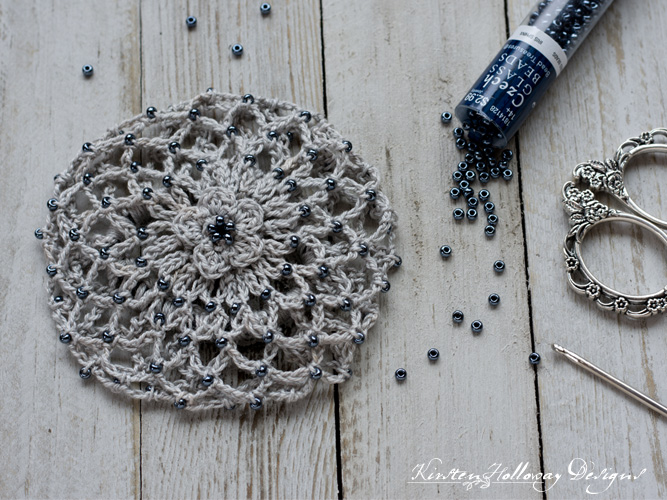
- This bun cover looks nice with or without beads. It’s up to you how you want to make it.
- I’ve linked to the size and type of beads I used for this project in the materials list. If you choose to use a different brand be sure the size is at least 8/0 or the beads may not fit over the #10 crochet thread.
- If you aren’t sure how to get the beads into the center of the single crochet stitch, please watch this video:
Crochet a Ballerina Hair Bun Cover With Beads for Girls and Women of All Ages (US Terms):
Click here to purchase an ad-free, print-optimized PDF of this pattern on LoveCrafts
If making this cover with beads follow this step first, then continue with the instructions below:
For Small bun cover: string 70 seed beads onto your working thread. This will give you enough beads for up to 5 rounds of bead accents. I used a dot of glue to stiffen the end of the string to form a make-shift needle to pick up the beads with. You can use a split beading needle instead if that’s easier.
For Medium size bun cover: string 80 seed beads onto your working thread. This will give you enough beads for up to 5 rounds of bead accents. I used a dot of glue to stiffen the end of the string to form a make-shift needle to pick up the beads with. You can use a split beading needle instead if that’s easier.
For Large/X-Large size bun cover: string 90 or 108 beads onto your working thread. This will give you enough beads for up to 5 or 6 rounds of beads. I used a dot of glue to stiffen the end of the string to form a make-shift needle to pick up the beads with. You can use a split beading needle instead if that’s easier.
If you don’t want to make your bun cover with beads, start here:
Bun Cover – Small, Medium, and Large/X-Large Sizes:
Using 2.35mm steel hook, and leaving a 6″ tail, ch 5, join to first ch creating a ring.
Round 1: [ch 3, sl st into ring] 5 times in ring. (5 ch-3 sps)
Round 2: sl st into first ch-3 sp, (ch 1, hdc, dc, hdc, ch 1 sl st), *sl st in next ch-3 sp (ch 1, hdc, dc, hdc, ch 1 sl st); repeat from * around. (5 petals)
Turn flower over so you are working at the back of the piece,
Round 3: sl st into back of first petal (the bottom of the dc st in the center of the petal is a good spot), *ch 2, sl st into back of next petal; repeat from * around, final sl st will be worked in beginning sl st and counts as join. (5 ch-2 sps)
Now that you have made the flower, you need to choose what size bun cover you want to make. *Continue to use the same size hook that you have been.*
Small (Child Size) Bun Cover:
Round 4: ch 1, 2 sc in first ch-2 sp, *3 sc in next ch-2 sp; repeat from * around, join with sl st to first sc. (14)
Round 5: ch 5, sl st into same dc as join, *ch 5, sl st to next dc; repeat from * around for a total of 14 “loops”, final sl st counts as join. (14 ch-5 sps)
Each time you make a single crochet in rounds 6-10 slide a bead up into the center of the stitch. Your beads may try to poke through the back, but try to make it come through the front. This step may take a little bit of practice, but it will look better in the end. Once your bead is situated in the center of the stitch, pull the single crochet stitch tight. This will ensure your bead does not wander out of the center.
If you need to make the cover smaller feel free to leave off round 10 and go straight to the finishing round.
Round 6: sl st into next 3 chs of first ch-5 sp, this should put you right about the top of the sp, ch 1, sc in same st, ch 6, *sc in next ch-5 sp, ch 6; repeat from * around, join with sl st to first sc. (15 ch-6 sps)
Rounds 7-10: sl st into the next 4 chains of the first ch-6 sp. This should put you right about the top of the sp, ch 1, sc in same st, ch 6, *sc in next ch-6 sp, ch 6; repeat from * around, join with sl st to first sc. (15 ch-6 sps)
Finishing round: ch 1, taking your hair elastic, work 4 sc around the ch-6 sp from the previous row and the elastic to join them together. Continue putting 4 (or even 5 sc if you want the band to be more filled in) sc around each of the ch-6 loops or sps and the elastic until you reach the end of the round, join with sl st to first sc. (56 sc)
Fasten off, and weave in ends. Use the 6″ tail at the beginning of the bun to sew the center of the flower shut before adding your beads in the next step.
String 5 beads onto a 18″ length of sewing thread. Sew into center of flower.
Medium Size Bun Cover:
Round 4: ch 1, 4 sc in first ch-2 sp, *3 sc in next ch-2 sp; repeat from * around, join with sl st to first sc. (16)
Round 5: ch 6, sl st into same sc as join, *ch 6, sl st to next sc; repeat from * around for a total of 16 “loops”, final sl st counts as join. (16 ch-6 sps)
Each time you make a single crochet in rounds 6-10 slide a bead up into the center of the stitch. Your beads may try to poke through the back, but try to make it come through the front. This step may take a little bit of practice, but it will look better in the end. Once your bead is situated in the center of the stitch, pull the single crochet stitch tight. This will ensure your bead does not wander out of the center.
Rounds 6-10: sl st into the next 4 chains of the first ch-6 sp. This should put you right about the top of the sp, ch 1, sc in same st, ch 6, *sc in next ch-6 sp, ch 6; repeat from * around, join with sl st to first sc. (16 ch-6 sps)
Round 11- 12: sl st into the next 4 chains of the first ch-6 “loop” or sp. This should put you right about the top of the “loop”, ch 1, sc in same st, ch 6,* sc in next ch-6 sp, ch 6; repeat from * around, join with sl st to first sc. (16 ch-6 sps)
Finishing round: ch 1, taking your hair elastic, work 4 sc around the ch-6 sp from the previous row and the elastic to join them together. Continue putting 4 (or even 5 sc if you want the band to be more filled in) sc around each of the ch-6 loops or sps and the elastic until you reach the end of the round, join with sl st to first sc. (64 sc)
Fasten off, and weave in ends. Use the 6″ tail at the beginning of the bun to sew the center of the flower shut before adding your beads.
String 5 beads onto a 18″ length of sewing thread. Sew into center of flower.
Large/X-Large Size Bun Cover:
Round 4: ch 1, 4 sc in first ch-2 sp, *3 sc in next ch-2 sp, 4 sc in next ch-2 sp; repeat from * around, join with sl st to first sc. (18)
Round 5: ch 6, sl st into same sc as join, *ch 6 sl st to next sc; repeat from * around for a total of 18 “loops”, final sl st counts as join. (18 ch-6 sps)
Each time you make a single crochet in rounds 6-11 slide a bead up into the center of the stitch. Your beads may try to poke through the back, but try to make it come through the front. This step may take a little bit of practice, but it will look better in the end. Once your bead is situated in the center of the stitch, pull the single crochet stitch tight. This will ensure your bead does not wander out of the center.
Rounds 6-11: sl st into the next 4 chains of the first ch-6 sp. This should put you right about the top of the sp, ch 1, sc in same st, ch 6, *sc in next ch-6 sp, ch 6; repeat from * around, join with sl st to first sc. (18 ch-6 sps)
If you have extra thick/very long hair you may wish to work another round before continuing on to the next section.
Round 12- 13: sl st into the next 4 chains of the first ch-6 “loop” or sp. This should put you right about the top of the “loop”, ch 1, sc in same st, ch 6,* sc in next ch-6 sp, ch 6; repeat from * around, join with sl st to first sc. (18 ch-6 sps)
Finishing round: ch 1, taking your hair elastic, work 4 sc around the ch-6 sp from the previous row and the elastic to join them together. Continue putting 4 (or even 5 sc if you want the band to be more filled in) sc around each of the ch-6 loops or sps and the elastic until you reach the end of the round, join with sl st to first sc. (72 sc)
Fasten off, and weave in ends. Use the 6″ tail at the beginning of the bun to sew the center of the flower shut before adding your beads.
String 5 beads onto a 18″ length of sewing thread. Sew into center of flower.
JOIN ME ON SOCIAL MEDIA
I would love to see a picture when you’re done, so please feel free to come by my Facebook group and show off your project! Be sure to tag @kirstenhollowaydesigns when you share pictures of your finished hat on Instagram!
You can also follow me on Facebook, Pinterest, Instagram, and Ravelry for more beautiful crochet patterns.
PATTERN TERMS AND CONDITIONS:
You are welcome to share the link to this pattern, using one image of your choice, on your site, but please do not share the written patterns themselves, this includes my Ravelry downloads or translations of these patterns, or use additional images. You do not have permission to use my images by themselves to create pinnable graphics for Pinterest, however they may be included in a roundup pin if there are 4 or more other patterns. If you sell finished items online, please do not use my pictures for your listings. I’m positive that your work is of high enough quality for you to sell the finished piece. Have confidence in your abilities! <3 Thank you!
This pattern was made to be used by individuals, and small business crocheters alike. Selling your finished pieces in boutiques, at farmer’s markets, craft shows, and other local events is encouraged! The only thing I require is that this pattern not be used commercially to produce hundreds of thousands of copies.
If you enjoyed this pattern or found it useful, why not share a link to this post with your friends?


