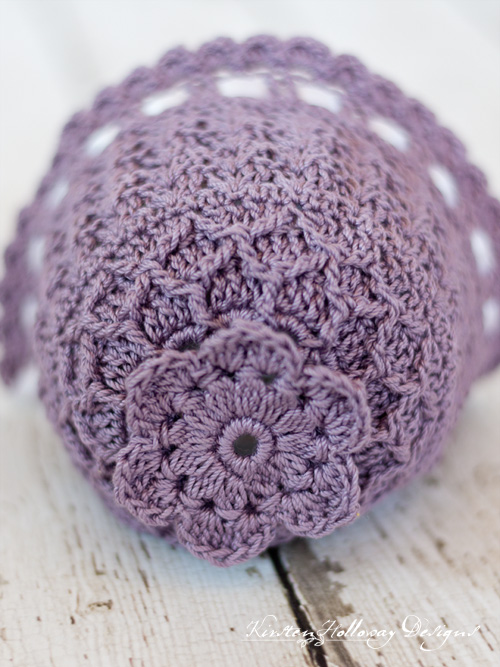
This sweet 0-3 month crochet lace baby bonnet pattern is a true heirloom piece with lots of vintage-style charm. It’s filled with lace textures that complement, and contrast for a one of a kind accessory. The Lavender Blue Baby Bonnet is lightweight, spring-like, and perfect for Easter. It would also make an adorable photo prop for a newborn photo-shoot. Find the free crochet pattern instructions below, or purchase a print-optimized, ad-free PDF by clicking here.

This bonnet pattern is also very quick to make and works well for a last minute gift to crochet for a baby shower. It’s a classic looking piece that makes a stylish addition to any modern baby’s spring wardrobe.
When I first designed this bonnet I used a soft, stretchy baby yarn called “Baby Fingering” yarn from Red Heart that is no longer being manufactured. so I’ve updated this pattern using Aunt Lydia’s Fashion #3 Crochet Thread in “Plum” which is a beautiful dusty purple color. It’s 100% cotton which means it’s easy to care for, and should look nice for a long time.
If you prefer to make this with something other than cotton yarn Red Heart makes Heart and Sole #1 fingering weight sock yarn which a great substitution. You could also make this with 2 strands of crochet thread, or only one strand if you’re looking for a preemie size. It’s a versatile pattern, and can be made larger using sport or DK yarn, and larger hook sizes. I’ve included some suggestions for the “preemie” size in the “Additional Notes” section.
Difficulty:
Intermediate
Materials needed:
2.75mm (C) hook, or hook needed to obtain gauge
4mm (G) hook for 6-12 months size
100-150 yards of Red Heart Aunt Lydia’s Fashion #3 Crochet Thread in “Plum”
1 yard of 1/4″ satin ribbon
Scissors
Yarn needle
Ribbon needle
Stitches used:
ch = chain
sl st = slip stitch
sc = single crochet
hdc = half double crochet
dc = double crochet
tr = treble crochet
sc2tog = single crochet 2 together
3dc cluster = dc3tog worked in same stitch
tr2tog = treble crochet 2 together
FPtr2tog = front post treble crochet 2 together
Additional Terms:
sk = skip
prev = previous
st/sts = stitch/stitches
sp/sps = space/spaces
Special Stitches:
V-stitch = (dc, ch 1, dc) in same st
Gauge:
For 0-3 months, your circle should measure 2 1/2″ across after round 7
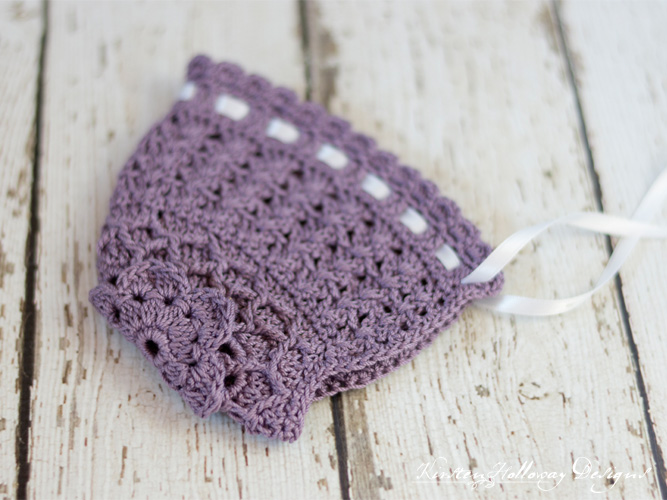
Measurements:
0-3 months, unstretched: 6″ tall at its tallest point, by 5″ front to back
Additional Notes:
-ch-1 at beginning of row or round does not count as a stitch, ch-3, and ch-4 do count as stitches.
-Use relaxed tension to ensure measurements come out right.
-It is possible to make a Preemie/newborn size using #10 crochet thread, and a 2.75mm hook. Substitute tr for dc in row 18. Follow the instructions as written except for those changes. Scroll to the bottom of the post to see pictures of this hat done in thread. Preemie size should measure 5″ tall by 4″ front to back, 6-12 months should measure, unstretched, 7″ tall, by 6″ front to back.
Lavender Blue Baby Bonnet Crochet Pattern (US terms):
Click here to purchase an ad-free, print-optimized PDF of this pattern on LoveCrafts
Round 1: ch 4, join with sl st to first ch forming a ring.
Round 2: ch 1, 12 sc into ring, join with sl st to first sc. (12)
Round 3: ch 1, 3dc cluster in first st, ch 2, *3dc cluster in next st, ch 2; repeat from * around, join with sl st to first 3dc cluster. (12 3dc clusters, 12 ch-2 sps)
Round 4: Note: each flower petal will take up two ch-2 sps. ch 1, in first ch-2 sp: *hdc, 2 dc, tr2tog placing second leg of the tr2tog in next ch-2 sp, 2 dc, hdc, sl st, sl st into next ch-2 sp; repeat from * around. (6 petals)
Turn your flower over and work this next step across the back side. Don’t forget to turn it back over so the front side is facing you after you end the round.
Round 5: working at the back of the flower, ch 1, sl st around the top of the first 3dc cluster from round 3, *ch 2, sl st around the top of the next 3dc cluster from round 3; repeat from * around. (12 ch-2 sps)
Round 6: with right side of flower facing, working into first ch-2 sp, (ch 4 (counts as first dc+ch 1), dc) *working into next ch-2 sp, v-stitch; repeat from * around, join with sl st to top of 3rd chain. (12 v-stitches)
Round 7: ch 1, *4 sc in ch-1 sp (this is the center of the v-stitch); repeat from * around, join with sl st to first sc. (48)
Your circle should measure 2 1/2″ across at this point
Round 8: ch 1, dc in next 4 sts, FPtr around where the two v-stitches from round 6 make an upside down V or pyramid shape *dc in next 4 sts, FPtr around where the two v-stitches from round 6 make an upside down V or pyramid shape; repeat from * around, join with sl st to first dc. (60)
You will now be creating the diamond shapes at the back of the bonnet. Round 9 is the bottom of the diamond, round 10 is the top.
Round 9: ch 1, dc in next 2 sts, FPtr2tog placing first leg around first FPtr from prev round, place second leg around next FPtr from prev round, *working behind the second leg of the FPTR2tog dc in next 4 sts, FPtr2tog placing first leg around next FPtr from prev round, place second leg around next FPtr from prev round; repeat from * around, dc in final 2 sts, join with sl st to first dc. (60)
Round 10: ch 1, dc in first st, FPtr around first FPtr2tog from prev round, working behind the FPtr, dc in the next 4 sts, FPtr2tog placing first leg around FPtr2tog from prev round, place second leg around next FPtr2tog creating the top of the diamond, working behind the stitch you just made, dc in the next 2 sts *dc in next two sts, FPtr2tog placing first leg around FPtr2tog from previous round, place second leg around next FPtr2tog, working behind the stitch you just made dc in next 2 sts; Repeat from * until you have 12 sts left in the round, then dc in next 2 sts, FPtr around FPtr2tog from prev round that you just worked around, when you have two loops left on your hook, dc in the next st, Note: it’s like working the FPtr2tog, but with the second part being a dc instead of a tr, ch 1, turn Note: there should be 9 sts left unworked at the end of the round.
You will now be working in rows.
Row 11: ch 1, turn, sc in each st around, ch 3, turn. (52)
Row 12: sk st, *4 dc in next st, sk 2 sts; repeat from * across, dc in final st of row. You will not skip any stitches after the last shell. ch 3 (counts as first dc of next row), turn. (17 shells)
Row 13: sk 2 sts to center of shell, 4 dc between 2nd and 3rd dc of first shell *sk 4 sts to center of next shell, 4 dc between 2nd and 3rd dc of next shell; repeat from * across, dc in final st of row, ch 3 (counts as first dc of next row), turn. (17 shells)
Row 14: sk 2 sts to center of shell, 2 dc in center creating half-shell, [sk 4 sts to center of next shell, 4 dc between 2nd and 3rd dc of next shell] 15 times, sk 4 sts, 2 dc in center of final shell, sk 2 sts, dc in top of ch-3, ch 3 (counts as first dc of next row), turn. (2 dc, 15 complete shells, 2 half-shells)
Row 15: sk st, 2 dc between 1st and 2nd dc of half-shell from prev row, [sk 4 sts to center of next shell, 4 dc between 2nd and 3rd dc of next shell] 15 times, 2 dc between 1st and 2nd dc of last half-shell, sk st, dc in top of ch-3, ch 3 (counts as first dc of next row), turn. (2 dc, 15 complete shells, 2 half-shells)
Row 16: sk st, 2 dc between 1st and 2nd dc of half-shell from prev row, [sk 4 sts to center of next shell, 4 dc between 2nd and 3rd dc of next shell] 15 times, 2 dc between 1st and 2nd dc of last half-shell, sk st, dc in top of ch-3, ch 1, turn. (2 dc, 15 complete shells, 2 half-shells)
Row 17: *sc2tog, sc in next 5 sts; repeat from * across, ending with a sc2tog, ch 1, turn. (56)
Row 18: dc in each st across, ch 2, turn. (56)
Row 19: sk st, sl st into next st, *ch 2, sk st, sl st into next st; repeat from * across placing final sl st in side of dc from prev row, turn. (28 ch-2 sps)
Row 20: *working into ch-2 sp, (ch 1, 3 hdc, ch1, sl st); repeat from * across. (28 petals)
Turn bonnet sideways and work the next row across the bottom
Row 21: working evenly along the bottom, put 1 sc in each sc, and 2 sc in each dc st.
Fasten off and weave in ends.
Using a ribbon needle, run 1 yard of 1/4″ ribbon through the dc from row 18. Cut ends on a diagonal and finish ends of ribbon with fray check or clear nail polish. If the ribbon ties are too long for your taste, you may trim to fit.
If you decide to make your Lavender Blue baby bonnet in #10 thread, it should end up looking something like this. So cute and delicate, don’t you think?

Want more gorgeous crochet patterns, and a little encouragement for your day? Sign up for my newsletter here!
JOIN ME ON SOCIAL MEDIA
I would love to see a picture when you’re done, so please feel free to come by my Facebook group and show off your project! Be sure to tag @kirstenhollowaydesigns when you share pictures of your finished poncho on Instagram, and use #LavenderBlueBabyBonnet
You can also follow me on Facebook, Pinterest, Instagram, and Ravelry for more beautiful crochet patterns.
PATTERN TERMS AND CONDITIONS:
You are welcome to share the link to this pattern, using one image of your choice, on your site, but please do not share the written patterns themselves, this includes my Ravelry downloads or translations of these patterns, or use additional images. You do not have permission to use my images by themselves to create pinnable graphics for Pinterest, however they may be included in a roundup pin if there are 4 or more other patterns. If you sell finished items online, please do not use my pictures for your listings. I’m positive that your work is of high enough quality for you to sell the finished piece. Have confidence in your abilities! <3 Thank you!
This pattern was made to be used by individuals, and small business crocheters alike. Selling your finished pieces in boutiques, at farmer’s markets, craft shows, and other local events is encouraged! Please credit/link Kirsten Holloway Designs when selling finished products online. The only thing I require is that this pattern not be used commercially to produce hundreds of thousands of copies.
If you enjoyed this pattern or found it useful, why not share a link to this post with your friends?


Hi, Kirsten!
Thank you for this cute bonnet! I have a new grandniece and a new GREAT-grandniece that I am making this for. I have to admit to some confusion with the front post section, but I figured it out by looking at the photos LOTS of times and rereading again and again! I also used a larger hook and 4 weight yarn and it came out for sized more for a 1-year-old. I can hardly wait to get the photos of the girls wearing the hats.
You’re welcome, Nancy! I’m glad you like the larger bonnets!
Hi there, I’m wondering if there’s a video tutorial available for this. I’m starting round 6 and I’m confused as to where I’m supposed to start it.
Thanks!
Hi Becky,
No, there isn’t any video tutorial, but please feel free to swing by my Facebook group and drop your questions there: https://www.facebook.com/groups/KirstenHollowayDesigns/ It’s full of helpful crocheters who love to lend a hand. 🙂
Hi Kirsten, I absolutely love the pattern and usually can figure wording out of stitches but on row 9 I just cant get it to look right to how it says to do the stitches. Is there any way that I can go to see it being done, like a tutorial, so I may continue the bonnet? I’d really like to finish. Thanks, Maura
Hi Maura,
I don’t have a video tutorial, but looking up the crochet Diamond Stitch on YouTube may give you a better idea of how this is supposed to turn out. You will work this across two rows and be making “peaks” between the FPtr stitches you made in the previous round. This is part of the diamond texture at the back of the bonnet.
First I want to thank you so much for such a beautiful pattern. Expecting my first grandbaby in April and am excited to have found this! One question though … I made it to round 9 and realized the flower was facing in the wrong direction. I frogged it back to row 5 and it seems I should have turned my work so I’m working row 6 into the ch2 spaces in the opposite direction for the flower and surface design stitches to be facing the same way. Does this make sense?
You should be working on the right side of the piece for round 6 in the same direction as you worked the other rounds before you worked the chains at the back of the flower. I am also putting a note in at the beginning of round 6 to remind people to turn the flower back over. I hope that helps!
This is my first not beginner project. I’m stumped Row 9. Do you have any advice or super specific directions? To give you an idea of where I’m at, I start Row 9 with the ch1 and dc into the first 2 st. Then sk 2 st and start the FPtr2tog. Then I’ve got four stitches “behind” the TOG. Where do I do the next two dc? Thank you so much.
You will work the FPtr2tog stitches around the FPtr stitches from the previous round, then work the dc stitches behind the second leg of the FPtr2tog just made into the dc stitches of the previous round. 🙂
I love this pattern! I wish it can be adapted to be an adult sized beanie so the mom can wear it to match the baby.
I’m glad you like the bonnet so much, Gigi! You could try using a # 2 or #3 yarn and a larger (maybe 5 mm) hook and you might end up with something that would fit an adult! If you try, let me know how it turned out!
I would like to see some baby bonnets and bibs that are crocheted in cotton or silk for fine beautiful baby crochet. Also full sets and little dresses. Do you know where i can find these?
Hi Diane,
YouTube has some great video tutorials for those kinds of projects. I’d do a search over there for the kinds of items you’re wanting to make. 🙂 You can also browse through my patterns to find the Rosemary Green baby bonnet, which is also made with a light weight yarn (#1/fingering weight).
Good luck!
This is a lovely pattern. Almost finished making it for my 6 month old daughter in an 8ply silk wool yarn. I just increased the number of rows of the dc shells till it fit her head. It’s one of the most beautiful things I’ve made to date. Thank you!
You’re welcome! I’m glad you have enjoyed it, Nomita!
Thanks so much ! This is such a cute bonnet.
You’re welcome, Geeta! 😀
Are you supposed to end up with 60 stitches in row 9 if your decreasing stitches
Yes because you’re not really decreasing. You’re working the Fptr2tog stitches around the FPtr stitches of the previous round creating the surface “lines” or “diamond” shapes at the back of the hat. In between those FPtr2tog stitches you’ll be working extra dc stitches, which should keep the count at 60. Make sure to leave a space for the FPtr2tog stitch. Since it’s more of a surface stitch, it’s easy to not remember to put that place-holder space in, but it’s important for stitch counts, especially when you start row 11. 🙂
I hope that helps!
Hi Kristen,
Absolutely love your baby bonnet pattern and it couldn’t come at a better time. Both my sons married girls named Heather, and both Heathers are currently expecting. One is due in Sept. The other is due in Oct. I love this pattern because the pattern is so delicate, dainty, and feminine. Just what every new baby girl deserves. I would like to thank you for this beautiful pattern. :).
You’re very welcome! How exciting that you will soon be welcoming two new grandbabies! I’m sure they will look cute in their little bonnets!
Love it, making for a friend, baby due in April
That’s great! I hope your friend likes it! 😀
Love the look. Going to make it for a friends granbaby. Maybe I’ll try to make a circle sweater to match.
Thank you! Have fun making it! I’m also planning to do more with this motif. 😉
Love this, Thank you for sharing. I just became a first time Great Grandma to a beautiful little girl. Ayva Jean. Born Feb. 22nd, 2017.
Can’t wait to make this for her.
How wonderful! Congratulations on becoming a Great Grandma! Have fun making the bonnet!
Thank you for this beautiful pattern! I’m on round 10 and was wondering if you have the stitch count because I’m a little confused and I think this will help me figure it out.
TIA
You’re very welcome! Round 10 should be 52 since the next row (since that is where you will switch to rows) is 52 stitches. I could have been counting the join when I said 9 stitches were left. I’ll have to look at that more closely when making my next bonnet (I’m having a lot of fun with this pattern too!).
Thank you so much.
I can’t wait to see it finished, I’m making it for a friend who is a photographer and I’m giving as a gift at Open house on her very first studio. Again thank you for the beautiful patterns and when I’m finished I’ll post it on Ravelry.
How sweet! I’m sure your friend will appreciate it!
You’re very welcome for the pattern! I’ll look forward to seeing your finished project on Ravelry. 🙂
Love this little bonnet – sweet, pretty, adorable!!!! And using all the different stitch patterns together, just beautiful! Thank you!!! =)
You’re welcome! I’m so glad you are enjoying the textures too!
I love this! Boy if only I could sell 1 million! Just kidding. This is special and will be gifted to my young coworkers as they marry and have kids. Thank you for the pattern just wished it was a pdf.
You’re very welcome! What a wonderful gift for your co-workers!
I plan to offer a PDF download on Ravelry soon. 🙂