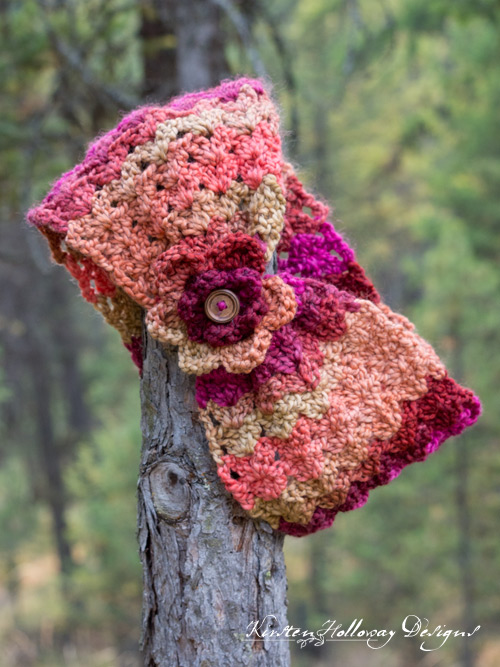
This quick, easy crochet cowl pattern uses only 1 skein of chunky weight yarn to create a soft and stylish winter neck warmer. Basic stitches mean you can crochet this entire project in an hour or two! Find the free crochet pattern instructions below, or purchase a print-optimized, ad-free PDF by clicking here.

Click here to add this to your Ravelry queue!
It’s time to get started on those Christmas presents, friends! Being a good, responsible crafter means you’re never left scrambling for a quick crochet gift at the last minute, right–oh wait, who am I fooling. In the unlikely highly likely event that you find your self in this predicament, I’ve got an easy crochet cowl pattern that uses only 1 skein (about 140 yards) of yarn, and can be made in an evening. Sounds good, right? If this doesn’t have you reaching for your crochet hook, and jumping up and down with excitement, I don’t know what will! 😃
How to crochet a warm winter cowl
Anyway, on to the pattern for today! Because this warm winter cowl pattern is so basic, using a self-striping yarn will really bring this project to the next level. I used a beautifully colored, and textured yarn from Hobby Lobby called “First Love” which has since been discontinued. Any #5 chunky yarn that is self-striping, and has 140 yards in the skein should work to give you a similar effect though.
This cowl primarily uses double crochet stitches across a 1 row repeat so you can absolutely fly through this project. These stitches create a shell design of sorts that is lacy, yet warm. I know you are going to love the finished result–you may even need to make one for yourself after you’ve finished making them for all your friends!
Need another chunky cowl pattern for some variation? Try this one.
Disclaimer: This post contains affiliate links. When you purchase something using these links a small amount of the sales price goes to me to help keep this site, and the patterns on it free. You do not pay any extra for the item you purchase. How cool is that?
Difficulty:
Easy
Materials Needed:
1 skein Yarn Bee First Love in “Road Trip”, or 140 yards of #5 chunky yarn in the color of your choice
6.5mm (K) hook
Yarn needle
Scissors
7/8″ or 1″ button for flower center
Stitches Used:
ch = chain
st sl = slip stitch
sc = single crochet
hdc = half double crochet
dc = dc
tr = treble crochet
st/sts = stitch/stitches
Additional Notes:
-If you have extra yarn in the same color, it’s possible to turn this into a shrug by using a starting chain count of 43, and repeating row 2 until the piece is as long as your shoulders are around, then continue with the pattern as written. You will need more than 1 skein of yarn to complete it.
-One of my testers made this using #6 bulky yarn, and had it turn out nicely. It measured about 10″ tall, and was more bunchy around her neck. If you’re looking for a cowl that will be more like a hug around the neck, feel free to try this option. 🙂
Gauge:
5 shells in 7 1/2″
Measurements:
X-small: 20″ around, by 7.5″ tall
Small 22″ around, by 7.5″ tall
Medium: 24″ around, by 7.5″ tall
Large: 26″ around, by 7.5″ tall
X-Large: 28″ around, by 7.5″ tall
Sweet ‘n Sassy 1 Skein Cowl Pattern (US Terms):
Click here to purchase an ad-free, print-optimized PDF of this pattern on LoveCrafts
Ch 27,
Row 1: sk 6 sts, dc in 7th ch from hook (counts as first dc+3 skipped stitches), 3 dc in same st, sk 3 sts *4 dc in next st, sk 3 sts; repeat from * across, when there are 4 sts left in row, dc in final st, ch 3 (counts as first dc of next row), turn. (5 shells)
Row 2: 4 dc in center (between 2nd and 3rd dc) of first shell from previous row *4 dc in center of next shell; repeat from * across, dc in top of ch-3 from prev row, ch 3 (counts as first dc of next row), turn. (5 shells)
Repeat row 2 until your piece is 20″ (x-small), 22″ (small), 24″ (medium), 26″ (large), 28″ (x-large) long.
Cut yarn leaving an 18″ tail for sewing the 2 ends together
Sew ends of cowl together using the whip stitch. There should be a little yarn left over after you finish sewing the ends together. Run that length back through the center of the whip stitches and pull to cinch the cowl so it is narrow at that point. This is where you will put the flower once it’s made (see next step).
Flower:
Ch 4, sl st to first ch making a ring,
Round 1: 12 sc in ring, join with sl st to first sc. (12)
Round 2: (hdc, 2 dc, hdc) in first st, sl st in next st *(hdc, 2 dc, hdc) in next st, sl st in next st; repeat from * across. (6 petals)
This next round will be worked in the back of the petals that you made in the previous round:
Round 3: sl st into back of first petal, *ch 3, sl st into back of next petal; repeat from * around, final sl st counts as join. (6 ch-3 sps)
Round 4: sl st into first ch-3 sp, (hdc, dc, 2 tr, dc, hdc, sl st), move to next ch-3 sp *(hdc, dc, 2 tr, dc, hdc, sl st), move to next ch-3 sp; repeat from * around, (6 petals)
Once you have completed this round you will go immediately into the band that holds the flower to the cowl without cutting your yarn.
Ch 6, place flower on top of cinched part of cowl, wrap the chains around the cowl and sl st into the opposite side of the flower. This will fasten the flower to the cowl. Note: You may sew the flower in place instead if you prefer, but the method mentioned above will probably use less yarn, which is important if you are making the x-large size.
Fasten off securely and weave in ends. Sew a button into the center of the flower.
Fasten off, and weave in ends
Thank you for joining me for this fun little neck warmer project!
Want more gorgeous crochet patterns, and a little encouragement for your day? Sign up for my newsletter here! That way you’ll never miss out on special events, or freebies I’m offering.
JOIN ME ON SOCIAL MEDIA
I would love to see a picture when you’re done, so please feel free to come by my Facebook group and show off your cowl! Be sure to tag @kirstenhollowaydesigns when you share pictures of your finished item on Instagram, and use #sweetnsassycowl!
You can also follow me on Facebook, Pinterest, Instagram, and Ravelry for more beautiful crochet patterns.
PATTERN TERMS AND CONDITIONS:
You are welcome to share the link to this pattern, using one image of your choice, on your site, but please do not share the written patterns themselves, this includes my Ravelry downloads or translations of these patterns, or use additional images. You do not have permission to use my images by themselves to create pinnable graphics for Pinterest, however they may be included in a roundup pin if there are 4 or more other patterns. If you sell finished items online, please do not use my pictures for your listings. I’m positive that your work is of high enough quality for you to sell the finished piece. Have confidence in your abilities! <3 Thank you!
This pattern was made to be used by individuals, and small business crocheters alike. Selling your finished pieces in boutiques, at farmer’s markets, craft shows, and other local events is encouraged! The only thing I require is that this pattern not be used commercially to produce hundreds of thousands of copies.
If you enjoyed this pattern or found it useful, why not share a link to this post with your friends?


