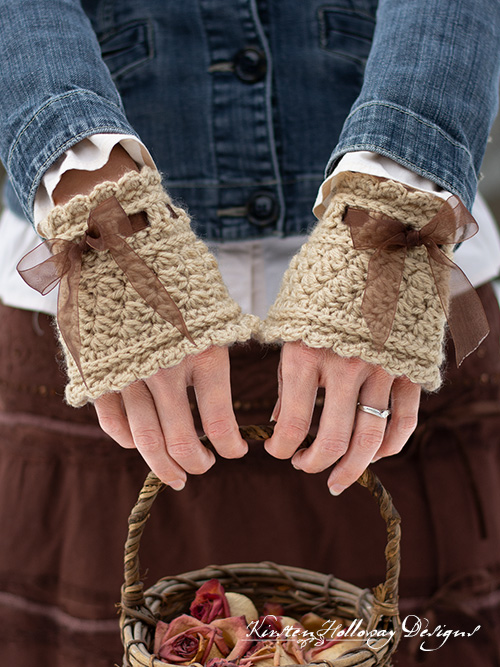
These crochet wrist cuffs have a Victorian feel that will dress up a variety of everyday outfits or costumes! Simple stitches are used to crochet this easy, yet elegant wrist warmer pattern. Find the free crochet pattern instructions below, or purchase a print-optimized, ad-free PDF by clicking here.
Click here to add this pattern to your Ravelry queue!
I have been excited to try crocheting “wristers” (also known as wrist warmers) for a while, and have been looking for the perfect opportunity to make a set. Several of you have mentioned wanting a pair of fingerless gloves to go with the Ribbons and Grace Bootcuffs, Neck warmer, or Ribbons and Grace Headband, but due to the way the pattern spirals, a straight thumb hole would have been somewhat tricky to pull off. These pretty crochet cuffs solve that problem nicely since they lack a thumb hole.
I’ve included only one size because the pattern has a good amount of stretch to it, however, if your wrists run very large, you may want to go up a hook size when working the first 4 rows. My wrists are very tiny, and these are slightly loose.
Make it a set! Here are 3 other Ribbons and Grace patterns that will compliment/complete your look:
Ribbons and Grace Boot Cuffs
Ribbons and Grace Neck Warmer/Cowl
Ribbons and Grace Headband
Disclaimer: This post may contain affiliate links. When you purchase something using these links a small amount of the sales price goes to me to help keep this site, and the patterns on it free. You do not pay any extra for the item you purchase.
Difficulty:
Easy/Intermediate
Materials Needed:
5 mm (H) hook, or hook needed to obtain gauge
75 yards #4 worsted weight Red Heart Super saver in “Buff”, or color of your choice <–Click here to pick some up
Scissors
Yarn needle
Very fine sewing needle
sewing thread in a color that matches your ribbon
2 yards of 7/8” sheer ribbon
2 5/8″ La Mode Flower Buttons-Antique Gold
fray check or clear nail polish
Optional: Hot glue/glue gun
Stitches Used:
ch = chain
sl st = slip stitch
sc = single crochet
hdc = half double crochet
dc = double crochet
Additional Terms:
hdc in the 3rd loop: work all stitches for the round in the 3rd loop of the hdc from previous round. Instructions: Look at the top of the stitch, and locate the sideways “V”, bend the stitch to look at the back, and you should see another “V” which is created by the “yarn over”. You’ll be working into the back loop of that “V”, this is called the 3rd loop.
Gauge:
14 stitches in 4″
Measurements:
4 1/4″ tall, by 3 1/2″ wide at the narrowest point.
Additional Notes:
-ch 1 at beginning of round does not count as a stitch.
-If these are too short, feel free to add another repeat of round 6. If they are too small, in the opening, go up a hook size; too large, go down a hook size.
-It is possible to add a thumb hole of sorts by putting a stitch at the end about 1″ from the edge.
-These cuffs are worked in multiples of 6.
–Scroll to the bottom of the post for a simple picture tutorial
Ribbons and Grace Victorian Wrist Warmers Pattern (US Terms):
ch 25,
Row 1: hdc in 3rd ch from hook (counts as first hdc), hdc in each st across, ch 1, turn. (24)
Row 2: working in 3rd loop of hdc, dc in each st across, ch 1 turn. (24)
Row 3: hdc in each st across, ch 1, turn. (24)
Row 4: working in 3rd loop of hdc, sc in each st across, ch 1, turn. (24)
Round 5: (sc, hdc, dc) in first st, sk st *(sc, hdc, dc) in next st, sk st; repeat from * around, join with sl st to first sc. (36)
Round 6-8: ch 1, (sc, hdc, dc) in first st, sk 2 sts, *(sc, hdc, dc) in the next st, sk 2 st; repeat from * around, join with sl st to first sc. (36)
Round 9: ch 1, hdc in each st around, join with sl st to first hdc. (36)
Round 10: ch 1, working in 3rd loop of hdc, sc in each st around, join with sl st to first sc. (36)
Round 11: ch 2, sk st, sl st in next st, *ch 2, sk st, sl st in next st; repeat from * around, final sl st counts as join. (18 ch-2 sps)
Round 12: sl st into ch-2 sp, *(ch 1, 3 sc, sl st), sl st into next ch-2 sp; repeat from * around, join with sl st to first sl st. (18 shells)
Fasten off, and weave in ends.
Attach yarn to other end of cuff,
Round 1: ch 2, sk st, sl st in next st, *ch 2, sk st, sl st in next; repeat from * around. (11 ch-2 sps)
If you end up with 1 stitch left at the end of your round, this is ok. Keep moving to the next step.
When you get to the end of this row, continue down the side of the opening, working sc along the edges of rows 1-5 (they created an opening so you can slip your hand through) slip stitch into the bottom row, and sc back up the other side. This will make your opening prettier. Once you get back up to the other side, continue with round 2.
Round 2: sl st into ch-2 sp, *(ch 1, 3 sc, sl st), sl st into next ch-2 sp; repeat from * around, join with sl st to first sl st. (11 shells)
When you complete round 2, sl st into first sc that was worked down the side of the opening (in round 1), ch 6, sl st into the next sc, creating a button loop.
Fasten off, and weave in ends.
Repeat for other wrister, with this change:
After getting to the end of round 2 on the top part of the cuff, fasten off, and weave in ends. Attach yarn to first sc at opposite side of wrister opening. Ch 6, sl st into next sc creating a button loop.
Fasten off, and weave in ends.
Sew a small button on the back of the wrister, opposite the button loop.
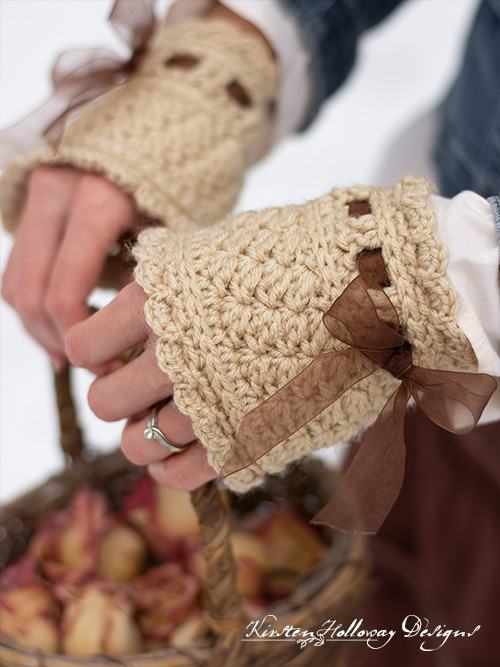
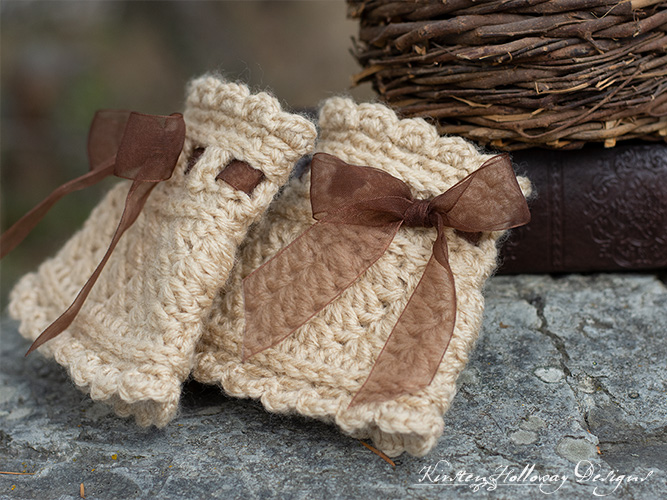
Cut two lengths of ribbon for each wrister: one 15”, and the other 20”. Using sewing needle and thread, sew ribbon (or use hot glue) to itself to secure one end of ribbon near the back openings of the wrister. Weave ribbons through row 2, and tie in a bow, to one side of the cuff. Tie into a bow, and trim the ends as short as you’d like them. Coat the ends of the ribbons with fray check or clear nail polish.
If you enjoyed this pattern, don’t forget to sign up for my newsletter here! That way you’ll never miss out on special events, or freebies I’m offering.
You can also find me on Facebook, Pinterest, Instagram, and Ravelry.
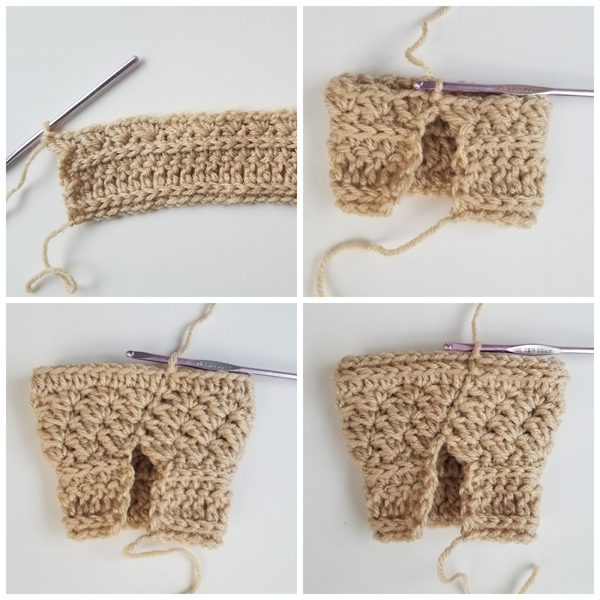
If you’re a visual learner, here is a simple picture tutorial showing how to crochet the basic wrist warmer:
- Left to right, top row:
This is how rows 1-5 will look just before you join round 5, and after you join round 5. - Left to right, bottom row:
Once you are done with doing the shells in rounds 6-8, you will add a round of hdc (round 9), then in round 10 you will work single crochets in the 3rd loop of the hdc from the previous round. This will create a ridge.
Once you have finished round 10, you will repeat: *ch 2, sk st, sl st in next st; around the bottom edge. Then work the shells from the final round in those ch-2 sps.
Fasten off.
Do the same thing on the top of the cuff, but once you get to the opening, single crochet down the opening and back up. Then, start the the next round (shells). After you have completed the shells, make a button loop by chaining 6, and slip stitch into the single crochet right near the base of the chain.
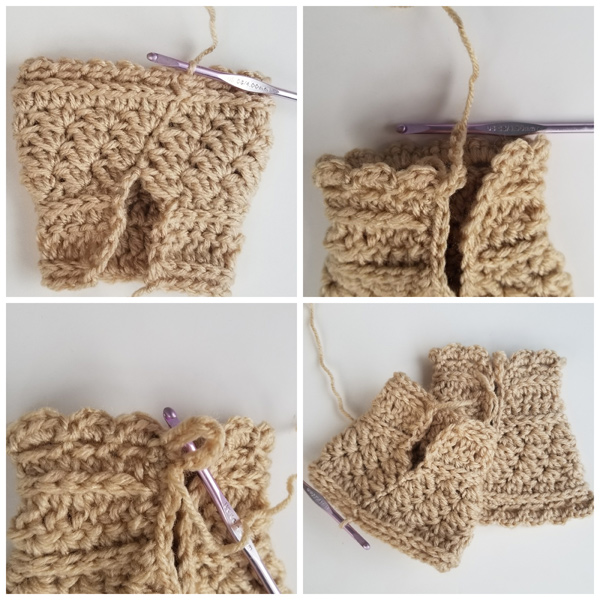
Fasten off and weave in ends.
Want more gorgeous crochet patterns, and a little encouragement for your day? Sign up for my newsletter here! That way you’ll never miss out on special events, or freebies I’m offering.
JOIN ME ON SOCIAL MEDIA
I would love to see a picture when you’re done, so please feel free to come by my Facebook group and show off your work! Be sure to tag @kirstenhollowaydesigns when you share pictures of your finished wrist warmers on Instagram, and use #ribbonsandgracewristers!
You can also follow me on Facebook, Pinterest, Instagram, and Ravelry for more beautiful crochet patterns.
PATTERN TERMS AND CONDITIONS:
You are welcome to share the link to this pattern, using one image of your choice, on your site, but please do not share the written patterns themselves, this includes my Ravelry downloads or translations of these patterns, or use additional images. You do not have permission to use my images by themselves to create pinnable graphics for Pinterest, however they may be included in a roundup pin if there are 4 or more other patterns. If you sell finished items online, please do not use my pictures for your listings. I’m positive that your work is of high enough quality for you to sell the finished piece. Have confidence in your abilities! <3 Thank you!
This pattern was made to be used by individuals, and small business crocheters alike. Selling your finished pieces in boutiques, at farmer’s markets, craft shows, and other local events is encouraged! The only thing I require is that this pattern not be used commercially to produce hundreds of thousands of copies.
If you enjoyed this pattern or found it useful, why not share a link to this post with your friends?
