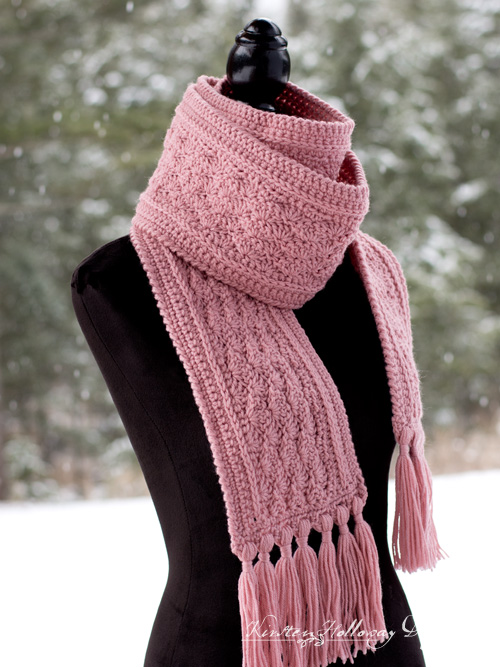
This free ladies shell stitch scarf pattern is simple and easy to crochet, the texture is subtle, but gorgeous, and the special crab stitched edging, and fringe really bring this design to the next level! Find the free crochet pattern instructions below, or purchase a print-optimized, ad-free PDF by clicking here.
Click here to add this to your Ravelry queue!

Anyone from beginner to experienced crocheter will be able to make this beautiful ladies scarf, and if pink is not your thing, it will look just as fetching in neutrals as it will in bright, eye-catching colors. I’ve also included the multiple count so you can adjust this pattern to be shorter or longer based on your needs.
There’s even a spot that tells you how to make this into a wrap (because if you’ve figured out anything about me in the last year, hopefully its that I love beauty, options, and inspiring you to greater creative expression)!
Today is also a special day, and not only because I’m celebrating Thanksgiving with family (though they are at the top of my list!). Why is that you ask?
It’s because a year ago today, I released the ski hat pattern that launched me into being a designer! *throws confetti* You can find the matching La Vie en Rose earflap hat and the story behind it, over here. It was a happy coincidence, and I feel so blessed to have been able to provide you with beautiful crochet patterns throughout the last year. Your sweet comments and stories have touched and inspired me, and I thank you from the bottom of my heart.
Alright, enough of the mushy stuff, let’s get started!
Disclaimer: This post contains affiliate links. When you purchase something using these links a small amount of the sales price goes to me to help keep this site, and the patterns on it free. You do not pay any extra for the item you purchase.
Difficulty:
Easy
Materials Needed:
5.5mm (I) hook, or hook needed to obtain gauge
3.75mm hook for crab stitch edging
415, 470, 540 yards of #4 worsted weight Red Heart Comfort in “Petal Pink”
scissors
yarn needle
measuring tape
Stitches Used:
sl st = slip stitch
ch= chain
sc = single crochet
hdc = half double crochet
dc = double crochet
Additional Terms
-Crab Stitch (also known as the reverse single crochet). This stitch is formed as you would make a normal single crochet, but at the end, you will move backward, working your next crab stitch into the previous stitch, and not the “next stitch” (ahead).
-hdc in the 3rd loop: Look at the top of the stitch, and locate the sideways “V”, bend the stitch to look at the back, and you should see another “V”. You’ll be working into the back loop of that “V”, this is called the 3rd loop. When you are working in rows, this 3rd loop will be facing you after you turn!
shell = 5 dc in same st
st/sts = stitch/stitches
sp/sps = space/spaces
prev = previous
Gauge:
13 hdc stitches in 4”
Measurements:
Approximately 6 ½ ft, [7 ½ ft, 8 ½ ft] long, including fringe, by 6 in. tall.
Additional Notes:
-Ch 1 at the beginning of a row is not counted as a stitch, ch 2 is counted as a stitch
-The crab stitch edging is optional, but will give the scarf a more finished, professional look.
-If you want to adjust the length even more, this pattern is worked in multiples of 6+1, (plus 1 for the first row’s turning chain)
-You could easily turn this into a blanket by working rows 1-16, doing an additional row of sc after row 16, and then pick up and repeat from row 2-16, always remembering to add that extra row of sc between repeats. Repeat these steps until you have a blanket the length or width that you want. 🙂
La Vie en Rose Ladies Scarf Pattern With Fringe (US Terms):
Click here to purchase an ad-free, print-optimized PDF of this pattern on LoveCrafts
Chain 218, [254, 296],
Row 1 (RS): sc in second ch from hook, sc in each st across, ch 1, turn. (217, [253, 295])
Row 2 (WS): sc in each st across, ch 2 (counts as first hdc of next row), turn. (217, [253, 295])
Row 3(RS): hdc in each st across, ch 1, turn. (217, [253, 295])
Row 4 (WS): working in the 3rd loop of hdc, sc in each st across, placing final sc of row in top of ch-2 from prev row, ch 1, turn. (217, [253, 295])
Row 5 (RS): sc in first st, sk 2 sts, *shell in next st, sk 2 sts, sl st in next st, sk 2 sts; repeat from * across, sc in final st of row, ch 1, turn. (36 [42, 49] shells, 2 sc)
Row 6 (WS): 3 dc in first sc, sk 2 sts, sl st in next st, sk 2 sts, *shell in next st, sk 2 sts, sl st in next st, sk 2 sts; repeat from * across, 3 dc in final sc, ch 1, turn. (35 [41, 48] shells, 2 half-shells)
Row 7 (RS): sc in first st, sk 2 sts, *shell in next st, sk 2 sts, sl st in next st sk 2 sts; repeat from * across, sc in final st of row, ch 1, turn. (36 [42, 49] shells, 2 sc)
Repeat rows 6 and 7 two more times.
Note: If you want to turn this into a wrap, repeat rows 6 and 7 until your piece is as wide as you’d like, then continue with the rest.
Row 12 (WS): ch 1, hdc in first 2 sts, sc in each of the next 3 sts, *hdc in each of the next 3 sts, sc in next 3 sts; repeat from * across, hdc in each of the last 2 sts of row, ch 2 (counts as first hdc of next row), turn. (217, [253, 295])
Row 13 (RS): hdc in each st across, ch 1, turn. (217, [253, 295])
Row 14 (WS): working in the 3rd loop of hdc, sc in each st across, ch 1, turn. (217, [253, 295])
Rows 15-16 (RS, WS): sc in each st across, ch 1, turn. (217, [253, 295])
Fasten off, and weave in ends.
How to add fringe to the ends of your scarf:
Attach yarn to one end of scarf,
Row 1: work 21 sc across end, ch 1, turn. (21)
Row 2: sc in first st, ch 2, sk st, *sc in next 2 sts, ch 2, sk st; repeat from * across, sc in final st, ch 1, turn. (7 ch-2 sps, 14 sc)
Row 3: sc in first st, 3 sc in ch-2 sp, sl st in next st, sk st *3 sc in ch-2 sp, sl st in next st, sk st; Repeat from * across, sc in final st of row.
Fasten off, and weave in ends.
Loop nine 12” pieces of fringe through each hole on the ends. Wrap a piece of yarn around the fringe several times to create a tassel. Tie off securely.
Repeat this section at the other end of the scarf.
Crab Stitch Edging (Optional):
Note: If you do not wish to put the crab stitch edging on, you may do a single crochet edge instead.
Instructions:
with 3.75mm hook,
Working along long edge of scarf with front side facing you, attach yarn to top edge of scarf, crab stitch along the edge.
Fasten off when you get to the end.
Attach yarn to bottom edge of scarf, crab stitch along that edge.
Fasten off and weave in ends.

Want more gorgeous crochet patterns, and a little encouragement for your day? Sign up for my newsletter here! That way you’ll never miss out on special events, or freebies I’m offering.
JOIN ME ON SOCIAL MEDIA
I would love to see a picture when you’re done, so please feel free to come by my Facebook group and show off your project! Be sure to tag @kirstenhollowaydesigns when you share pictures of your finished ornament or gift tag on Instagram, and use #victorianblushsnowflake
You can also follow me on Facebook, Pinterest, Instagram, and Ravelry for more beautiful crochet patterns.
PATTERN TERMS AND CONDITIONS:
You are welcome to share the link to this pattern, using one image of your choice, on your site, but please do not share the written patterns themselves, this includes my Ravelry downloads or translations of these patterns, or use additional images. You do not have permission to use my images by themselves to create pinnable graphics for Pinterest, however they may be included in a roundup pin if there are 4 or more other patterns. If you sell finished items online, please do not use my pictures for your listings. I’m positive that your work is of high enough quality for you to sell the finished piece. Have confidence in your abilities! <3 Thank you!
This pattern was made to be used by individuals, and small business crocheters alike. Selling your finished pieces in boutiques, at farmer’s markets, craft shows, and other local events is encouraged! The only thing I require is that this pattern not be used commercially to produce hundreds of thousands of copies.
If you enjoyed this pattern or found it useful, why not share a link to this post with your friends?