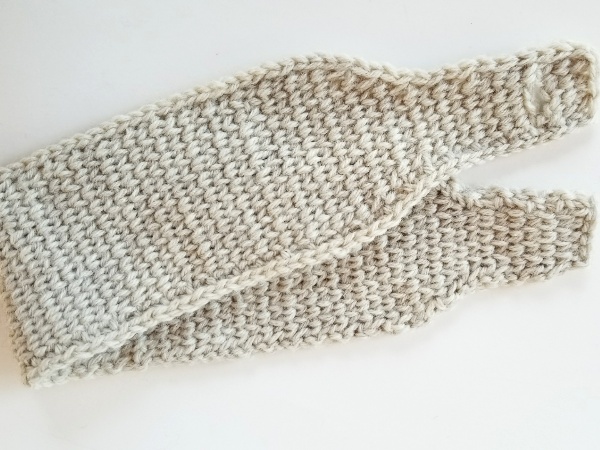
What’s this about the “knit stitch” in a crochet pattern? Friends, if you have ever wanted to achieve the look of knit, without picking up two needles (eg. you want to “knit” with your crochet hook), this easy “knit look” headband pattern tutorial will teach you how! Find the free crochet pattern instructions below, or purchase a print-optimized, ad-free PDF by clicking here.
Click here to add this pattern to your Ravelry queue!
We’re almost done with February, but it’s not too late to learn a new skill in the New Year, and that’s just what we’re going to do today as part of the New Year, New Skill Crochet-A-Long. If you’re just now learning about this fun event, head on over to Underground Crafter to see what skills you missed in the first half of the event, or visit the CAL Central Facebook group.
Let’s get started on this week’s project, shall we?
A crochet stitch that looks like knitting
I chose to teach you the crochet “knit stitch”, also called the “crochet waistcoat stitch”, or center single crochet, because I love the look of knit fabric, but my knitting skills run quite a bit behind my crochet skills. The crochet “knit stitch” provides a workable solution to this dilemma, and is great for headbands, bags, and purses, or any project that needs a thicker, more durable, fabric. I should also note that when worked in the round, it truly does take on the appearance of knit fabric, much more so than it does in rows, but hopefully you will still enjoy this project.
Maintaining relaxed tension is very important when crocheting the “knit stitch”. Since you are working through the center of the stitch it adds extra thickness to the resulting project, so keeping your stitches loose will make it more bendable or have better “drape”.
Disclaimer: This post may contain affiliate links. When you purchase something using these links a small amount of the sales price goes to me to help keep this site, and the patterns on it free. You do not pay any extra for the item you purchase.
Difficulty:
Easy/Intermediate
Materials Needed:
30-35 yards Lion Brand Fisherman’s Wool in “Nature’s Brown”
60-75 yards Lion Brand Wool-ease in “Natural Heather”
Flower: 3.75mm (F) hook
Headband: 5mm (H) hook, or hook needed to obtain gauge
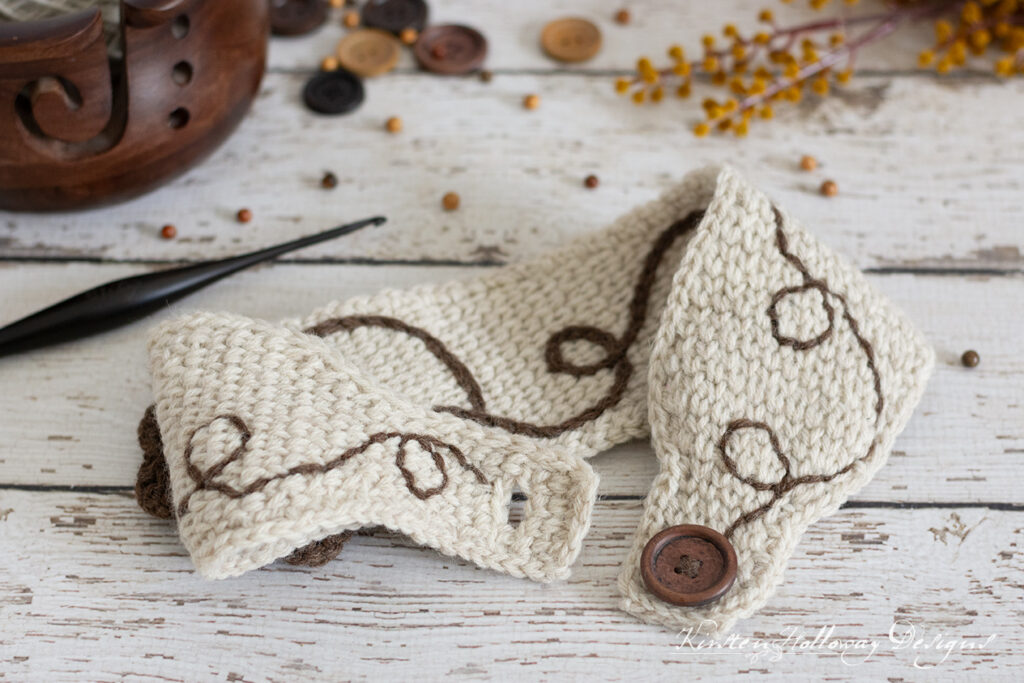
1 inch button
Yarn needle
Scissors
3 tiny wooden beads
Sewing needle
Thread
Stitches Used:
ch = chain
sc = single crochet
sc2tog = single crochet 2 together
hdc = half double crochet
dc = double crochet
tr = treble crochet
Additional Terms
BLO = Back Loop/s Only
FLO = Front Loop/s Only
st/sts = stitch/stitches
sp/sps = space/spaces
prev = previous
Gauge:
For headband: 7 stitches in 2 inches. Gauge is unimportant for flower.
Measurements:
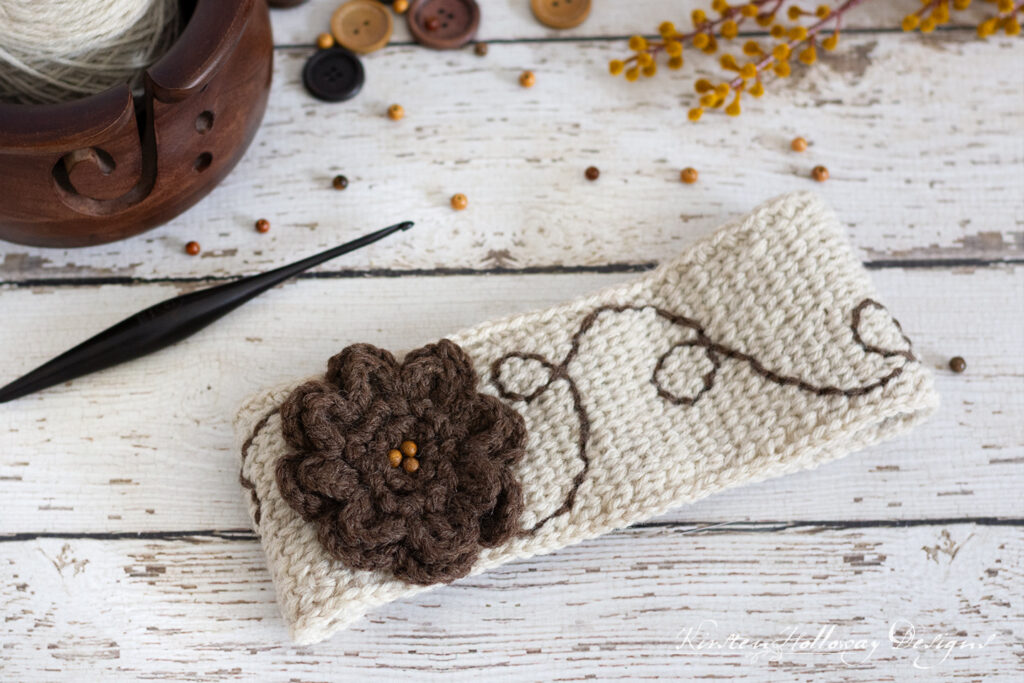
Headband (adult): 3 ½” across by 21” long
Flower: 4” across
Additional Notes:
-ch 1 at end of row does not count as a stitch.
Loose tension is a MUST for this project.
Because this headband is worked in rows, you can make it as long or short as you like. Remember this headband is NOT a toy, and you may want to leave the small wooden beads off the flower if you plan on making this for a child.
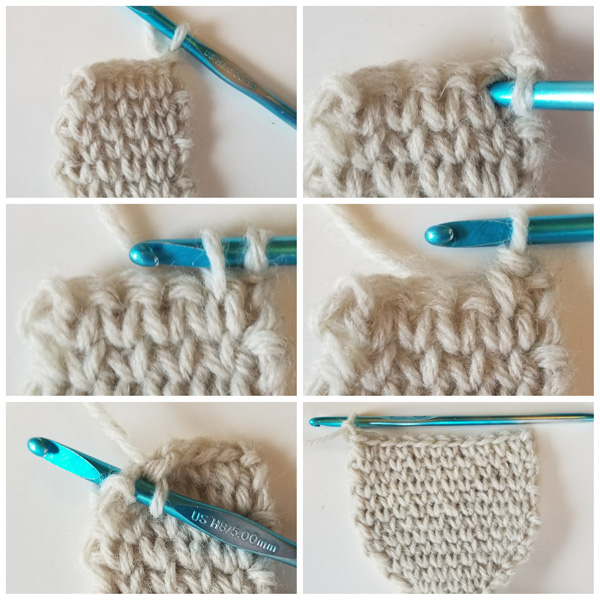
Step-by-step picture tutorial of the “knit stitch” or “waistcoat stitch”:
It’s important to remember the only difference between the crochet “knit stitch” and a normal single crochet stitch is where you insert your hook.
- The picture at the top, left shows a new row before any stitches are worked into it.
- The picture at the top, right shows where to insert your hook. You will see what look like upside-down v’s. Insert your hook between those upside-down v’s, and complete a sc as normal.
- The picture on the middle, left shows what your stitch should look like after drawing up a loop.
- The picture on the middle, right shows the completed stitch.
- The bottom, left picture shows the last stitch of the row being worked into the final stitch, as one normally would,
- The bottom, right picture shows what the fabric looks like after increasing, and doing several row repeats. Keep scrolling down for a short video tutorial.

How to crochet the “knit stitch” (also called the “waistcoat stitch”) video tutorial:
Knit-Stitch Headband Pattern (US Terms):
Ch 6,
Row 1: sc in second ch from hook, sc in each remaining st across, ch 1, turn. (5)
This is where you will begin the center-single crochet or “crochet knit stitch” section. Work your sc in the post (center) of the stitch. It will look like an upside down v, and be different from the traditional stitch placement. If you’re not sure what this looks like go back and look at the picture tutorial, or video above.
Rows 2-8: sc in post (or center) of each stitch across, When you get to the end, sc in final stitch, ch 1, turn (5)
Row 9: 2 sc in post of first st, sc in post of next 3 sts, 2 sc in final st, ch 1 turn. (7)
Row 10: sc in post of each st across, sc in final st, ch 1, turn. (7)
Row 11: 2 sc in post of first st, sc in post of next 5 sts, 2 sc in final st, ch 1 turn. (9)
Row 12: sc in post of each st across, sc in final st, ch 1, turn. (9)
Row 13: 2 sc in post of first st, sc in post of next 7 sts, 2 sc in final st, ch 1 turn. (11)
Row 14: sc in post of each st across, sc in final st, ch 1, turn. (11)
Repeat row 14 until your band is about 4-6” inches shorter than the head circumference of the person you are making it for, then begin decrease rows. I crochet very loosely and did a total of 72 rows before decreasing.
Decrease/Ending:
Note: Final sc2tog of each row will be worked in the center of the second to last stitch, and in the last stitch as normal.
Row 1: sc2tog in post of first 2 sts, sc in post of next 7 sts, sc2tog (9)
Row 2: sc in post of each st across, sc in final stitch, ch 1, turn (9)
Row 3: sc2tog in post of first 2 sts, sc in post of next 5 sts, sc2tog (7)
Row 4: sc in post of each st across, sc in final st, ch 1, turn. (7)
Row 5: sc2tog in post of first 2 sts, sc in post of next 3 sts, sc2tog, turn. (5)
Rows 6-14: sc in post of each st across, sc in final st, ch 1, turn. (5)
Row 15: sc in post of first st, ch 3, skip 3 sts, sc in final stitch. (5)
Row 16: sc in each st across, ch 1, turn. (5)
Row 17: sc in post of each st across, sc in final st, ch 1, turn. (5)
Row 18: sc2tog in post of first 2 sts, sc in post of next st, sc2tog. (3)
Headband Edging:
This will make your headband look neater and more “finished”. It will also help to strengthen the sides of the button hole. Go up a hook size or two if you have tight tension. Your headband should still be very stretchy when you finish this step.
Round 1: Slip stitch loosely around the edge of the headband.
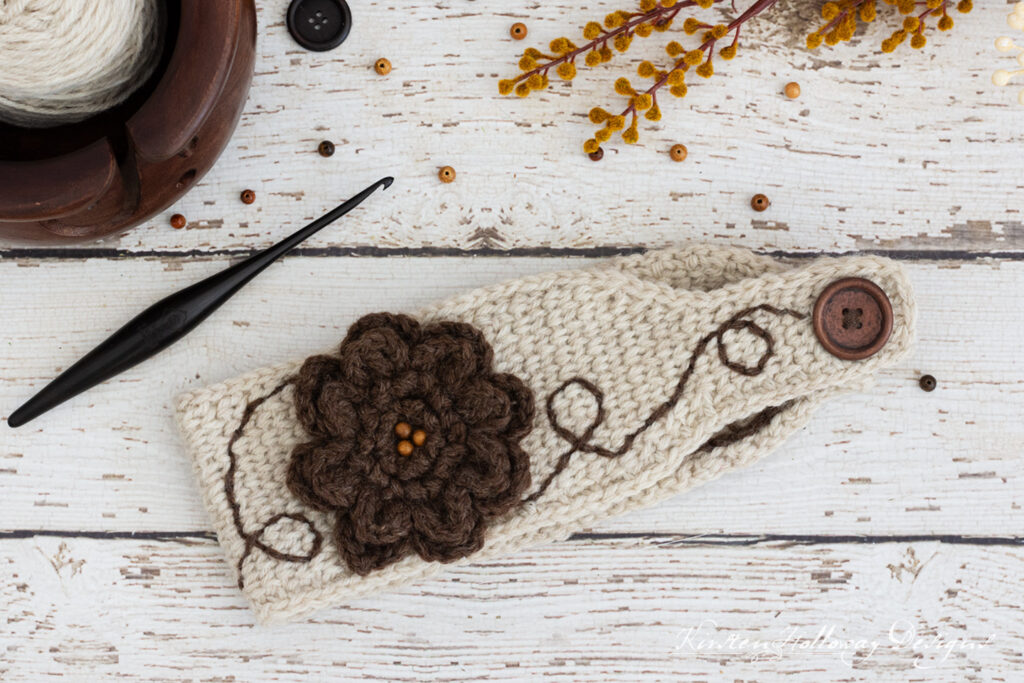
Here is a picture of how your headband should look at this point:
Fasten off and weave in ends. Note: I ended up weaving in one of my ends near the button hole to reinforce it a little more.
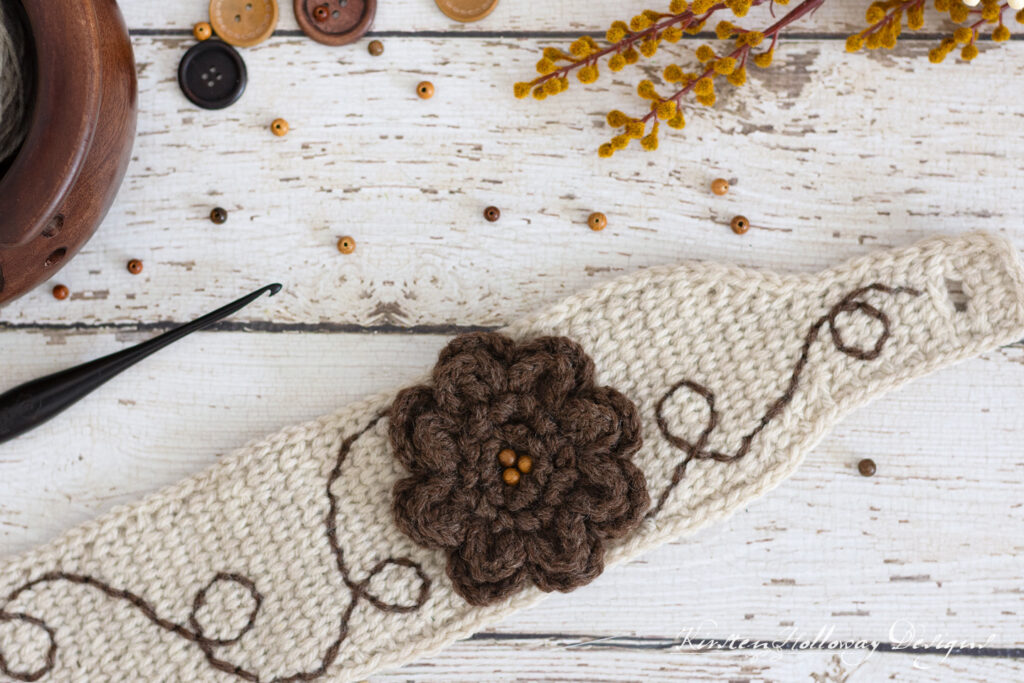
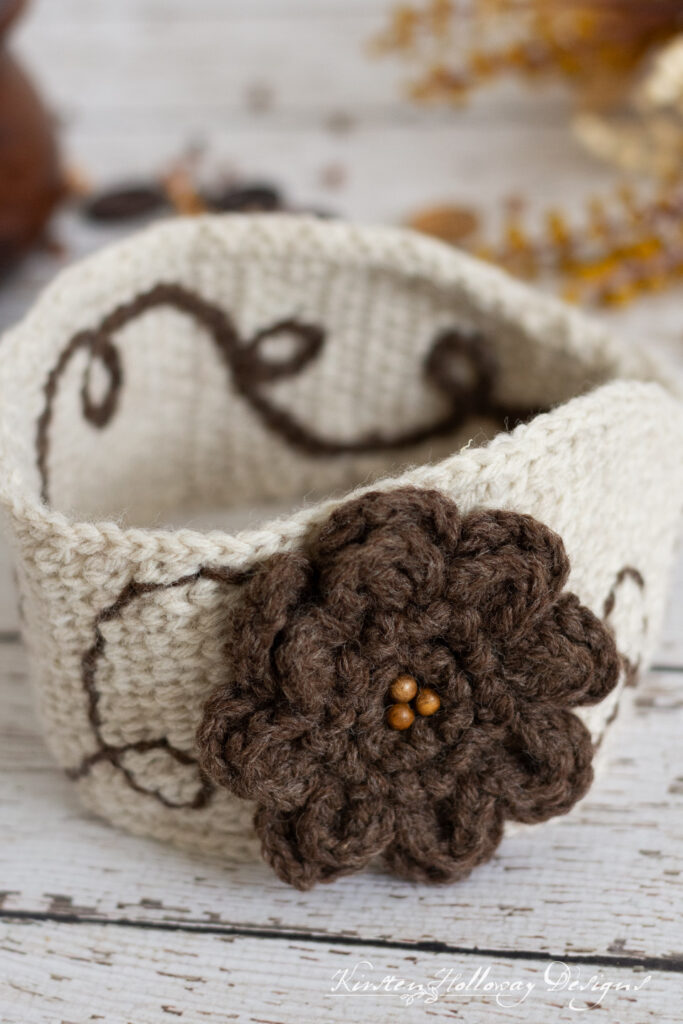
Waterlily Flower Crochet Pattern:
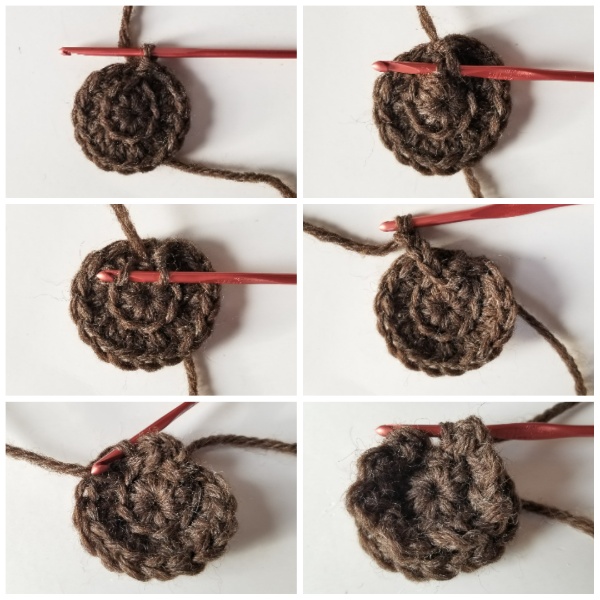
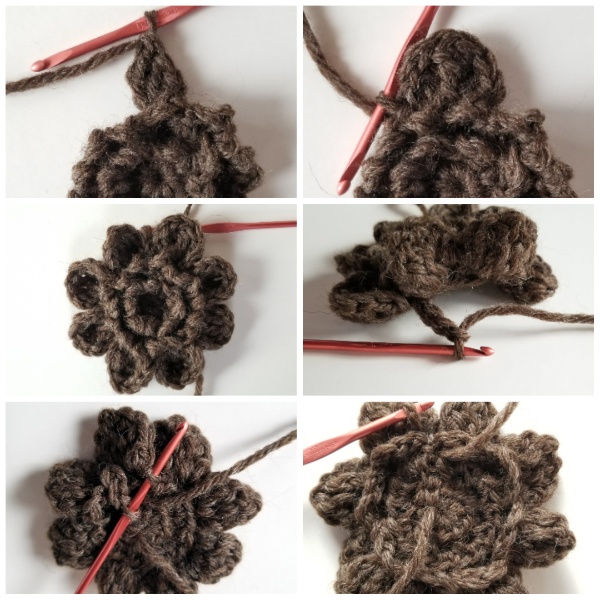
If you get stuck, I have included a picture tutorial of the steps to crochet this waterlily flower pattern below the written instructions. Once completed, sew the flower to the headband over-top of the slip stitched swirls.
With 3.75mm (F) hook,
Round 1: 8 hdc in magic ring, join with sl st to first hdc. (8)
Round 2: ch 1, Working in BLO, 2 hdc in each st around, join with sl stitch first hdc. (16)
Round 3: ch 1, sl st into join of round 1, sl st into first front loop, *working in FLO, ch 3, sl st in next stitch, ch 3, sl st in next stitch; repeat from * around. (8 ch-3 sps)
Round 4: working in FLO of round 2, ch 1, sl st into front loop of first st , *ch 3 sl st in next stitch* Note: the final “front loop” may be a little difficult to find as it may be hidden under the ch-1 (16 ch-3 sps)
Round 5: sl st into first back loop, working in BLO of round 2, (ch 1, hdc, dc, tr) in first st, (tr, dc, hdc, ch 1, sl st) in next stitch, *(ch 1, hdc, dc, tr) in next st, (tr, dc, hdc, ch 1, sl st) in next st; repeat from * around. (8 petals)
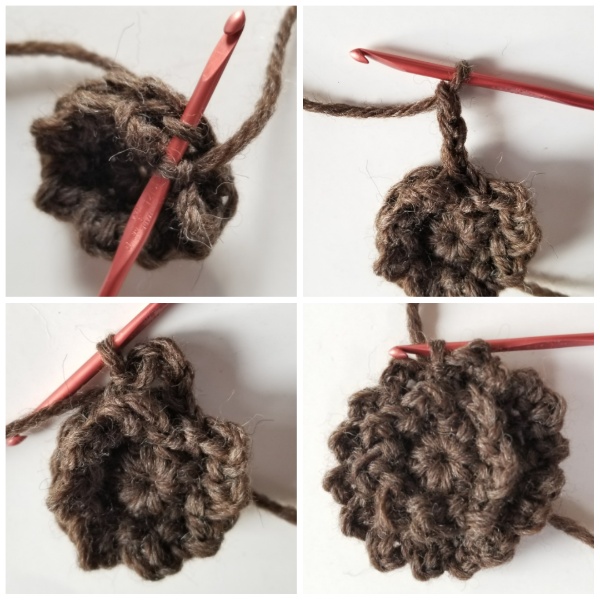
Turn your flower over and work this next step across the back side. Don’t forget to turn it back over so the front side is facing you after you end the round.
Round 6: *ch 4, sl st into sl st between petals from prev round; repeat from * around, final sl st counts as join. (8, ch-4 sps)
Round 7: *working in ch-4 sp, (ch 1, dc, 2 tr, ch 1, sl st back into chain making a picot, 2 tr, dc, ch 1 sl st); repeat from * around, join last petal to first with sl st. (8 petals)
Here is a picture tutorial of the steps to crochet this flower, if you get stuck:
Keep scrolling down for additional finishing instructions if you don’t need the picture tutorial.

Leave a 18” tail for sewing flower securely to headband, but don’t attach it yet. We’ll be creating the slip stitched swirl first:
Slip Stitched Swirl:
Flip headband over so you are working on the back side.
Attach brown yarn to one end of headband, and slip stitch a simple swirl pattern from one end of the band to the other. You will need to check the front every few stitches to make sure your swirls are looking the way you want them to. If you are familiar with cross-stitch, you may try doing the back stitch instead. It may be faster and easier.
Another tip that may help:
- I laid out my yarn in a swirly pattern on the headband, then took a picture, and used that as a guide for how I wanted my swirls to look.
(Optional) Take 3 small wooden beads and sew them securely into the center of the flower.
Sew flower to headband over-top of swirls.
Fasten off, and weave in ends
Want more gorgeous crochet patterns, and a little encouragement for your day? Sign up for my newsletter here! That way you’ll never miss out on special events, or freebies I’m offering.
JOIN ME ON SOCIAL MEDIA
I would love to see a picture when you’re done, so please feel free to come by my Facebook group and show off your project! Be sure to tag @kirstenhollowaydesigns when you share pictures of your finished scarf on Instagram, and use #primroseandpropersuperscarf!
You can also follow me on Facebook, Pinterest, Instagram, and Ravelry for more beautiful crochet patterns.
PATTERN TERMS AND CONDITIONS:
You are welcome to share the link to this pattern, using one image of your choice, on your site, but please do not share the written patterns themselves, this includes my Ravelry downloads or translations of these patterns, or use additional images. You do not have permission to use my images by themselves to create pinnable graphics for Pinterest, however they may be included in a roundup pin if there are 4 or more other patterns. If you sell finished items online, please do not use my pictures for your listings. I’m positive that your work is of high enough quality for you to sell the finished piece. Have confidence in your abilities! <3 Thank you!
This pattern was made to be used by individuals, and small business crocheters alike. Selling your finished pieces in boutiques, at farmer’s markets, craft shows, and other local events is encouraged! The only thing I require is that this pattern not be used commercially to produce hundreds of thousands of copies.
If you enjoyed this pattern or found it useful, why not share a link to this post with your friends?


Again another winner. I have done your CAL afghans and love the pick of blocks. I enjoy your style. Thanks for sharing your gift.
You’re welcome! So many other creative designers joined me in that project. I couldn’t have done it without them! 😊
This is a wonderful pattern absolutely enjoyed making it.
Thank you Joan! I’m so glad you liked it!
Very pretty pattern and love the pictorial.
Thank you, Heather! I’m glad it was helpful!