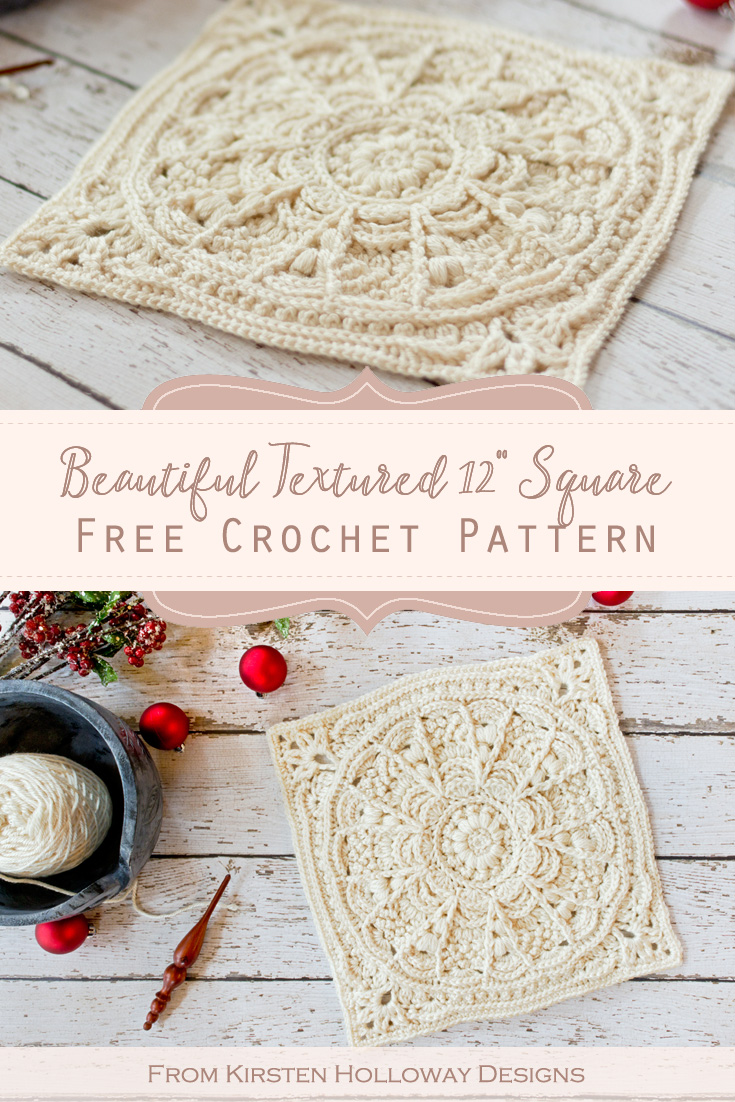
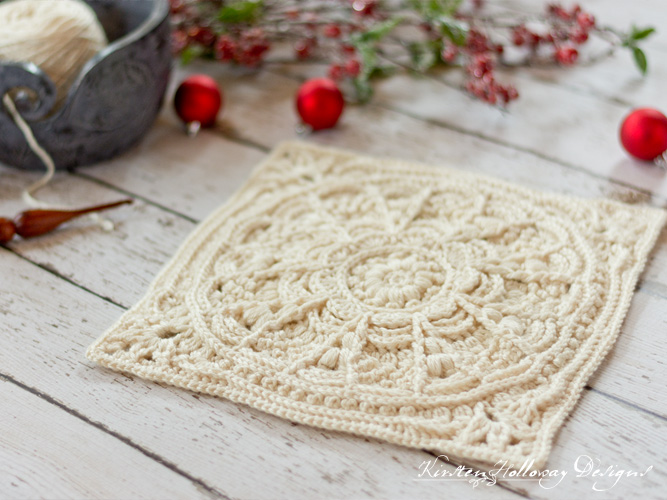
This beautiful crochet granny square pattern creates a thick, sturdy block, which will make such a warm addition to your next blanket or afghan. It is so bursting with texture. However, no two rounds are the same. So, this is a challenging, yet fun square to crochet. Find the free crochet pattern instructions below, or purchase a print-optimized, ad-free PDF by clicking here.
This free granny square pattern was designed for the Creative Crossings Sampler Blanket to begin with. However, it would also make a stunning blanket by itself. Because it’s so textured, it looks beautiful either in one single color, or in several different ones. Variegated yarn is not recommended for this project as it will hide all that beautiful texture.
Click here to add this pattern to your Ravelry Queue!
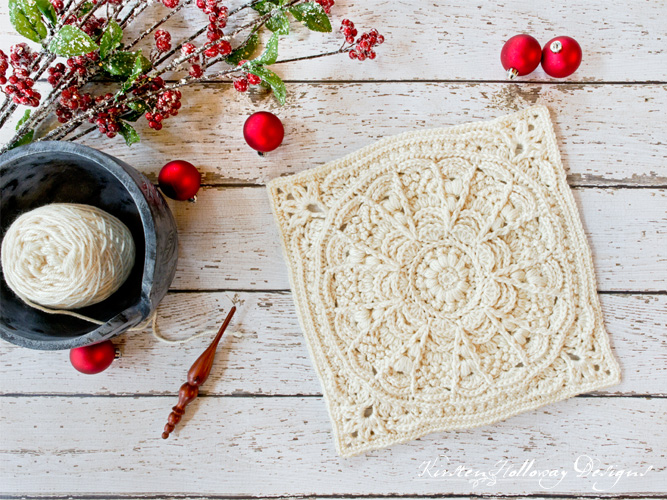
I used #4 worsted weight Red Heart “Soft” yarn because it has a nice drape, and feels amazing! It also has a beautiful silky sheen that makes this textured square stand out in an afghan. You may substitute other worsted weight yarns, but you may not end up with the same effect.
It is important to remember this is an intermediate/advanced level pattern and you will need to be comfortable making front and back post stitches, as well as puffs, clusters, shells and picot single crochet stitches.
A special thank you to AllFreeCrochet for featuring the Winter Opulence crochet granny square in their top 100 crochet patterns for 2019!
Disclaimer: This post contains affiliate links. When you purchase something using these links a small amount of the sales price goes to me to help keep this site, and the patterns on it free. You do not pay any extra for the item you purchase.
Difficulty:
Intermediate/Advanced
Materials Needed:
5 mm hook, or hook needed to obtain gauge
250-275 yards #4 worsted weight Red Heart “Soft” in Off-white
Yarn needle
Scissors
Blocking Board (Optional)
Stitches Used:
ch = chain
sl st = slip stitch
sc = single crochet
hdc = half double crochet
dc = double crochet
tr = treble crochet
2tr cluster = treble crochet 2 together in same st
tr2tog = treble crochet 2 together (worked over top of the 2tr clusters, with one leg on each side of the cluster.)
BPsc = back post single crochet
BPhdc = back post half double crochet
BPdc = back post double crochet
FPsc = front post single crochet
FPdc = front post double crochet
FPtr = front post treble crochet
BLO = back loop only
sp(s) = space(s)
Additional Terms:
Picot sc = Insert hook, yo, pull up a loop, [yo, draw through 1 loop] 3 times to make a ch 3, then yo, and draw through last loop on the hook. Push the picot stitch toward the front of your work when finished.
3dc cluster = dc3tog in same stitch
Small puff st = yo, pull up a loop 3 times in same st, yo, pull through 6 loops, yo, pull through final 2 loops
Puff st = yo, pull up a loop 4 times in same st, yo, pull through 8 loops, yo, pull through final 2 loops
Measurements:
12” x 12”
Gauge:
My circle measured a little over 3 1/4” across after round 6.
Additional Notes:
This square will not always lay flat as you are working it, although it does flatten out in the end and a bit of light blocking should fix any wobbly edges. The square pictured has not been blocked.
This is an intermediate/Advanced level square, but the texture repeats should be fairly intuitive after you complete the first repeat section of a round. Take it one comma at a time if you get stuck.
-I have recently rewritten rounds 20 and 21 using different terminology for the tr clusters and tr2tog stitches to hopefully make the instructions for the corner sections clearer.
Winter Opulence Crochet Granny Square Pattern (US Terms):
Click here to purchase an ad-free, print-optimized PDF of this pattern on LoveCrafts
Round 1: 6 sc in magic circle, join with sl st to first sc. (6 sc)
Round 2: ch 1, working in BLO, 2 sc in each st around, join with sl st to first st. (12 sc)
Round 3: ch 1, *small puff st, ch 1, move to next st; repeat from * around, join with sl st to first small puff. (12 small puffs, 12 ch)
Round 4: ch 1, picot sc in first st, sc in next st * picot sc in next st, sc in next st; repeat from * around, join with sl st to first picot sc. (12 picot sc, 12 sc)
Round 5: ch 1, sc in first st, 2 sc in next st *sc in next st, 2 sc in next st; repeat from * around, join with sl st to first sc (36 sc)
Round 6: ch 1, BPsc around each sc st in round, join with sl st to first BPsc. (36 BPsc)
Your project will probably cup a little at this point, just hang in there. It’s going to get worse before it gets better.
Round 7: Sk join st, *sk next st, 5 dc in next st, sk st, sl st in next st; repeat from * around, final sl st counts as join. (9 5-dc shells)
Turn piece over so back side is facing,
Round 8: *ch 5, sl st around BPsc between petals (This is just the closest BPsc to where you placed your sl st. You’ll be working into the actual sl sts in a few rounds); repeat from * around, final sl st counts as join. (9 ch-5 sp, 9 sl st)
Turn piece back over so right side is facing,
Round 9: *sl st into ch-5 sp, (hdc, 2 dc, 3 tr, 2 dc, hdc, sl st) in ch-5 sp; repeat from * around. Final sl st counts as join. (9 petals)
Round 10: ch 1, *BPdc around next 3 sts, BPhdc around next 3 tr, BPdc around next 3 sts, sk 2 sl sts; repeat from * along each petal. Join with sl st to first BPdc. (54 Bpdc, 27 BPhdc)
Round 11: ch 1, FPtr in sl st between first petals from round 7, *sk st, BPhdc around next 7 sts, sk st, (FPtr, ch 1, FPtr) in Round 7 sl st between next 2 petals; repeat from * around omitting final FPtr. Join with sl st to first FPtr. (9 7-st petals, 18 FPtr, 9 ch-1 sps)
Your project should start laying flat after this round.
Round 12: ch 1, FPdc around FPtr, *ch 1, sk 2 sts, [3dc cluster in next st, ch 1] 3 times, sk 2 sts, FPdc around FPtr, ch 1, puff st in ch-1 sp, ch 1, FPdc around next FPtr; repeat from * around omitting final FPdc. Join with sl st to first FPdc. (18 FPdc, 9 puff sts, 27 3-dc clusters)
Round 13: ch 1, *FPdc around FPdc, [sc in ch-1 sp, picot sc in top of 3 dc cluster] 3 times, sc in ch-1 sp, FPdc around FPdc, sk st (puff st, ch 1, puff st) in top of puff st from previous round, sk st; repeat from * around, join with sl st to first FPdc. (18 FPdc, 36 sc, 27 picot sc, 18 puff sts)
Round 14: ch 1, *FPsc around FPdc, [picot sc in next st, sc in next st] 3 times, picot sc in next st, FPsc around FPdc, sk to ch-1 sp between puff sts from previous round, 7 hdc in ch-1 sp; repeat from * around, join with sl st to first FPsc. (18 FPsc, 36 picot sc, 27 sc, 9 hdc petals)
Your project will start to pucker a bit after this round, but we’ll flatten it out in a few rounds.
Round 15: ch 1, *FPhdc around FPsc, [sc in next st, picot sc in next st] 3 times, sc in next st, FPhdc around FPsc, BPdc around next 7 hdc sts; repeat from * around, join with sl st to first FPhdc. (18 FPhdc, 9 BPdc petals, 36 sc, 27 picot sc)
Round 16: ch 1, *FPhdc around FPhdc, sk 3 sts, 7 dc in next st, sk 3 sts, FPhdc around FPhdc, BPsc around next 7 sts; repeat from * around, join with sl st to first FPhdc. (144)
Round 17: ch 1, *hdc in FPhdc, BPhdc around next 7 sts, hdc in FPhdc, hdc in next 7 sts; repeat from * around, join with sl st to first hdc. (144 hdc)
Round 18: ch 1, BPsc in each st around, join with sl st to first BPsc. (144)
Round 19: ch 1, [sc in next st, picot sc in next st] 6 times, sc in next st, hdc in next st, (3dc cluster, ch 1), in next st, *sk st, (3dc cluster, ch 1) in next st, sk st, (tr, ch 1, tr, ch 1) in next, sk st, (3dc cluster, ch 1) in next st, sk st, 3dc cluster in next st, hdc in next st, [sc in next st, picot sc in next st] 12 times, sc in next st, hdc in next st, (3dc cluster, ch 1) in next st; repeat from * around, ending final side with (tr, ch 1, tr, ch 1,) in next, sk st, (3dc cluster, ch 1) in next st, sk st, 3dc cluster in next st, hdc in next st, [sc in next st, picot sc in next st] 6 times, join with sl st to first sc. (Each side: 4 3dc clusters, 2 hdc, 2 tr, 13 sc, 12 picot sc)
Take a moment to assess your work, because your project should be starting to flatten out at this point.
Round 20: ch 1, sc in next 12 sts, *sk st, 5 dc in hdc, sc in ch-1 sp between 3dc clusters from previous round, skip next ch-1 sp, work (2tr cluster, ch 2, 2tr cluster, ch 2, 2tr cluster, ch 2, 2tr cluster) in next ch-1 sp, sc in ch-1 sp between 3dc clusters, 5 dc between hdc and sc sts from previous round, sk 2 sts, sc in next 22 sts; repeat from * around, omitting 12 sts at the end of final repeat, join with sl st to first sc. (Each side: 4 tr2tog, 2 5dc shells, 24 sc)
A few notes on the corners: The first tr2tog stitches worked in the corners in round 21 are worked around tr stitches and in the corner ch-1 space from round 19, 2 rounds below. This is the same ch-1 space where your 2tr clusters were worked in round 20. That’s a lot of stitches to fit in a ch-1 space, but it yields a tighter, neater corner. The two “legs” of the tr2tog are made over and around the 2tr clusters that were made in round 20. This should push the 2tr clusters from round 20 to the back. The tr2tog stitches in round 21 should both cover and “sandwich” the 2tr clusters from round 20 giving the petal shape and creating some dimension. If you get stuck, please feel free to come by my Facebook group and ask your question.
Round 21: ch 1, BPsc around next 10 sts, *BPhdc around next 7 sts, BPdc around next sc, work tr2tog around first tr2tog made in previous round by working on the first tr from round 19 (2 rows below) and in ch-1 sp from round 19, 3 sc in first ch-2 sp between 2tr clusters in previous round, work tr2tog into the ch-1 sp from round 19 and around second 2tr cluster made in previous round, (2 hdc, ch 2, 2 hdc) in second ch-2 sp from previous round, tr2tog into ch-1 sp from round 19 and around third 2tr clluster made in previous round, 3 sc in third ch-2 sp, tr2tog around last 2tr cluster made in previous round by working first leg in ch-1 sp from round 19 and second leg around tr from round 19, BPdc around sc, BPhdc around next 7 sts, BPsc around next 18 sc; repeat from * omitting 10 BPsc on final repeat, join with sl st to first BPsc. (Each side: 18 BPsc, 14 BPhdc, 2 BPdc, 4 tr2tog, 6 sc, 4 hdc)
Round 22: ch 1, sc in next 17 sts, *hdc in next 3 sts, sc in next 5 sts, (2 sc, ch 1, 2 sc) in ch-2 sp in corner, sc in next 5 sts (Note: the first of the 5 stitches you are working into will look like a chain, so be careful not to miss it!), hdc in next 3 sts, sc in next 32 sts; repeat from * around, omitting 17 sts in final repeat, join with sl st to first sc. (Each side: 46 sc, 6 hdc)
Fasten off and then weave in ends.
Block to finish.
Want more gorgeous crochet patterns, and a little encouragement for your day? Sign up for my newsletter here! That way you’ll never miss out on special events, or freebies I’m offering.
JOIN ME ON SOCIAL MEDIA
I would love to see a picture when you’re done, so please feel free to come by my Facebook group and show off your square! Be sure to tag @kirstenhollowaydesigns when you share pictures of your finished square on Instagram, and use #winteropulencesquare!
You can also follow me on Facebook, Pinterest, Instagram, and Ravelry for more beautiful crochet patterns.
PATTERN TERMS AND CONDITIONS:
You are welcome to share the link to this pattern, using one image of your choice, on your site, but please do not share the written patterns themselves, this includes my Ravelry downloads or translations of these patterns, or use additional images. You do not have permission to use my images by themselves to create pinnable graphics for Pinterest, however they may be included in a roundup pin if there are 4 or more other patterns. If you sell finished items online, please do not use my pictures for your listings. I’m positive that your work is of high enough quality for you to sell the finished piece. Have confidence in your abilities! <3 Thank you!
This pattern was made to be used by individuals, and small business crocheters alike. Selling your finished pieces in boutiques, at farmer’s markets, craft shows, and other local events is encouraged! Please credit/link Kirsten Holloway Designs when selling finished products online. The only thing I require is that this pattern not be used commercially to produce hundreds of thousands of copies.
If you enjoyed this pattern or found it useful, why not share a link to this post with your friends?
Thank you so very much for sharing this amazingly beautiful pattern and such detailed instructions. The pics of the finished product helped when I got stuck. You are awesome!!
You’re welcome! I’m glad you are pleased with the square!
I think an easier way to show what the pattern should look like is if you were to add a chart of the square. Then you could see exactly what you mean by saying crochet tr2tog on both sides, in front of and around the tr2tog clusters from row 19. It would help me so I’m sure it would help others. Just a suggestion from a fellow crochet artist. Otherwise it’s a beautiful pattern and I really appreciate that you have offered something so beautiful for free.
The chart is available for purchase on Ravelry. 🙂 https://www.ravelry.com/patterns/library/winter-opulence-square
Apologies then. I hadn’t realized that. I’m a very visual learner. Thanks, miss! 😊
I also am stumped at row 21 – I have no idea whether I am working a tr2tog or a tr around the tr from row 19. I also don’t know where I am going with the needle? Is it a FPtr? Or am I supposed to go in the space between the two tr stitches on row 19? I have been crocheting for 50 years and have done many complicated patterns, but I am at a loss with this corner. Please help.
Hi Nancy,
I’d suggest joining my Facebook group as it’s easier to problem solve when I can see what you’re having trouble with. https://www.facebook.com/groups/KirstenHollowayDesigns/ The tr2tog stitches are worked over top of and around the clusters you made in the previous round. It’s kind of like a FPtr, but not completely since the first leg of the first tr2tog is worked around the tr from round 19 and the second leg is worked in the ch-1 sp.
I absolutely LOVE this granny square. I found it very easy to follow, my only problem is the size. I used the exact yarn and hooks you’ve stated and I cannot get it under 15in. I even used a lighter weighted yarn AND a much smaller hook and still couldn’t get it to 12in. What am I doing wrong!?! I’ve tried this 3 times and its always the same. I guess 4th time will have to be the charm for me. Thank you so much for sharing this design, its gorgeous.
Keep going down in hook size until you can make it work. 😊 I’m glad you like the pattern!
Hi!I love the design.but I needed a video tutorial to understand how to make it..is that available?
I’m sorry, only the written pattern instructions are available at this time.
Hi I love this pattern. I’m having trouble on rd 4 & 5. I watched the video how to do the picot single crochet. But she turns her work after the picot round. If you don’ turn, aren’t you just doing the sc in the next round in front of the picots? Thank you!
You will be pushing your picot to the front of your work instead of the back for this pattern. 🙂
Thank you for the beautiful pattern.. I want to ask if you count the chain 1 at the beginning of the row as a stitch or not ? Tia
Hi Jess,
No, you will not count the ch-1 at the beginning of the round as a stitch. I’m glad you like the pattern! 🙂
Mailtje uit Holland: Wat een schitterend patroon, ga er zeker een sprei van haken.
Heel veel dank!!!
Loes
You’re welcome! I think it would make a gorgeous bedspread too!
Hello, like everyone else, I am having a hard time with round 21. You think it would be possible to get a little video tutorial on this particular area. Thank you for this square pattern it’s wonderfully beautiful.
I may be doing a CAL for this square this summer. If you need help, please feel free to ask your questions in my Facebook group. There are a lot of other people who have made this square and could probably walk you through the tricky spots. 🙂 https://www.facebook.com/groups/KirstenHollowayDesigns/
Hi,
At any point are you turning your work and crocheting into the other side? I’m on round 20 and there have been times where I’ve felt that I should be working into the other side. This is my first intermediate/advanced project! Thank you
Hi Brittany,
When you work the chains in round 8 you’ll be working at the back of the square (it’s also noted in the pattern that round is worked at the back). This square has some tricky parts, it is more “Advanced” than “Intermediate” level, so I’d encourage you to be very comfortable with intermediate-level designs before beginning this square. 🙂
Okay. So unless noted, I should be working into only one side? My project is looking pretty good so far. I’m really proud of how it’s coming, I’ve just really been questioning myself with this. Thank you again!
Correct. 🙂
Good luck!
I’m having trouble with round 7. What is the “SK” supposed to be? Did I miss something? Thanks!
Hi Tracey,
The “sk” is a skip, as in you will skip a stitch. 🙂
Hi could you please tell me what stitch you use to put the squares together with ?
Hi Carol, there are several different ways of joining squares. I used a slip stitch in the back loop of each side of the square. You can do a Google search for “how to join granny squares” if you would like to see more options. 🙂
I bought the pattern but when I tried to download it i was kicked off site. When I got back on i was unable to download. How can I correct this please?
Hi Karin,
It should be in your Library on Ravelry if you purchased it there. 🙂
I just cannot get these corners through my thick head! I’ve been crocheting for forty some odd years and never had something stump me to the point of tears! Could you possibly suggest an alternative corner? I’m making this in a beautiful gradient and just can’t bear the thought of abandoning it, but I’m at that point
I’m sorry you’re having so much trouble with the corners, Charla. Please feel free to bring your question to my Facebook group. There are several members who have completed the square and they may be able to walk you through the parts that are most confusing. https://www.facebook.com/groups/KirstenHollowayDesigns/ 🙂
I made one last attempt after the whiney post, guess what? Success! I think maybe in front of, rather than on top of might have been better wording for me, but I finally got it to work! Thanks for your response! I love your patterns, your seed stitch beanies and the wanderlust beanies are my best sellers every year! Thanks again!
Wonderful! I’m glad you finally got the square to cooperate!
I’m also thrilled to hear those beanies sell so well for you! ????
Wonderful pattern! Are all stiches from row 2 onwards meant to be crocheted in BLO or only row 2? Thank you!
Only the rounds that mention BLO should be worked in the back loop. All others should be worked normally. 🙂
thank you for the beautiful pattern. As always just lovely.
Laura
You’re welcome, Laura! 😀
Wow, just finished the white version of this square. It was definitely a challenge but it is gorgeous.
I’m so glad you like it! 🙂
Hi, thank you for this beautiful granny. I’m interested in making this into an afghan/blanket. In order to do so, what do I do after round 22? Thank you.
Fasten off, and make your next square. 🙂 There are many different ways to join crochet squares together. I’m sure you’ll find something you like if you do a Google or YouTube search!
Thank you for pattern. Funny I was stuck on a round last night, but looked at it today and I understood it. Now I’m stuck on round 11. I’m interpreting that there are only 5 stitches in the shells and there are 7 sts to make. Maybe you could give me a clue as to what I’m missing here? Thank you!
You’re welcome! The FPtr stitches are made in the slip stitches you made in round 7, I believe everything else is worked on the previous round (10).
Why all the SCREAMING in all caps? Made me decide not to even look at it further
Oops! That shouldn’t have been like that. It looks like some faulty coding on my end. It should be fixed now!
Absolutely love this granny square. I’ve just finished it and decided to make another and turn them into a handbag. The corners of row 21 are tricky, but stage by stage manageable for the first one and then straight forward for the other 3 corners . Thank you so much
I’m glad you love it, Chris! I’m sure your bag will be beautiful. I also plan on releasing a bag pattern for this square at some point. ????
My eyes bugged out when I saw this it’s absolutely beautiful. Thank you for sharing this pattern.
You’re very welcome, Irene!
Kirsten, this square is turning out really nice. I will definitely print it out to do it again for the Creative Crossings CAL , highlighting some rounds as I go. (Laughing)
I have a question about this part:
ROUND 20:
ch 1, …, 5 dc in hdc, … 5 dc between hdc and sc sts from previous round, …
Was the difference intentional?
Thank you!
Yes, it was intentional. 🙂 This made the square more balanced in my opinion. I’m glad you enjoyed the square!
Winter opulence granny square
I started this beautiful square today and love the way it looks, but I can’t work out what you mean on row 8. Do you have a clip to show how it’s done?
Hi Colleen,
I do not have any videos for this square. If you have made multi-layered flowers before this is similar. You will be creating ch-5 spaces to work petals in on the next round. You will be slip stitching around the BPsc sts you made in round 6. The pattern gives you an idea of where to place the slip stitches so they fall in the proper place: between the petals or shells you made in round 7.
I am also stuck on Round 8. I stitched the first ch-5 and slip stitched it into the BPsc closest to it….so I have a small loop between the first and the last 5-dc shell. Now, I believe that the next ch-5 loop goes in between the first and the second 5-dc shell. But how do I travel across the shell? I’m thinking that when I finish Round 8, I should have alternating 5-dc shells and ch-5 loops, 9 of each. I’m stuck with how to travel across the shell to make the next ch-5 loop.
For round 8 you should have 9 ch-5 loops. Each loop should be directly behind the shell from the previous round, and they should be evenly spaced.
I was able to finish this square, and it is so beautiful, but the rounds following the picot sc rounds (round 5, and 14-16) were a bit confusing for me. Do you work some of the sc into the chain 3 space from the picots? That’s what I did, and it seems like it was just added bulk to that round, but it could be added texture too. This square has so much texture, I did have fun with it, even with the tricky corners on round 21!
Gena
Hi Gena,
I’m glad you’ve been enjoying the design! A picot sc is different from a regular picot stitch. You will not be working into the ch-3 space as that part should bump forward, not up like a typical picot stitch. This video on the picot sc by Hopeful Honey may be helpful: https://youtu.be/TiNnTOgYeEc 🙂
Gena I was stuck here too because the video shows pushing the picot st to the back of the work. Instead, when you finish the picot st and go to start the next st which is a sc, bend the picot to the front/ right side of the work, ie the bump forward, then the following sc will lock it to the front of the work and will give you the proper base to work the next row’s sts in.
Beautiful!!! Consider myself a high end beginner, but maybe some day I’ll be able to make this.
Thank you, Ann! Keep up the practice and you’ll definitely get there!
How much yarn does one square use? I’m trying to plan for a blanket.
Thabks!
Hi Mal,
Each square will take approximately 250-260 yards of worsted weight yarn. 🙂 This could vary slightly based on your tension though.
Thank you so much!
You’re welcome!
I adore this pattern. Thank you so much for for sharing.
You’re welcome, Jen! ????
I am having trouble with rd 21. Been crocheting for 50+ years and must be getting thick headed. Please help
Hi Kat,
Round 21 is the most complex in this whole pattern. What are you having difficulty with? Taking things one comma at a time may help.
The corner details. Trc placements
Those are tricky, and I dont know how to explain it better than the way it’s written. You’ll be working the first tr and last tr in the corner around the tr stitches from round 19, and the rest of the tr2tog stitches in the ch-1 sp. Taking the instructions one comma at a time will help. That and looking at the picture. 🙂 This part is worked over top of the tr clusters to create more texture.
I finally got it!!! Beautiful square-great design.
Fantastic! I’m glad to hear that, Kat!
Round 21 was tricky. Reading your comments “This part is worked over top of the tr clusters” was exactly what I needed to know. That clarified it as I couldn’t understand the pattern alone. Thank you!!
So glad it helped, Hallie!
absolutely stunning – thank you! i jumped over to the afghan and that’s equally beautiful. any chance you know when pat dunnell’s square will be released? thanks, again!
I’m glad you’re enjoying them! I don’t know for sure on the date but hopefully early next month. 🙂
thanks so much! i’ve got 2 lapghans to donate so i was thinking about your square and hers. heading to the homestretch with only a few hiccups – and will be holding my breath thru round 21!
Sounds great! This square is stiff and dense, and Pat’s square is soft and drapey, so you may want to keep that in mind for your projects. 🙂
Your square is amazingly beautiful. I will give it a try when my skills improve. Thank you for sharing your lovely pattern.
You’re welcome, Kitty! ????
This is Gorgeous!! Thank you so much for sharing.
You’re welcome, Lynne!
Thanks so much for the beautiful pattern; so gorgeous and generous of you ❤️
Have a nice holiday!
You’re welcome, Heidi! I hope your Thanksgiving was nice as well!