Yarn colors give a unique look to this versatile women’s slouch hat. The free crochet pattern includes notes for using a couple of different worsted weight yarns that will each give this hat a completely diverse and distinctive feel. Find the free crochet pattern instructions below, or purchase a print-optimized, ad-free PDF by clicking here.
Click here to add this pattern to your Ravelry queue!

This easy, and fun slouchy beanie pattern came about because of a couple of questions I am often asked, primarily, “What will happen if I use a different yarn than the one you recommend?” I’ve answered that question over in this post, so if you’ve ever wondered the same thing, I’d highly recommend reading it.

If you’re here for the Serendipity slouch hat I’ve got the free crochet pattern instruction just a little further down, but I’ve got to share a little about how it came together , and got it’s name, first!
What’s so special about this hat is that it the result of a happy accident. Serendipity, right? I’ve had some very colorful Red Heart “Unforgettable” yarn sitting in my stash for a while that I knew I wanted to use for a special project. So I decided to restitch a design I had come up with a couple of weeks ago to donate to charity and turn it into a written crochet pattern to share with you. For kicks and giggles I chose to use that colorful yarn on this pattern, and to be perfectly honest, I wasn’t sure I liked it at first. Even though I liked the warm, vibrant colors, it was way outside my comfort zone of neutrals and pastel pinks!
I shared a quick progress picture in my Facebook group and asked you what you thought, and you all LOVED it!
This got me thinking of how fun it would be to talk a little about how different yarns affect the look and size of a project, and actually show you a pattern that works well in a variety of situations.
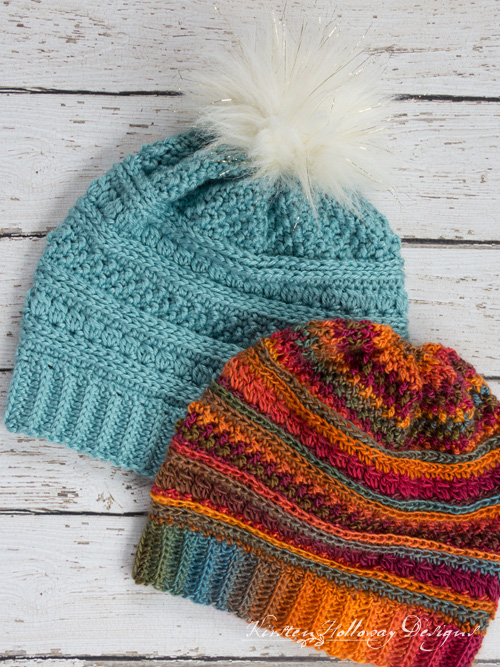
The colorful version using Red Heart “Unforgettable” is a light-weight fall or spring slouch that is super soft and has lots of drape. It practically melts in your hands it is so soft and silky! I know some people don’t like to crochet with roving yarn because of how hard it is to rip out, but if you use relaxed tension and a slightly larger hook, as I did, you should have very little trouble with it.
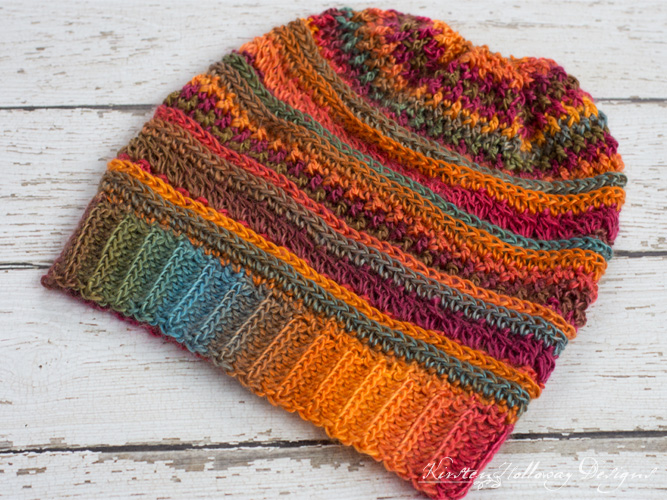
Look at how those stitches show off the color! Since each round has a different color due to the long variegated stripes in this yarn it really makes the stitches stand out more despite being a fairly light weight yarn.
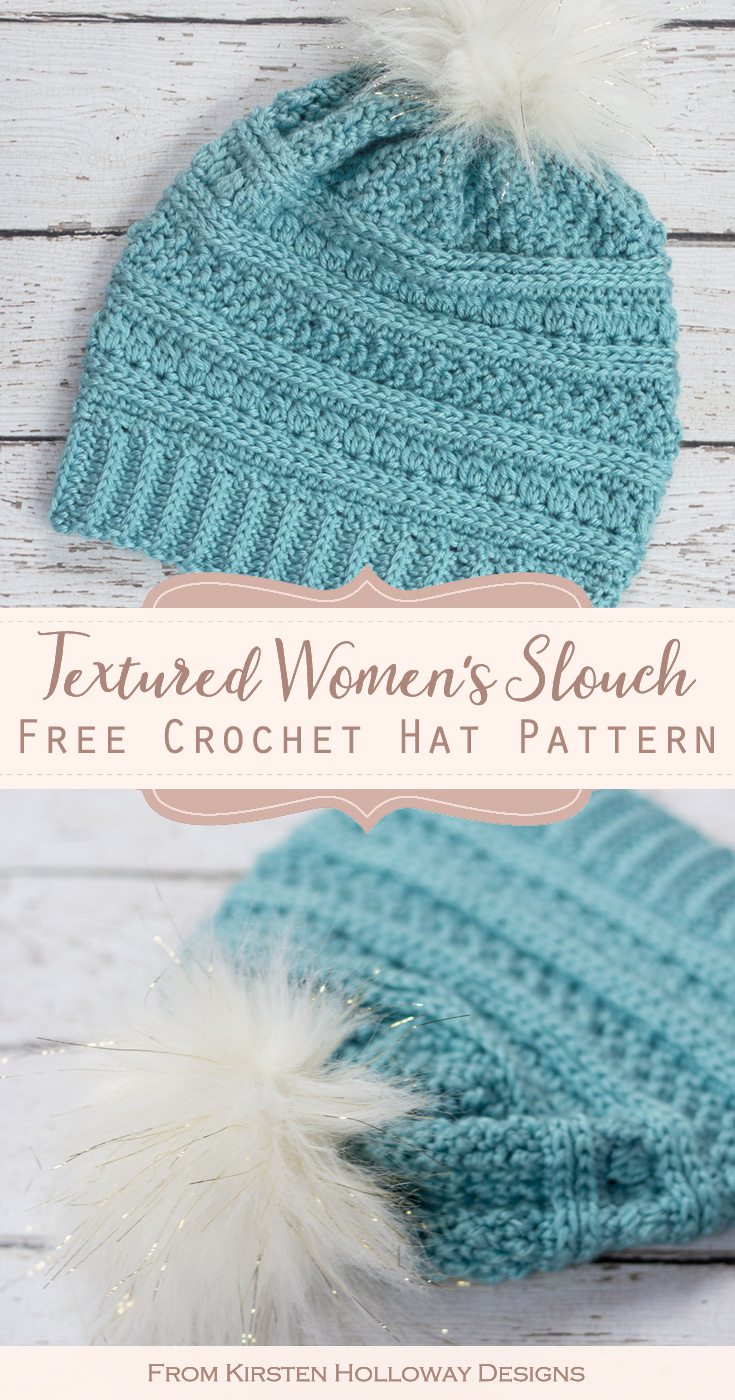
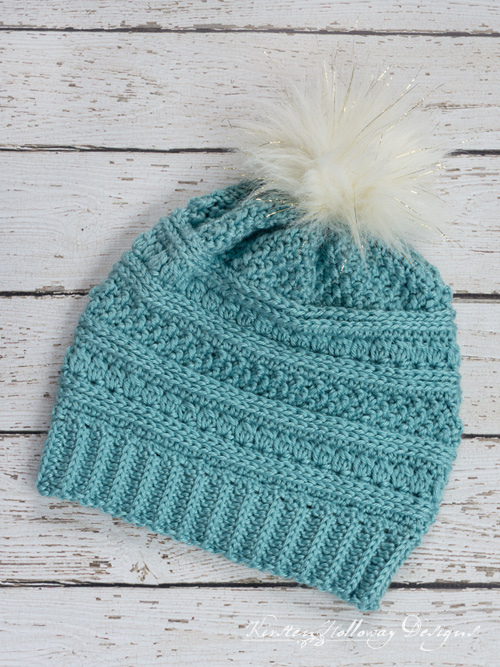
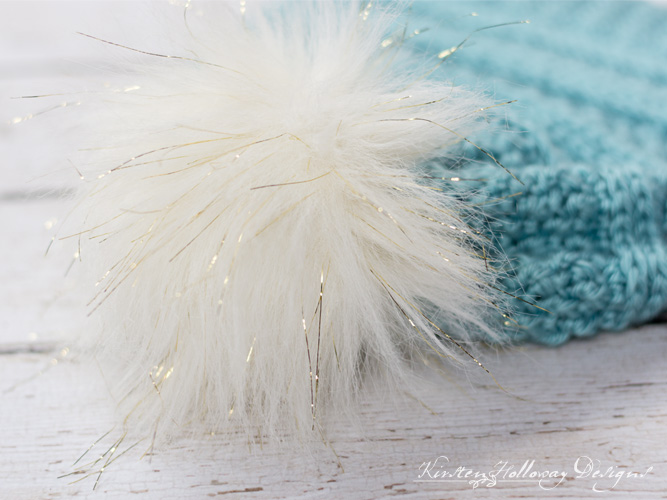
I also made a plain version using Red Heart Soft in “Seafoam” that is more my taste, and topped it with a faux fur pom-pom fit for the holidays (it has strands of gold tinsel in it!). The solid color and thicker yarn show off the texture as a whole in this version.
Ready to make your own? Pick a yarn and let’s get started!
Disclaimer: This post contains affiliate links. When you purchase something using these links a small amount of the sales price goes to me to help keep this site, and the patterns on it free. You do not pay any extra for the item you purchase.
Difficulty:
Easy
Materials Needed:
4mm (G) hook, or hook needed to obtain gauge – band
5mm (H) hook, or hook needed to obtain gauge – hat body
250-260 yards Red Heart Soft in “Seafoam”, or, 250 yards Red Heart Unforgettable in color of your choice
1/4 yd Fashion Faux Fur Fabric – Ivory Gold Metallic
Heavy-duty button thread
Sharp, heavy duty sewing needle
Golf-ball sized piece of polyester stuffing
Large pom-pom maker (optional)
Stitches Used:
ch/chs = chain/chains
sl st = slip stitch
sc = single crochet
hdc = half double crochet
FPdc = Front Post double crochet
Additional Terms:
3dc cluster= = YO, insert hook into stitch, pull up a loop, YO, draw through 2 loops (1st stitch of cluster made), YO, insert hook into same st, pull up a loop, YO draw through 2 loops (2nd st of cluster made), YO, insert hook into same st, pull up a loop, YO, draw through 2 loops (3rd st of cluster made), YO, draw through all loops on hook.
hdc in the 3rd loop = Look at the top of the stitch, and locate the sideways “V”, bend the stitch to look at the back*, and you should see another “V”. You’ll be working into the back loop of that “V”, this is called the 3rd loop. *For this hat band the textured portion created by working hdc in the 3rd loop should always be facing you when beginning a new row. When working on the hat body the 3rd loop will be facing away from you.
st/sts = stitch/stitches
prev = previous
Gauge:
With Red Heart Soft: 15 hdc in 4″ for hat body
With Unforgettable: 16 hdc in 4″ for hat body
Measurements:
With Red Heart Soft: 10 3/4″ at widest point x 10″ 1/2″ tall, excluding pom-pom
With Unforgettable: 10 1/2″ at widest point x 9 1/2″ tall
Additional Notes:
Ch-1 at beginning of a row does not count as a stitch.
Ch-2 at beginning of row does count as a stitch.
Serendipity Slouch Hat Pattern (US Terms):
Click here to purchase an ad-free, print-optimized PDF of this pattern on LoveCrafts
OR
Pick up the printable version of this pattern on Etsy instead
Hat band:
Using 4mm (G) hook,
Row 1: Leaving a 10″ tail, ch 11, hdc in 3rd ch from hook (skipped sts count as first hdc), hdc in each st across. (10)
Rows 2-60: ch 2* (counts as first hdc), turn, working in 3rd loop of hdc from prev row, hdc in each st across. *Remember to skip the very first stitch of the row each time. (10)
The band should measure 20” long and wrap comfortably around your head at this point. If it seems too big you are welcome to leave off some of the final rows, but be sure to adjust your stitches in round 1 below to maintain the same stitch count as the pattern calls for.
Drop working yarn, but do not fasten off.
Sew ends of band together with 10” tail left over from row 1.
Hat body:
Pick up working yarn,
Using 5mm (H) hook, crochet this next section along the side of the band:
Round 1: ch 1, 2 hdc in first hdc, hdc in each of the next 2 hdc sts, *2 hdc in next hdc, hdc in next 2 hdc sts; repeat from * around, join with sl st to first hdc. (80 hdc)
Round 2: ch 1, working in 3rd loop of hdc, hdc in each st around, join with sl st to first hdc. (80 hdc)
Round 3: ch 1, working in 3rd loop of hdc, sc in each st around, join with sl st to first sc. (80 sc)
Round 4: ch 1, 3 dc cluster in first st, ch 1, sk st, *3 dc cluster in next st, ch 1, sk st; repeat from * around, join with sl st to first 3dc cluster. (40 3dc clusters, 40 chains)
Round 5: ch 1, hdc in each cluster and ch-1 sp around, join with sl st to first hdc. (80 hdc)
Round 6: ch 1, working in 3rd loop of hdc, hdc in each st around, join with sl st to first hdc. (80 hdc)
Round 7: ch 1, working in 3rd loop of hdc, sc in each st around, join with sl st to first sc. (80 sc)
Round 8: ch 1, FPdc around first st, sc in next, *FPdc around next st, sc in next st; repeat from * around, join with sl st to first FPdc. (40 FPdc, 40 sc)
Round 9: ch 1, *sc in FPdc, FPdc around sc; repeat from * around, join with sl st to first sc. (40 sc, 40 FPdc)
Round 10: ch 1, FPdc around sc, sc in FPdc; repeat from * around, join with sl st to first FPdc. (40 FPdc, 40 sc)
Round 11: ch 1, hdc in each st around, join with sl st to first hdc. (80)
Round 12: ch 1, working in 3rd loop of hdc, hdc in each st around, join with sl st to first hdc. (80 hdc)
Round 13: ch 1, working in 3rd loop of hdc, sc in each st around, join with sl st to first sc. (80 sc)
Round 14: ch 1, 3-dc cluster in first st, ch 1, sk st, *3-dc cluster in next st, ch 1, sk st; repeat from * around, join with sl st to first 3-dc cluster. (40 3-dc clusters, 40 chains)
Round 15: ch 1, hdc in each cluster and ch-1 sp around, join with sl st to first hdc. (80 hdc)
Round 16: ch 1, working in 3rd loop of hdc, hdc in each st around, join with sl st to first hdc. (80 hdc)
Round 17: ch 1, working in 3rd loop of hdc, sc in each st around, join with sl st to first sc. (80 sc)
Round 18: ch 1, FPdc around first st, sc in next, *FPdc around next st, sc in next st; repeat from * around, join with sl st to first FPdc. (40 FPdc, 40 sc)
Round 19: ch 1, *sc in FPdc, FPdc around sc; repeat from * around, join with sl st to first sc. (40 sc, 40 FPdc)
Round 20: ch 1, FPdc around sc, sc in FPdc; repeat from * around, join with sl st to first FPdc. (40 FPdc, 40 sc)
Repeat rounds 19 and 20 3 more times, then begin decrease rounds.
Decreases:
Round 1: ch 1, sc in each dc around skipping the sc sts, join with sl st to first sc (40)
Round 2: ch 1, sc in every other sc from prev round, join with sl st to first sc. (20)
Fasten off, weave in ends.
You should have a large, round, tapered tube at this point. Turn it inside out to complete the next part.
Cut 18” length of yarn and string half-way through large-eyed yarn needle. Go through every other stitch all the way around the top of the hat, and then cinch it closed. Knot the ends together securely with a square knot. Weave in ends.
Turn hat right-side out again.
Create a pompom from a 7″ circle of the Fashion Faux Fur Fabric. This particular fabric is lighter weight than some of the other faux furs I work with, so I had to start with a larger circle than normal to achieve the same luxurious feel.
Pom-Pom Tutorial Instructions:
1. Trace a circle around a small/medium-size bowl or lid using a pencil, on the back side of the fabric. My circle was 7″ across.
2. Cut out the circle. Only cut the fabric backing–not the fur itself! I recommend an Exact-o or similar craft knife.
3. With your needle and thread, sew a loose running stitch near the edge of the circle
4. Take a small, golf-ball-sized amount of polyester stuffing and put it in the middle of the circle.
5. Tug on the ends of the thread to cinch the circle into a ball. It should be snug so the fiber fill doesn’t come out.
6. Tie off securely, and then sew the pom-pom to your beanie.

Want more gorgeous crochet patterns, and a little encouragement for your day? Sign up for my newsletter here! That way you’ll never miss out on special events, or freebies I’m offering.
JOIN ME ON SOCIAL MEDIA
I would love to see a picture when you’re done, so please feel free to come by my Facebook group and show off your project! Be sure to tag @kirstenhollowaydesigns when you share pictures of your finished scarf on Instagram, and use #serendipityslouchhat!
You can also follow me on Facebook, Pinterest, Instagram, and Ravelry for more beautiful crochet patterns.
PATTERN TERMS AND CONDITIONS:
You are welcome to share the link to this pattern, using one image of your choice, on your site, but please do not share the written patterns themselves, this includes my Ravelry downloads or translations of these patterns, or use additional images. You do not have permission to use my images by themselves to create pinnable graphics for Pinterest, however they may be included in a roundup pin if there are 4 or more other patterns. If you sell finished items online, please do not use my pictures for your listings. I’m positive that your work is of high enough quality for you to sell the finished piece. Have confidence in your abilities! <3 Thank you!
This pattern was made to be used by individuals, and small business crocheters alike. Selling your finished pieces in boutiques, at farmer’s markets, craft shows, and other local events is encouraged! Please credit/link Kirsten Holloway Designs when selling finished products online. The only thing I require is that this pattern not be used commercially to produce hundreds of thousands of copies.
If you enjoyed this pattern or found it useful, why not share a link to this post with your friends?


My band has a gap where I’m crocheting the next round into the chain two space of the band? Is that normal? And am I supposed to be crocheting in the back loop or through the full stitch for the band?
When working the hat body along the band I usually work through only a small portion of the chain to minimize the gap. If it really is noticeable or bugs you, it’s possible to take a long piece of yarn and loosely stitch the gaps shut. 🙂
Hi!!! Im Making This parte en. But have trouble on row 2 of decreases
Don’t understand how to get the 20 sts
Thanks for the help
You will sc in every other stitch meaning you will *skip a stitch and then sc in the next stitch; all the way around. This will reduce your stitch count from 40 down to 20. 😊 I hope that helps!
Hello… I have a problem with row 5. Hdc in each cluster… in the middle? And i don’t understand the sp around… can you help me?
A 3dc cluster is not the same as 3 separate dc stitches worked in the same stitch. It should have only 1 stitch at the top to work into. 😊
I’m very new at this. I’m losing the look of row 3 in the body “knitted look” when I begin row 4. What am I doing wrong? I’ve restarted several times and I don’t have the look in the pattern as you have in the picture. I’m lost.
Are you having trouble with working in the 3rd loop of the hdc in round 3, or making cluster stitches in round 4?
I was having problems with the 3rd loop of the hdc. I have figured it out! Thank you!
I’m glad you have it figured out now. 😊
Is the body of the hat wider than the band? I’ve taken it out twice now and gone back to see if I missed something and it still is larger than the band.
Thanks
Yes it is. You will be increasing your stitch count for the body of the hat. 🙂
Hi, just making sure I understand correctly, there will be 26 ows total before I start decreasing?
Yes, that should be correct. It does not start decreasing until the very end, then you’ll cinch it the rest of the way shut with a piece of yarn. 🙂
Hi! I LOVE the hat. I’m just stuck between rounds 7 and 8. How do I do the fpdc in the single crochet? Am I missing something? Thank you! I’m pretty new at this!
Hi Tracey,
You will complete the FPdc around a sc stitch in the same way you would around a dc or hdc stitch. The post of a sc stitch is much shorter, but it is still possible to work post stitches around them. 🙂 If you get stuck, you can do a YouTube search for how to FPdc around a sc stitch. Good luck!
This is the video I found… It really helped, I couldn’t figure out what stitch to single crochet in after the fpdc…
https://youtu.be/MsnuQpsp6oQ
Hi Kirsten! This is the only way that I can figure out how to contact you. I was on your Facebook page – Kirsten’s Crochet Studio. (found you when looking at Yarnutopia’s page. Your picture contains a beautiful cowl, a pink earflap hat and a gorgeous scarf. So I headed here – your website hoping to find those patterns. I found a similar cowl pattern which I hope to make soon. My main goal was to find the pink hat hoping to make it into a big kid size for myself 🙂 I can’t seem to find it anywhere! Can you please point me in the correct direction. Your patterns are so detailed which is important to me. I love textures and mixing stitches together to make something unique yet beautiful. You do a great job at this xx Have a wonderful day!
Hi Tina,
I’m so glad you found me! That pink earflap hat is the La Vie en Rose Hat, and it comes in 6 sizes (including one for adults): https://kirstenhollowaydesigns.com/2016/11/la-vie-en-rose-baby-hat-3-6-months.html
Have fun making it!
Love the pattern. This hat is super cute. Just thought you should know that roe 19 and 20 are merged together here. And I think the repeat should be rows 19&20 3more times
Fixed! Thank you for letting me know about the typo!