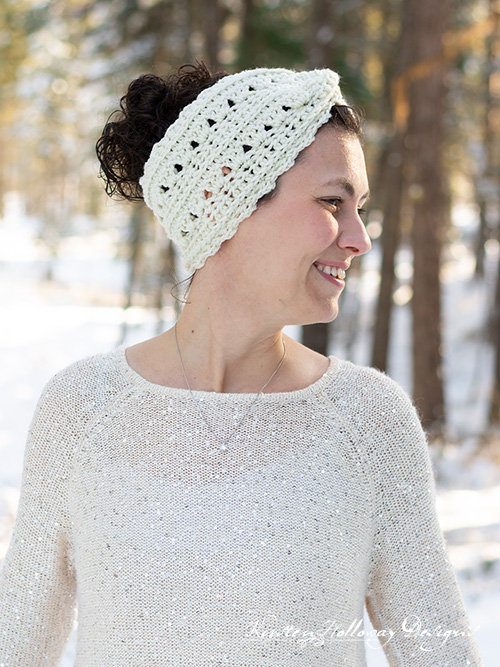
This pretty ear warmer with an X-twist is a quick 1-hour project that will keep your head warm this winter. This headband is so easy to make, and it’s simple to adjust to fit women and older kids/teens. Find the free crochet pattern instructions below, or purchase a print-optimized, ad-free PDF by clicking here.
Click here to add this pattern to your Ravelry queue!
This year for Christmas I was looking for something quick and easy to crochet for a few last-minute gifts for some family members. I was pleasantly surprised when I was able to crochet this headband up in about 1 hour! Since it was such as fast project I was able to finish several before family arrived for Christmas dinner. The best thing about this crochet project was that they absolutely loved the ear warmers!
How to crochet an easy X-Twist headband
If you are familiar with my Primrose & Proper stitch pattern this will be a super easy headband to master. The most complex part will be creating the twist, but even that is really quite simple. You will essentially be creating two U shapes with the ends of your rectangle and then interlocking them before sewing them together. I have some more detailed instructions with a short picture tutorial further down in the pattern.

I used Red Heart With Love or this crochet pattern because acrylic yarn is easy to care for. This yarn is soft and warm too, so it lends itself well to winter accessories. The ear warmer only takes a small amount of this yarn–about 70-75 yards–so it makes a great stash-busting project! You can use the Aran color shown in the pictures or you can use a different hue. I’ve made it in 4 different colors so far and they all look beautiful!
Disclaimer: This post contains affiliate links. When you purchase something using these links a small percentage of the sales price goes to me. However, you do not pay any extra for the item you purchase.
Difficulty:
Advanced Beginner/Easy
Materials needed:
5.5mm (I) hook, or hook needed to obtain gauge
70-75 yards of Red Heart Super Saver or Red Heart With Love in “Aran”
Yarn needle
Scissors
Stitches used:
ch = chain
sl st = slip stitch
sc = single crochet
hdc = half double crochet
dc = double crochet
Additional terms:
Working in the 3rd Loop of hdc – Instructions: Look at the top of the stitch, and locate the sideways “V”, bend the stitch to look at the back and you should see another “V” made by the “yarn over”. You’ll be working into the back loop of that “V”. This is called the 3rd loop. When you are working in rows, this 3rd loop will be facing you after you turn!
sp/sps = space/spaces
st/sts = stitch/stitches
prev = previous
sk = skip
Gauge:
14 hdc in 4”
Measurements:
4 1/2” wide (without ruffle), 5 1/4″ (with ruffle) by,
Small/med = 19” in circumference after completion (fits heads 20”-22”)
Large/X-large = 21” in circumference after completion (fits heads 23”-24”)
Additional Notes:
-Ch-1 does not count as a stitch. Ch-2 and ch-3 do count as stitches.
-You may substitute a real hdc or dc in place of the ch-2 or ch-3 if you prefer. Simply chain 1 to turn in that instance.
This pattern is worked in multiples of 3 +1. Other starting chain numbers that will work are 70, 64, and 61.
Primrose and Proper Twisted Headband Ear Warmer pattern (US Terms):
Click here to purchase an ad-free, print-optimized PDF of this pattern on LoveCrafts
Ch (67, [73]),
Row 1: hdc in 3rd ch from hook (skipped chains count as first hdc), hdc in each st across, ch 2 (counts as first hdc of next row), turn. (66 [72])
Row 2: working in 3rd loop of hdc, hdc in each st across, ch 2 (counts as first hdc of next row), turn. Note: final hdc of row will be worked in top of ch-2 from prev row. (66 [72])
Row 3: (sc, ch 2, sc) in next st, *sk 2 sts, (sc, ch 2, sc) in next st; repeat from * across, hdc in top of ch-2 from prev row, ch 3 (counts as first dc of next row), turn. (22 [24] bumps)
Row 4: 2 dc in first ch-2 sp, *3 dc in next ch-2 sp; repeat from * across, 2 dc in final ch-2 sp, dc in top of ch-2 from prev row, ch 2, turn (counts as first hdc of next row). (66 [72])
Row 5: hdc in each st across, ch 2 (counts as first hdc of next row), turn. (66 [73])
Row 6: working in 3rd loop of hdc, hdc in each st across, ch 2 (counts as first hdc of next row), turn. Note: final hdc of row will be worked in top of ch-2 from prev row. (66 [72])
Repeat rows 3-5, ch-1, turn at the end of row 5,
Row 10: working in 3rd loop of hdc, sc in each st across, ch 1, turn. (66 [72])
The next part is optional, but so very cute! Only add these next two rows if you want a bumpy edge like the Primrose & Proper scarf and cowl have. Omit the “ch-1, turn” at the end of row 10 if you do not wish to add this edging:
Row 11: sl st in first st, (sc, ch 2, sc) in next st, *sk 2 sts, (sc, ch 2, sc) in next st; repeat from * across, sl st into final st of row
Fasten off, leaving 10” tail for sewing the ends together.
Row 12: attach yarn to row 1 on other side of headband, sk st st, (sc, ch 2, sc) in next st, *sk 2 sts, (sc, ch 2, sc) in next st; repeat from * across, sl st into final st of row.
Fasten off, and weave in end.
Assembling your headband:
1. Lay your headband flat, right side (with the texture) facing up, so it is a tall, skinny “I”-shaped rectangle.
2. Fold the “I” in half (bringing the bottom up to the top) so your top and bottom ends line up You will be looking at the “wrong side” of the headband.
3. Fold the end of the band that you brought up to the top in half sideways creating a U. The ridge at row 5 will be your mid-way point. The sideways U should wrap around the right side of the piece.

4. Next, fold the left side of your piece in half, using the ridge at row 5 as a mid-way point. You will now have 2 interlocking sideways U shapes.

5. Use the 10″ tail to sew the ends together securely.

6. Flip your band right-side out so the pretty texture shows. ![]()
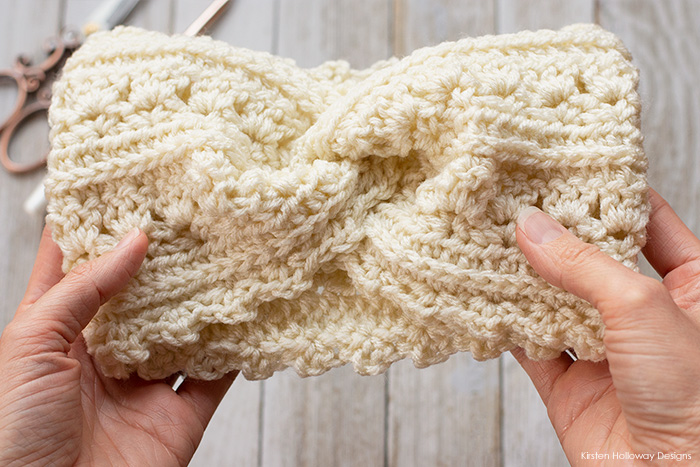
Ta-da! Less than an hour and you’ve got a stylish present for yourself or someone special.
JOIN ME ON SOCIAL MEDIA
I would love to see a picture when you’re done, so please feel free to come by my Facebook group and show off your project! Be sure to tag @kirstenhollowaydesigns when you share pictures of your finished headband on Instagram–I’d love to see what you made!
You can also follow me on Facebook, Pinterest, Instagram, and Ravelry for more beautiful crochet patterns.
PATTERN TERMS AND CONDITIONS:
You are welcome to share the link to this pattern, using one image of your choice, on your site, but please do not share the written patterns themselves, this includes my Ravelry downloads or translations of these patterns, or use additional images. You do not have permission to use my images by themselves to create pinnable graphics for Pinterest, however they may be included in a roundup pin if there are 4 or more other patterns. If you sell finished items online, please do not use my pictures for your listings. I’m positive that your work is of high enough quality for you to sell the finished piece. Have confidence in your abilities! <3 Thank you!


Thank you so much for your pattern. I love how you explain and you put your pictures. I was browsing through Pinterest and I found this pattern. I love it it’s beautiful. Can’t wait to do different colors. I’m in bed rest so I wanted something to do. I just finished it and I’m going to take the same pattern and do a scarf.
Thank you so much.
Just made one! I used navy blue charisma by loops and threads and I used the Large/XL. It came out perfect. I made it as a Christmas gift for my stepmom. I plan to make more for stocking stuffers for other people! Also this was a fast little project it onlh took about an hour to finish! Love it!
This pattern is beautiful! Enjoyed crocheting it!
Loved making this! It came out beautifully. I’m going to use a lighter cotton yarn to make one for summer. Super cute, thanks for sharing!
You’re welcome, Colleen! I’m glad you like your new headband!
I tried to follow pattern- I used red heart yarn, and an “I” crochet hook. It came out pretty small- it fits my 1 year old 🫤 what did I do wrong? Maybe I didn’t understand some of it.
I’m sorry the headband turned out so small. Your tension may be quite a bit tighter than mine. Did you do a gauge check? Making sure you meet gauge is the best thing I can recommend when making wearable items. 😅 I hope that helps!
I loosened my tension, and added some stitches and it worked. Thank you!
Wonderful! I’m glad to hear that!
This worked up quickly and beautifully. Thank you so very much for a wonderful pattern!
The only think I did differently was on the last row, I did hdc across instead of the sc across. It just seemed a but more balancedto me
I’m glad you enjoyed the headband pattern, Elizabeth!
can this be adjusted for a little girl?
You might try using a #3 yarn and go down a hook size to see if it works. 😊
Would this be easy to make with 2 different colors of yarn, in a 3-stripe pattern? Like, if I wanted it to go from color A, to color B, back to color A when going from the top to the bottom? Could I easily just change yarns between some of the rows? Or would there not be a good way to do that because of the textures being made?
Hi Selina,
You could make it with different colors, but using a lot of different colors will hide the texture, so I recommend that you stick to one color. You could always make 3 different headbands! 😀
Good Morning, while I slept I figured out what I had done. Thanks for listening.
You’re welcome! I’m glad you got it figured out!
Hi there, I love you pattern but I have questions. After I finish the sc,ch 2,sc, I get the 22 ch.2 humps and then I do the dc as directed but I only end up with 56 sc on the next row rather than 66. I am perplexed. Can you help me?
Hi Barbara,
Each ch-2 sp, except the first and last one, should get 3 dc worked into it. This should make your final count come up as 66: 22×3=66. I hope that helps!
Nice pattern just finished it. Thank you!
You’re welcome! I’m glad you liked crocheting the headband, Sandra! 😀
I love this. Thank you.
Laura
You’re welcome, Laura! I’m glad you enjoy the headband pattern!
I was just getting caught up with the Primrose and Proper Collection when I saw this today!
Another piece to add! YAY!!
I’m currently working on the blanket, shawl is next and I’ve completed all the other pieces. LOL!
Love this pattern.
Thanks again for sharing!
You’re welcome, Karen! I’m glad the headband pattern was a happy surprise! 😊