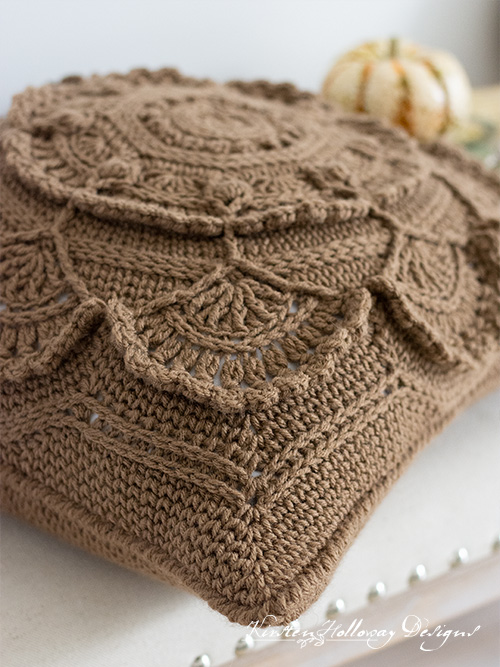
This ornate, decorative fall pillow has beautiful swirls and ornaments that make this crochet pattern a design you’ll want to make to celebrate the arrival of cold weather. This free crochet pattern features lots of textured stitches to give it its “knit” look.
Click here to add this pattern to your Ravelry queue!
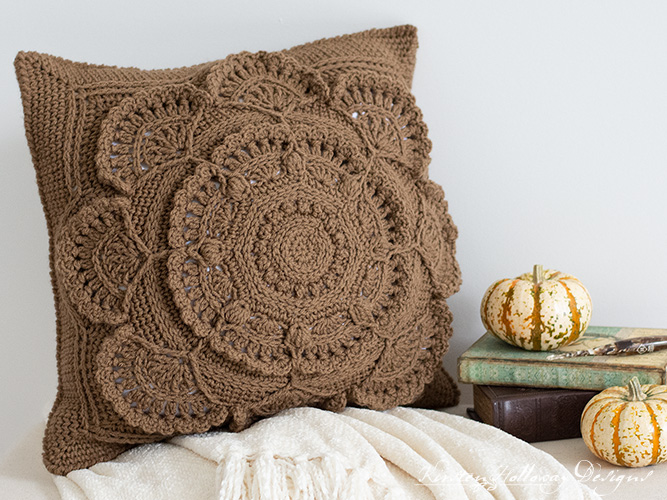
When Yarnspirations sent me some of their new O’Go yarn I knew based on the color that it had to be turned into a pillow for fall. I love how warm this color is. It reminds me of burlap, in a way, which is an essential part of fall decorating! There are several gorgeous fall hues to choose from in this line-up so if browns aren’t your thing add a splash of color to your living room with Gold, or make it in White for a winter wonderland feel.

This decorative throw pillow uses a bunch of different stitches! Clusters, bobbles, picot single crochets and shells–you will never get bored (and you might learn something new). This pillow gets its unique look from the waistcoat stitch (referred to as “center single crochet” in this pattern). I found that more crochet stitches could be worked into the center of the single crochet stitch than just another round of center single crochet though so look for hdc and reverse single crochet to be worked in that same spot to continue the knit look! (My best advice: don’t over-think these.)
I have included lots of notes throughout the pattern to help you out, but I’d still consider this an Intermediate to Advanced level pattern. Take the pattern one comma at a time and don’t be shy about using stitch markers to keep track of your progress.
Disclaimer: This post contains affiliate links. When you purchase something using these links a small percentage of the sales price goes to me. However, you do not pay any extra for the item you purchase.
Difficulty:
Intermediate/Advanced
Materials Needed:
- 5mm (H) hook, or hook needed to obtain gauge
- 675 yards #4 worsted weight O’Go Super Saver in Café Latte, Gold, or color of your choice
- Yarn needle
- Scissors
- 20″ x 20” pillowform <-these are filled with feathers, but you can get different ones filled with polyester stuffing instead
Stitches Used:
- ch = chain
- sl st = slip stitch
- sc = single crochet
- dc = double crochet
- FPdc = front post double crochet
- 2dc cluster = dc2tog in same st
- FPdc2tog = front post double crochet 2 together
Additional Terms:
- psc = picot single crochet – Instructions: insert hook, YO, draw up a loop, draw through 1 loop 3 times making a ch-3, YO, draw through both loops on hook. Pull your ch-3 sp towards the front of your work instead of pushing it toward the back.
- Shell = 5 dc in same st
- Bobble = dc5tog in same st
- BLO = back loop only
- Back bar of sc – Instructions: Look at the back of the stitch and locate the short bar that runs horizontal. Work all stitches for that section into this bar.
- Center sc = known as the “Waistcoat stitch”. Work a regular sc by inserting your hook in the center of the post, between the 2 vertical lines that the loop you draw up makes. Complete as you would a regular sc.
rsc = reverse single crochet (also called the crab stitch) - prev = previous
- st/sts = stitch/stitches
- sp/sps = space/spaces
Gauge:
5” across after round 9
Measurements:
18”x18” after blocking, or stretching over your pillowform
Additional Notes:
- ch 1 at beginning of round does not count as a stitch.
- watch the pattern carefully for instructions on where to insert your hook. Some stitches are worked as center single crochet, others are worked as regular single crochet, while still other sections are worked in the BLO, 3rd loop of a hdc, or even the back bar of a sc. Sometimes you will be switching back and forth between these sections in the same round.
- Stitches that instruct you to work in the center of a sc stitch are completed the same way they would be if you were working them in the normal place. The only thing that is changing is where you are inserting your hook.
- Stitch markers will be your friend on the last few rounds–even if you almost never use them (like me–I had to go out and buy a couple boxes just for this project).
- If you are new to working the center single crochet stitch (waistcoat stitch) you may need to go up a hook size or two. Relaxed tension is a must, or else your fabric will end up too thick and tight.
- It is important to use a pillowform that is 2″ larger than the finished size of your pillow. This will make your finished pillow look squeezable and inviting, not flat and worn out. I used these pillowforms and can’t quit hugging my pillow!
Arabesque 18-Inch Decorative Fall Pillow (US Terms):
Click here to purchase an ad-free, print-optimized PDF of this pattern on LoveCrafts
Front panel:
Round 1: 6 sc in magic circle, join with sl st to first sc. (6)
Round 2: ch 1, 2 center sc in each st around, join with sl st to first sc. (12)
Round 3: ch 1, 2 center sc in first st, center sc in next st, *2 center sc in next st, center sc in next st; repeat from * around, join with sl st to first sc. (18)
Round 4: ch 1, working in back bar of sc: 2 sc in first st, sc in next 2 sts, *2 sc in next st, sc in next 2 sts; repeat from * around, join with sl st to first sc. (24)
Round 5: ch 1, working in back bar of sc: 2 sc in first st, sc in next 2 sts, *2 sc in next st, sc in next 2 sts; repeat from * around, join with sl st to first sc. (32)
Round 6: ch 1, sc in first st, *psc in next st, sc in next st; repeat from * around, join with sl st to first sc. (32)
Round 7: ch 1, 2 sc in first st, sc in next 3 sts, *2 sc in next st, sc in next 3 sts; repeat from * around, join with sl st to first sc. (40)
Round 8: ch 1, working in back bar of sc: 2 sc in first st, sc in next 4 sts, *2 sc in next st, sc in next 4 sts; repeat from * around, join with sl st to first sc. (48)
Round 9: ch 1, working in back bar of sc: 2 sc in first st, sc in next 5 sts, *2 sc in next st, sc in next 7 sts; repeat from * around, join with sl st to first sc. (56)
Place st markers in both of the increase sts of each repeat you make in round 10. You will be working FPdc sts around them in round 12.
Round 10: ch 1, 2 center sc in first st (place stitch markers), center sc in next 6 sts, *2 center sc in next st (place stitch markers) center sc in next 6 sts; repeat from * around, join with sl st to first sc. (64)
Round 11: ch 1, sc in first st, *bobble in next st, sc in next st, sk 2 sts, shell in next st, sk 2 sts, sc in next st; repeat from * around, join with sl st to first sc. (8 shells, 8 bobbles, 16 sc)
The stitches you will be skipping in the next round are the sc stitches next to the bobbles. You will be working a FPdc to take their place.
Round 12: ch 1, FPdc around front half of first marked st in round 10, sk st, 2 sc in top of bobble, FPdc around front half of next marked st, sk st, working in BLO, sc in next 5 sts, *FPdc around front half of next marked stitch in round 10, sk st, 2 sc in top of bobble, FPdc around front half of next marked st, working in BLO, sc in next 5 sts; repeat from * around, join with sl st to first FPdc. (40 sc worked in BLO, 16 sc, 16 FPdc)
Round 13: ch 2, FPdc2tog placing first leg around first FPdc from prev round, sk 2 sts in current round, place second leg of FPdc2tog around next FPdc from prev round, ch 1, working in back bar of sc, [2dc cluster, ch 1] in each of next 5 sts, * FPdc2tog placing first leg around next FPdc from prev round, sk 2 sts in current round, place second leg of FPdc2tog around next FPdc from prev round, ch 1, working in back bar of sc, [2dc cluster, ch 1] across next 5 sts; repeat from * around, join with sl st to first FPdc2tog. (8 FPdc2tog, 40 2dc clusters)
Round 14: ch 1, *working behind FPdc2tog, hdc in the 2 sc sts above the bobble from round 12 (place stitch marker in 1st hdc to make it easier to find in round 16), ch 1, [BPsc around top part of 2dc cluster from prev round, ch 1] 5 times; repeat from * around, join with sl st to first hdc.(40 BPsc, 16 hdc, 48 ch-1 sps)
The following round will be worked in the ch-1 sps and top of the 2dc clusters that you made in round 13, you will completely skip the FPdc2tog sts. You will be working into round 14 after you complete round 15.
Round 15: sl st into first ch-1 sp from round 13, *[4 hdc in top of 2dc cluster, sl st in next ch-1 sp] 5 times, sk st, sl st into next ch-1 sp; repeat from * around, final sl st counts as join. (40 4-hdc shells)
You will now begin working in the stitches from round 14. Each BPsc, and ch-1 sp will get a stitch worked into it, while each pair of hdc sts will get a sc2tog worked across them. Your first hdc stitch may be a little hard to locate if you opted not to place the recommended stitch marker in round 14.
Round 16: ch 1, *sc2tog across next 2 hdc sts, [sc in ch-1 sp, sc in BPsc] 5 times, sc in ch-1 sp; repeat from * around, join with sl st to first sc. (96)
Round 17: ch 1, *FPdc around top of FPdc2tog from round 13, center sc in next 11 sts; repeat from * around, join with sl st to first FPdc. (96)
Round 18: ch 1, *sc in top of FPdc st, center sc in next 11 sts; repeat from * around, join with sl st to first sc. (96)
Round 19: ch 1, *FPdc around FPdc from round 18, center sc in next 11 sts; repeat from * around, join with sl st to first FPdc. (96)
Round 20: ch 1, *sc in top of FPdc, working in back bar of sc: sc in next 11 sts; repeat from * around, join with sl st to first sc. (96)
Round 21: ch 1, shell in first st, sk st, working in back bar of sc: sc in next 9 sts, sk st, *shell in next st, sk st, working in back bar of sc: sc in next 9 sts, sk st; repeat from * around, join with sl st to first dc of shell. (8 shells, 72 sc worked in back bar)
Round 22: ch 1, *FPtr around FPdc from round 19, work this sequence around the shell made in previous round: FPdc around first st, [dc in next st, FPdc around same st] 4 times, FPtr around FPdc from round 19, sk st, center sc in next 7 sts, sk st; repeat from * around, join with sl st to first FPtr. (16 FPtr, 56 center sc, 40 FPdc, 32 dc)
Round 23: ch 1, sk st, *working in BLO, 2 sc in next st, [sc in next 3 sts, 2 sc in next st] 2 times, sk 2 sts, center sc in next 5 sts, sk 2 sts; repeat from * around, join with sl st to first sc. (40 center sc, 96 sc)
Round 24: ch 1, *FPtr around FPtr from round 22, working in back bar of sc: 2dc cluster, [ch 1, 2dc cluster] across next 11 sts (12 2dc clusters made), FPtr around FPtr from round 22, sk st, center sc in next 3 sts, sk st; repeat from * around, join with sl st to first FPtr. (96 2dc clusters, 16 FPtr, 24 center sc)
Round 25: ch 1, sk st, *BPsc around top part of 2dc cluster from prev round, [ch 1, BPsc around top part of 2dc cluster from prev round] 11 times, sk 2 sts, center sc in next st, sk 2 sts; repeat from * around, join with sl st to first sc.
The following round will be worked primarily in the ch-1 sps and top of the 2dc clusters that you made in round 24. You will be working into round 25 after you complete round 26.
Round 26: ch 1, sl st into FPtr from round 24, *[4hdc in top of next 2dc cluster, sl st in ch-1 sp] 11 times, 4hdc in top of next 2dc cluster, sl st in top of FPtr, ch 1, center sc in next st, ch 1, sl st into top of FPtr; repeat from * around, final sl st counts as join. (96 4-hdc shells)
This next round will be worked primarily in the BPsc and ch-1 sps from round 25.
Round 27: ch 1, *working across back of large fan, sc in next 23 BPsc and ch-1 sps, sl st in sc st between petals; repeat from * around, final sl st counts as join. (184 sc)
Round 28: ch 2, sk st, *center sc in next 10 sts, (center sc, ch 1, center sc) in next st, center sc in next 10 sts, center sc2tog, center sc in next 21 sts, center sc2tog; repeat from * around, join with sl st to first center sc. (8 sc2tog, 172 sc)
In this next round you will be creating a sc2tog in the 2 sts on either side of the sc2tog you made in the last round completely skipping that stitch.
Round 29: ch 2, sk st, center sc in next 10 sts, *(center sc, ch 1, center sc) in ch-1 sp, center sc in next 10 sts, sc2tog skipping the sc2tog from prev round, center sc in next 19 sts, sc2tog skipping sc2tog from prev round; repeat from * around, join with sl st to first center sc. (164 sc, 8 sc2tog, 4 ch-1 sps)
The next round has you working hdc stitches in the center of the stitch just like you have been doing with your center sc sts. The hdc3tog is worked in the center of the stitches as well.
Round 30: ch 2, sk st, *hdc in center of next 10 sc, (hdc, ch 1, hdc) in ch-1 sp, hdc in center of next 10 sc, hdc3tog, center sc in next 17 sts, hdc3tog; repeat from * around, join with sl st to first hdc. (88 center hdc, 68 center sc, 8 hdc3tog, 4 ch-1 sps)
You may notice the spots where you are working your decrease stitches (between the petals) starting to pucker a little. These should flatten out at the end once you block the piece or put it over your pillow insert.
Round 31: ch 2, sk st, working in 3rd loop of hdc, *hdc in next 10 sts, (hdc, ch 1, hdc) in ch-1 sp, working in 3rd loop of hdc, hdc in next 10 sts, hdc3tog (3rd part of st will be worked in back bar of sc), working in back bar of sc, sc in next 7 sts, 2 sc in next st, sc in next 7 sts, hdc3tog (1st part will be worked in back bar of sc, 2nd and 3rd part will be worked in 3rd loop of hdc); repeat from * around, join with sl st to first hdc. (88 center hdc, 76 sc in back bar, 8 hdc3tog, 4 ch-1 sps)
Fasten off, weave in ends.
After you complete this round you will want to go back and place a stitch marker in each of the 18 sc sts in the 4 rounded sections. I recommend color coding these to make the next few rounds easier. The 8 sts at the top of the rounded section should be 1 color (mine are yellow), the 4 stitches on each side should alternate between 2 different colors. Make sure these colors match up on each side. These are going to help you keep your slip stitches across the backs of these sections straight.
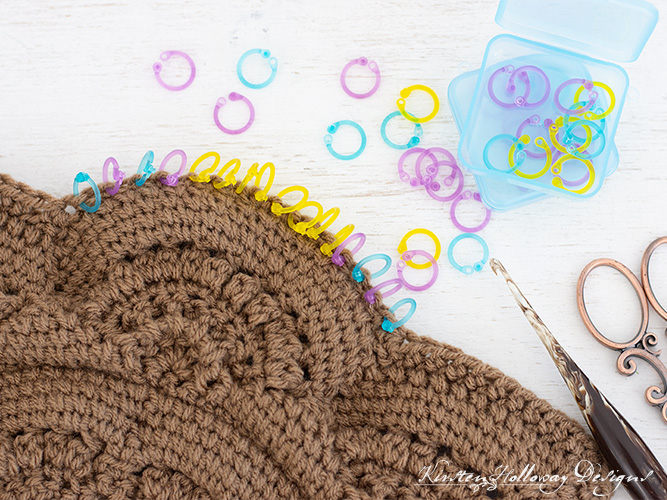
With the next round, we will start to sl st across the back of the fans that sit in the middle of each side. Going under the back half of a stitch keeps the slip stitches from being visible on the front of your work. While you should try to keep these lines of slip stitches as straight as you possibly can (since you will be doing 4 rounds of them), you just need to get to the other side of the fan. These will not be visible once the pillow cover is sewn together. Use loose tension, or go up a hook size or two if you need to. Here’s a picture of what this will look like after your first round:

Attach yarn to 3rd loop of hdc3tog (this will be the stitch just before where you fastened off),
Round 32: ch 1, *working in 3rd loop of hdc, 2 sc in first st, sc in next 11 sts, (sc, ch 1, sc) in ch-1 sp, working in 3rd loop of hdc, sc in next 11 sts, 2 sc in next st (this will be the top of the hdc3tog), sl st into back bar of next st, sl st in as straight a line as you can along back of petal between the two stitch markers, sl st into back bar of marked stitch; repeat from * around, join with sl st to first sc. (112 sc)
If you made it this far you’ve made it through the hardest part. For the next 3 rounds we are gradually reducing the number of sl sts as we build the corners.
Round 33: ch 1, *2 center sc in first st, center sc in next 13 sts, (sc, ch 1, sc) in ch-1 sp, center sc in next 13 sts, 2 center sc in next st, sl st into back bar of next sc st (note stitch marker color for this round), sl st in as straight a line as you can along back of petal between the two stitch markers, sl st into back bar of marked stitch; repeat from * around, join with sl st to first sc. (128 sc)
Round 34: ch 1, *2 center sc in first st, center sc in next 15 sts, (sc, ch 1, sc) in ch-1 sp, center sc in next 15 sts, 2 center sc in next st, sl st into back bar of next sc st (note stitch marker color for this round), sl st in as straight a line as you can along back of petal between the two stitch markers, sl st into back bar of marked stitch; repeat from * around, join with sl st to first sc. (144)
Round 35: ch 1, *2 center sc in first st, center sc in next 17 sts, (sc, ch 1, sc) in ch-1 sp, center sc in next 17 sts, 2 center sc in next st, sl st into back bar of next sc st (note stitch marker color for this round), sl st in as straight a line as you can along back of petal between the two stitch markers, sl st into back bar of marked stitch; repeat from * around, join with sl st to first sc. (160 sc)
In the next round we will stop making sl sts, we will work across the remaining sc at the top of the fan between your markers. If you opted not to use stitch markers and your stitch count is different from mine at this point that’s ok as long as each edge lays flat. You’ll want each side to have an equal number of stitches. (I had 8 sts at the top of each fan).
Round 36: ch 1, *center sc in next 20 sts, (sc, ch 1, sc in ch-1 sp), center sc in next 20 sts, working in back bar of sc, sc in next 8 sts; repeat from * around, join with sl st to first sc. (200)
Round 37: ch 1, center sc in next 21 sts, *(sc, ch 1, sc) in ch-1 sp, center sc in next 50 sts; repeat from * around omitting last 21 sts of final repeat. (208)
Back panel:
Relaxed tension and drawing up tall loops is a must in order to keep this panel from puckering badly. A small amount of pucker will be unavoidable, but if there is a lot you can switch to working regular sc instead of center sc stitches.
I wrote this section to perfectly match the front panel for easy joining. You may need to adjust how many rounds you crochet if you have a different stitch count in front. This square is worked in multiples of 8. All sc are to be worked as center sc. Your square should measure 6″ across after round 10, and 18″ across after round 26.
Round 1: [2 sc, ch 1] 4 times in magic circle, join with sl st to first sc. (8 sc, 4 ch-1 sps)
Round 2: ch 1, *center sc in next 2 sts, (sc, ch 1, sc) in ch-1 sp; repeat from around, join with sl st to first sc. 16 sc, 4 ch-1 sps)
Round 3: ch 1, center sc in next 3 sts, *(sc, ch 1, sc) in ch-1 sp, center sc in next 4 sts; repeat from * around, omitting last 3 sc in final repeat. (24 sc, 4 ch-1 sps)
Rounds 4-26: ch 1, *center sc in each st to ch-1 sp, (sc, ch 1, sc) in ch-1 sp; rep from * around, center sc to first st, join with sl st to first sc.
| Round | Total sc around | Sc between corners | Round | Total sc around | Sc between corners | Round | Total sc around | Sc between corners |
| 1 | 8 | 2 | 11 | 88 | 22 | 21 | 168 | 42 |
| 2 | 16 | 4 | 12 | 96 | 24 | 22 | 176 | 44 |
| 3 | 24 | 6 | 13 | 104 | 26 | 23 | 184 | 46 |
| 4 | 32 | 8 | 14 | 112 | 28 | 24 | 192 | 48 |
| 5 | 40 | 10 | 15 | 120 | 30 | 25 | 200 | 50 |
| 6 | 48 | 12 | 16 | 128 | 32 | 26 | 208 | 52 |
| 7 | 56 | 14 | 17 | 136 | 34 | |||
| 8 | 64 | 16 | 18 | 144 | 36 | |||
| 9 | 72 | 18 | 19 | 152 | 38 | |||
| 10 | 80 | 20 | 20 | 160 | 40 |
Fasten off, weave in ends.

Sewing your pillow together:
Place squares on table with right sides facing out.
Attach yarn to ch-1 sp in corner with front of pillow facing you,
Working around 3 sides of pillow cover, rsc through both squares to join (work this stitch in the center of your sc stitches so that it blends with the rest of the pillow), work 1 rsc in corner ch-sps as well. This will give the corners a slightly rounded look.
Insert pillow form.
rsc across final side.
Fasten off, and weave in ends.
Want more gorgeous crochet patterns, and a little encouragement for your day? Sign up for my newsletter here! That way you’ll never miss out on special events, or freebies I’m offering.
JOIN ME ON SOCIAL MEDIA
I would love to see a picture when you’re done, so please feel free to come by my Facebook group and show off your finished project! Be sure to tag @kirstenhollowaydesigns when you share pictures of your pillow on Instagram!
You can also follow me on Facebook, Pinterest, Instagram, and Ravelry for more beautiful crochet patterns.
PATTERN TERMS AND CONDITIONS:
You are welcome to share the link to this pattern, using one image of your choice, on your site, but please do not share the written patterns themselves, this includes my Ravelry downloads or translations of these patterns, or use additional images. You do not have permission to use my images by themselves to create pinnable graphics for Pinterest, however they may be included in a roundup pin if there are 4 or more other patterns. If you sell finished items online, please do not use my pictures for your listings. I’m positive that your work is of high enough quality for you to sell the finished piece. Have confidence in your abilities! <3 Thank you!
This pattern was made to be used by individuals, and small business crocheters alike. Selling your finished pieces in boutiques, at farmer’s markets, craft shows, and other local events is encouraged! Please credit/link Kirsten Holloway Designs when selling finished products online. The only thing I require is that this pattern not be used commercially to produce hundreds of thousands of copies.
If you enjoyed this pattern or found it useful, why not share a link to this post with your friends?