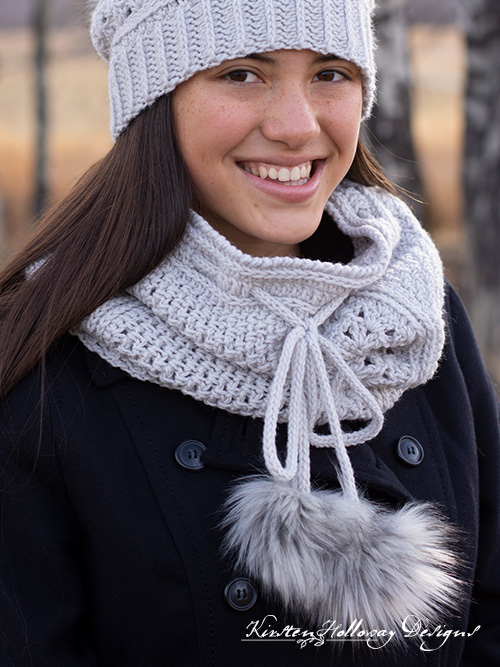
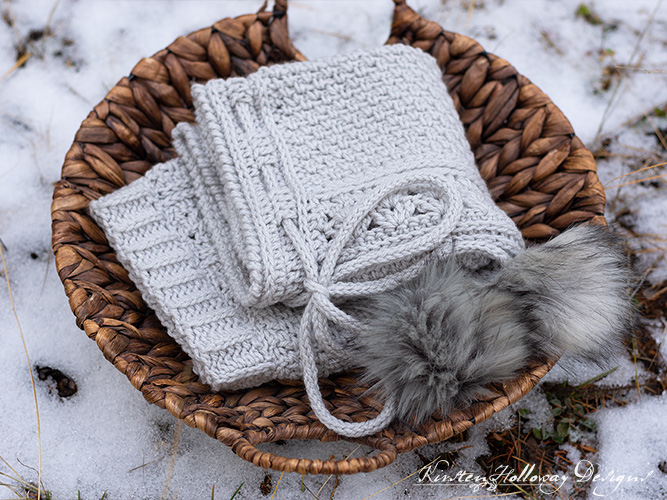
This luxurious and modern cowl features easy stitches and an I-cord pom-pom tie! It comes in a wide variety of sizing options so you can make it for any of the women or girls in your family. Find the free crochet pattern instructions below, or purchase a print-optimized, ad-free PDF by clicking here.
Click here to add this to your Ravelry queue!
Looking for the matching hat pattern? Find it over here.
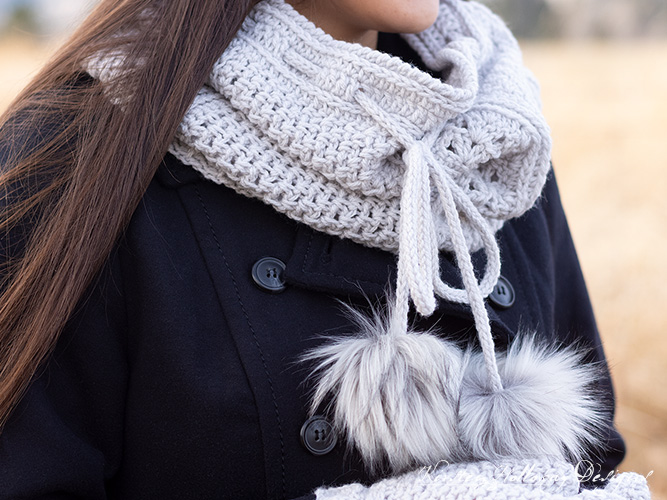
The Misty Hollow cowl is part 2 of the collaborative effort between American Crochet and myself. This elegant winter cowl pattern uses baby yarn for softness and gorgeous drape. Faux fur pom-poms add a rich feeling of warmth and winter style! The free crochet pattern comes in 5 sizes with 3 different height options each so you can customize this cowl to fit almost all your needs! The 18″ high version might even be able to double as a snood.
Despite the complex look of this design it uses simple crochet stitches. The main part of the cowl is worked sideways and features the Granite stitch (also known as the Moss stitch or Seed stitch), and split shells for some lacy texture. Top and bottom bands are added afterwards to give it a finished look.
Baby yarn is one of my favorites to use on accessories because it has lots of drape and looks professional when crocheted up. It does take a little longer to crochet these kinds of patterns but the end result is completely worth it. I used Bernat baby Sport to crochet this set and it comes in several neutral colors, like this “Baby Grey” that are great for teens and adults.
Disclaimer: This post contains affiliate links. When you purchase something using these links a small percentage of the sales price goes to me. However, you do not pay any extra for the item you purchase.
Difficulty:
Easy/Intermediate
Materials Needed:
350, 490, 520, 560, 600 yds yds #3 light weight Bernat Baby Sport in Baby Grey (all yardages are based on 15” tall cowl, except child size which is based on 12” tall cowl)
5mm (H) hook, or hook needed to obtain gauge (body)
4mm (G) hook (top and bottom band)
3.25mm (D) hook (I-cord)
Scissors
Measuring stick or measuring tape
Yarn needle
¼ yard Fashion Faux Fox Fur in “Silver” for pom-poms
2 Golf-ball size pieces of polyester stuffing
Sewing needle
Heavy-duty button thread
Stitches Used:
ch = chain
sl st = slip stitch
sc = single crochet
hdc = half double crochet
dc = double crochet
rsc = reverse single crochet (crab stitch)
Additional Terms:
hdc in the 3rd loop = Look at the top of the stitch, and locate the sideways “V”, bend the stitch to look at the back*, and you should see another “V”. You’ll be working into the back loop of that “V”, this is called the 3rd loop. *When working in rows this 3rd loop will be facing you. Click the link for a picture tutorial.
st/sts = stitch/stitches
sp/sps = space/spaces
sk = skip
prev = previous
Gauge:
14 hdc in 4”
8 rows of granite stitch gives 2” of height.
Measurements:
12 (15”, 18”) tall by:
(Measured by width of bottom band):
24” cowl (Child)
26” cowl (Teen/X-Small Adult)
28” cowl (Small/Medium Adult)
30” cowl (Large/X-Large Adult)
32” cowl (2X-Large Adult)
Additional Notes:
- Ch-1 at beginning of row only counts as a stitch in the granite stitch section.
- This cowl can be made in 3 different heights. Model is wearing a 28” cowl that is 15” tall.
- New hdc rows can be started using a chainless starting method.
- This cowl is worked sideways and will look like a scarf before you sew the ends together.
Misty Hollow Cowl Pattern (US Terms):
Click here to purchase an ad-free, print-optimized PDF of this pattern on LoveCrafts
Row 1 (RS): Ch 36, (48, 60),
hdc in second ch from hook, hdc in each remaining ch. (35, [47, 59])
Fasten off.
With right side facing, attach yarn to 3rd loop of hdc at opposite end of where you fastened off,
Row 2 (RS): working in 3rd loop of hdc, hdc in each st across, ch 1, turn. (35, [47, 59])
Row 3 (WS): working in 3rd loop of hdc, sc in each st across, ch 3 (counts as first dc of next row), turn. (35, [47, 59])
Row 4 (RS): sk 2 sts, 4 dc in next st, *sk 3 sts, 4 dc in next st; repeat from * across, sk 2 sts, dc in final st of row, ch 3 (counts as first dc of next row), turn. (8, [11, 14] shells, 2 dc)
Row 5 (WS): sk 2 sts, 4 dc between 2nd and 3rd dc of shell from prev row, *sk 4 sts, 4 dc between 2nd and 3rd dc of shell from prev row; repeat from * across, sk 2 sts, dc in final st of row, ch 1, turn. (8, [11, 14] shells, 2 dc)
Row 6 (RS): hdc in top of dc, hdc in first st of shell, sk st, 2 hdc between 2nd and 3rd dc of shell from prev row, sk st, hdc in next st, *hdc in next st, sk st, 2 hdc between 2nd and 3rd dc of shell from prev row, sk st, hdc in next st; repeat from * across, hdc in top of ch-3. (34, [46, 58])
Fasten off.
With right side facing, attach yarn to 3rd loop of hdc at opposite end at opposite end of where you fastened off,
Row 7 (RS): working in 3rd loop of hdc, hdc in each st across, ch 1, turn. (34, [46, 58])
Row 8 (WS): working in 3rd loop of hdc, sc in next 16 (22, 28) sts, 2 sc in next st, sc in next 17 (23, 29) sts, ch 1, turn. (35, [47, 59])
You will now begin the granite stitch section. Keep your tension very relaxed across this section so that your stitches don’t start to suck in too much. If you need to feel free to go up a hook size or two.
Row 9 (RS): sc in first st, *ch 1, sk st, sc in next st; repeat from * across, ch 1 turn. (35, [47, 59])
Row 10 (WS): *sk sc, sc in ch-1 sp, ch 1; repeat from * across, placing final sc in turning ch of prev row, ch 1, turn. (36 [48, 60])
Repeat row 10:
11 times or until that section measures 3” for a 24” cowl,
13 times or until that section measures 3 1/2” for a 26” cowl,
15 times or until that section measures 4” for a 28” cowl,
17 times or until that section measures 4 1/2” for a 30” cowl,
19 times or until that section measures 5” for a 32” cowl,
Write which number of row 10 repeats you did down so you have it for future reference. You will need to repeat this section in the future and I think you will like the results better if each section is of equal length. 🤭
At this point your cowl should measure just about 6”, 6 1/2”, 7”, 7 1/2”, or 8” from row 1 to where you stopped. It is important that you stop the granite stitch on a row where the wrong side (WS) is facing you because the next row needs to be worked with the right side (RS) facing you.
Row 11 (RS): hdc in each st across, but do *not* work into turning ch at end of row.
Fasten off, weave in ends.
Repeat rows 2-11 3 more times leaving off row 11 on the final repeat.
Fasten off leaving 18” tail for sewing ends of cowl together.
Sew ends of cowl together with 18” tail.
At this point it is likely that your cowl is a couple of inches wider than the measurement that you set out to get. Working the bottom band, and threading the cord through the top part of the cowl will help bring the sizing down to where you want it.
Begin bottom band:
Using 4mm (G) hook,
Row 1: Leaving a 6” tail, ch 8, hdc in 2nd ch from hook, hdc in each st across. (7)
Rows 2: ch 1, turn, working in 3rd loop of hdc from prev row, hdc in each st across. (7)
Repeat row 2 until band measures the length you need for the cowl size you wish to make (24”, 26”, 28”, 30”, or 32”).
Sew ends of band together with 6” tail.
Turn cowl inside out.
Place band just inside bottom edge of cowl and pin in place. You will fold it out straight when you finish.
Sew band in place with yarn needle and length of yarn.
Fasten off, weave in ends.
Turn cowl right side out, and straighten band so it’s not folded down.
Top band:
Using 4mm (G) hook,
Attach yarn to top of cowl,
Round 1: ch 1, hdc evenly around top of cowl. You will want your final stitch count to be a multiple of 4.
Round 2: working in 3rd loop of hdc, sc in each st around, join with sl st to first sc.
Round 3: ch 1, dc in each st around, join with sl st to first dc.
Round 4: ch 1, hdc in each st around, join with sl st to first hdc.
Round 5: ch 1, working in 3rd loop of hdc, sc in each st around, join with sl st to first sc.
Round 6: ch 1, rsc in each st around, join to first rsc.
Crocheting the I-cord:
If you have never crocheted I-cord before this may seem a little tricky at first. Keep in mind it’s just like knitting with your crochet hook and the finished product will look almost identical to a knitted I-cord. I pulled my loops tighter than normal so the stitches created a more dense cord. I am hoping this will prevent them from catching on things when I wear it.
Using 3.25mm hook,
Step 1: Chain 3,
Step 2: Insert hook in 2nd chain from hook, draw up a loop, insert hook in 3rd chain from hook, draw up a loop.
Step 3: Remove your hook from the 2 loops you just made. You should still have 1 loop on your hook. Hold onto those 2 loops so you don’t lose them, ch 1.
Step 4: insert your hook into the 2nd loop, chain 1, insert your hook into the 3rd loop, chain 1.
Repeat steps 3 and 4 until your cord is at least 4 ft long for child size cowl, or 5 ft long for all other size cowls, (or until your fingers fall off—whichever happens first).
Fasten off by pulling your hook through the loops, weave in ends.
Weave your cord through round 3 of the top of the cowl skipping every 4 stitches. We do this before attaching the pom-poms to the ends of the ties. If you forget to do this step first then you’ll have to take a pom-pom off one of the ends, weave it through and start all over with attaching the pom-pom. Fair warning: there may be tears if you forget to weave first and have to redo things…😅
Assembling the pom-poms and I-cord:
Have you woven your cord through round 3 of the top band yet? If so, let’s continue!
- Trace 2 circles around a small bowl or cup using a marker, on the back side of the faux fur fabric. My circles were about 3 1/2″ across.
- Cut out the circles. Only cut the fabric backing–not the fur itself! I recommend an XACT-O or similar craft knife.
- With your needle and heavy-duty button thread, sew a loose running stitch all the way around near the edge of the circle.
- Take a small, golf-ball-sized amount of polyester stuffing and put it in the middle of the circle.
- Tug on the ends of the thread to cinch the circle into a ball. It should be pretty snug so the fiber fill doesn’t come out, but there will probably be a tiny hole left.
- Insert one end of your I-cord into the tiny hole that is left.
- Sew through the cord and into the edges of your pom-pom a few times then knot your thread to make sure they are attached securely. Make sure your knots are tight!
- Repeat steps 6 and 7 to attach the second pom-pom.

Want more gorgeous crochet patterns, and a little encouragement for your day? Sign up for my newsletterhere! That way you’ll never miss out on special events, or freebies I’m offering.
JOIN ME ON SOCIAL MEDIA
I would love to see a picture when you’re done, so please feel free to come by my Facebook group and show off your finished project! Be sure to tag @kirstenhollowaydesigns when you share pictures of your cowl on Instagram!
You can also follow me on Facebook, Pinterest, Instagram, and Ravelry for more beautiful crochet patterns.
PATTERN TERMS AND CONDITIONS:
You are welcome to share the link to this pattern, using one image of your choice, on your site, but please do not share the written patterns themselves, this includes my Ravelry downloads or translations of these patterns, or use additional images. You do not have permission to use my images by themselves to create pinnable graphics for Pinterest, however they may be included in a roundup pin if there are 4 or more other patterns. If you sell finished items online, please do not use my pictures for your listings. I’m positive that your work is of high enough quality for you to sell the finished piece. Have confidence in your abilities! <3 Thank you!
This pattern was made to be used by individuals, and small business crocheters alike. Selling your finished pieces in boutiques, at farmer’s markets, craft shows, and other local events is encouraged! Please credit/link Kirsten Holloway Designs when selling finished products online. The only thing I require is that this pattern not be used commercially to produce hundreds of thousands of copies.
Ifyou enjoyed this pattern or found it useful, why not share a link to this post with your friends?


Leave a Reply