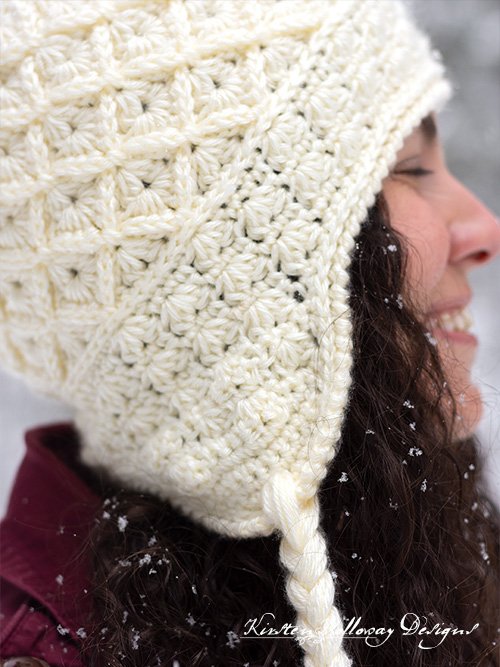
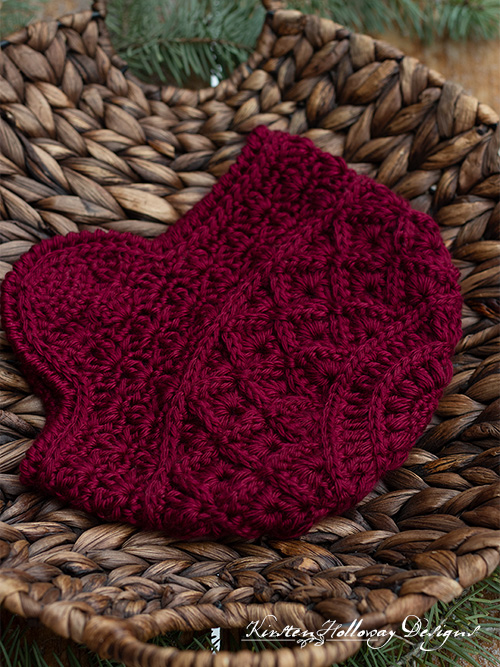
This stunning ski hat features a beautiful diamond texture that can double as flower petals, pine cones, or facets on a jewel. Earflaps will keep your ears warm during winter weather. In true holiday fashion this pattern has many bonuses/”gifts”! Read through the whole pattern before you begin for some creative surprises! Find the free crochet pattern instructions below, or purchase a print-optimized, ad-free PDF by clicking here.
Click here to add this to your Ravelry queue!
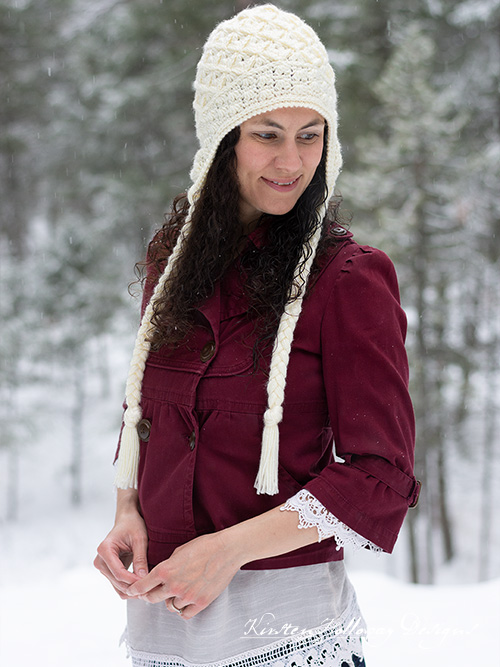
The textures on this ski hat remind me of all things winter–pine-cones, frost on every surface, and the sparkles and richness of the Christmas season.* Because I want this hat to be something you’ll love I have provided several customization options in the crochet pattern for you to try. Read through the notes before you begin to make sure you haven’t missed anything.
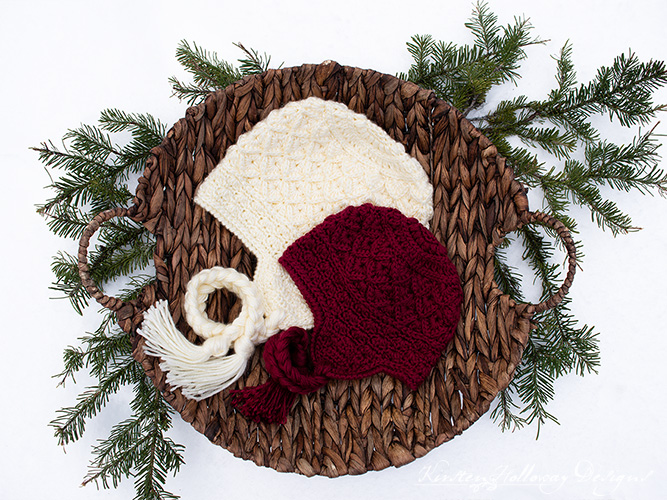
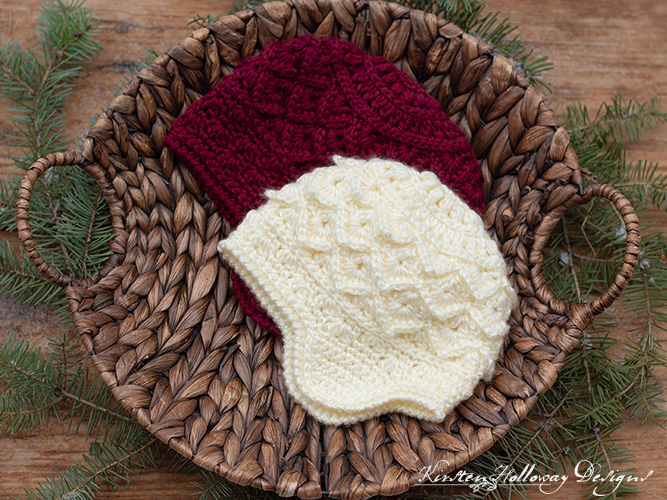
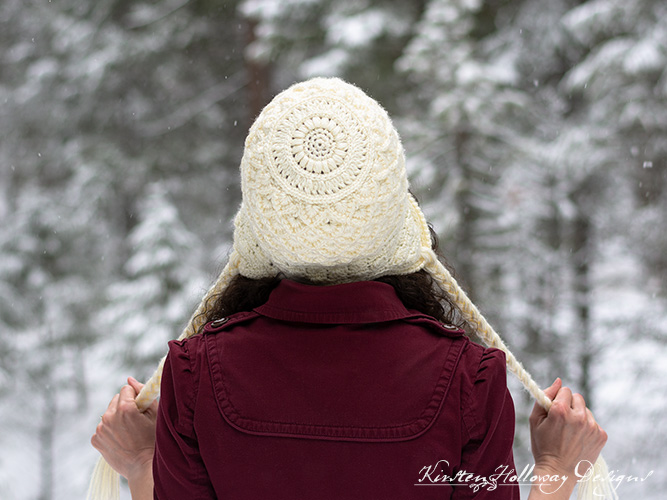
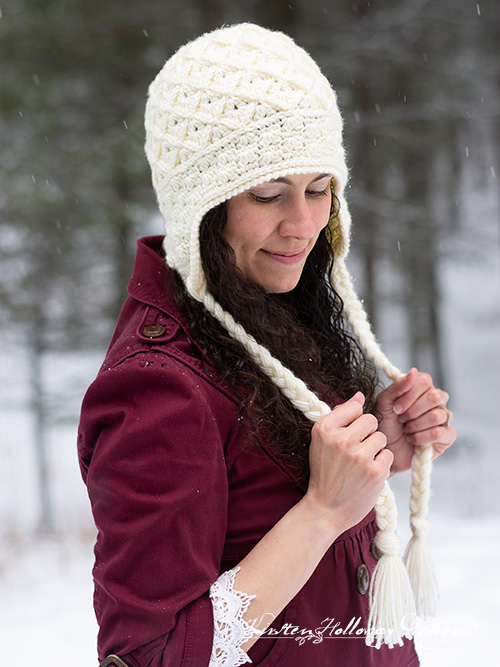
The stitch texture on the upper part of this hat is very thick to provide extra warmth. You can choose to tack the petals down (the burgundy hat) for a rich, elegant look, or let them stick up (the off-white hat further down the page) for a more playful look.
You can choose to add ties, a ribbed band, and/or a pom-pom! If you want even more finishing options look over here for some tassels that I think could be a really pretty addition to this hat.
*While these hats are very rich in their appearance, the first Christmas was quite a bit different. You can read the story in Luke 2:1-20
Disclaimer: This post contains affiliate links. When you purchase something using these links a small percentage of the sales price goes to me. However, you do not pay any extra for the item you purchase.
Difficulty:
Intermediate
Materials Needed:
175-300 yards #4 worsted weight Caron Simply Soft yarn in “Off White” or “Burgundy”
4mm hook, or hook needed to obtain gauge
Yarn needle
scissors
stitch markers (optional)
¼ yard Faux fur for pom-pom (optional)
Heavy duty button thread (optional)
Size 4 snaps for pom-pom (optional)
Stitches Used:
sl st = slip stitch
ch = chain
sc = single crochet
dc = double crochet
2dc cluster = dc2tog in same stitch
sc2tog = single crochet 2 together
Additional terms:
Puff: YO, pull up a loop 3 times, pull through all 7 loops on hook
Back bar of sc – Instructions: Look at the back of the stitch and locate the short bar that runs horizontal. Work all stitches for that section into this bar.
Picot: ch 1, sl st back into same ch forming a tiny point
prev = previous
st/sts = stitch/stitches
sp/sps = space/spaces
Finished measurements:
6-Months: 6” to 6 1/2″ tall by 8” wide
Toddler/preschooler: 6 1/2″ to 7” tall By 9” wide
Child (4 to 8 yrs): 7 1/2” to 8” tall by 10” wide
Adult: 8 1/2″ to 9″ tall by 11″ wide
Gauge:
14 sc in 4”
See additional notes in individual sizes.
For newborn size with Woolike yarn: 2 3/4” after round 6 on child’s size using 2.55mm hook (see additional notes below)
Additional Notes:
-ch-1 at beginning of round does not count as stitch
-It is possible to crochet a newborn size ski hat following the child’s size hat pattern using sock yarn (I used Loops and Threads Woolike to crochet my test piece) and a 2.55mm hook
-This hat has lots of customization options. Read through the pattern completely before you begin.
-If you need a hat size that is just a little bit larger than the sizes I have listed, and if you meet gauge using a 4mm hook like I recommend, then try using a 4.5mm or 5mm hook to get a roomier hat. If you do not meet gauge using the 4mm hook, use the next hook size up from what you used to get the listed gauge. For example: If you met gauge with a 5mm hook, go up to a 5.5mm or even 6mm to get a larger hat.
Winter Splendor: Treasures From The East (US Terms):
6-Months Ski Hat Pattern:
Note: For a 12-month size ski hat, try using a 4.5mm hook, or hook 1 size larger than you used to obtain gauge.
Round 1: 5 sc in magic circle, join with sl st to first sc. (5)
Round 2: ch 1, 2 sc in each st around, join with sl st to first sc. (10)
Round 3: ch 1, *2 sc in next st, sc in next st; repeat from * around, join with sl st to first sc. (15)
Round 4: ch 1, *puff in next st, ch 1; repeat from * around, join with sl st to first puff st. (15 puff sts, 15 ch-1 sps)
Round 5: ch 1, *2 sc in ch-1 sp; repeat from * around, join with sl st to first sc. (30)
Round 6: ch 1, working in back bar of sc, *2dc cluster, ch 1; repeat from * around, join with sl st to first 2dc cluster. (30 2dc clusters, 30 ch-1 sps)
Your piece should measure 4” across.
Round 7: ch 1, 2 sc in each ch-1 sp around, join with sl st to first sc. (60)
Round 8: ch 1, working in back bar of sc, sc in each st around, join with sl st to first sc. (60)
Your piece should measure 4 3/4” across.
If you do not want points that stick out of your hat ch 1, but do not slip stitch back into it to form a picot whenever you see that text in the following round and in each round where you are instructed to make shells (rounds 9, 12, and 15). You will work a sc through this ch-1 sp when you work the sc stitches called for in rounds 13, and 16. See additional note above round 18.
Round 9: *sk 2 sts, (4 dc, ch 1, sl st back into ch forming picot, 4 dc), sk 2 sts, sl st in next st; repeat from * around, final sl st counts as join. (10 shells)
Round 10: ch 1, *sc in sl st (for first repeat only this will be the sl st you just made to join the round), working across shell: BPsc around next 4 sts, ch 1, BPsc around next 4 sts; repeat from * around, join with sl st to first sc. (80 BPsc, 10 sc, 10 ch-1 sps)
Round 11: ch 1, (2dc cluster, ch 1, 2dc cluster) in sc st between petals, sk 3 sts, sc in next st, sc in ch-1 sp, sc in next st, sk 3 sts; repeat from * around, join with sl st to first sc. (20 2dc clusters, 20 sc, 10 ch-1 sps)
Round 12: ch 1, sk 2 sts, *(4 dc, ch 1, sl st back into ch forming picot, 4 dc) in ch-1 sp, sk 2 sts sl st in next st, sk 2 sts; repeat from * around, join with sl st to first dc. (10 shells)
Round 13: ch 1, *sc in sl st, (for first repeat only this will be the sl st you just made to join the round), working across shell: BPsc around next 4 sts, ch 1, BPsc around next 4 sts; repeat from * around, join with sl st to first sc. (80 BPsc, 10 sc, 10 ch-1 sps)
Round 14: ch 1, *(2dc cluster, ch 1, 2dc cluster) in sc, sk 3 sts, sc in next st, sc in ch-1 sp, sc in next st, sk 3 sts; repeat from * around, join with sl st to first 2dc cluster. (20 2dc clusters, 30 sc, 10 ch-1 sps)
Round 15: ch 1, *(4 dc, ch 1, sl st back into ch forming picot, 4 dc) in ch-1 sp, sk 2 sts, sl st in next st, sk 2 sts; repeat from * around, join with sl st to first dc. (10 shells, 10 sl st)
Round 16: ch 1, *sc in sl st (for first repeat only this will be the sl st you just made to join the round), working across shell: BPsc around next 4 sts, ch 1, BPsc around next 4 sts; repeat from * around, join with sl st to first sc. (80 BPsc, 10 sc, 10 ch-1 sps)
Round 17: ch 1, *(2dc cluster, ch 1, 2dc cluster) in sc, sk 3 sts, sc in next st, sc in ch-1 sp, sc in next st, sk 3 sts; repeat from * around, join with sl st to first 2dc cluster. (20 2dc clusters, 30 sc, 10 ch-1 sps)
Optional modification: because I love more options (and I’m sure you do too), if you like this texture that you have been creating for the past few rounds you can repeat rounds 15-17 1 more time, or until your hat measures 5 1/2” long. Work rounds 18 and 19, and then begin the earflaps right after that.
If you want to complete the hat the way it’s shown in the picture instead, then move straight into round 18 and continue the pattern from there.
If you opted to tack your petals down, the 2nd sc out of each “sc in next 3 sts” grouping will be worked in the ch-1 sp at the top of the petal you made in round 15.
Round 18: ch 1, *sc in top of 2dc cluster, sc in ch-1 sp, sc in top of next 2dc cluster, sc in next 3 sts; repeat from * around, join with sl st to first sc. (60)
Round 19: ch 1, working in back bar of sc, sc in each st around, join with sl st to first sc. (60)
Round 20: ch 1, *sc in next 3 sts, sk st, (2dc cluster, ch 1, 2dc cluster) sk st; repeat from * around, join with sl st to first sc. (20 2dc clusters, 30 sc, 10 ch-1 sps)
Round 21: ch 1, sk st, *(2dc cluster, ch 1, 2dc cluster) in next st, sk st, sc in next st, sc in ch-1 sp, sc in next st, sk st; repeat from * around, join with sl st to first 2dc cluster. (20 2dc clusters, 30 sc, 10 ch-1 sps)
Now you get to decide if you want earflaps, or a ribbed band. The band will make for a slightly longer hat. Scroll down to see the band instructions. Move straight from round 21 into crocheting the earflaps if you want those instead.
EARFLAPS 6-12 months:
Row 1: ch 1, sc in next 9 sts, ch 1, turn. (9)
Rows 2-3: sc in each st across, ch 1, turn. (9)
Row 4: sc2tog, sc in next 5 sts, sc2tog, ch 1, turn. (7)
Row 5: sc in each st across, ch 1, turn. (7)
Row 6: sc2tog, sc in next 3 sts, sc2tog, ch 1, turn. (5)
Row 7: sc2tog, sc in next st, sc2tog. (3)
Fasten off, and weave in ends.
Attach yarn to opposite side and repeat the instructions above. I recommend that you start where a 2dc cluster begins, or where the 3sc in a row begins. The finished result will be neater since the first earflap is positioned in a similar way. I counted over 27 sts from the first earflap to begin my next one (this gap will be the front of the hat).
Once you complete the 2nd earflap move to the edging:
Edging:
Round 1: ch 1, sc around earflaps and bottom of hat (following the same progression across clusters as you did in round 18), join with sl st to first sc.
Round 2: ch 1, working in back bar of sc, sc in each st around, join with sl st to first sc.
Round 3: ch 1, with tight tension (you may prefer to go down a hook size instead) rsc in each st around, join with sl st to ch-1.
Fasten off, weave in ends.
Hat ties:
Cut 12, 24″ lengths of yarn for each tie. Thread through the bottom of each earflap, braid, and knot off.
RIBBED BAND:
Round 1: ch 1, *sc in top of 2dc cluster, sc in ch-1 sp, sc in top of next 2dc cluster, sc in next 3 sts; repeat from * around, join with sl st to first sc. (60)
Round 2: ch 1: working in back bar of sc, sc in each st around, join with sl st to first sc. (60)
Round 3: ch 1, FPsc around first st, BPsc around next st, *FPsc around next st, BPsc around next st; repeat from * around, join with sl st to first FPsc. (60)
Round 4: ch 1: FPsc around first st, sc in next st, *FPsc around next st, sc in next st; repeat from * around, join with sl st to first FPsc. (60)
Repeat round 4 until your brim is as long as you want it. 4 rounds should give you about 1” of height.
Toddler Ski Hat Pattern (2 yrs):
Note: For a preschooler size ski hat, try using a 4.5mm hook, or hook 1 size larger than you used to obtain gauge.
Round 1: 6 sc in magic circle, join with sl st to first sc. (6)
Round 2: ch 1, 2 sc in each st around, join with sl st to first sc. (12)
Round 3: ch 1, 2 sc in first st, sc in next 2 sts *2 sc in next st, sc in next 2 sts; repeat from * around, join with sl st to first sc. (16)
Round 4: ch 1, *puff in next st, ch 1; repeat from * around, join with sl st to first puff st. (16 puff sts, 16 ch-1 sps)
Round 5: ch 1, *2 sc in ch-1 sp; repeat from * around, join with sl st to first sc. (32)
Round 6: ch 1, working in back bar of sc, *2dc cluster, ch 1; repeat from * around, join with sl st to first 2dc cluster. (32 2dc clusters, 32 ch-1 sps)
Your piece should measure 4” across.
Round 7: ch 1, 2 sc in each ch-1 sp around, join with sl st to first sc. (64)
Round 8: ch 1, working in back bar of sc, 2 sc in first st, sc in next 31 sts, 2 sc in next st, sc in next 31 sts, join with sl st to first sc. (66)
Your piece should measure 4 3/4” across.
If you do not want points that stick out of your hat ch 1, but do not slip stitch back into it to form a picot whenever you see that text in the following round and in each round where you are instructed to make shells (rounds 9, 12, and 15). You will work a sc through this ch-1 sp when you work the sc stitches called for in rounds 13, and 16. See additional note above round 18.
Round 9: *sk 2 sts, (4 dc, ch 1, sl st back into ch forming picot, 4 dc), sk 2 sts, sl st in next st; repeat from * around, final sl st counts as join. (11 shells)
Round 10: ch 1, *sc in sl st (for first repeat only this will be the sl st you just made to join the round), working across shell: BPsc around next 4 sts, ch 1, BPsc around next 4 sts; repeat from * around, join with sl st to first sc. (88 BPsc, 11 sc, 11 ch-1 sps)
Round 11: ch 1, (2dc cluster, ch 1, 2dc cluster) in sc st between petals, sk 3 sts, sc in next st, sc in ch-1 sp, sc in next st, sk 3 sts; repeat from * around, join with sl st to first sc. (22 2dc clusters, 22 sc, 11 ch-1 sps)
Round 12: ch 1, sk 2 sts, *(4 dc, ch 1, sl st back into ch forming picot, 4 dc) in ch-1 sp, sk 2 sts sl st in next st, sk 2 sts; repeat from * around, join with sl st to first dc. (11 shells)
Round 13: ch 1, *sc in sl st, (for first repeat only this will be the sl st you just made to join the round), working across shell: BPsc around next 4 sts, ch 1, BPsc around next 4 sts; repeat from * around, join with sl st to first sc. (88 BPsc, 11 sc, 11 ch-1 sps)
Round 14: ch 1, *(2dc cluster, ch 1, 2dc cluster) in sc, sk 3 sts, sc in next st, sc in ch-1 sp, sc in next st, sk 3 sts; repeat from * around, join with sl st to first 2dc cluster. (22 2dc clusters, 33 sc, 11 ch-1 sps)
Round 15: ch 1, *(4 dc, ch 1, sl st back into ch forming picot, 4 dc) in ch-1 sp, sk 2 sts, sl st in next st, sk 2 sts; repeat from * around, join with sl st to first dc. (11 shells, 11 sl st)
Round 16: ch 1, *sc in sl st (for first repeat only this will be the sl st you just made to join the round), working across shell: BPsc around next 4 sts, ch 1, BPsc around next 4 sts; repeat from * around, join with sl st to first sc. (88 BPsc, 11 sc, 11 ch-1 sps)
Round 17: ch 1, *(2dc cluster, ch 1, 2dc cluster) in sc, sk 3 sts, sc in next st, sc in ch-1 sp, sc in next st, sk 3 sts; repeat from * around, join with sl st to first 2dc cluster. (22 2dc clusters, 33 sc, 11 ch-1 sps)
Your hat should measure 4 1/2” long.
Optional modification: because I love more options (and I’m sure you do too), if you like this texture that you have been creating for the past few rounds you can repeat rounds 15-17 2 more times, or until your hat measures 6 1/2” long. Work rounds 18 and 19, and then begin the earflaps right after that.
If you want to complete the hat the way it’s shown in the picture instead, then move straight into round 18 and continue the pattern from there.
If you opted to tack your petals down, the 2nd sc out of each “sc in next 3 sts” grouping will be worked in the ch-1 sp at the top of the petal you made in round 15.
Round 18: ch 1, *sc in top of 2dc cluster, sc in ch-1 sp, sc in top of next 2dc cluster, sc in next 3 sts; repeat from * around, join with sl st to first sc. (66)
Round 19: ch 1, working in back bar of sc, sc in each st around, join with sl st to first sc. (66)
Round 20: ch 1, *sc in next 3 sts, sk st, (2dc cluster, ch 1, 2dc cluster) sk st; repeat from * around, join with sl st to first sc. (22 2dc clusters, 33 sc, 11 ch-1 sps)
Round 21: ch 1, *(2dc cluster, ch 1, 2dc cluster) in sc, sk st, sc in next st, sc in ch-1 sp, sc in next st, sk st; repeat from * around, join with sl st to first 2dc cluster. (22 2dc clusters, 33 sc, 11 ch-1 sps)
Round 22: ch 1, *sc in next 3 sts, sk st, (2dc cluster, ch 1, 2dc cluster) sk st; repeat from * around, join with sl st to first sc. (22 2dc clusters, 33 sc, 11 ch-1 sps)
Round 23: ch 1, *(2dc cluster, ch 1, 2dc cluster) in sc, sk st, sc in next st, sc in ch-1 sp, sc in next st, sk st; repeat from * around, join with sl st to first 2dc cluster. (22 2dc clusters, 33 sc, 11 ch-1 sps)
Your hat should measure 6 1/2” in length.
Now you get to decide if you want earflaps, or a ribbed band. The band will make for a slightly longer hat. Scroll down to see the band instructions. Move straight from round 23 into crocheting the earflaps if you want those instead.
EARFLAPS:
Note: When I got to the last 4 rows of each earflap I used tighter tension.
Row 1: ch 1, 2 sc in first st, sc in next 2 sts, sk st, (2dc cluster, ch 1, 2dc cluster) in next st, sk st, sc in next 4 sts, ch 1, turn. (8 sc, 2 2dc clusters, 1 ch-1 sp)
Row 2: ch 1, dc in first st, sk st, (2dc cluster, ch 1, 2dc cluster) in next st, sk st, sc in top of 2dc cluster, sc in ch-1 sp, sc in top of next 2dc cluster, sk st, (2dc cluster, ch 1, 2dc cluster) in next st, sk st, dc in next st, ch 1, turn. (2 dc, 3 sc, 4 2dc clusters, 2 ch-1 sps)
Row 3: sc in first st, sc in top of 2dc cluster, sc in ch-1 sp, sc in top of next 2dc cluster, sk st, (2dc cluster, ch 1, 2dc cluster) in next st, sk st, sc in next 4 sts, ch 1, turn.
Row 4: sc2tog, sc in next 7 sts, sc2tog, ch 1 turn. (2 sc2tog, 7 sc)
Row 5: sc2tog, sc in next 5 sts, sc2tog, ch 1, turn. (2 sc2tog, 5 sc)
Row 6: sc2tog, sc in next 3 sts, sc2tog, ch 1, turn. (2 sc2tog, 3 sc)
Row 7: sc2tog, sc in next st, sc2tog. (2 sc2tog, 1 sc)
Fasten off.
Count over 29 sts from your last earflap. Attach yarn in the 30th st (this should be the first sc at the start of series of 3 sc sts).
Row 1: dc, (2dc cluster, ch 1, 2dc cluster) in next st, sk st, sc in top of 2dc cluster, sc in ch-1 sp, sc in top of next 2dc cluster, sk st, (2dc cluster, ch 1, 2dc cluster) in next st, dc in next st, ch 1, turn. (3 sc, 2 dc, 4 2dc clusters, 2 ch-1 sps)
Row 2: sc in first st, sc in next 3 sts, sk st, (2dc cluster, ch 1, 2dc cluster) in next st, sk st, sc in next 4 sts, ch 1, turn. (8 sc, 2 2dc clusters, 1 ch-1 sp)
Row 3: dc in first st, sk st, (2dc cluster, ch 1, 2dc cluster) in next st, sk st, sc in top of 2dc cluster, sc in ch-1 sp, sc in top of next 2dc cluster, sk st, (2dc cluster, ch 1, 2dc cluster) in next st, sk st, dc in final st, ch 1, turn.
Row 4: sc2tog, sc in next 7 sts, sc2tog, ch 1 turn. (2 sc2tog, 7 sc)
Row 5: sc2tog, sc in next 5 sts, sc2tog, ch 1, turn. (2 sc2tog, 5 sc)
Row 6: sc2tog, sc in next 3 sts, sc2tog, ch 1, turn. (2 sc2tog, 3 sc)
Row 7: sc2tog, sc in next st, sc2tog. (2 sc2tog, 1 sc)
Once you complete the 2nd earflap move to the edging:
Edging:
Round 1: ch 1, sc around earflaps and bottom of hat (following the same progression across clusters as you did in round 18), join with sl st to first sc.
Round 2: ch 1, working in back bar of sc, sc in each st around, join with sl st to first sc.
Round 3: ch 1, with tight tension (you may prefer to go down a hook size instead) rsc in each st around, join with sl st to ch-1.
Fasten off, and weave in ends.
Hat ties:
Cut 18, 30″ lengths of yarn for each tie. Thread through the bottom of each earflap, braid, and knot off.
RIBBED BAND:
Round 1: ch 1, *sc in top of 2dc cluster, sc in ch-1 sp, sc in top of next 2dc cluster, sc in next 3 sts; repeat from * around, join with sl st to first sc. (66)
Round 2: ch 1: working in back bar of sc, sc in each st around, join with sl st to first sc. (66)
Round 3: ch 1, FPsc around first st, BPsc around next st, *FPsc around next st, BPsc around next st; repeat from * around, join with sl st to first FPsc. (66)
Round 4: ch 1: FPsc around first st, sc in next st, *FPsc around next st, sc in next st; repeat from * around, join with sl st to first FPsc. (66)
Repeat round 4 until your brim is as long as you want it. 4 rounds should give you about 1” of height.
BONUS – Alternate Toddler/Preschooler Size (3-5 yrs)
This pattern is unique to the series and does not follow the traditional stiching, look, or sizing of the other hat sizes. For this size you will need:
Approximately 220 yds #2 sport weight yarn, or a very heavy sock yarn.
3.75mm hook for body
3.25mm hook for band
Finished measurements: 9 1/2″ wide by 9″ tall
Round 1: 7 hdc in magic ring, join with sl st to first hdc. (7)
Round 2: ch 1, 2 hdc in each st around, join with sl st to first hdc. (14)
Round 3: ch 1, 2 hdc in first st, hdc in next st, * 2 hdc in next st, hdc in next st; repeat from * around, join with sl st to first hdc. (21)
Round 4: ch 1, *puff in next st, ch 1; repeat from * around, join with sl st to first puff st. (21 puff sts, 21 ch-1 sps)
Piece should measure approximately 3 3/4″ across
Round 5: ch 1, *2 sc in ch-1 sp; repeat from * around, join with sl st to first sc. (42)
Round 6: ch 1, working in back bar of sc, *2dc cluster, ch 1; repeat from * around, join with sl st to first 2dc cluster. (42 2dc clusters, 42 ch-1 sps)
Round 7: ch 1, 2 sc in each ch-1 sp around, join with sl st to first sc. (84)
Round 8: ch 1, working in back bar of sc, sc in each st around, join with sl st to first sc. (84)
If you do not want points that stick out of your hat ch 1, but do not slip stitch back into it to form a picot whenever you see that text in the following round and in each round where you are instructed to make shells (rounds 9, 12, 15, and 18). You will work a sc through this ch-1 sp when you work the sc stitches called for in rounds 13, 16 and 19. See additional note above round 21.
Round 9: *sk 2 sts, (4dc, ch 1, sl st back into ch forming picot, 4 dc), sk 2 sts, sl st in next st; repeat from * around, final sl st counts as join. (14 shells, 14 sl sts)
Round 10: ch 1, *sc in sl st, working across shell: BPsc around next 4 sts, ch 1, BPsc around next 4 sts; repeat from * around, join with sl st to first sc. (112 BPsc, 14 sc, 14ch-1 sps)
Round 11: ch 1, *(2dc cluster, ch 1, 2dc cluster) in sc st between petals, sk 3 sts, sc in next st, sc in ch-1 sp, sc in next st, sk 3 sts; repeat from * around, join with sl st to first sc. (28 2dc clusters, 42 sc, 14 ch-1 sps)
Round 12: ch 1, sk 2 sts, *(4 dc, ch 1, sl st back into ch forming picot, 4 dc) in ch-1 sp, sk 2 sts sl st in next st, Optional modification: I worked my slip stitches through the center of the post instead of through the top as normal, sk 2 sts; repeat from * around, join with sl st to first dc. (14 shells, 14 sl st)
Round 13: ch 1, *sc in sl st (for first repeat only this will be the sl st you just made just before you joined the round), working across shell: BPsc around next 4 sts, ch 1, BPsc around next 4 sts; repeat from * around, join with sl st to first sc. (112 BPsc, 14 sc, 14ch-1 sps)
Round 14: ch 1, *(2dc cluster, ch 1, 2dc cluster) in sc, sk 3 sts, sc in next st, sc in ch-1 sp, sc in next st, sk 3 sts; repeat from * around, join with sl st to first 2dc cluster. (28 2dc clusters, 42 sc, 14 ch-1 sps)
Round 15: ch 1, *(4 dc, ch 1, sl st back into ch forming picot, 4 dc) in ch-1 sp, sk 2 sts, sl st in next st, sk 2 sts; repeat from * around, join with sl st to first dc. (14 shells, 14 sl st)
Round 16: ch 1, *sc in sl st (for first repeat only this will be the sl st you just made just before you joined the round), working across shell: BPsc around next 4 sts, ch 1, BPsc around next 4 sts; repeat from * around, join with sl st to first sc. (112 BPsc, 14 sc, 14ch-1 sps)
Round 17: ch 1, *(2dc cluster, ch 1, 2dc cluster) in sc, sk 3 sts, sc in next st, sc in ch-1 sp, sc in next st, sk 3 sts; repeat from * around, join with sl st to first 2dc cluster. (28 2dc clusters, 42 sc, 14 ch-1 sps)
Round 18: ch 1, *(4 dc, ch 1, sl st back into ch forming picot, 4 dc) in ch-1 sp, sk 2 sts, sl st in next st, sk 2 sts; repeat from * around, join with sl st to first dc. (14 shells, 14 sl st)
Round 19: ch 1, *sc in sl st (for first repeat only this will be the sl st you just made just before you joined the round), working across shell: BPsc around next 4 sts, ch 1, BPsc around next 4 sts; repeat from * around, join with sl st to first sc. (112 BPsc, 14 sc, 14ch-1 sps)
Round 20: ch 1, *(2dc cluster, ch 1, 2dc cluster) in sc, sk 3 sts, sc in next st, sc in ch-1 sp, sc in next st, sk 3 sts; repeat from * around, join with sl st to first 2dc cluster. (28 2dc clusters, 42 sc, 14 ch-1 sps)
If you opted to tack your petals down, the 2nd sc out of each “sc in next 3 sts” grouping will be worked in the ch-1 sp at the top of the petal you made in round 18.
Round 21: ch 1, *sc in top of 2dc cluster, sc in ch-1 sp, sc in top of next 2dc cluster, sc in next 3 sts; repeat from * around, join with sl st to first sc. (84)
Round 22: ch 1, working in back bar of sc, sc in each st around, join with sl st to first sc. (84)
Round 23: ch 1, *sc in next 3 sts, sk st, (2dc cluster, ch 1, 2dc cluster) sk st; repeat from * around, join with sl st to first sc. (28 2dc clusters, 42 sc, 14 ch-1 sps)
Round 24: ch 1, *(2dc cluster, ch 1, 2dc cluster) in sc, sk 3 sts, sc in next st, sc in ch-1 sp, sc in next st, sk 3 sts; repeat from * around, join with sl st to first 2dc cluster. (28 2dc clusters, 42 sc, 14 ch-1 sps)
Round 25: ch 1, *sc in next 3 sts, sk st, (2dc cluster, ch 1, 2dc cluster) sk st; repeat from * around, join with sl st to first sc. (28 2dc clusters, 42 sc, 14 ch-1 sps)
Round 26: ch 1, *(2dc cluster, ch 1, 2dc cluster) in sc, sk st, sc in next st, sc in ch-1 sp, sc in next st, sk st; repeat from * around, join with sl st to first 2dc cluster. (28 2dc clusters, 42 sc, 14 ch-1 sps)
We will now reduce the opening a little bit. If the pre-schooler you are making this for has a larger head then you may wish to keep the same stitch count instead of reducing in the second round.
Round 1: ch 1, *sc in top of 2dc cluster, sc in ch-1 sp, sc in top of next 2dc cluster, sc in next 3 sts; repeat from * around, join with sl st to first sc. (84)
Round 2: ch 1: working in back bar of sc, *sc in next 5 sts, sc2tog; repeat from * around join with sl st to first sc. (72)
Hat Band:
Row 1: Leaving a 6″ tail, ch 11, hdc in 2nd ch from hook, hdc in each st across, ch 1, turn. (10)
Rows 2-58: working in 3rd loop of hdc from prev row, hdc in each st across, ch 1, turn. (10)
Your band should measure approximately 18-19″ long and have plenty of stretch.
Sew ends of band together with 6″ tail.
Pin band in place inside hat. Sew band to hat, then fold down to make the band visible.
Fasten off, and weave in all ends.
Create a snap-on pom-pom following the instructions at the bottom of the post if you wish.
Child’s Ski Hat Pattern (4-8 yrs):
Note: Use this pattern size and sock yarn with a 2.55mm hook to make a newborn size ski hat.
Round 1: 6 sc in magic circle, join with sl st to first st. (6)
Round 2: ch 1, 2 sc in each st around, join with sl st to first sc. (12)
Round 3: ch 1, 2 sc in first st, sc in next st *2 sc in next st, sc in next st; repeat from * around, join with sl st to first sc. (18)
Round 4: ch 1, *puff in next st, ch 1; repeat from * around, join with sl st to first puff st. (18 puff sts, 18 ch-1 sps)
Round 5: ch 1, *2 sc in ch-1 sp; repeat from * around, join with sl st to first sc. (36)
Round 6: ch 1, working in back bar of sc, *2dc cluster, ch 1; repeat from * around, join with sl st to first 2dc cluster. (36 2dc clusters, 36 ch-1 sps)
Your piece should measure 4” across.
Round 7: ch 1, 2 sc in each ch-1 sp around, join with sl st to first sc. (72)
Round 8: ch 1, working in back bar of sc, sc in each st around, join with sl st to first sc. (72)
Your piece should measure 5” across.
If you do not want points that stick out of your hat ch 1, but do not slip stitch back into it to form a picot whenever you see that text in the following round and in each round where you are instructed to make shells (rounds 9, 12, 15, and 18). You will work a sc through this ch-1 sp when you work the sc stitches called for in rounds 13, 16 and 19. See additional note above round 21.
Round 9: *sk 2 sts, (4dc, ch 1, sl st back into ch forming picot, 4 dc), sk 2 sts, sl st in next st; repeat from * around, final sl st counts as join. (12 shells)
Round 10: ch 1, *sc in sl st, working across shell: BPsc around next 4 sts, ch 1, BPsc around next 4 sts; repeat from * around, join with sl st to first sc. (84 BPsc, 12 sc, 12 ch-1 sps)
Round 11: ch 1, *(2dc cluster, ch 1, 2dc cluster) in sc st between petals, sk 3 sts, sc in next st, sc in ch-1 sp, sc in next st, sk 3 sts; repeat from * around, join with sl st to first sc. (24 2dc clusters, 36 sc, 12 ch-1 sps)
Round 12: ch 1, sk 2 sts, *(4 dc, ch 1, sl st back into ch forming picot, 4 dc) in ch-1 sp, sk 2 sts sl st in next st, Optional modification: I worked my slip stitches through the center of the post instead of through the top as normal, sk 2 sts; repeat from * around, join with sl st to first dc. (96 BPsc, 12 sc, 12 ch-1 sps)
Round 13: ch 1, *sc in sl st (for first repeat only this will be the sl st you just made just before you joined the round), working across shell: BPsc around next 4 sts, ch 1, BPsc around next 4 sts; repeat from * around, join with sl st to first sc. (96 BPsc, 12 sc, 12 ch-1 sps)
Round 14: ch 1, *(2dc cluster, ch 1, 2dc cluster) in sc, sk 3 sts, sc in next st, sc in ch-1 sp, sc in next st, sk 3 sts; repeat from * around, join with sl st to first 2dc cluster. (24 2dc clusters, 36 sc, 12 ch-1 sps)
Round 15: ch 1, *(4 dc, ch 1, sl st back into ch forming picot, 4 dc) in ch-1 sp, sk 2 sts, sl st in next st, sk 2 sts; repeat from * around, join with sl st to first dc. (12 shells, 12 sl st)
Round 16: ch 1, *sc in sl st (for first repeat only this will be the sl st you just made just before you joined the round), working across shell: BPsc around next 4 sts, ch 1, BPsc around next 4 sts; repeat from * around, join with sl st to first sc. (96 BPsc, 12 sc, 12 ch-1 sps)
Round 17: ch 1, *(2dc cluster, ch 1, 2dc cluster) in sc, sk 3 sts, sc in next st, sc in ch-1 sp, sc in next st, sk 3 sts; repeat from * around, join with sl st to first 2dc cluster. (24 2dc clusters, 36 sc, 12 ch-1 sps)
Round 18: ch 1, *(4 dc, ch 1, sl st back into ch forming picot, 4 dc) in ch-1 sp, sk 2 sts, sl st in next st, sk 2 sts; repeat from * around, join with sl st to first dc. (12 shells, 12 sl st)
Round 19: ch 1, *sc in sl st (for first repeat only this will be the sl st you just made just before you joined the round), working across shell: BPsc around next 4 sts, ch 1, BPsc around next 4 sts; repeat from * around, join with sl st to first sc. (96 BPsc, 12 sc, 12 ch-1 sps)
Round 20: ch 1, *(2dc cluster, ch 1, 2dc cluster) in sc, sk 3 sts, sc in next st, sc in ch-1 sp, sc in next st, sk 3 sts; repeat from * around, join with sl st to first 2dc cluster. (24 2dc clusters, 36 sc, 12 ch-1 sps)
Hat should measure 10” wide, and 5 1/2” long from crown to bottom of hat.
If you opted to tack your petals down, the 2nd sc out of each “sc in next 3 sts” grouping will be worked in the ch-1 sp at the top of the petal you made in round 18.
Round 21: ch 1, *sc in top of 2dc cluster, sc in ch-1 sp, sc in top of next 2dc cluster, sc in next 3 sts; repeat from * around, join with sl st to first sc. (72)
Round 22: ch 1, working in back bar of sc, sc in each st around, join with sl st to first sc. (72)
Round 23: ch 1, *sc in next 3 sts, sk st, (2dc cluster, ch 1, 2dc cluster) sk st; repeat from * around, join with sl st to first sc. (24 2dc clusters, 36 sc, 12 ch-1 sps)
Round 24: ch 1, *(2dc cluster, ch 1, 2dc cluster) in sc, sk st, sc in next st, sc in ch-1 sp, sc in next st, sk st; repeat from * around, join with sl st to first 2dc cluster. (24 2dc clusters, 36 sc, 12 ch-1 sps)
Round 25: ch 1, *sc in next 3 sts, sk st, (2dc cluster, ch 1, 2dc cluster) sk st; repeat from * around, join with sl st to first sc. (24 2dc clusters, 36 sc, 12 ch-1 sps)
Round 26: ch 1, *(2dc cluster, ch 1, 2dc cluster) in sc, sk st, sc in next st, sc in ch-1 sp, sc in next st, sk st; repeat from * around, join with sl st to first 2dc cluster. (24 2dc clusters, 36 sc, 12 ch-1 sps)
Now you get to decide if you want earflaps, or a ribbed band. The band will make for a slightly longer hat. Scroll down to see the band instructions. Move straight from round 26 into crocheting the earflaps if you want those instead.
EARFLAPS:
Note: When I got to the last 4 rows of each earflap I used tighter tension.
Row 1: ch 1, 2 sc in first st, sc in next 2 sts, sk st, (2dc cluster, ch 1, 2dc cluster) in next st, sk st, sc in next 4 sts, ch 1, turn. (8 sc, 2 2dc clusters, 1 ch-1 sp)
Row 2: ch 1, dc in first st, sk st, (2dc cluster, ch 1, 2dc cluster) in next st, sk st, sc in top of 2dc cluster, sc in ch-1 sp, sc in top of next 2dc cluster, sk st, (2dc cluster, ch 1, 2dc cluster) in next st, sk st, dc in next st, ch 1, turn. (2 dc, 3 sc, 4 2dc clusters, 2 ch-1 sps)
Row 3: sc in first st, sc in top of 2dc cluster, sc in ch-1 sp, sc in top of next 2dc cluster, sk st, (2dc cluster, ch 1, 2dc cluster) in next st, sk st, sc in next 4 sts, ch 1, turn.
Row 4: sc2tog, sc in next 7 sts, sc2tog, ch 1 turn. (2 sc2tog, 7 sc)
Row 5: sc2tog, sc in next 5 sts, sc2tog, ch 1, turn. (2 sc2tog, 5 sc)
Row 6: sc2tog, sc in next 3 sts, sc2tog, ch 1, turn. (2 sc2tog, 3 sc)
Row 7: sc2tog, sc in next st, sc2tog. (2 sc2tog, 1 sc)
Count over 32 sts from your last earflap. Attach yarn in the 33rd st (this should be the first sc at the start of series of 3 sc sts).
Row 1: dc, (2dc cluster, ch 1, 2dc cluster) in next st, sk st, sc in top of 2dc cluster, sc in ch-1 sp, sc in top of next 2dc cluster, sk st, (2dc cluster, ch 1, 2dc cluster) in next st, dc in next st, ch 1, turn. (3 sc, 2 dc, 4 2dc clusters, 2 ch-1 sps)
Row 2: sc in first st, sc in next 3 sts, sk st, (2dc cluster, ch 1, 2dc cluster), sk st, sc in next 4 sts, ch 1, turn. (8 sc, 2 2dc clusters, 1 ch-1 sp)
Row 3: dc in first st, sk st, (2dc cluster, ch 1, 2dc cluster), sk st, sc in top of 2dc cluster, sc in ch-1 sp, sc in top of next 2dc cluster, sk st, (2dc cluster, ch 1, 2dc cluster), sk st, dc in final st, ch 1, turn.
Row 4: sc2tog, sc in next 7 sts, sc2tog, ch 1 turn. (2 sc2tog, 7 sc)
Row 5: sc2tog, sc in next 5 sts, sc2tog, ch 1, turn. (2 sc2tog, 5 sc)
Row 6: sc2tog, sc in next 3 sts, sc2tog, ch 1, turn. (2 sc2tog, 3 sc)
Row 7: sc2tog, sc in next st, sc2tog. (2 sc2tog, 1 sc)
Once you complete the 2nd earflap move to the edging:
Edging:
Round 1: ch 1, sc around earflaps and bottom of hat (following the same progression across clusters as you did in round 21), join with sl st to first sc.
Round 2: ch 1, working in back bar of sc, sc in each st around, join with sl st to first sc.
Round 3: ch 1, with tight tension (you may prefer to go down a hook size instead) rsc in each st around, join with sl st to ch-1.
Fasten off, and weave in ends.
Hat ties:
Cut 18, 36″ lengths of yarn for each tie. Thread through the bottom of each earflap, braid, and knot off.
RIBBED BAND:
Round 1: ch 1, *sc in top of 2dc cluster, sc in ch-1 sp, sc in top of next 2dc cluster, sc in next 3 sts; repeat from * around, join with sl st to first sc. (72)
Round 2: ch 1: working in back bar of sc, sc in each st around, join with sl st to first sc. (72)
Round 3: ch 1, FPsc around first st, BPsc around next st, *FPsc around next st, BPsc around next st; repeat from * around, join with sl st to first FPsc. (72)
Round 4: ch 1: FPsc around first st, sc in next st, *FPsc around next st, sc in next st; repeat from * around, join with sl st to first FPsc. (72)
Repeat round 4 until your brim is as long as you want it. 4 rounds should give you about 1” of height.
Adult Ski Hat Pattern:
Round 1: 6 sc in magic circle, join with sl st to first st. (6)
Round 2: ch 1, 2 sc in each st around, join with sl st to first sc. (12)
Round 3: ch 1, 2 sc in first st, sc in next st *2 sc in next st, sc in next st; repeat from * around, work a 2nd sc in final st, join with sl st to first sc. (19)
Round 4: ch 1, *puff in next st, ch 1; repeat from * around, join with sl st to first puff st. (19 puff sts, 19 ch-1 sps)
Round 5: ch 1, *2 sc in ch-1 sp; repeat from * around, join with sl st to first sc. (38)
Round 6: ch 1, working in back bar of sc, *2dc cluster, ch 1; repeat from * around, join with sl st to first 2dc cluster. (38 2dc clusters, 38 ch-1 sps)
Your piece should measure 4 1/4” across. It will be a bit puckered, but we’ll get it to flatten out in a few more rounds.
Round 7: ch 1, 2 sc in each ch-1 sp around, join with sl st to first sc. (76)
Round 8: ch 1, working in back bar of sc, 2 sc in first st, sc in next 37 sts, 2 sc in next st, sc in next 37 sts, join with sl st to first sc. (78)
Your piece should measure 5 1/4” across.
If you do not want points that stick out of your hat ch 1, but do not slip stitch back into it to form a picot whenever you see that text in the following round and in each round where you are instructed to make shells (rounds 9, 12, and 15). You will work a sc through this ch-1 sp when you work the sc stitches called for in rounds 13, 16, and 19. See additional note above round 24.
Round 9: *sk 2 sts, (4 dc, ch 1, sl st back into ch forming picot, 4 dc), sk 2 sts, sl st in next st; repeat from * around, final sl st counts as join. (13 shells)
Round 10: ch 1, *sc in sl st, BPsc around next 4 sts, ch 1, working across shell: BPsc around next 4 sts; repeat from * around, join with sl st to first sc. (104 BPsc, 13 sc, 13 ch-1 sps)
Round 11: ch 1, *(2dc cluster, ch 1, 2dc cluster) in sc st between petals, sk 3 sts, sc in next st, sc in ch-1 sp, sc in next st, sk 3 sts; repeat from * around, join with sl st to first sc. (26 2dc clusters, 39 sc, 13 ch-1 sps)
Round 12: ch 1, sk 2 sts, *(4 dc, ch 1, sl st back into ch forming picot, 4 dc) in ch-1 sp, sk 2 sts sl st in next st, Optional modification: I worked my slip stitches through the center of the post instead of through the top as normal, sk 2 sts; repeat from * around, join with sl st to first dc. (13 shells, 13 sl st)
Round 13: ch 1, *sc in sl st (for first repeat only this will be the sl st you just made just before you joined the round), working across shell: BPsc around next 4 sts, ch 1, BPsc around next 4 sts; repeat from * around, join with sl st to first sc. (104 BPsc, 13 sc, 13 ch-1 sps)
Round 14: ch 1, *(2dc cluster, ch 1, 2dc cluster) in sc, sk 3 sts, sc in next st, sc in ch-1 sp, sc in next st, sk 3 sts; repeat from * around, join with sl st to first 2dc cluster. (26 2dc clusters, 39 sc, 13 ch-1 sps)
Round 15: ch 1, *(4 dc, ch 1, sl st back into ch forming picot, 4 dc) in ch-1 sp, sk 2 sts, sl st in next st, sk 2 sts; repeat from * around, join with sl st to first dc. (13 shells, 13 sl st)
Round 16: ch 1, *sc in sl st (for first repeat only this will be the sl st you just made just before you joined the round), BPsc around next 4 sts, ch 1, BPsc around next 4 sts; repeat from * around, join with sl st to first sc. (104 BPsc, 13 sc, 13 ch-1 sps)
Round 17: ch 1, *(2dc cluster, ch 1, 2dc cluster) in sc, sk 3 sts, sc in next st, sc in ch-1 sp, sc in next st, sk 3 sts; repeat from * around, join with sl st to first 2dc cluster. (26 2dc clusters, 39 sc, 13 ch-1 sps)
Round 18: ch 1, *(4 dc, ch 1, sl st back into ch forming picot, 4 dc) in ch-1 sp, sk 2 sts, sl st in next st, sk 2 sts; repeat from * around, join with sl st to first dc. (13 shells, 13 sl st)
Round 19: ch 1, *sc in sl st (for first repeat only this will be the sl st you just made just before you joined the round), working across shell: BPsc around next 4 sts, ch 1, BPsc around next 4 sts; repeat from * around, join with sl st to first sc. (104 BPsc, 13 sc, 13 ch-1 sps)
Round 20: ch 1, *(2dc cluster, ch 1, 2dc cluster) in sc, sk 3 sts, sc in next st, sc in ch-1 sp, sc in next st, sk 3 sts; repeat from * around, join with sl st to first 2dc cluster. (26 2dc clusters, 39 sc, 13 ch-1 sps)
Round 21: ch 1, *(4dc, ch 1, sl st back into ch forming picot, 4 dc) in ch-1 sp, sk 2 sts, sl st in next st, sk 2 sts; repeat from * around, join with sl st to first dc. (13 shells, 13 sl st)
Round 22: ch 1, *sc in sl st (for first repeat only this will be the sl st you just made just before you joined the round), working across shell: BPsc around next 4 sts, ch 1, BPsc around next 4 sts; repeat from * around, join with sl st to first sc. (104 BPsc, 13 sc, 13 ch-1 sps)
Round 23: ch 1, *(2dc cluster, ch 1, 2dc cluster) in sc, sk 3 sts, sc in next st, sc in ch-1 sp, sc in next st, sk 3 sts; repeat from * around, join with sl st to first 2dc cluster. (26 2dc clusters, 39 sc, 13 ch-1 sps)
Hat should measure 11” wide, and 6 1/2” long from crown to bottom of hat.
Round 24: ch 1, *sc in top of 2dc cluster, sc in ch-1 sp, sc in top of next 2dc cluster, sc in next 3 sts; repeat from * around, join with sl st to first sc. (78)
Round 25: ch 1, working in back bar of sc, sc in each st around, join with sl st to first sc. (78)
Round 26: ch 1, *sc in next 3 sts, sk st, (2dc cluster, ch 1, 2dc cluster) sk st; repeat from * around, join with sl st to first sc. (26 2dc clusters, 39 sc, 13 ch-1 sps)
Round 27: ch 1, *(2dc cluster, ch 1, 2dc cluster) in sc, sk st, sc in next st, sc in ch-1 sp, sc in next st, sk st; repeat from * around, join with sl st to first 2dc cluster. (26 2dc clusters, 39 sc, 13 ch-1 sps)
Round 28: ch 1, *sc in next 3 sts, sk st, (2dc cluster, ch 1, 2dc cluster) sk st; repeat from * around, join with sl st to first sc. (26 2dc clusters, 39 sc, 13 ch-1 sps)
Round 29: ch 1, *(2dc cluster, ch 1, 2dc cluster) in sc, sk st, sc in next st, sc in ch-1 sp, sc in next st, sk st; repeat from * around, join with sl st to first 2dc cluster. (26 2dc clusters, 39 sc, 13 ch-1 sps)
Now you get to decide if you want earflaps, or a ribbed band. The band will make for a slightly longer hat. Scroll down to see the band instructions. Move straight from round 29 into crocheting the earflaps if you want those instead.
EARFLAPS:
Note: When I got to the last 5 rows of each earflap I used tighter tension.
Row 1: ch 1, 2 sc in top of 2dc cluster, sc in ch-1 sp, sc in top of next 2dc cluster, sk st, (2dc cluster, ch 1, 2dc cluster) in next st, sk st, sc in top of 2dc cluster, sc in ch-1 sp, sc in top of next 2dc cluster, sk st, (2dc cluster, ch 1, 2dc cluster) in next st, sk st, sc in next st, ch 1, turn. (8 sc, 2 2dc clusters, 2 ch-1 sps)
Rows 2-4: sc in first st, sc in top of 2dc cluster, sc in ch-1 sp, sc in top of next 2dc cluster, sk st, (2dc cluster, ch 1, 2dc cluster) in next st, sk st, sc in top of 2dc cluster, sc in ch-1 sp, sc in top of next 2dc cluster, sk st, (2dc cluster, ch 1, 2dc cluster) in next st, sk st, sc in next st, ch 1, turn. (8 sc, 4 2dc clusters, 2 ch-1 sps)
Row 5: sc2tog, sc in next 10 sts, sc2tog, ch 1 turn. (2 sc2tog, 10 sc)
Row 6: sc2tog, sc in next 8 sts, sc2tog, ch 1, turn. (2 sc2tog, 8 sc)
Row 7: sc2tog, sc in next 6 sts, sc2tog, ch 1, turn. (2 sc2tog, 6 sc)
Row 8: sc2tog, sc in next 4 sts, sc2tog, ch 1, turn. (2 sc2tog, 4 sc)
Row 9: sc2tog, sc in next 2 sts, sc2tog. (2 sc2tog, 2 sc)
Fasten off, weave in ends.
Count over 35 sts from your last earflap. Attach yarn in the 36th st. This should be the first 2dc cluster out of a (2dc cluster, ch-1 2 dc cluster) grouping.
Row 1: 2 sc in top of 2dc cluster, sc in ch-1 sp, sc in top of next 2dc cluster, sk st, (2dc cluster, ch 1, 2dc cluster) in next st, sk st, sc in top of 2dc cluster, sc in ch-1 sp, sc in top of next 2dc cluster, sk st, (2dc cluster, ch 1, 2dc cluster) in next st, sk st, sc in next st, ch 1, turn. (8 sc, 2 2dc clusters, 2 ch-1 sps)
Rows 2-4: sc in first st, sc in top of 2dc cluster, sc in ch-1 sp, sc in top of next 2dc cluster, sk st, (2dc cluster, ch 1, 2dc cluster) in next st, sk st, sc in top of 2dc cluster, sc in ch-1 sp, sc in top of next 2dc cluster, sk st, (2dc cluster, ch 1, 2dc cluster) in next st, sk st, sc in next st, ch 1, turn. (8 sc, 4 2dc clusters, 2 ch-1 sps)
Row 5: sc2tog, sc in next 10 sts, sc2tog, ch 1 turn. (2 sc2tog, 10 sc)
Row 6: sc2tog, sc in next 8 sts, sc2tog, ch 1, turn. (2 sc2tog, 8 sc)
Row 7: sc2tog, sc in next 6 sts, sc2tog, ch 1, turn. (2 sc2tog, 6 sc)
Row 8: sc2tog, sc in next 4 sts, sc2tog, ch 1, turn. (2 sc2tog, 4 sc)
Row 9: sc2tog, sc in next 2 sts, sc2tog. (2 sc2tog, 2 sc)
Once you complete the 2nd earflap move to the edging:
Edging:
Round 1: ch 1, sc around earflaps and bottom of hat (following the same progression across clusters as you did in round 24), join with sl st to first sc.
Round 2: ch 1, working in back bar of sc, sc in each st around, join with sl st to first sc.
Round 3: ch 1, with tight tension (you may prefer to go down a hook size instead) rsc in each st around, join with sl st to ch-1.
Fasten off, and weave in ends.
Hat ties:
Cut 20, 48″ lengths of yarn for each tie. Thread through the bottom of each earflap, braid, and knot off.
RIBBED BAND:
Round 1: ch 1, *sc in top of 2dc cluster, sc in ch-1 sp, sc in top of next 2dc cluster, sc in next 3 sts; repeat from * around, join with sl st to first sc. (78)
Round 2: ch 1: working in back bar of sc, sc in each st around, join with sl st to first sc. (78)
Round 3: ch 1, FPsc around first st, BPsc around next st, *FPsc around next st, BPsc around next st; repeat from * around, join with sl st to first FPsc. (78)
Round 4: ch 1: FPsc around first st, sc in next st, *FPsc around next st, sc in next st; repeat from * around, join with sl st to first FPsc. (78)
Repeat round 4 until your brim is as long as you want it. 4 rounds should give you about 1” of height.
Faux Fur Pom-Pom Instructions:
- Trace a circle around a small bowl or cup using a marker, on the back side of the faux fur fabric. For adult and child hats my circle is about 5″ across. Try a 4″ circle for toddler and 6 month sizes.
- Cut out the circle. Only cut the fabric backing–not the fur itself! I recommend an XACT-O or similar craft knife.
- With your needle and heavy-duty button thread, sew a loose running stitch all the way around near the edge of the circle.
- Take a small, golf-ball-sized amount of polyester stuffing and put it in the middle of the circle.
- Tug on the ends of the thread to cinch the circle into a ball. It should be snug so the fiber fill doesn’t come out.
- Tie off securely, and then sew one part of the snap over the tiny hole that is left. Make sure it is the right part, facing the right direction or you’ll have to sew it on again
- Sew the other end of the snap over the very top of your hat where you began it.
Want more gorgeous crochet patterns, and a little encouragement for your day? Sign up for my newsletter here! That way you’ll never miss out on special events, or freebies I’m offering.
JOIN ME ON SOCIAL MEDIA
I would love to see a picture when you’re done, so please feel free to come by my Facebook group and show off your finished project! Be sure to tag @kirstenhollowaydesigns when you share pictures of your project on Instagram!
You can also follow me on Facebook, Pinterest, Instagram, and Ravelry for more beautiful crochet patterns.
PATTERN TERMS AND CONDITIONS:
You are welcome to share the link to this pattern, using one image of your choice, on your site, but please do not share the written patterns themselves, this includes my Ravelry downloads or translations of these patterns, or use additional images. You do not have permission to use my images by themselves to create pinnable graphics for Pinterest, however they may be included in a roundup pin if there are 4 or more other patterns. If you sell finished items online, please do not use my pictures for your listings. I’m positive that your work is of high enough quality for you to sell the finished piece. Have confidence in your abilities! <3 Thank you!
This pattern was made to be used by individuals and small business crocheters alike. Selling your finished pieces in boutiques, at farmer’s markets, craft shows, and other local events is encouraged! Please credit/link Kirsten Holloway Designs when selling finished products online. The only thing I require is that this pattern not be used commercially to produce hundreds of thousands of copies. If you enjoyed this pattern or found it useful, why not share a link to this post with your friends?


Hi, love this beautiful hat pattern. Do you have a video tutorial for this pattern?
thanks!
Hi Sadia, I’m sorry, I do not have a video tutorial for this pattern, only written instructions.
Hello! I just finished making the hat and it looks amazing, thank you for the fun pattern! I had some issues with rounds 27 and 29 (adult size). The instructions say to skip 3 stitches after the cluster, but this doesn’t fit the pattern, skipping 1 stitch works perfect though.
I’m glad you liked the hat! I’ll have to see what’s up with those rounds and fix them. It should only be calling for 1 skipped stitch after the cluster. 😅
Hi! Not sure if you’re still monitoring this pattern. I’m in round 13, and there’s a noticeable line of stitches between the shells, rather than the lattice pattern you have. How do I make it joined together?
The lattice design is formed from shells. Round 13 makes the tops of the shell stitches stand out which creates the diamond shapes you see on the design. There are some notes at the beginning of the pattern that explain how to make your lattice “joined” instead of sticking out (you’ll work sc stitches into the ch-1 space at the very top of the shell). Keep going and you should be able to see the lattice design start to form after another 3-4 rounds. 😀
I hope that helps!
If I used a 4.25 or 4.5 size hook what would the finished dimensions be for the adult pattern?
Thanks!
It all depends on your tension. I’d encourage you to look at the gauge information at the beginning of the pattern and in the individual sizes themselves and see how it compares with those hooks to my measurements.
I would like to use my Caron chunky cakes 6 super bulky weight how would I go about doing it?
That yarn is much, much thicker than the yarn I used to design the hat. You could try crocheting the smallest size with a larger hook and see if it would fit an adult, but I’m not real confident that such a bulky yarn would work for thr fine features on this hat. 😅
Beautiful hat! I love the texture.
Thank you! I had a lot of fun coming up with this unique hat pattern. 😊
I’m working on the childs size. In Rd 11, if we don’t want the points to stick out, shouldn’t we be putting the 2nd of the 3 sc’s in the ch-1 sp of the petal in round 9?
You will sc in the ch-1 sp at the top of the shell in round 9 on round 13. It will call for a sc in a sl st and whenever it does that you will work a sc in the ch-1 sp at the top of the shell instead. 🙂
Since so many people are wanting to crochet this without the little points I may rewrite the pattern to make that the default method so that process is more straightforward.
Just before row 9 it says:
“If you do not want points that stick out of your hat ch 1, but do not slip stitch back into it to form a picot whenever you see that text in the following round and in each round where you are instructed to make shells. You will work a sc through this ch-1 sp when you work the sc stitches called for in round 15.”
After row 14 it says “If you do not want points that stick out of your hat: sc in the ch-1 sp at the top of the shell you made in round 9.”
Round 15: ch 1, *(4dc, ch 1, sl st back into ch forming picot, 4 dc) in ch-1 sp, sk 2 sts, sl st in next st, sk 2 sts; repeat from * around, join with sl st to first dc. (13 shells, 13 sl st)
There are no sc in round 15.
I am totally stumped! When do I do the sc in row 9’s ch 1? I’ve tried many different ways but keep frogging. Please help!
It looks like everything was off by 1 round. It should be round 16. Work the sc that would be in the sl st in the ch-1 sp at the top of the petal instead. You will do that each time this repeat shows up. I hope that helps!
Thank you very much for your quick reply! I will give that a try. 🙂
You’re welcome! 😊