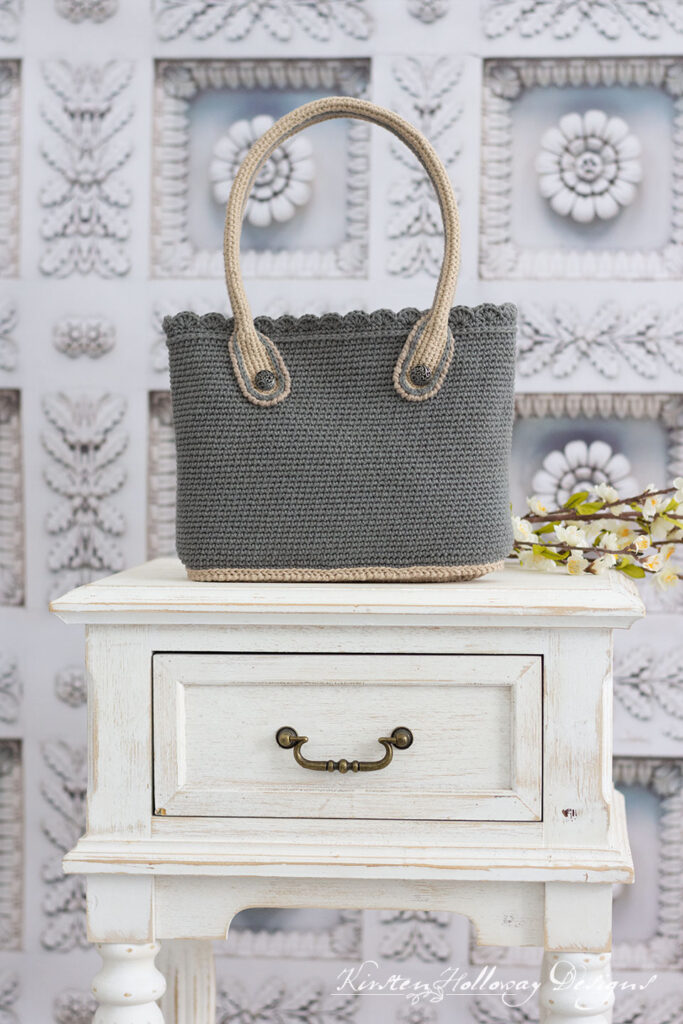
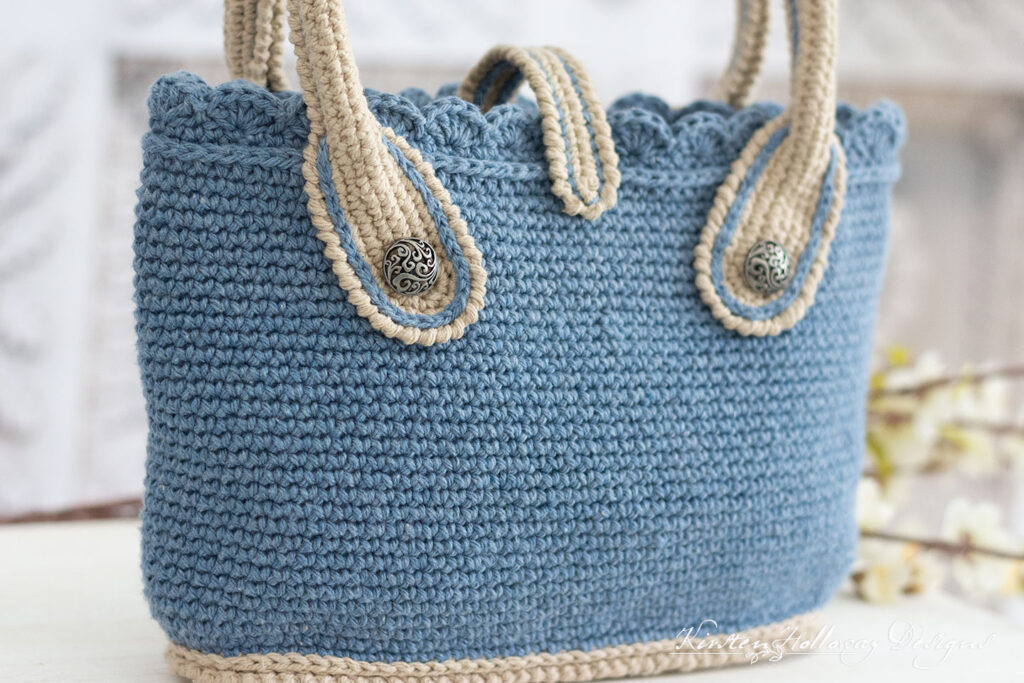
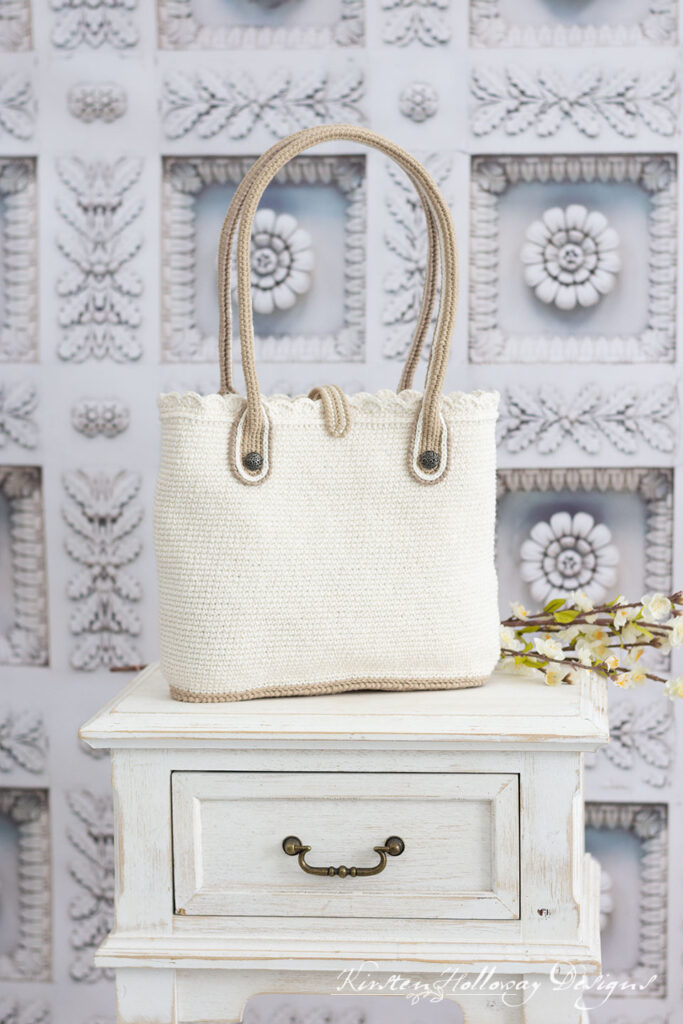
Everything about the look of this simple crochet bag is understated and elegant. The free crochet pattern comes in 3 sizes: small, medium, and large, and can easily be adjusted to make the perfect bag for any occasion. Find the free crochet pattern instructions below, or purchase a print-optimized, ad-free PDF by clicking here.
Click here to add this to your Ravelry queue!
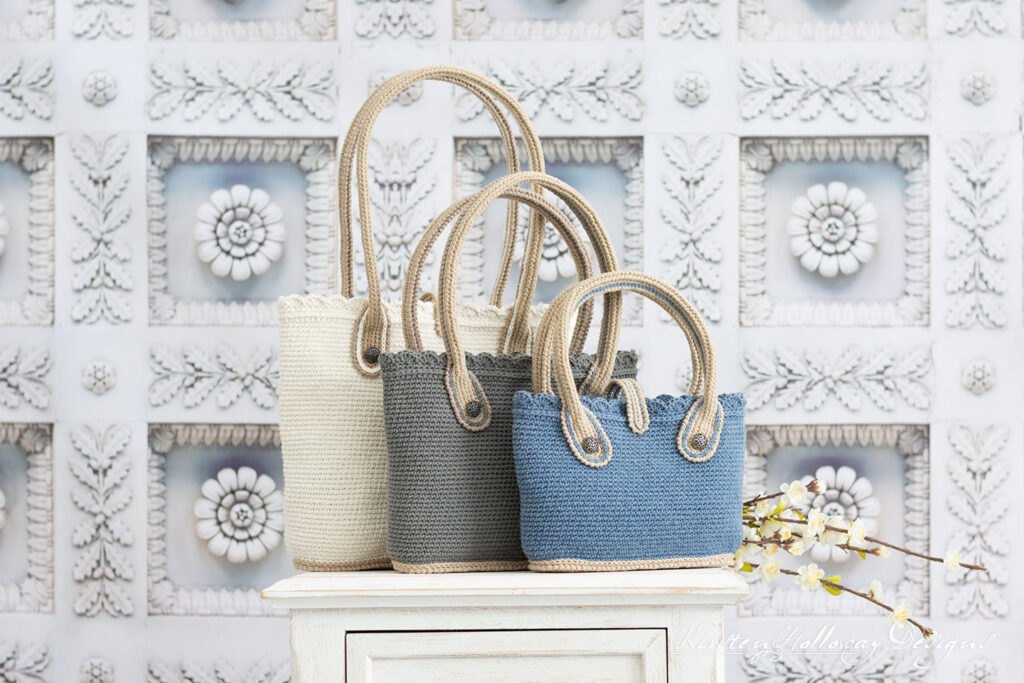
Usually I’m all about the frills and lace, but I wanted to try something different for a change. The Sweet Simplicity bag pattern is made primarily with single crochet stitches, but there are several other stitches especially on the bag bottom/base and handle straps to keep things interesting.
For this project I used Lily Sugar n Cream cotton yarn because it’s sturdy and should hold up for a long time. It comes in so many nice colors! You can go with what I used, or come up with your own color scheme.
When crocheting bags it’s often best to maintain tight tension, so be sure to take frequent breaks if you notice your hands getting tired.
Difficulty:
Easy/Intermediate
Techniques used: reverse single crochet (crab stitch) post stitches, surface slip stitches, working in the back loop only, half-double crochet in the 3rd loop.
Materials Needed:
- 3.25mm hook, or hook needed to obtain gauge (bag body)
- 3mm hook (for handles, straps, and trim)
- 415 (525, 685) yds of #4 Lily Sugar n Cream Cotton Yarn in 2 colors of your choice (I used Jute, Denim Blue, Overcast, and Ecru.)
- Yarn needle
- Scissors
- Size 2 Snap or magnetic clasp for closure strap
- Sewing needle and small amount of thread
- 4 5/8” Pewter Waves Metal Shank Buttons
- 2 yds 4.5mm cotton rope
- (Optional) Sheet of plastic canvas for reinforcing bottom of bag
- (Optional) Stitch markers
Stitches Used:
- ch = chain
- sl st = slip stitch
- sc = single crochet
- hdc = half double crochet
- dc = double crochet
- BPsc = back post single crochet
- rsc = reverse single crochet (crab stitch)
Additional Terms:
- hdc in the 3rd loop = Look at the top of the stitch, and locate the sideways “V”, bend the stitch to look at the back, and you should see another “V”. You’ll be working into the back loop of that “V”, this is called the 3rd loop.
- BLO = back loop only
- prev = previous
- st/sts = stitch/stitches
Gauge:
- Bag body: 18 sc in 4”, 10 rounds give 2” of height
- Handles: 20 sc in 4”
Measurements:
(Handles are not included in these measurements.)
- Small bag: 11” wide by 7 1/2” tall
- Medium bag: 13” wide by 9 1/2” tall
- Large bag: 15” wide by 11 1/2” tall
Additional Notes:
- ch-1 at beginning of round does not count as a stitch.
- Use tight tension when working this bag. It will end up stiffer and more “formed”.
- Since this bag pattern does require tight tension don’t forget to take frequent breaks to drink a glass of water and stretch.
- Bonus option 1: You can turn these bags into cute little baskets for holding things in your guest room or bathroom: Follow the instructions through round 9, then repeat round 10 of the bag 20 times (Approximately 4″ of height). After that, go to the scalloped edging to finish. Do not add straps.
- Bonus option 2: The body of this bag is written in multiples of 4. If you are really adventurous, you can actually use the stitch pattern from the Secret Garden Cowl (Rounds 1-8, then repeat Rounds 2-8 until it’s as tall as you want), or the Layer Cake Cowl (Rounds 1-8, then repeat round 3-8 until it’s as tall as you want), then continue to the scalloped trim section on this pattern and complete the bag straps as written
Sweet Simplicity Bag (US Terms):
Bag bottom (make 2):
Crochet your first oval in color A (Jute). Crochet your second oval in color B until round 4, then switch to color A for round 5.
Round 1: ch 31, [39, 47], 3 sc in second ch from hook, sc in next 28 [36, 44] sts, 3 sc in final st, continue working around end of chain and up other side, sc in next 28 (36, 44) sts, join with sl st to first sc. (62, [78, 94])
Round 2: ch 1, 2 sc in each of next 3 sts, sc in next 28 [36, 44] sts, 2 sc in each of next 3 sts, sc in next 28 [36, 44] sts, join with sl st to first sc. (68 [84, 100])
Round 3: ch 1, 2 sc in each of next 6 sts, sc in next 28 [36, 44] sts, 2 sc in each of next 6 sts, sc in next 28 [36, 44] sts, join with sl st to first sc. (80 [96, 112])
Round 4: ch 1, sc in next 3 sts, 2 sc in each of next 6 sts, sc in next 34 [42, 50] sts, 2 sc in each of next 6 sts, sc in next 31 [39, 47] sts, join with sl st to first sc. (92 [108, 124])
Special notes when making second oval: drop color B, and fasten off. Complete round 5 with color A.
Round 5: ch 1, sc in each st around, join with sl st to first sc. (92 [108, 124])
Your ovals should be about 2” wide.
Fasten off, weave in ends for first oval, on second oval you can continue to round 6 without fastening off.
Optional instructions if using plastic to reinforce the bottom of the bag:
- Trace the outline of one of your ovals on the plastic and cut it out about 1/4” smaller than your oval.
- Place your ovals on top of each other with wrong sides facing together and right sides facing out. If you are using a piece of plastic place that between the 2 sides. You should now have a bag bottom sandwich (please do not taste it-it’s far too stringy). 🤭
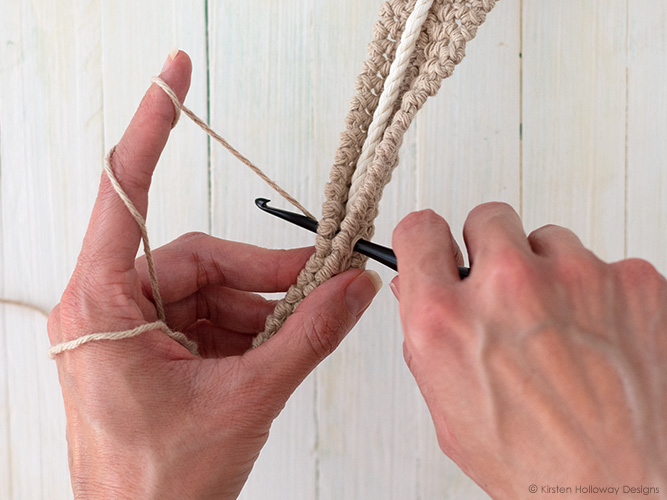
In the following round you will join your ovals together using reverse single crochet (also known as the crab stitch). You will be working through the back loops of each oval. This will create a decorative line. It is a stylistic element, but it’s also easier on the hands than going through both loops when maintaining such tight tension.
This section where you create the bottom of the bag is the most complex part of the pattern. Once you get past this it’s smooth sailing! Here is a picture of how the bottom of the bag should look as it comes together:
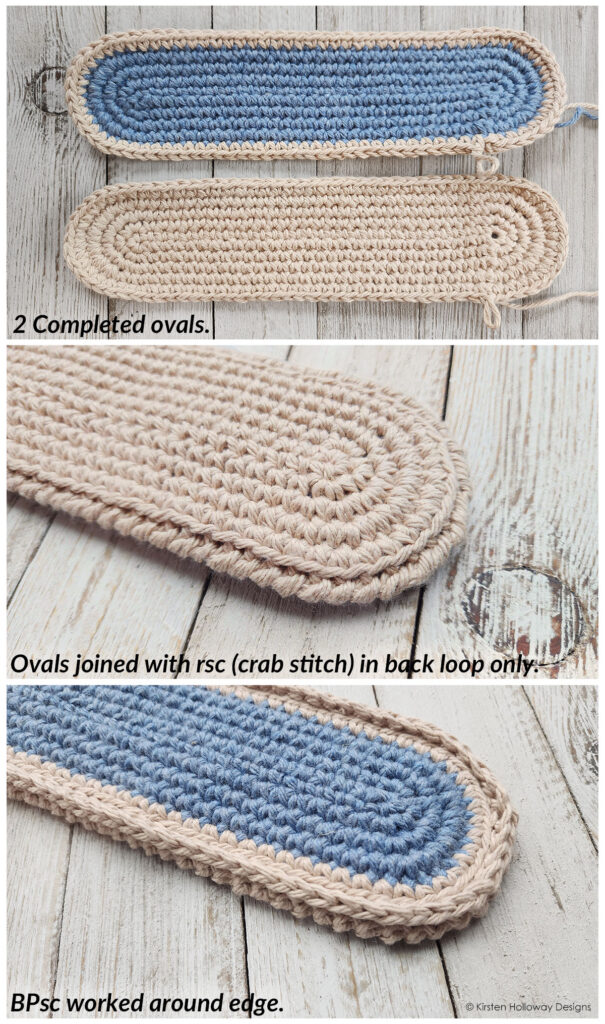
With Color A, working through BLO of both ovals,
Round 6: rsc in each st around, join with sl st to first rsc.
The oval in color A will be the bottom of your bag, and the oval in color B with the final round done in color A will be the inside of the bag. You will want the inside of the bag facing up for this next part.
Also, the outer edge of your project should be the “right side”. If it’s not then your bag will be inside out and the pretty details at the top will be on the inside of the bag. Your pocketbook will not appreciate the texture and its zippers are especially prone to arguments with those details.
Fasten off, and weave in ends.
With color B facing you,
Round 7: working through both layers of the bottom, between rounds 5 and 6, BPsc in each st around, join with sl st. (92, 108, 124) Note: if you have trouble getting your hook through both layers you may wish to use a slightly larger hook to open up the holes between the rounds.
Round 8: Move working yarn to front, sl st around each st in round 7, join with sl st or invisible join.
In the next round you will need to increase across 4 sts at what will be each end of the bag. Since you may have attached your working yarn in a different place than I have you will need to eyeball this. Use stitch markers and mark 4 stitches at each end of the bag and then work 2 sc into each of those 4 sts. Both sides of the bag should have the same number of stitches between them. For example, the small bag will have 42 sts between each increase at the end.
With color B,
Round 9: ch 1, sc evenly around bag working 4 increase stitches at each end of the bag (this will add a total of 8 sts to the count), join with sl st to first sc. (100 [116, 132])
The following round adds height. You will complete round 10:
- 30 times for a small bag,
- 40 times for a medium bag,
- 50 times for a large bag,
- Bonus add-on: 20 times for a short storage basket
Continue using tight, even tension. This will help the sides of your bag to be sturdier:
Round 10: ch 1, sc in each st around, join with sl st to first st. (100 [116, 132])
Scalloped Trim:
This adds a braided ridge, and the scalloped edge to your bag. If you don’t want scallops at the top of your bag you are welcome to substitute rsc for the shells in round 3 of the following section.
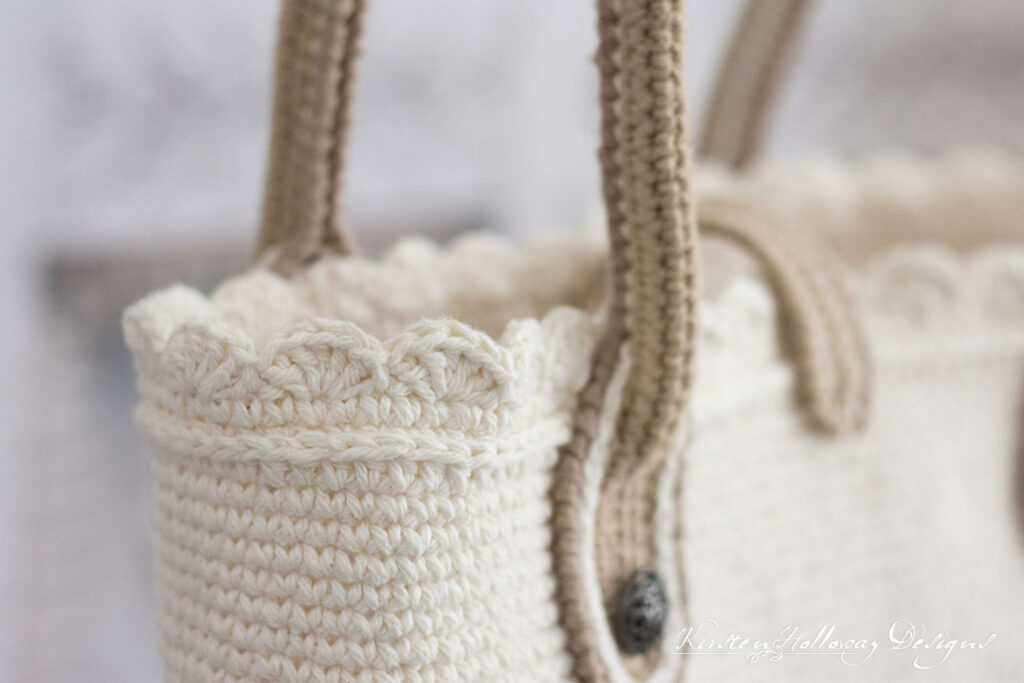
Round 1: ch 1, hdc in each st around, join with sl st to first sc. (100 [116, 132])
Round 2: ch 1, working in 3rd loop of hdc, sc in each st around, join with sl st to first sc. (100, [116, 132])
Round 3: *sk st, 5 dc in next st, sk st, sl st in next st; repeat from * around, final sl st counts as join. (25, [29, 33] petals)
Fasten off, and weave in ends.
If you decided to make the basket add-on this is where the pattern ends. You could make some very short straps for each end following the same idea as the handles, but I haven’t put the math together for that yet.
Bag Handle Straps (make 2):
The small bag gets an arm strap, the larger bags are written with a shoulder strap. You are welcome to mix and match, or even adjust the length of your chain to make your straps longer or shorter, just follow the idea below:
- Small (finished strap length is approximately 20”)
- Medium (finished strap length is approximately 24”)
- Large (finished strap length is approximately 28”)
Materials Needed:
- 3mm hook, or hook needed to obtain gauge
- 2 yds 4.5mm cotton rope for using inside handle straps
Additional Notes:
- The gauge on the handles should be 20 sc sts in 4”.
- Use tight tension so your straps don’t stretch as much.
Leaving a 15” tail, using 3mm hook, and very tight tension, ch 104 [130, 156],
Round 1: 3 sc in first ch, sc in next 101 [127, 153] sts, 3 sc in final st of row, continue working around end of chain and up other side, sc in next 101 [127, 153] sts, join with sl st to first sc.
Round 2: ch 1, 2 sc in each of next 3 sts, sc in next 101 [127, 153] sts, 2 sc in each of next 3 sts, sc in next 101 [127, 153] sts, join with sl st to first sc.
Round 3: ch 1, 2 sc in each of next 6 sts, sc in next 101 [127, 153] sts, 2 sc in each of next 6 sts, sc in next 101 [127, 153] sts, join with sl st to first sc.
Round 4: rsc in each st around, join with sl st to first rsc.
Fasten off, leaving a 15” tail for sewing one end of strap to bag. Use length of yarn from beginning of strap to sew other end to bag.
Assembling Bag Handle Straps
Measure 3″ from both ends of shoulder strap. You will sew these ends flat to the bag with the tails left over from the beginning and ending to finish your strap in a little bit.
Cut length of 4.5mm cotton rope approximately 2-3″ longer than the remaining strap (you will trim off the excess later). This rope will lay at the center of your strap giving it some extra durability and shape. I do not recommend crocheting this style of strap without putting the rope through the center because the straps will be more prone to growing with use.
Tie off one end tightly with piece of heavy-duty thread or twine. You’ll whip the other end once you know exactly how long the center of your rounded strap will be. I have a step-by-step tutorial on how to “whip” the end of a cotton cord so that it does not fray out over here. Coat ends of rope with fray check if you wish.
Note: It is possible to crochet this next section without cutting the yarn and reattaching it multiple times, but the transitions between slip stitching through one layer to 2 layers and back to one layer will leave a little extra string that will be visible if you are up close. The bag will look more professional without the extra bits of string showing, however, so that’s how I’ve written it below:
With Color B,
Round 5: Count 18 sts from end of strap (approximately 3” from end), with front side showing, sl st between rounds 2 and 3 continuing around end of strap and up the other side the same distance.
Cut yarn, and fasten off.
Place the rope in the center of the strap and fold the strap over the rope. Continue where you left off by slip stitching both sides of the strap together with a new piece of yarn (the rope should be in the center).
Once you are 18 sts (approximately 3”) from other end of strap cut yarn, and fasten off.
Continue where you left off slip stitching through only 1 layer of the strap and work around the end and up to the other side the same distance.
You can now trim your rope so it fits neatly in the center of your strap and whip the other end so it doesn’t fray out.
Fasten off, and weave in ends running them through the center of both ends of the rope a few times as you go. This will help to prevent the strap from growing in length as you use the bag.
Attaching Straps to Bag:
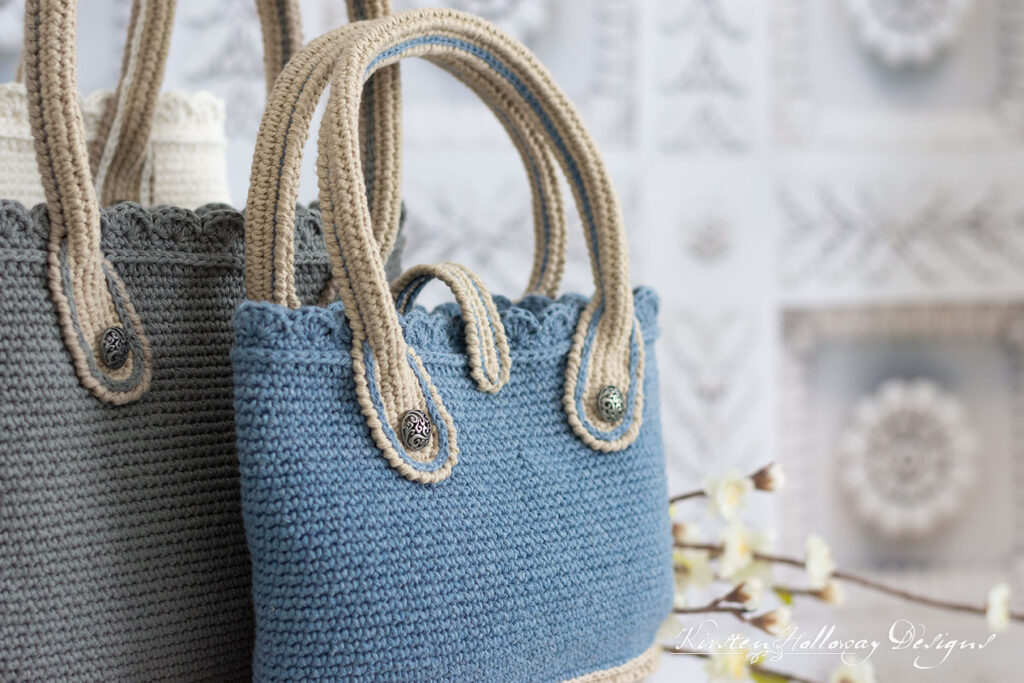
Angle the ends of the straps so they tilt toward the center of the bag as shown in the pictures (Denim Blue and Overcast bags). Sew straps to one side of bag. You may sew them on without tilting the straps if you wish. You can see that demonstrated on the Ecru bag.
Repeat for other side of bag.
Sew buttons in the center of the bottoms of each strap end.
Fasten off, and weave in ends.
Small Closure Strap for Middle of Bag:
This next step is optional, but it will help to keep the top of the bag from gaping open as much. The differences in the look between the slip stitching on the handles and the slip stitching on the closure strap is achieved by which side of the piece was facing me as I crocheted around.
With Color A,
Ch 30,
Round 1: 3, sc in first st, sc in next 28 sts, 3 sc in final st of row, continue working around end of chain and up other side, sc in next 28 sts, join with sl st to first sc.
round 2: ch 1, rsc in each st around, join with sl st.
Fasten off and weave in ends.
With Color B,
Round 3: With wrong side of strap facing you, sl st through strap between rounds 1 and 2, Note: This will give you a finer line as shown in the picture above.
Fasten off leaving 10″ strap for sewing end of strap to back of bag.
Position closure strap in center of bag between handles.
Sew strap to back of bag with 10″ tail.
With needle and sewing thread,
Sew snap to underside of strap end. Sew other side of snap to front of bag just below the trim as shown in the pictures.
All done! You may line your bag or add a zipper if you wish. If I had had more time and energy I would have added a couple of large embroidered flower outlines to the bag. Maybe in the future!
Want more gorgeous crochet patterns, and a little encouragement for your day? Sign up for my newsletter here! That way you’ll never miss out on special events, or freebies I’m offering.
JOIN ME ON SOCIAL MEDIA
I would love to see a picture when you’re done, so please feel free to come by my Facebook group and show off your finished project! Be sure to tag @kirstenhollowaydesigns when you share pictures of your project on Instagram!
You can also follow me on Facebook, Pinterest, Instagram, and Ravelry for more beautiful crochet patterns.
PATTERN TERMS AND CONDITIONS:
You are welcome to share the link to this pattern, using one image of your choice, on your site, but please do not share the written patterns themselves, this includes my Ravelry downloads or translations of these patterns, or use additional images. You do not have permission to use my images by themselves to create pinnable graphics for Pinterest, however they may be included in a roundup pin if there are 4 or more other patterns. If you sell finished items online, please do not use my pictures for your listings. I’m positive that your work is of high enough quality for you to sell the finished piece. Have confidence in your abilities! <3 Thank you!
This pattern was made to be used by individuals and small business crocheters alike. Selling your finished pieces in boutiques, at farmer’s markets, craft shows, and other local events is encouraged! Please credit/link Kirsten Holloway Designs when selling finished products online. The only thing I require is that this pattern not be used commercially to produce hundreds of thousands of copies. If you enjoyed this pattern or found it useful, why not share a link to this post with your friends?


