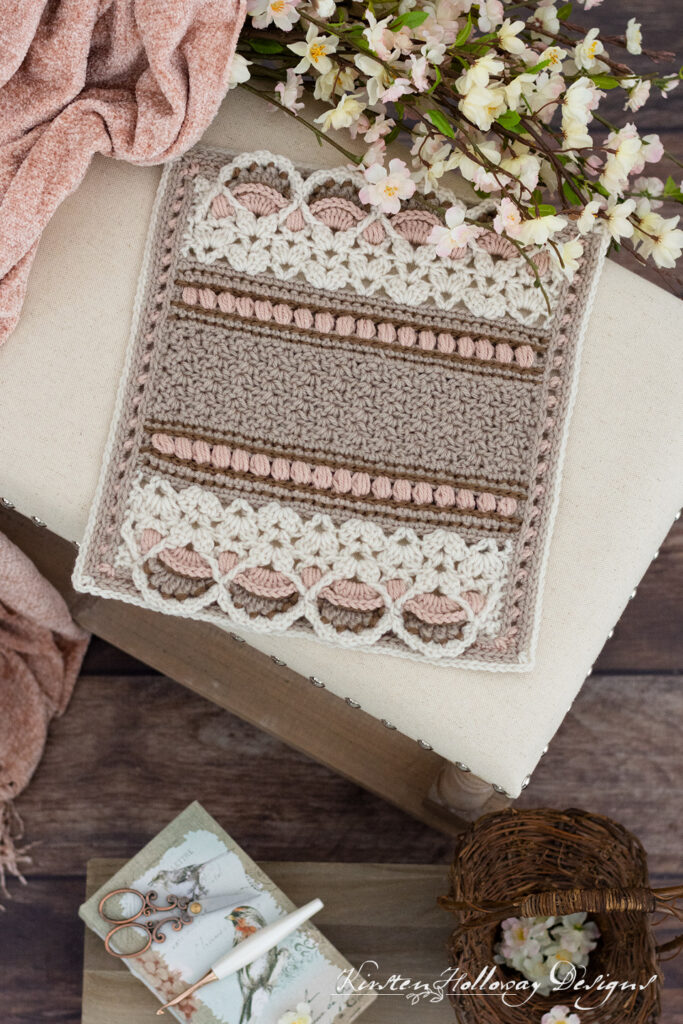
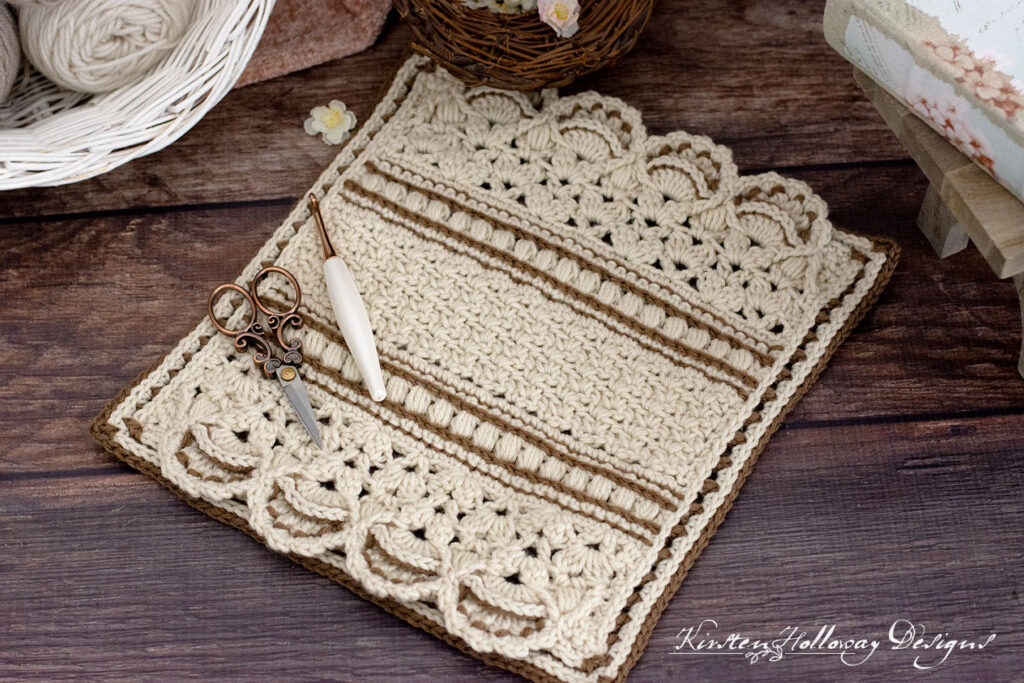
This lacy 12″ square is filled with lots of beautiful textures! Switching up the colors takes the look from sweets shop to vintage heirloom treasure. Pair this crochet square with plain texture afghan blocks for a beautifully tactile design. Find the free crochet pattern instructions below, or purchase a print-optimized, ad-free PDF by clicking here.
Click here to add this pattern to your Ravelry queue!
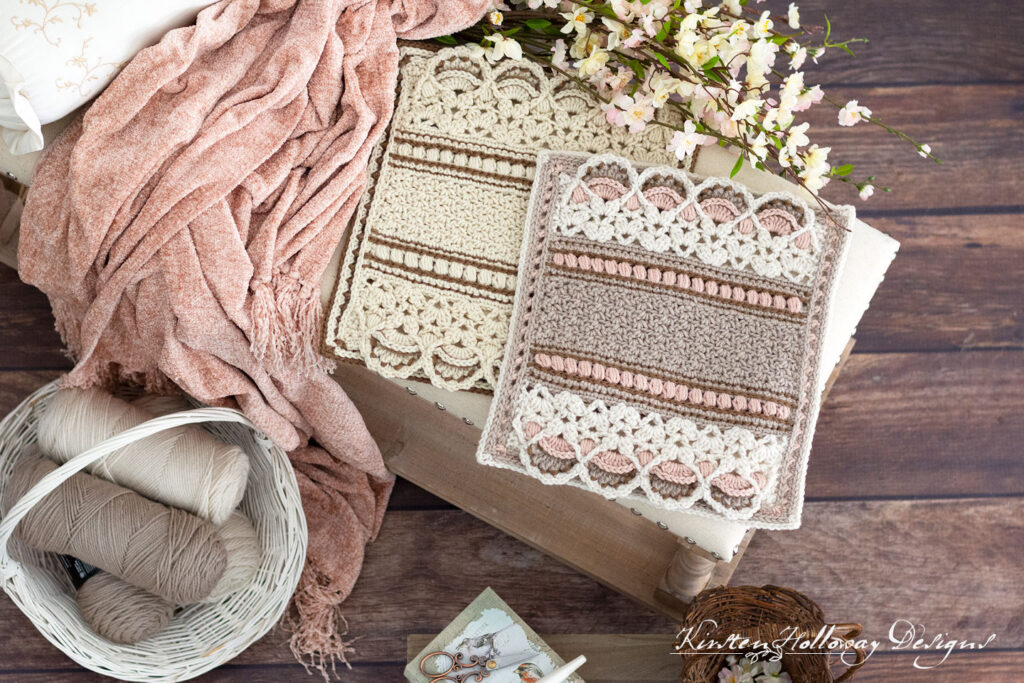
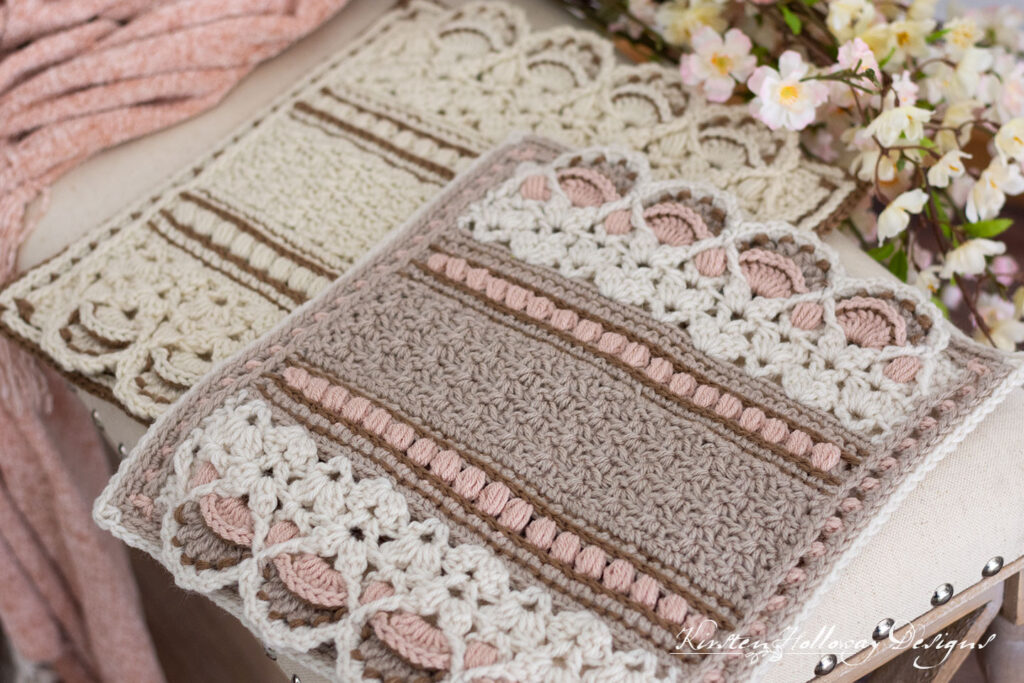
Most of my 12″ square patterns are completely worked in the round, but this design is worked back and forth in rows until the very end. Color changes work with the textures to create an almost endless variety of looks. Darker accent stripes really make the stitches pop! It may look complex but it’s really not too bad. You can always come by my Facebook group and ask questions if you get stuck.
This square is part of the Stashbusting CAL hosted by the Unraveled Mitten. So if you have some odds and ends of yarn that need using up, why not take a look over there. There will be a total of 20 squares once the CAL is finished. 🙂
I recommend #4 worsted weight yarn in 4 colors for this square, but it also looks perfectly lovely in 2 colors as you can see in the square on the left. Red Heart Super Saver, Red Heart With Love, or Caron One Pound are great for this project!
As a bonus, I have included some notes at the very bottom of this pattern for a plain version of the square using the wattle stitch which you see in the center. You will add the outside trim as normal.
Let’s get started, shall we?
Difficulty:
Intermediate
Materials Needed:
225 yds #4 Worsted weight Red Heart Super Saver yarn in Off White, Oatmeal, Cafe, and Bernat Super Value in Primrose, or 4 colors of your choice.
5mm hook, or hook needed to obtain gauge
Yarn needle
Scissors
Stitch markers
Stitches Used:
ch = chain
sl st = slip stitch
sc = single crochet
hdc = half double crochet
dc = double crochet
FPtr2tog = Front Post treble crochet 2 together
2dc cluster = dc2tog in same st
3dc cluster = dc3tog in same st
Additional Terms:
Puff st: yo, insert hook into st, pull up a loop 4 times, pull through 8 loops, yo pull through 2 loops.
Large puff st: yo, insert hook into st, pull up a loop 5 times, pull through 10 loops, yo pull through 2 loops.
Cluster shell: (3dc cluster, ch 2, 3dc cluster) in same st or sp
V stitch: (dc, ch 1, dc) in same stitch
Elizabeth Stitch: insert hook into st, yo, draw up a loop, yo, insert hook into same st, draw up a loop, yo pull through all 4 loops on hook. These stitches should be as tall as a sc stitch.
Back bar of sc (not to be confused with back loop) – Instructions: Look at the back of the stitch and locate the short bar that runs horizontal. Work all stitches for that section into this bar.
sp/sps = space/spaces
ch/chs = chain/chains
Prev = previous
Gauge:
Wattle stitch section at center of square should measure 3” tall by 9 ¾” wide by row 7.
Measurements:
12” x 12” when blocked
Additional notes:
-You’ll begin with the wattle stitch at the middle of the square, then transition into the puff stitches before finally moving into the lace and flowers at the ends. The second end will be worked similarly, starting just before the puff stitches and continuing out to the ends. The trim rounds are then added, followed by surface slip stitching near the rows of puff stitches.
-ch 1 at beginning of row is not counted as a stitch unless otherwise indicated.
-To cut down on the amount of ends you have to work in, carry your working yarn across the row and work the other color over the top of the carried yarn. You will want to do this on the rows with puff stitches, and on the rows with the shells and puffs.
-There are 2 bonus squares at the bottom of this post that will match the main square. You will need additional yarn beyond what I’ve listed at the top if you wish to complete them.
Memories of Yesterday (US Terms):
Click here to purchase an ad-free, print-optimized PDF of this pattern on LoveCrafts
With Color A,
Leaving 18” tail (for minimizing the gap between the chain row and the first row of the Wattle Stitch a little later on in this pattern), Ch 39,
Row 1: working in 3rd ch from hook (place st marker in that chain), (sc, ch 1, dc), sk 2 sts, *(sc, ch 1, dc), sk 2 sts; repeat from * across, sc in final st of row, ch 1, turn. (12 wattle stitches, 1 sc)
Row 2: sk 2 sts, *(sc, ch 1, dc) in ch-1 sp, sk 2 sts; repeat from * across, omitting sk-2 in final repeat, sc in ch at end of row, ch 1, turn. (12 wattle stitches, 1 sc)
Repeat row 2 5 times.
Gauge should measure 3” tall by 9 ¾” wide at this point.
I will now include right side (RS) and wrong side (WS) notations at the beginning of each row. This will ensure that your texture all shows up on the correct side. You with the sharp eyes will have caught that this square pattern actually starts on the WS.
Row 8 (RS): sk st, sc in each remaining st and in each ch-sp across, sc in ch at end of row, ch 1, turn. (37)
Row 9 (WS): sc in each st across, ch 1, turn. (37)
Row 10 (RS): dc in first sc, join color B, carry color A under puff sts, puff st in next st, *ch 1, sk st, puff st in next st; repeat from * across, drop color B and fasten off, with color A, dc in final st of row, ch 1, turn. (18 puff sts,17 ch-1 sps, 2 dc)
Row 11 (WS): sc in each st and in each ch-sp across, ch 1, turn. (37)
Row 12 (RS): sc in each st across, ch 1, turn. (37)
Drop color A and fasten off.
Join color C,
Row 13 (WS): dc in first st, sk st, v-stitch in next st, *sk 3 sts, (3dc cluster, ch 2, 3dc cluster) in next st, sk 3 sts, v-stitch in next st; repeat from * across, when there are 2 sts left in row sk st, dc in final st of row, ch 1, turn. (5 v-stitches, 4 cluster shells, 2 dc)
Row 14 (RS): dc in first st, sk st, (3dc cluster, ch 2, 3dc cluster) in ch-1 sp, *sk 2 sts, v-stitch in ch-2 sp, sk 2 sts (3dc cluster, ch 2, 3dc cluster) in ch-1 sp; repeat from * across, when there are 2 sts left in row sk st, dc in final st of row, ch 1, turn. (5 cluster shells, 4 v-stitches, 2 dc)
In the following row you will need to place stitch markers in the first and last dc of the row as well as in each dc for the v-stitches you create. You should have a total of 12 marked stitches when you complete row 15. *You will be working in the marked v-stitches in row 17, but be skipping them in row 16.*
Row 15 (WS): dc in first st (place stitch marker), sk st, v-stitch in ch-2 sp, sk 2 sts, (3dc cluster, ch 2, 3dc cluster) in ch-1 sp, sk st, v-stitch in ch-2 sp; repeat from * across, when there are 2 sts left sk st, dc in final st of row (place stitch marker—you’ll need it in row 18), ch 1, turn. (5 v-stitches, 4 cluster shells, 2 dc)
Row 16 (RS): hdc in first st, with color B, carry color C under puffs and shells, ch 1, sk st, large puff in ch-1 sp, ch 1, *sk 2 sts, (hdc, 6 dc, hdc, ch 1) in ch-2 sp, sk 2 sts, large puff in ch-1 sp, ch 1; repeat from * across, when there are 2 sts left sk st, drop color B and fasten off, with color C, hdc in final st of row, ch 1, turn. (2 hdc, 5 large puffs, 4 large shells, 10 ch-1 sps)
Optional accent row: Using color D, sl st across large puff st, *sl st into ch-1 sp, sl st across each st in shell, sl st into ch-1 sp, sl st, across top of large puff st; repeat from * to end of row. Drop color D and fasten off.
The following row is worked behind row 16 in the tops of the marked dc sts that make up the V-stitches from row 15 (if you’re new to v-stitches they are made up of 2 dc with a ch-1 sp between). Your ch-2 will go behind the puff sts you made in row 16 and will be “sandwiched” between 2 sc sts (worked into the tops of those marked v-stitches).
Row 17 (WS): sk st, sc in next st, ch 2, sk puff st, sc in next st, *ch 5, sk shell, sc in next st, ch 2, sk puff st, sc in next st; repeat from * across, at end of row sk final st, ch 1, join with sl st to top of hdc from row 16, ch 1, turn. (10 sc, 4 ch-5 sps, 5 ch-2 sps)
In the following row you will work large cluster shells in the ch-5 sps you made in row 17, but you will completely skip the ch-2 sps for now.
Row 18 (RS): sc in top of same hdc from row 16, sc in ch-1 sp between hdc and puff st from row 16, FPtr2tog placing first leg around marked dc at end of row 15, place second leg around top of 3dc cluster from row 15, *with color A, working in ch-5 sp from row 17 ([2dc cluster, ch 1] 5 times, 2dc cluster), with color C, FPtr2tog placing first leg around top of 3dc cluster from row 15, place next leg around top of next 3dc cluster from row 15; repeat from * across, when you arrive at end of row second leg of FPtr2tog will be worked around dc at end of row 15, sc in ch-1 sp between puff and hdc at end of row (this space and the next stitch may be hiding), sc in top of hdc, ch 1, turn. (4 large cluster shells, 5 FPtr2tog, 4 sc)
Row 19 (WS): sc in next 2 sts, 2 dc in ch-2 sp from row 17, *ch 5, sk large cluster shell, 2 dc in ch-2 sp from row 17: repeat from * across, sc in final 2 sts (from row 18), ch 1, turn. (4 ch-5 sps, 10 dc, 4 sc)
Optional accent row: With right side facing you, drop color C, with color D, *working across shell: BPsc around top of 2dc cluster, ch 1] 5 times, BPsc around top of next 2dc cluster, sk st (this will be the FPtr2tog stitch); repeat from * across, once you come to the last 2dc cluster cut color D and fasten off. Continue row 20 with color C,
Note: If you have decided to add the accent row you will work through the ch-1 sps between each 2dc cluster and through the ch-1 sps of the accent row. This will join the two together into 1 layer.
Row 20 (RS): sc in first 2 sc sts (place st markers in both sts), insert hook under the center of FPtr2tog from row 18, above the puff st, and through the center of the 2 dc sts from row 19 and draw up a loop, with very tight tension sl st these rows together, note: this slip stitch serves to tie the flowers and the chains across the back together, sk st, *[(3 sc, sl st) in ch-1 sp between clusters] 5 times, sk st, insert hook under the center of FPtr2tog from row 18, above the puff st, and through the center of the 2 dc sts from row 19 and draw up a loop, with very tight tension sl st these rows together, sk st; rep from * across, omitting the sk st in final repeat, sc in final 2 sts of row (place stitch marker in both sts). (4 sc, 5 sl sts, 20 small petals)
Fasten off, and weave in end.
You will now essentially be repeating the design you made in rows 8-20 on the opposite side of your square.
With RS facing, rotate square and attach color A in same st where you placed your very first stitch marker,
Row 1 (RS): sc in next 37 sts, ch 1, turn. (37)
Sew gap together between this row and row 1 at the very beginning of your project with 18″ tail.
Row 2 (WS): sc in each st across, ch 1, turn. (37)
Row 3 (RS): dc in first sc, join color B, carry color A under puff sts, puff st in next st, *ch 1, sk st, puff st in next st; repeat from * across, drop color B and fasten off, with color A, dc in final st of row, ch 1, turn. (18 puff sts,17 ch-1 sps, 2 dc)
Row 4 (WS): sc in each st and in each ch-sp across, ch 1, turn. (37)
Row 5 (RS): sc in each st across, ch 1, turn. (37)
Drop color A and fasten off.
Join color C,
Row 6 (WS): dc in first st, sk st, v-stitch in next st, *sk 3 sts, (3dc cluster, ch 2, 3dc cluster) in next st, sk 3 sts, v-stitch in next st; repeat from * across, when there are 2 sts left in row sk st, dc in final st of row, ch 1, turn. (5 v-stitches, 4 cluster shells, 2 dc)
Row 7 (RS): dc in first st, sk st, (3dc cluster, ch 2, 3dc cluster) in ch-1 sp, *sk 2 sts, v-stitch in ch-2 sp, sk 2 sts (3dc cluster, ch 2, 3dc cluster) in ch-1 sp; repeat from * across, when there are 2 sts left in row sk st, dc in final st of row, ch 1, turn. (5 cluster shells, 4 v-stitches, 2 dc)
In the following row you will need to place stitch markers in the first and last dc of the row as well as in each dc for the v-stitches you create. You should have a total of 12 marked stitches when you complete row 8. *You will be working in the marked v-stitches in row 11, but be skipping them in row 10.*
Row 8 (WS): dc in first st (place stitch marker), sk st, v-stitch in ch-2 sp, sk 2 sts, (3dc cluster, ch 2, 3dc cluster) in ch-1 sp, sk st, v-stitch in ch-2 sp; repeat from * across, when there are 2 sts left sk st, dc in final st of row (place stitch marker), ch 1, turn. (5 v-stitches, 4 cluster shells, 2 dc)
Row 9 (RS): hdc in first st, with color B, carry color C under puffs and shells, ch 1, sk st, large puff in ch-1 sp, ch 1, *sk 2 sts, (hdc, 6 dc, hdc, ch 1) in ch-2 sp, sk 2 sts, large puff in ch-1 sp, ch 1; repeat from * across, when there are 2 sts left sk st, drop color B and fasten off, with color C, hdc in final st of row, ch 1, turn. (2 hdc, 5 large puffs, 4 large shells, 10 ch-1 sps)
Optional accent row: Using color D, sl st across top of large puff st, *sl st into ch-1 sp, sl st across each st in shell, sl st into ch-1 sp, sl st, across top of large puff st; repeat from * to end of row. Drop color D and fasten off.
The following row is worked behind row 9 in the tops of the marked dc sts that make up the V-stitches from row 8 (if you’re new to v-stitches they are made up of 2 dc with a ch-1 sp between). Your ch-2 will go behind the puff sts you made in row 9 and will be “sandwiched” between 2 sc sts (worked into the tops of those marked v-stitches).
With color C,
Row 10 (WS): sk st, sc in next st, ch 2, sk puff st, sc in next st, *ch 5, sk shell, sc in next st, ch 2, sk puff st, sc in next st; repeat from * across, at end of row sk final st, ch 1, join with sl st to top of hdc from row 9, ch 1, turn. (10 sc, 4 ch-5 sps, 5 ch-2 sps)
In the following row you will work large cluster shells in the ch-5 sps you made in row 10, but you will completely skip the ch-2 sps for now.
Row 11 (RS): sc in top of hdc from row 9, sc in ch-1 sp, between hdc and puff st from row 9, FPtr2tog placing first leg around marked dc at end of row 8, place second leg around top of 3dc cluster from row 8, *with color A, working in ch-5 sp from row 10 ([2dc cluster, ch 1] 5 times, 2dc cluster), with color C, FPtr2tog placing first leg around top of 3dc cluster from row 8, place next leg around top of next 3dc cluster from row 8; repeat from * across, when you arrive at end of row second leg of FPtr2tog will be worked around marked dc at end of row 8, sc in ch-1 sp between puff and hdc at end of row, sc in top of hdc, ch 1, turn. (4 large cluster shells, 5 FPtr2tog, 4 sc)
Optional accent row: With right side facing you, drop color C, with color D, *working across shell: BPsc around top of 2dc cluster, ch 1] 5 times, BPsc around top of next 2dc cluster, sk st (this will be the FPtr2tog stitch); repeat from * across, once you come to the last 2dc cluster cut color D and fasten off. Continue row 12 with color C.
Note: If you have decided to add the accent row you will work through the ch-1 sps between each 2dc cluster and through the ch-1 sps of the accent row. This will join the two together into 1 layer.
Row 12 (WS): sc in next 2 sts, 2 dc in ch-2 sp from row 9, *ch 5, sk shell, 2 dc in ch-2 sp from row 9; repeat from * across, 2 sc in final 2 sts of row 9, ch 1, turn. (4 ch-5 sps, 10 dc, 4 sc)
Row 13 (RS): sc in first 2 sc sts, insert hook under the center of FPtr2tog from row 11, above the puff st, and through the center of the 2 dc sts from row 12 and draw up a loop, with very tight tension sl st these rows together, note: this slip stitch serves to tie the flowers and the chains across the back together, sk st, *[(3 sc, sl st) in ch-1 sp between clusters] 5 times, sk st, insert hook under the center of FPtr2tog from row 11, above the puff st, and through the center of the 2 dc sts from row 12 and draw up a loop, with very tight tension sl st these rows together, sk st; rep from * across, omitting the sk st in final repeat, sc in final 2 sts of row. (4 sc, 5 sl sts, 20 small petals)
You will now move directly into the outside edging rounds. Continue working down the side along the raw edge:
Outside Edging for Square:
-All edging rounds are worked on RS.
-Place stitch makers in the ch-1 sps at each corner to keep track of them.
-ch-1 sps at corners are not included in stitch counts at the end of the rows.
With color A,
Round 1: ch 1, evenly space 38 sc along side of rectangle, when you arrive at end of side ch-1 (place st marker to help you keep track of corner) and continue working in the spaces across the back of the piece: sc in next 2 sc sts, sc in next 2 dc sts note: these may be a bit hard to find since your slip stitch from the final ending rows will be worked between theposts of these 2 dc sts, just do your best, 6 sc in ch-5 sp, *sc in next dc, sc in next dc, 6 sc in ch-5 sp* repeat from * to *, when you get to end of row, sc in next 2 dc sts, sc in final st of row, ch 1, continue working down side of rectangle evenly spacing 38 sc along raw edge, ch 1, continue working across the back of the piece: sc in first st, sc in first st, sc in next 2 dc sts, 6 sc in ch-5 sp, **sc in next 2 dc sts, 6 sc in ch-5 sp** repeat from ** to **, when you get to end of row sc in next 2 dc sts, sc in final 2 sc sts, ch 1 (this is your corner, place stitch marker), join with sl st to first sc at beginning of round. (38 sts per side)
Drop color A,
With color B,
Round 2: ch 1,*working in back bar of sc Elizabeth Stitch in next st, ch 1, sk st* repeat * to * along side edge, (sc, ch 1, sc) in ch-1 sp at corner, working in back bar of sc sc in each st across end, (sc, ch 1, sc) in corner, **working in back bar of sc Elizabth Stitch in next st, ch 1, sk st** repeat ** to ** along side edge, (sc, ch 1, sc) in corner, working in back bar of sc sc in each st across end of row, (sc, ch 1, sc) in ch-1 sp, join with sl st to first Elizabeth stitch. (38 Elizabeth stitches, 38 ch-1 sps, 84 sc, 40 sts per side)
Drop color B, and fasten off.
With color A,
Round 3: 2 sc between last sc of prev round and first Elizabeth st, *sk st, 2 sc in ch-1 sp*, repeat * to * to end of side, sk st, (sc, ch 1, sc) in ch-1 sp at corner, sc in each remaining st of side, (sc, ch 1, sc) in ch-1 sl at corner, sk st, 2 sc between sc and Elizabeth st from prev round, **sk st, 2 sc in ch-1 sp** repeat ** to ** to end of side, sk st, (sc, ch 1, sc) in corner, sc in each remaining st of side, join with sl st to first sc. (42 sts per side)
Drop color A and fasten off.
With color C (or D if you prefer),
Round 4: ch 1, working in back bar of sc, sc in each st around, (sc, ch 1, sc) in each corner, join with sl st to first sc. (44 sts per side)
Fasten off, and weave in ends.
Finishing:
With color D,
With wrong side facing, Surface sl st between both rows of sc on either side of puff stitches.
With right side facing, surface slip stitch between bottoms of puff stitches, and tops of puff stitches.
Fasten off and weave in ends.
Block for best results.
Below are two different bonus squares that will match nicely with the main square. They are easier and not as complex.
Plain Accent Square (Bonus #1):
If you want to crochet a more plain square follow these 2 rows:
With color A,
Row 1: working in 3rd ch from hook (place st marker in that chain), (sc, ch 1, dc), sk 2 sts, *(sc, ch 1, dc), sk 2 sts; repeat from * across, sc in final st of row, ch 1, turn. (12 wattle stitches, 1 sc)
Row 2: sk 2 sts, *(sc, ch 1, dc) in ch-1 sp, sk 2 sts; repeat from * across, omitting sk-2 in final repeat, sc in ch at end of row, ch 1, turn. (12 wattle stitches, 1 sc)
Repeat row 2 until your square measures approximately 9 3/4″ by 9 3/4″.
Edging rounds:
Round 1: sc evenly around entire square making sure there are 36 sts per side, ch 1 at each corner. (144 sc sts, 4 ch-1 sps, 36 sc sts per side)
Drop color A,
Join color C,
Round 2: sc in each st around (sc, ch 1, sc) in each corner, join with sl st to first sc. (152 sc, 4 ch-1 sps, 38 sts per side)
Drop color C,
With Color B,
Round 3: ch 1,*working in back bar of sc Elizabeth Stitch in next st, ch 1, sk st* repeat * to * along side edge, (sc, ch 1, sc) in ch-1 sp at corner, sk st; repeat from * around, join with sl st to first Elizabeth stitch. (76 Elizabeth stitches, 80 ch-1 sps, 8 sc)
Drop color B and fasten off.
With color C,
Round 4: *2 sc between sc of prev round and Elizabeth st, sk st, 2 sc in ch-1 sp] 19 times, sk st, (sc, ch 1, sc) in ch-1 sp at corner, sk st; repeat from * around, join with sl st to first sc. (168 sc, 4 ch-1 sps, 42 sc sts per side)
Drop color C, and fasten off.
With color A,
Round 5: ch 1, working in back bar of sc, sc in each st around, (sc, ch 1, sc) in each corner, join with sl st to first sc. (176 sc, 4 ch-1 sps, 44 sc sts per side)
Optional accent trim: with color D, slip stitch around edge of entire square between rounds 1 and 2.
Fasten off and weave in ends.
Block for best results.
Lacy Accent Square (Bonus #2):
With color C,
Ch 32,
Row 1: dc in second ch from hook, ch 1, sk 2 sts, (2dc cluster, ch 2, 2dc cluster) in next st, sk 2 sts, *v-stitch in next st, sk 2 sts, (2dc cluster, ch 2, 2dc cluster) in next st, sk 2 sts, repeat from * across, ch 1, dc in final st of row, ch 1, turn. (2 dc, 5 2d cluster shells, 4 v-stitches, 2 ch-1 sps)
Row 2: dc in first st, sk 2 sts, v-stitch in ch-2 sp, *sk 2 sts, (2dc cluster, ch 2, 2dc cluster) in ch-1 sp, sk 2 sts, v-stitch in ch-2 sp; rep from * across, dc in final st of row, ch 1, turn.
Row 3: dc in first st, sk 2 sts, (2dc cluster, ch 2, 2dc cluster) in next st, *sk 2 sts, v-stitch in next st, sk 2 sts, (2dc cluster, ch 2, 2dc cluster) in next st; repeat from * across, dc in final st of row, ch 1, turn.
Repeat rows 2 and 3 until your square measures approximately 9 1/2” by 9 1/2”.
We will now switch to working in rounds:
Round 1: Work 31 sc evenly on each side around entire square, work only 1 sc in both the ch-1 and ch-2 sps along the top of the square, ch 1 for corners, join with sl st to first sc. (124 sc, 4 ch-1 sps)
Drop color C,
Join color A,
Round 2: *working in ch-1 sp at corner of square (3dc cluster, ch 3, 3dc cluster, ch 1), sk st, sc in next 29 sts, ch 1, sk st; repeat from * around, join with sl st to first 3dc cluster. (116 sc, 8 3dc clusters, 4 ch-3 sps, 8 ch-1 sps)
Drop color A,
With color B,
Round 3: *working in ch-3 sp at corner of square (hdc, 6 dc, hdc), sk st, sl st into ch-1 sp, ch 1, sk st, working into back bar of sc [Elizabeth Stitch ch 1, sk st ] 14 times, ch 1, sl st into ch 1 sp, sk st; repeat from * around, join with sl st to first hdc. (56 Elizabeth Stitches, 4 large shells)
Drop color B,
With color A,
Round 4: *ch 6, sk large shell sl st into sl st from prev round, [2 sc in ch-1 sp, sk st] 14 times, sl st into sl st from prev round; repeat from * around, join with sl st to sl st from prev round. (120 sc, 4 ch-6 sps)
Drop color A,
With color C,
Round 5: *working in ch-6 sp ([2dc cluster, ch 1] 5 times, 2dc cluster), sk st, working in back bar of sc sc in next 28 sts, sk st; repeat from * around, join with sl st to first 2dc cluster. (112 sc, 4 large cluster shells)
You may wish to use color D to work the BPsc sections around the large cluster shells. If you choose to do this switch back to color C for the sc sections.
Round 6: ch 1, [BPsc around 2dc cluster, ch 1] 2 times, BPsc around next 2dc cluster, ch 2, *[BPsc around 2dc cluster, ch 1] 2 times, BPsc around next 2dc cluster, sc in next 28 sts; repeat from * around, join with sl st to first BPsc. (112 sc, (24 BPsc, 4 ch-2 sps, 16 ch-1 sps)
Drop color C,
With color A,
Round 7: ch 1, FPtr around 3dc cluster from round 2, [(3sc, sl st) in ch-1 sp from round 5] 5 times, omitting final sl st on last time, FPtr around 3dc cluster from round 2, sc in next 28 sts; repeat from * around, join with sl st to first FPtr. (8 FPtr, 112 sc, 20 tiny petals)
Drop color A,
With color B
Round 8: *sk st, working in ch-sps from from round 5, [2 sc in ch-1 sp, sk st] 2 times, (2sc, ch 1, 2 sc) in ch-2 sp, sk st, [2 sc in ch-1 sp, sk st] 2 times, working in back bar of sc, sc in next 28 sts; repeat from * around, join with sl st to first sc. (40 sts per side)
Drop color B, and fasten off.
With color A,
Round 9: sc in each st around, (sc, ch 1, sc) in ch-1 sps at corners, join with sl st to first sc. (42 sts per side)
Drop color A and fasten off.
With color C,
Round 10: working in back bar of sc, sc in each st around, (sc, ch 1, sc) in ch-1 sps at corners, join with sl st to first sc. (44 sts per side)
Fasten off, and weave in all ends.
Block for best results.
Want more gorgeous crochet patterns, and a little encouragement for your day? Sign up for my newsletter here! That way you’ll never miss out on special events, or freebies I’m offering.
JOIN ME ON SOCIAL MEDIA
I would love to see a picture when you’re done, so please feel free to come by my Facebook group and show off your finished project! Be sure to tag @kirstenhollowaydesigns when you share pictures of your project on Instagram!
You can also follow me on Facebook, Pinterest, Instagram, and Ravelry for more beautiful crochet patterns.
PATTERN TERMS AND CONDITIONS:
You are welcome to share the link to this pattern, using one image of your choice, on your site, but please do not share the written patterns themselves, this includes my Ravelry downloads or translations of these patterns, or use additional images. You do not have permission to use my images by themselves to create pinnable graphics for Pinterest, however they may be included in a roundup pin if there are 4 or more other patterns. If you sell finished items online, please do not use my pictures for your listings. I’m positive that your work is of high enough quality for you to sell the finished piece. Have confidence in your abilities! <3 Thank you!
This pattern was made to be used by individuals and small business crocheters alike. Selling your finished pieces in boutiques, at farmer’s markets, craft shows, and other local events is encouraged! Please credit/link Kirsten Holloway Designs when selling finished products online. The only thing I require is that this pattern not be used commercially to produce hundreds of thousands of copies. If you enjoyed this pattern or found it useful, why not share a link to this post with your friends?