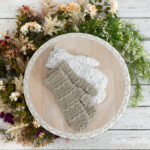
Store your plastic bags from the grocery or craft store in this lacy bag saver and use them later. The crochet pattern for this farmhouse-style plastic bag dispenser features lacy floral stitches and lots of texture. Find the free crochet pattern instructions below, or purchase a print-optimized, ad-free PDF by clicking here.
Click here to add this pattern to your Ravelry queue!
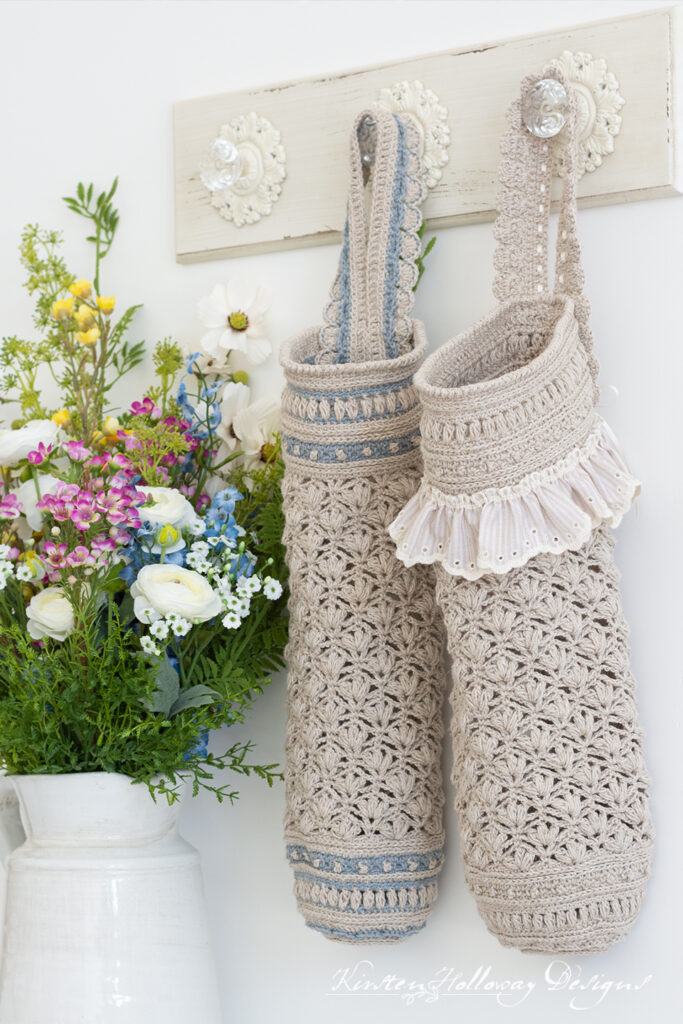
This pretty crochet bag saver is the perfect tool to help you organize that kitchen drawer or cupboard that’s full of loose plastic bags. You know, the one where you open the door to get something else and 3 or 4 plastic bags volunteer to come out to “visit” or wave farewell?
Put a limit on your plastic bag’s social activity by stuffing them neatly into one of these crochet bag holders. This pattern comes in 2 sizes so you can choose the version that will best accommodate the population of your grocery bags. My bag savers are about 16″ long (excluding their handle straps), but you can add extra length to yours if you’d like.
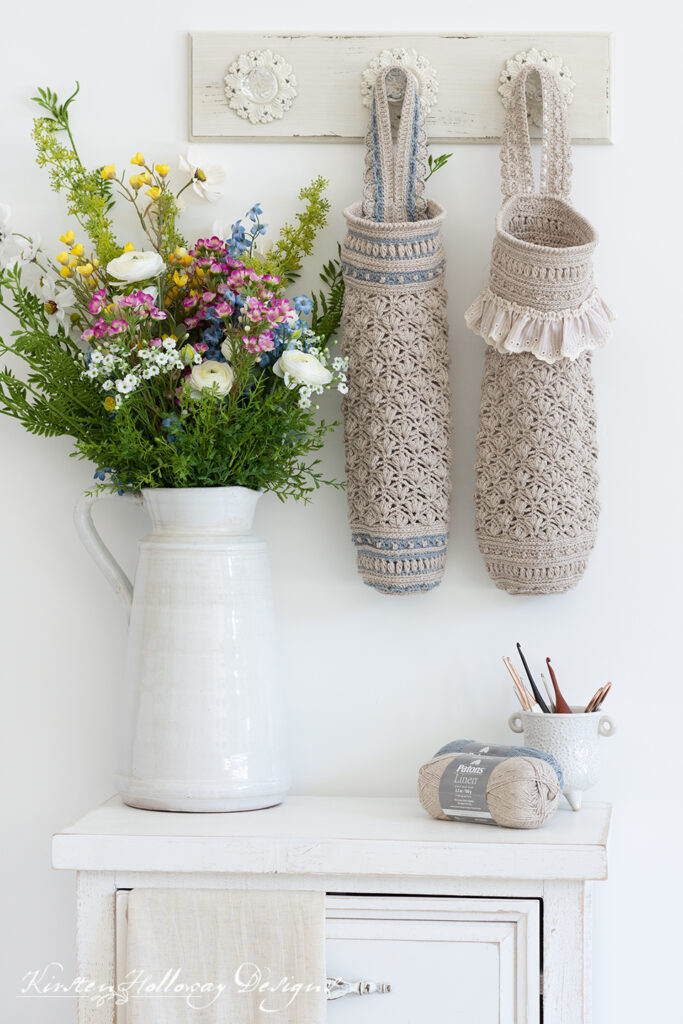
I used the new Patons Linen yarn from Yarnspirations for this project because 1. the “Cauliflower” color is my new favorite hue, and 2. I can never find a good cotton blend yarn in this weight. I need more of it in my life. As far as thickness goes, it’s listed as a #3, but this yarn is comparable to Aunt Lydia’s #3 Fashion Crochet Thread.
There are a couple different ways to sew your handles onto your bags. You can do the more utilitarian version shown on the blue and beige bag, or you can make the fancier strap shown on the beige bag with the ruffle. Here’s a close-up of how the straps look at the back of the bag saver.
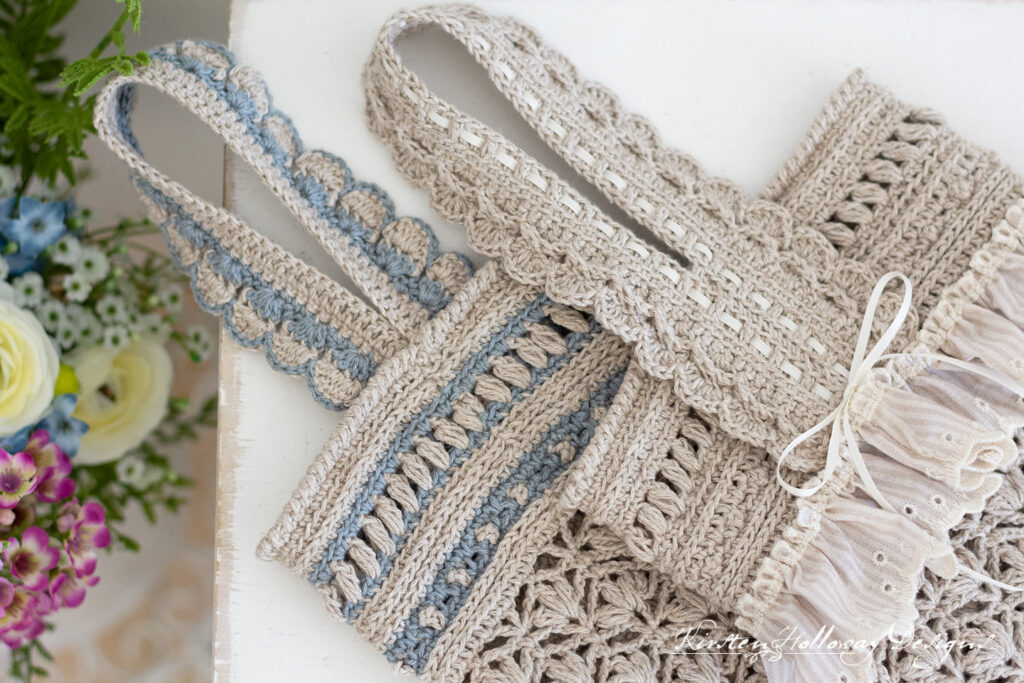
The ribbon bow on the solid colored bag isn’t visible from the front, but it peeks out from the sides just a little bit (and just like a cute undershirt, you’ll know it’s there, even if nobody else can see it under your jacket).
This pattern is extremely versatile and if your state doesn’t use plastic bags anymore I’ve included some notes at the very end of this pattern so you can turn this into a water bottle holder.
Disclaimer: This post contains affiliate links. When you purchase something using these links a small percentage of the sales price goes to me. However, you do not pay any extra for the item you purchase.
Difficulty:
Intermediate
Materials Needed:
2.35mm steel hook
450-475 yds Patons Linen yarn in Cauliflower
50-75 yds Patons Linen yarn in Sky
Hair elastic
Yarn needle
Scissors
(Optional): 1 yd 1/4″ cream ribbon
(Optional): 2 yards 2 3/16″ wide Beige and Grey Striped Eyelet Trim
(Optional): Sewing pins
Stitches Used:
sl st = slip stitch
ch/chs = chain/chains
sc = single crochet
hdc = half double crochet
dc = double crochet
BPsc = back post single crochet
BPhdc = back post half double crochet
BPdc = back post double crochet
Additional Terms:
Puff Stitch (abbreviated “puff” in pattern): yo, pull up a loop 3 times in same st, yo, pull through 6 loops, yo, pull through final 2 loops.
V-stitch: (dc, ch 1, dc) in same st
RSC spike = reverse single crochet (crab stitch) worked in the style of a spike stitch. Insert hook through the top of the stitch 1 row below where you are currently, complete the stitch as you would a normal rsc (or crab stitch)
hdc in the 3rd loop = Look at the top of the stitch, and locate the sideways “V”, bend the stitch to look at the back, and you should see another “V”. You’ll be working into the back loop of that “V”, this is called the 3rd loop.
Back bar of sc = Look at the back of the stitch and locate the short bar that runs horizontal. Work all stitches for the round into this bar. This is a different location than the back loop!
Picot single crochet (psc) = Insert hook through top of stitch, yo, pull up a loop, [yo, draw through 1 loop] 3 times making a ch 3, yo, draw through final 2 loops on hook. Pull your ch-3 sp towards the front of your work instead of pushing it toward the back.
BLO = back loop only
FLO = front loop only
st/sts = stitch/stitches
sp/sps = space/spaces
sk = skip
prev = previous
Gauge:
22 hdc sts in 4″, gauge isn’t super important for this project though.
Measurements:
Approximately 16″ long excluding handle strap, by 6″ (small), 7″ (medium) wide
Additional Notes:
-ch-1, ch-2 and ch-3 at beginning of round does not count as stitch
-This pattern is worked in multiples of 8. You can easily adjust the width.
-Color changes are possible, but there are some small modifications that you’ll need to do to make the color changes uniform and consistent in 2 places. I have written them in for the smaller bag saver, but they can easily be applied to the medium bag saver as well.
-Maybe your state doesn’t use plastic bags anymore, you can still use this pattern to create a water bottle holder. See my notes at the bottom of the pattern.
Bluebird Meadow: A Lacy Farmhouse-Style Plastic Bag Saver Pattern (US Terms):
Click here to purchase an ad-free, print-optimized PDF of this pattern on LoveCrafts
Medium-sized Bag Saver:
Round 1: work 48 hdc around hair elastic, join with sl st to first hdc. (48)
Round 2: ch 1, working in 3rd loop of hdc, sc in each st around, join with sl st to first sc. (48)
Round 3: ch 1, working in BLO, 2 sc in first st, sc in next 6 sts, *2 sc in next st, sc in next 6 sts; repeat from * around, join with sl st to first sc. (56)
Round 4: *sk st, 5 dc in next st, sk st, sl st in next st; repeat from * around, final sl st counts as join. (14 shells)
Slip stitches do not count as stitches and will be skipped in the following round:
Round 5: ch 1, *working across shell: BPdc around next st, BPhdc around next st, BPsc around next st, BPhdc around next st, BPdc around next st; repeat from * around, join with sl st to first BPdc. (70)
Round 6: ch 1, working in BLO, 2 hdc in first st, hdc in next 7 sts, *2 hdc in next st, hdc in next 7 sts; repeat from * around, join with sl st to first hdc. (80)
Round 7: ch 1, working in 3 loop of hdc, 2 sc in first st, sc in next 9 sts, *2 sc in next st, sc in next 9 sts repeat from * around, join with sl st to first sc. (88)
Round 8: ch 1, working in BLO, sc in each st around, join with sl st to first sc. (88)
Round 9: ch 1, puff in first st, ch 1, sk st, *puff in next st, ch 1, sk st; repeat from * around, join with sl st to first puff. (44 puff sts, 44 ch-1 sps)
Round 10: ch 1, *sk st, 2 sc in ch-1 sp; repeat from * around, join with sl st to first sc. (88)
Round 11: ch 1, working in BLO, hdc in each st around, join with sl st to first hdc. (88)
Round 12: ch 1, working in 3rd loop of hdc, sc in each st around, join with sl st to first sc. (88)
Round 13: ch 1, sc in first st, psc in next st, sc in next st, ch 1, sk st, *sc in next st, psc in next st, sc in next st, ch 1, sk st; repeat from * around, join with sl st to first sc. (22 psc, 44 sc, 22 ch-1 sps)
Round 14: ch 1, hdc in each st and ch-1 sp around, join with sl st to first hdc. (88)
Round 15: working in 3rd loop of hdc, hdc in each st around, join with sl st to first hdc. (88)
Round 16: ch 1, working in 3rd loop of hdc, sc in each st around, join with sl st to first sc. (88)
You will now move to the lacy part of the pattern:
Round 17: ch 1, sc in first stitch, *ch 1, sk 3 sts, ([puff, ch 2] 2 times, puff, ch 1), sk 3 sts, sc in next st; repeat from * around, join with sl st to first sc. (11 shells, 11 sc)
Round 18: ch 4 (counts as first dc + ch-1), dc in same st as join, ch 3, *sk to top of “shell” in prev round (this is the second puff of the shell) sc, ch 3, sk to sc between shells, V-stitch, ch 3; repeat from * around, join with sl st to 3rd ch at beginning of round. (11 v-stitches, 11 sc, 22 ch-3 sps)
In the following round you will be working 3 chains at the beginning to get to the height you need to complete the puff stitch. The ch-3 does not count as a stitch and you will skip it when you join the round.
Round 19: ch 3, *sk to ch-1 sp at center of V-stitch from prev round, ([puff, ch 2] 2 times, puff, ch 1) in ch-1 sp, sk 3 chs, sc in top of sc from prev round, ch 1; repeat from * around, join with sl st to top of first puff st. (11 shells, 11 sc)
Round 20: sl st to top of shell in prev round (this is the second puff of the shell), (ch 1, sc), ch 3, sk to sc between shells, V-stitch, ch 3, *sk to top of next shell, sc, ch 3, sk to sc between shells, v-stitch, ch 3; repeat from * around, join with sl st to first sc of round. (11 v-stitches, 11 sc, 22 ch-3 sps)
Round 21: ch 1, sc in first st, ch 1, *sk to ch-1 sp at center of V-stitch from prev row, ([puff, ch 2] 2 times, puff, ch 1) in ch-1 sp, sk 3 chs, sc in top of sc from prev round, ch 1; repeat from * around, join with sl st to first sc. (11 shells, 11 sc)
Repeat rounds 18-21 5 times, Your piece should measure 12 1/2” tall. If you want a longer bag you can continue repeating these rounds as many times as you wish. When you are done move on to the next part:
The following round is a modification on round 18 that will reduce your stitch count back down to 88:
Round 46: ch 4 (counts as first dc + ch-1), dc in same st as join, ch 2, *sk to top of “shell” in prev row (this is the second puff of the shell) sc, ch 2, sk to sc between shells, V-stitch, ch 2; repeat from * around, join with sl st to 3rd ch at beginning of round. (11 v-stitches, 11 sc, 22 ch-2 sps)
Now you will begin the top edging:
Round 47: ch 1, hdc in each st and ch around, join with sl st to first hdc. (88)
If you want to make your bag saver with a ruffled accent round 47 is the round you will sew your ruffle to. If you do not wish to add a ruffle to your bag skip to round 50.
To add a ruffle complete rounds 48 and 49:
Round 48: ch 1, working in 3rd loop of hdc, hdc in each st around, join with sl st to first hdc. (88)
Round 49: ch 1, hdc in each st around, join with sl st to first hdc. (88)
If you don’t want a ruffle, start here after completing round 47:
Round 50: ch 1, working in 3rd loop of hdc, hdc in each st around, join with sl st to first hdc. (88)
Round 51: ch 1, working in 3rd loop of hdc, sc in each st around, join with sl st to first sc. (88)
Round 52: ch 1, sc in first st, psc in next st, sc in next st, ch 1, sk st, *sc in next st, psc in next st, sc in next st, ch 1, sk st; repeat from * around, join with sl st to first sc. (22 psc, 44 sc, 22 ch-1 sps)
Round 53: ch 1, hdc in each st and ch-1 sp around, join with sl st to first hdc. (88)
Round 54: working in 3rd loop of hdc, hdc in each st around, join with sl st to first hdc. (88)
Round 55: ch 1, working in BLO, sc in each st around, join with sl st to first sc. (88)
Round 56: ch 1, puff in first st, ch 1, sk st, *puff in next st, ch 1, sk st; repeat from * around, join with sl st to first small puff, (44 puff sts, 44 ch-1 sps)
Round 57: ch 1, *sk st, 2 sc in ch-1 sp; repeat from * around, join with sl st to first sc. (88)
Round 58: ch 1, working in BLO, hdc in each st around, join with sl st to first hdc. (88)
Round 59: ch 1, working in 3rd loop of hdc, sc in each st around, join with sl st to first sc. (88)
Round 60: ch 1, working in BLO, sc in each st around, join with sl st to first sc. (88)
Round 61: ch 1, sc in each st around, join with sl st to first sc. (88)
In the following round you will be finishing the top edge with the reverse single crochet (crab stitch). You will be working this stitch around the round you just crocheted to give the top edge more sturdiness. The picture below shows what this should look like. The needle is pointing out the round where you will insert your hook to complete the “spike”. Normally you would work the reverse single crochet with a smaller hook and tighter tension, but because this is a “spike” style stitch and you will most likely have tighter tension try using the same size hook you have used to crochet the bag. If your tension is super relaxed then you can go down a hook size.
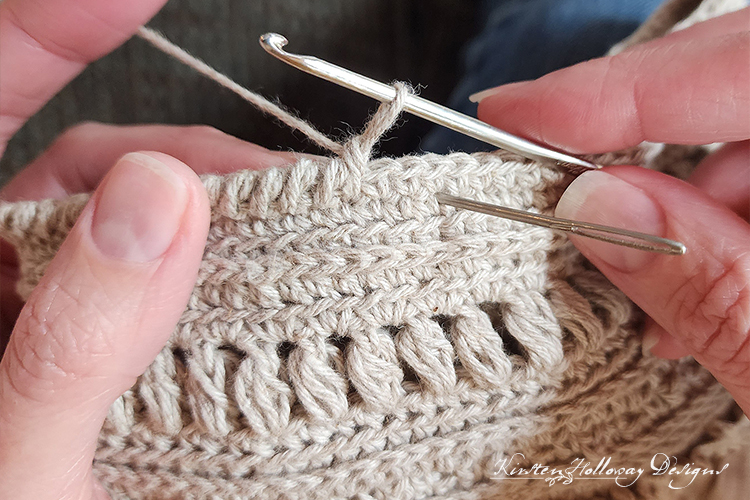
Round 62: ch 1, rsc spike st by inserting hook into top of round 60 and completing the stitch as normal, rsc spike st in each st around, join. (88)
Fasten off and weave in ends.
Small bag saver:
With color A,
Round 1: work 48 hdc around hair elastic, join with sl st to first hdc. (48)
Round 2: ch 1, working in 3rd loop of hdc, sc in each st around, join with sl st to first sc. (48)
Drop color A,
With color B,
Round 3: ch 1, working in BLO, 2 sc in first st, sc in next 6 sts, *2 sc in next st, sc in next 6 sts; repeat from * around, join with sl st to first sc. (56)
Round 4: *sk st, 5 dc in next st, sk st, sl st in next st; repeat from * around, final sl st counts as join. (14 shells)
Drop color B,
Slip stitches do not count as stitches and will be skipped in the following round:
With color A,
Round 5: ch 1, *working across shell: BPdc around next st, BPhdc around next st, BPsc around next st, BPhdc around next st, BPdc around next st; repeat from * around, join with sl st to first BPdc. (70)
Round 6: ch 1, working in BLO, 2 hdc in first st, hdc in next 34 sts, *2 hdc in next st, hdc in next 34 sts; repeat from * around, join with sl st to first hdc. (72)
Round 7: ch 1, working in 3rd loop of hdc, sc in each st around, join with sl st to first sc. (72)
Drop color A,
With color B,
Round 8: ch 1, working in BLO, sc in each st around, join with sl st to first sc. (72)
Drop color B,
With color A,
Round 9: ch 1, puff in first st, ch 1, sk st, *puff in next st, ch 1, sk st; repeat from * around, join with sl st to first puff. (36 puff sts, 36 ch-1 sps)
Drop color A,
With color B,
Round 10: ch 1, *sk st, 2 sc in ch-1 sp; repeat from * around, join with sl st to first sc. (72)
Drop color B,
With color A,
Round 11: ch 1, working in BLO, hdc in each st around, join with sl st to first hdc. (72)
Drop color A,
With color B,
Round 12: ch 1, working in 3rd loop of hdc, sc in each st around, join with sl st to first sc. (72)
Round 13: ch 1, sc in first st, with color A, psc in next st, with color B, sc in next st, ch 1, sk st, *sc in next st, with color A, psc in next st, with color B, sc in next st, ch 1, sk st; repeat from * around, join with sl st to first sc. (18 psc, 36 sc, 18 ch-1 sps)
If you are going to be working with colors you’ll need to follow these modifications so your color stripes look more balanced. This basically splits the hdc in round 14 into 2 sc rounds:
Round 14 (modified): ch 1, sc in each st around, join with sl st to first sc. (72)
Drop color B,
With color A,
Round 15 (modified): ch 1, sc in each st around, join with sl st to first sc.
You will now pick the pattern back up at round 15, below. Instead of working in the 3rd loop of a hdc however, you will need to work in the back bar of the sc st.
If you are not planning to change colors pick back up here:
Round 14: ch 1, hdc in each st and ch-1 sp around, join with sl st to first hdc. (72)
If you are changing colors pick back up here. Work this round in the back bar of the sc instead of the3rd loop of the hdc stitch:
Round 15: working in 3rd loop of hdc, hdc in each st around, join with sl st to first hdc. (72)
Round 16: ch 1, working in 3rd loop of hdc, sc in each st around, join with sl st to first sc. (72)
You will now move to the lacy part of the pattern:
Round 17: ch 1, sc in first stitch, *ch 1, sk 3 sts, ([puff, ch 2] 2 times, puff, ch 1), sk 3 sts, sc in next st; repeat from * around, join with sl st to first sc. (9 shells, 9 sc)
Round 18: ch 4 (counts as first dc + ch-1), dc in same st as join, ch 3, *sk to top of “shell” in prev row (this is the second puff of the shell) sc, ch 3, sk to sc between shells, V-stitch, ch 3; repeat from * around, join with sl st to 3rd ch at beginning of round. (9 v-stitches, 9 sc, 18 ch-3 sps)
In the following round you will be working 3 chains at the beginning to get to the height you need to complete the puff stitch. The ch-3 does not count as a stitch and you will skip it when you join the round.
Round 19: ch 3, *sk to ch-1 sp at center of V-stitch from prev row, ([puff, ch 2] 2 times, puff, ch 1) in ch-1 sp, sk 3 chs, sc in top of sc from prev round, ch 1; repeat from * around, join with sl st to top of first puff st. (9 puff shells, 9 sc)
Round 20: sl st to top of shell in prev round (this is the second puff of the shell), (ch 1, sc), ch 3, sk to sc between shells, V-stitch, ch 3, *sk to top of next shell, sc, ch 3, sk to sc between shells, v-stitch, ch 3; repeat from * around, join with sl st to first sc of round. (9 v-stitches, 9 sc, 18 ch-3 sps)
Round 21: ch 1, sc in first st, ch 1, *sk to ch-1 sp at center of V-stitch from prev row, ([puff, ch 2] 2 times, puff, ch 1) in ch-1 sp, sk 3 chs, sc in top of sc from prev round, ch 1; repeat from * around, join with sl st to first sc.
Repeat rounds 18-21 5 times, Your piece should measure 12 1/2” tall. If you want a longer bag you can continue repeating these rounds as many times as you wish. When you are done move on to the next part:
The following round is a modification on round 18 that will reduce your stitch count back down to 72.
Round 46: ch 4 (counts as first dc + ch-1), dc in same st as join, ch 2, *sk to top of “shell” in prev row (this is the second puff of the shell) sc, ch 2, sk to sc between shells, V-stitch, ch 2; repeat from * around, join with sl st to 3rd ch at beginning of round. (9 v-stitches, 9 sc, 18 ch-2 sps)
Now you will begin the top edging:
Round 47: ch 1, hdc in each st and ch around, join with sl st to first hdc. (72)
If you want to make your bag saver with a ruffled accent round 47 is the round you will sew your ruffle to. If you do not wish to add a ruffle to your bag skip to round 50.
To add a ruffle complete rounds 48 and 49:
Round 48: ch 1, working in 3rd loop of hdc, hdc in each st around, join with sl st to first hdc. (72)
Round 49: ch 1, hdc in each st around, join with sl st to first hdc. (72)
If you don’t want a ruffle, start here after completing round 47:
Round 50: ch 1, working in 3rd loop of hdc, hdc in each st around, join with sl st to first hdc. (72)
Drop color A,
With color B,
Round 51: ch 1, working in 3rd loop of hdc, sc in each st around, join with sl st to first sc. (72)
Round 52: ch 1, sc in first st, with color A, psc in next st, with color B, sc in next st, ch 1, sk st, *sc in next st, with color A, psc in next st, with color B, sc in next st, ch 1, sk st; repeat from * around, join with sl st to first sc. (18 psc, 36 sc, 18 ch-1 sps)
If you are going to be working with colors you’ll need to follow these modifications so your color stripes look more balanced. This basically splits the hdc in round 53 into 2 sc rounds:
Round 53 (modified): ch 1, sc in each st around, join with sl st to first sc. (72)
Drop color B,
With color A,
Round 54 (modified): ch 1, sc in each st around, join with sl st to first sc.
You will now pick the pattern back up at round 53, below. Instead of working in the 3rd loop of a hdc however, you will need to work in the back bar of the sc st.
If you are not planning to change colors pick back up here:
Round 53: ch 1, hdc in each st and ch-1 sp around, join with sl st to first hdc. (72)
If you are changing colors pick back up here. Work this round in the back bar of the sc instead of the3rd loop of the hdc stitch:
Round 53: ch 1, hdc in each st and ch-1 sp around, join with sl st to first hdc. (72)
Round 54: working in 3rd loop of hdc, hdc in each st around, join with sl st to first hdc. (72)
Round 55: ch 1, working in BLO, sc in each st around, join with sl st to first sc. (72)
Round 56: ch 1, puff in first st, ch 1, sk st, * puff in next st, ch 1, sk st; repeat from * around, join with sl st to first puff. (36 puff sts, 36 ch-1 sps)
Round 57: ch 1, *sk st, 2 sc in ch-1 sp; repeat from * around, join with sl st to first sc. (72)
Round 58: ch 1, working in BLO, hdc in each st around, join with sl st to first hdc. (72)
Round 59: ch 1, working in 3rd loop of hdc, sc in each st around, join with sl st to first sc. (72)
Round 60: ch 1, working in BLO, sc in each st around, join with sl st to first sc. (72)
Round 61: ch 1, sc in each st around, join with sl st to first sc. (72)
In the following round you will be finishing the top edge with the reverse single crochet (crab stitch). You will be working this stitch around the round you just crocheted to give the top edge more sturdiness. Normally you would work the reverse single crochet with a smaller hook and tighter tension, but because this is a “spike” style stitch and you will most likely have tighter tension try using the same size hook you have used to crochet the bag. If your tension is super relaxed then you can go down a hook size.
Round 62: ch 1, rsc spike st by inserting hook into top of round 60 and completing the stitch as normal, rsc spike st in each st around, join.
Fasten off and weave in ends.
Creating the ruffle and sewing it on:
- Measure bag circumference one more time, just to make sure.
- Cut lace trim 1.5x to 2x longer than bag circumference.
- Sew running stitch along top of lace trim and gather it until it’s just slightly larger than your bag.
- Fold ends over and sew them together, forming a circle.
- With sewing pins, pin trim to bag evenly at round 47 in the pattern. You will want to begin by pinning in 4 places: side to side, then place those sides together, and pin front to back. This will help keep your lace trim even and help to ensure you don’t end up with too much, or not enough trim at the end. Add more pins between each of the 4 original pins if needed.
- Sew lace trim to bag.
Bag strap:
Finished measurements:
Approximately 16” long folded in half, by 1 1/2” wide
To adjust the length of your bag strap:
Strap is worked in multiples of 4+1. Starting chain should be a multiple of 4 +2.
Leaving 18” tail for sewing strap to bag,
Ch 98,
You will want to make sure you are working into the back bump of the chain in row 1 so that you have a nice finished edge at the bottom of the piece. You will be working the final row of this strap (row 6) into the other side of the chain, in the BLO to create a small accent line.
Row 1: working into second ch from hook, sc in each st across, ch 1, turn. (97)
Row 2: working in FLO, sc in each st across, ch 1, turn. (97)
Row 3: sc in first st, *sk st, 4 dc in next st, sk st, sl st in next st; repeat from * across, on final repeat omit sl st and work sc in last st of row instead, ch 1, turn. (24 shells)
In the following row you will be skipping the sl sts you made in the prev row. In row 5 you will be working slip stitches in the little gap between each shell.
Row 4: dc in first st, *working across shell: FPhdc around first st, FPsc around next 2 sts, FPhdc around next st; repeat from * across, dc in final st of row, turn. (97)
Row 5: sk 2 sts, *(hdc, 2 dc) in next st, (2 dc, hdc) in next st, sk st, sl st between shells from prev row, sk st; repeat from * across, sl st in final st of row on final repeat. (24 large shells)
This next row will be worked down the side and across the bottom of the piece.
Row 6: sl st evenly down the side of the strap, when you get to the bottom of the first row ch 1, working in BLO, dc in each st across, sl st up side of strap.
Fasten off and weave in end.
Optional: Using a contrasting color of yarn, slip stitch across each shell from row 5 (you can see where I worked this technique on the tan and blue bag).
Optional: Weave decorative ribbon through row 6. Fasten off each end of the ribbon securely, or tie the ends into a bow. Coat the ends with fray check so they don’t unravel.
Fold strap in half so that the edges of row 6 are laying side by side (not one on top of the other).
Pin in place and sew strap to back of bag saver at seam with 18″ tail.
Water bottle holder modification
So maybe your state doesn’t use plastic bags anymore. You can still use this design to create a cute water bottle holder for your summer adventures! Here are some notes:
-Finished bag holder should be approximately 4″ across, by 9″ tall excluding handle.
Using a 2.35 mm hook,
Water bottle holder bottom:
Round 1: ch 1, 6 sc in magic circle, join with sl st to first sc. (6)
Round 2: ch 1, 2 sc in each st around, join with sl st to first sc. (12)
Round 3: ch 1, 2 sc in first st, sc in next st *2 sc in next st, sc in next st; repeat from * around, join with sl st to first sc. (18)
Round 4: ch 1, 2 sc in first st, sc in next 2 sts, *2 sc in next st, sc in next 2 sts; repeat from * around, join with sl st to first sc. (24)
Round 5: ch 1, 2 sc in first st, sc in next 3 sts, *2 sc in next st, sc in next 3 sts; repeat from * around, join with sl st to first sc. (30)
Round 6: ch 1, 2 sc in first st, sc in next 4 sts, *2 sc in next st, sc in next 4 sts; repeat from * around, join with sl st to first sc. (36)
Round 7: ch 1, 2 sc in first st, sc in next 5 sts, *2 sc in next st, sc in next 5 sts; repeat from * around, join with sl st to first sc. (42)
Round 8: ch 1, 2 hdc in first st, hdc in next 6 sts, *2 hdc in next st, hdc in next 6 sts; repeat from * around, join with sl st to first hdc. (48)
Once you have completed round 8, start following the original bag saver pattern as it is written from round 2, but do not work any of the increases, (your stitch count should stay at 48). For round 4 (the shell round) make shells using only 4 dc instead of 5 dc. For round 5, omit the BPsc that would have gone around that center dc that you omitted in the previous round. After you complete rounds 18-21 skip to round 46 and work the top edging.
When you crochet your strap you will most likely want it longer than 8″. Use the formula I included in the notes for the bag strap to adjust your handle to the length you want it to be. This handle will stretch a bit since it is not reinforced and water bottles are heavier than plastic bags. To reduce the stretch you can go back and add surface slip stitching along the bottom of the last row of the strap.
Sew the handle to the water bottle carrier on either side (instead of the back).
If this idea becomes popular I may write up an actual pattern with pictures. 🙂
.sdg.
Want more gorgeous crochet patterns, and a little encouragement for your day? Sign up for my newsletter here! That way you’ll never miss out on special events, or freebies I’m offering.
JOIN ME ON SOCIAL MEDIA
I would love to see a picture when you’re done, so please feel free to come by my Facebook group and show off your finished project! Be sure to tag @kirstenhollowaydesigns when you share pictures of your project on Instagram!
You can also follow me on Facebook, Pinterest, Instagram, and Ravelry for more beautiful crochet patterns.
PATTERN TERMS AND CONDITIONS:
You are welcome to share the link to this pattern, using one image of your choice, on your site, but please do not share the written patterns themselves, this includes my Ravelry downloads or translations of these patterns, or use additional images. You do not have permission to use my images by themselves to create pinnable graphics for Pinterest, however they may be included in a roundup pin if there are 4 or more other patterns. If you sell finished items online, please do not use my pictures for your listings. I’m positive that your work is of high enough quality for you to sell the finished piece. Have confidence in your abilities! <3 Thank you!
This pattern was made to be used by individuals and small business crocheters alike. Selling your finished pieces in boutiques, at farmer’s markets, craft shows, and other local events is encouraged! Please credit/link Kirsten Holloway Designs when selling finished products online. The only thing I require is that this pattern not be used commercially to produce hundreds of thousands of copies. If you enjoyed this pattern or found it useful, why not share a link to this post with your friends?


Leave a Reply