Good morning, and welcome to the first day of the La Vie en Rose Earflap Hat crochet-a-long!
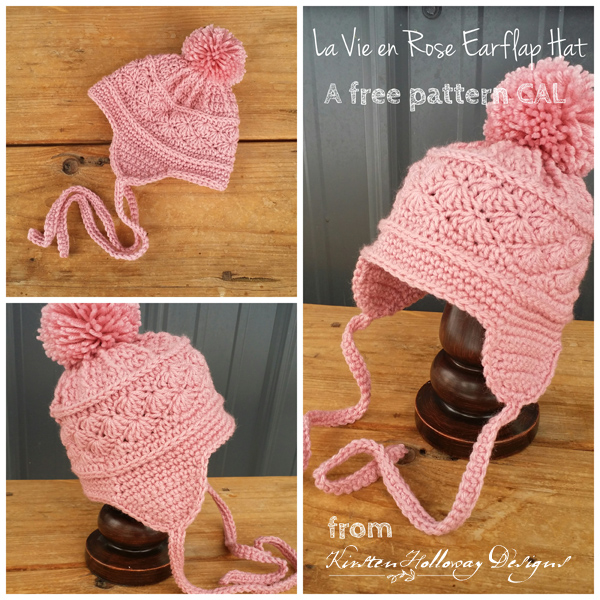
These instructions will get you through the top of the hat up to the shells. Scroll down to the hat size you want to make, and follow those instructions. I’ve included pictures of a few of the individual steps below the written instructions to give you an idea of how your hat should look as you go along. The version I’m working on (and will be photographing for the purpose of this CAL/tutorial ) is a 6-9 month size, and I’m using Red Heart Super Saver in Perfect Pink.
Note: The following instructions are written in American Crochet terms.
For today’s section you will need these items*:
3.75 mm (F) hook for 3-6 mos, and 9-12 mos
4mm (G) hook for 6-9 mos, toddler, child, and adult sizes
Approximately 100-200 yards of worsted weight yarn (or Aran for those of you in the UK), depending on the size chosen. I used less than one skein of Red Heart Super Saver per hat.
*There is not an official 0-3 months size in this pattern, however you may be able to work one up following the 3-6 month/6-9 month instructions using #3 lightweight, or DK yarn, and a 4mm hook.
Your gauge should be 2 1/4″ across after round 2 using a 3.75mm hook, and 2 1/2″ across after round 2 using a 4mm hook
Once you get to the end of this round you should have about 14 stitches in a 4″ section.
If you have additional questions, please head over to my Facebook page and leave a comment there.
-Size 3-6 months (use 3.75mm (F) hook), or 6-9 months (use 4mm (G) hook):
Round 1: 12 dc in magic circle. Join with sl st to first dc (12)
Round 2: ch 1, FPdc around first dc, dc in next stitch *FPdc around same dc, dc in next stitch* you should have one FPdc around each dc with one dc in between. Join with sl st to first FPdc (24)
Round 3: ch 1, FPdc around first FPdc from previous round, dc in top of dc from previous round, dc in next stitch, *FPdc around FPdc from previous round, dc in top of dc from previous round, dc in next stitch* Join with sl st to first FPdc (36)
Round 4: ch 1, FPdc around first FPdc from previous round, dc in top of dc from previous round, dc in next 2 stitches, *FPdc around FPdc from previous round, dc in top of dc from previous round, dc in next 2 stitches* Join with sl st to first FPdc (48)
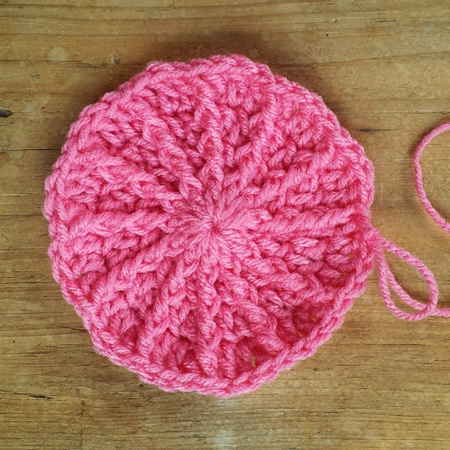
Round 5: ch 1, FPdc around first FPdc from previous round, dc in top of dc from previous round, dc in next 3 stitches, *FPdc around FPdc from previous round, dc in top of dc from previous round, dc in next 3 stitches* Join with sl st to first FPdc (60)
Round 6: ch 1, hdc in each stitch around. Join with sl st to first hdc (60)
Round 7: ch 1, working in the 3rd loop of hdc from previous round, hdc in each 3rd loop around. Join with sl st to first hdc (60)
(Additional instructions will be posted soon in Part 2)
-Sizes 9-12 months (use 3.75mm F hook), and Toddler (use 4mm G hook):
Round 1: 12 dc in magic circle. Join with sl st to first dc (12)
Round 2: ch 1, FPdc around first dc, dc in next stitch *FPdc around same dc, dc in next stitch* you should have one FPdc around each dc with one dc in between. Join with sl st to first FPdc (24)
Round 3: ch 1, FPdc around first FPdc from previous round, dc in top of dc from previous round, dc in next stitch, *FPdc around FPdc from previous round, dc in top of dc from previous round, dc in next stitch* Join with sl st to first FPdc (36)
Round 4: ch 1, FPdc around first FPdc from previous round, dc in top of dc from previous round, dc in next 2 stitches, *FPdc around FPdc from previous round, dc in top of dc from previous round, dc in next 2 stitches* Join with sl st to first FPdc (48)
Round 5: ch 1, FPdc around first FPdc from previous round, dc in top of dc from previous round, dc in next 3 stitches, *FPdc around FPdc from previous round, dc in top of dc from previous round, dc in next 3 stitches* Join with sl st to first FPdc (60)
Round 6: ch 1, FPdc around first FPdc from previous round, dc in top of dc from previous round, dc in next 4 stitches, FPdc around FPdc from previous round, dc in top of dc from previous round, dc in next 3 stitches *FPdc around FPdc from previous round, dc in top of dc from previous round, dc in next 4 stitches, FPdc around FPdc from previous round, dc in top of dc from previous round, dc in next 3 stitches* Join with sl st to first FPdc (66)*Note: If you skip the first stitch after the FPdc, and work your stitches for round 7 starting in that second stitch, it helps to minimize any “holes” that are left from not increasing in the last round.
Round 7: ch 1, FPdc around first FPdc from previous round, dc in top of dc from previous round , dc in next 4 stitches, FPdc around FPdc from previous round, dc in top of dc from previous round, dc in next 3 stitches *FPdc around FPdc from previous round, dc in top of dc from previous round, dc in next 4 stitches, FPdc around FPdc from previous round, dc in top of dc from previous round, dc in next 3 stitches* Join with sl st to first FPdc (66)
Round 8: ch 1, hdc in each stitch around. Join with sl st to first hdc (66)
Round 9: ch 1, working in the 3rd loop of hdc from previous round, hdc in each 3rd loop around. Join with sl st to first hdc (66)
(Additional instructions will be posted soon in Part 2)
-Child size (use 4mm G hook):
Round 1: 12 dc in magic circle. Join with sl st to first dc (12)
Round 2: ch 1, FPdc around first dc, dc in next stitch *FPdc around same dc, dc in next stitch* you should have one FPdc around each dc with one dc in between. Join with sl st to first FPdc (24)
Round 3: ch 1, FPdc around first FPdc from previous round, dc in top of dc from previous round, dc in next stitch, *FPdc around FPdc from previous round, dc in top of dc from previous round, dc in next stitch* Join with sl st to first FPdc (36)
Round 4: ch 1, FPdc around first FPdc from previous round, dc in top of dc from previous round, dc in next 2 stitches, *FPdc around FPdc from previous round, dc in top of dc from previous round, dc in next 2 stitches* Join with sl st to first FPdc (48)
Round 5: ch 1, FPdc around first FPdc from previous round, dc in top of dc from previous round, dc in next 3 stitches, *FPdc around FPdc from previous round, dc in top of dc from previous round, dc in next 3 stitches* Join with sl st to first FPdc (60)
Rounds 6-8: ch 1, FPdc around first FPdc from previous round, dc in top of dc from previous round, dc in next 4 stitches *FPdc around FPdc from previous round, dc in top of dc from previous round, dc in next 4 stitches* Join with sl st to top of first FPdc (72)
Round 9: ch 1, hdc in each stitch around. Join with sl st to first hdc (72)
Round 10: ch 1, working in the 3rd loop of hdc from previous round, hdc in each 3rd loop around. Join with sl st to first hdc (72)
(Additional instructions will be posted soon in Part 2)
-Adult size (use 4mm G hook):
Round 1: 12 dc in magic circle. Join with sl st to first dc (12)
Round 2: ch 1, fpdc around first dc, dc in next stitch *fpdc around same dc, dc in next stitch* you should have one fpdc around each dc with one dc in between. Join with sl st to first fpdc (24)
Round 3: ch 1, fpdc around first fpdc from previous round, dc in top of dc from previous round, dc in next stitch, *fpdc around fpdc from previous round, dc in top of dc from previous round, dc in next stitch* Join with sl st to first fpdc (36)
Round 4: ch 1, fpdc around first fpdc from previous round, dc in top of dc from previous round, dc in next 2 stitches, *fpdc around fpdc from previous round, dc in top of dc from previous round, dc in next 2 stitches* Join with sl st to first fpdc (48)
Round 5: ch 1, fpdc around first fpdc from previous round, dc in top of dc from previous round, dc in next 3 stitches, *fpdc around fpdc from previous round, dc in top of dc from previous round, dc in next 3 stitches* Join with sl st to first fpdc (60)
Round 6: ch 1, fpdc around first fpdc from previous round, dc in top of dc from previous round, dc in next 4 stitches *fpdc around fpdc from previous round, dc in top of dc from previous round, dc in next 4 stitches* Join with sl st to top of first fpdc (72)
*Note: If you skip the first stitch after the fpdc, and work your stitches for rounds 7, and 9, starting in that second stitch, while skipping the last stitch in round 8, it helps to minimize any “holes” that are left from not increasing in these rounds.
Rounds 7-9: ch 1, fpdc around first fpdc from previous round, dc in top of dc from previous round , dc in next 5 stitches, fpdc around fpdc from previous round, dc in top of dc from previous round, dc in next 4 stitches *fpdc around fpdc from previous round, dc in top of dc from previous round, dc in next 5 stitches, fpdc around fpdc from previous round, dc in top of dc from previous round, dc in next 4 stitches* Join with sl st to first fpdc (78)
Round 10: ch 1, hdc in each stitch around. Join with sl st to first hdc (78)
Round 11: ch 1, working in the 3rd loop of hdc from previous round, hdc in each 3rd loop around. Join with sl st to first hdc (78)
(Additional instructions will be posted soon in Part 2)
Step-by-step images
Image of round 2, from top left: dc, followed by FPdc, followed by dc, and final join.
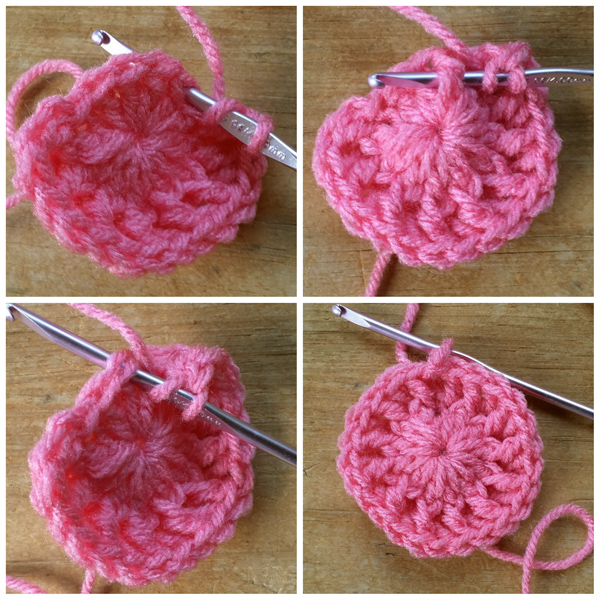
Image of Round 3: FPdc, dc in next 2 stitches. The image on the left shows the 2nd dc being worked.
The next post stitch will be worked around the post stitch from the previous round. (the post stitch looks like it’s the stitch right under where my hook is inserted).
This is how increases are worked. The picture on the right is what your hat should look like after round 3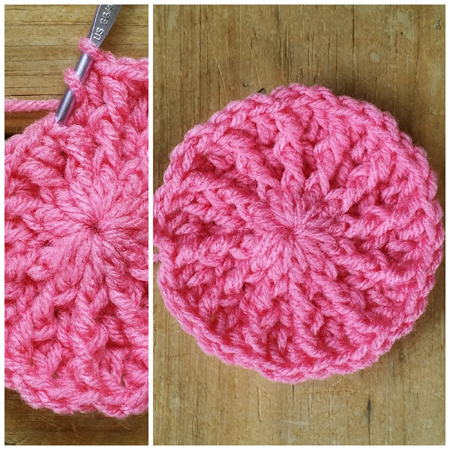
Image of round 4: Your FPdc stitches should be lining up nicely and increases should be easier to do at this point.
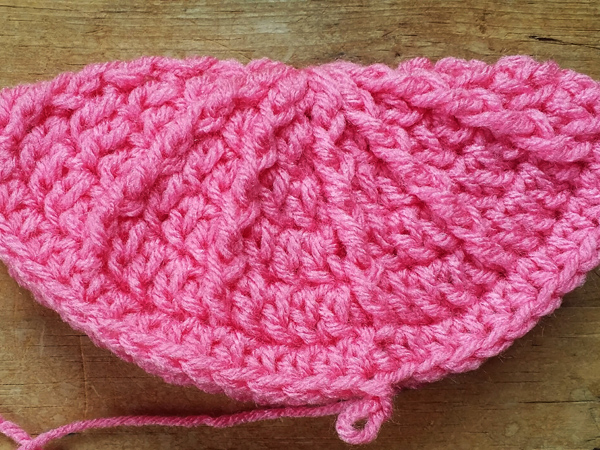
After you are done with your increase rounds (this will vary depending on which size hat you are making), you will do a round of hdc
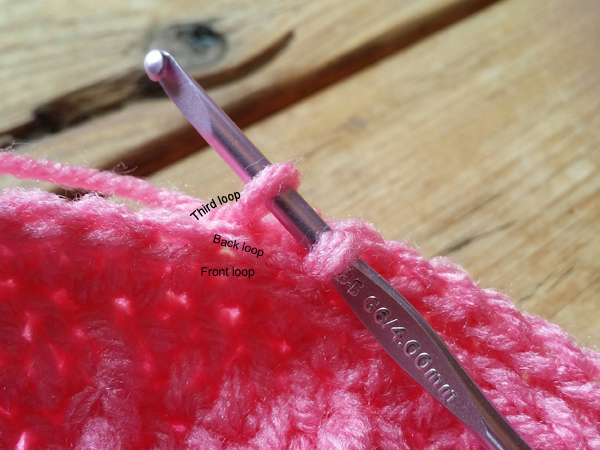
From there you will being working in the 3rd loop of the hdc. It’s kind of hard to see in this shot, but there is a front loop, a back loop (which many of you will have probably worked in before), then there is a 3rd loop at the back of the stitch. work one hdc in each 3rd loop around. In the shot below I’ve pulled up a loop through the 3rd loop to make it “pop” out and hopefully give you a better idea of where to stitch.
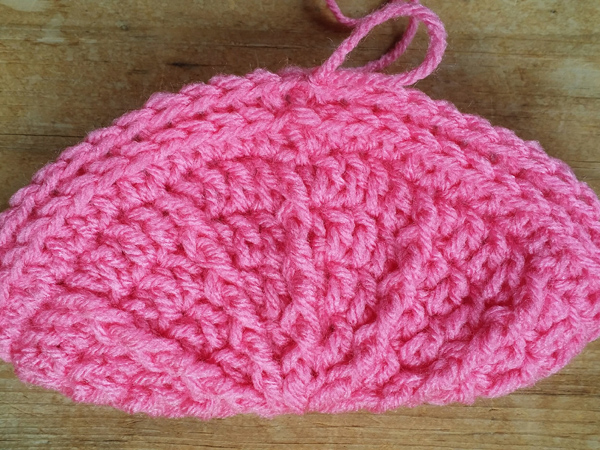
When you are done, you should have a nice little ridge of sideways V’s showing. This is actually the top of the stitch that has been pushed over by you working in the 3rd loop of the stitch.
Click here for Part 2!
*Remember to ask any additional questions on my Facebook page!
Disclaimer:
This post contains affiliate links.