Crochet a set of round throw pillows for the nursery or for your own bedroom! This free pattern comes with 4 different styles that you can mix and match to create the perfect accent pillows for your home.
Click here to add this pattern to your Ravelry queue!
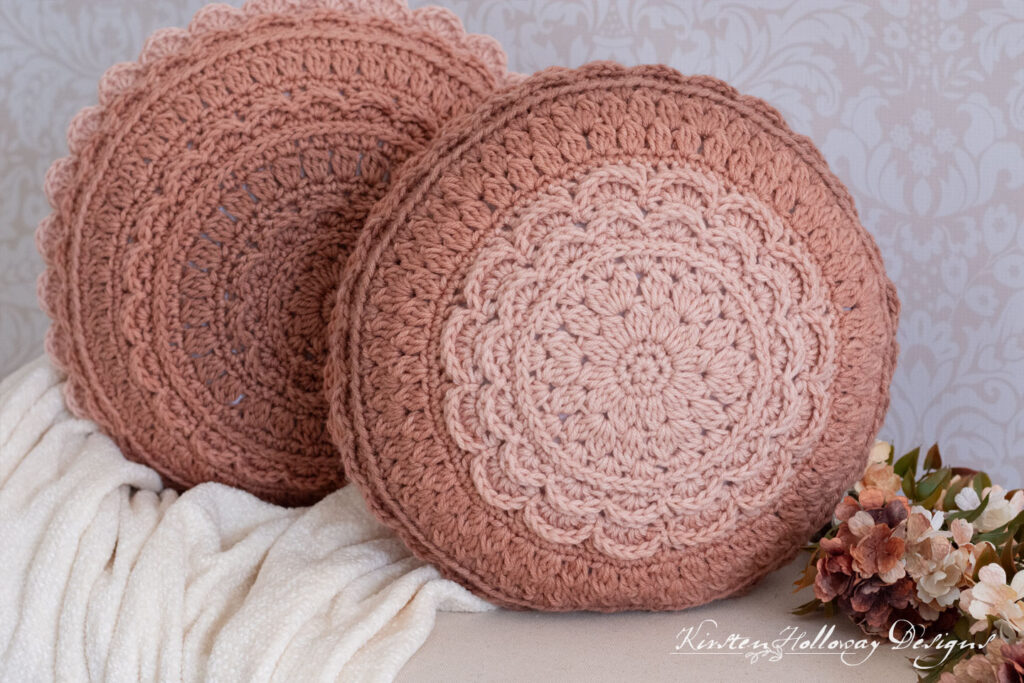
These feminine pillows are the perfect touch to add a bit of elegance to the living room, bedroom, or nursery. As usual, there’s beautiful floral texture, and as an added bonus in this set the petal pink, rose-gold, and clay tones of the yarn create a soft and pretty airbrushed/ombré effect that’s absolutely decadent and sure to please the eye!
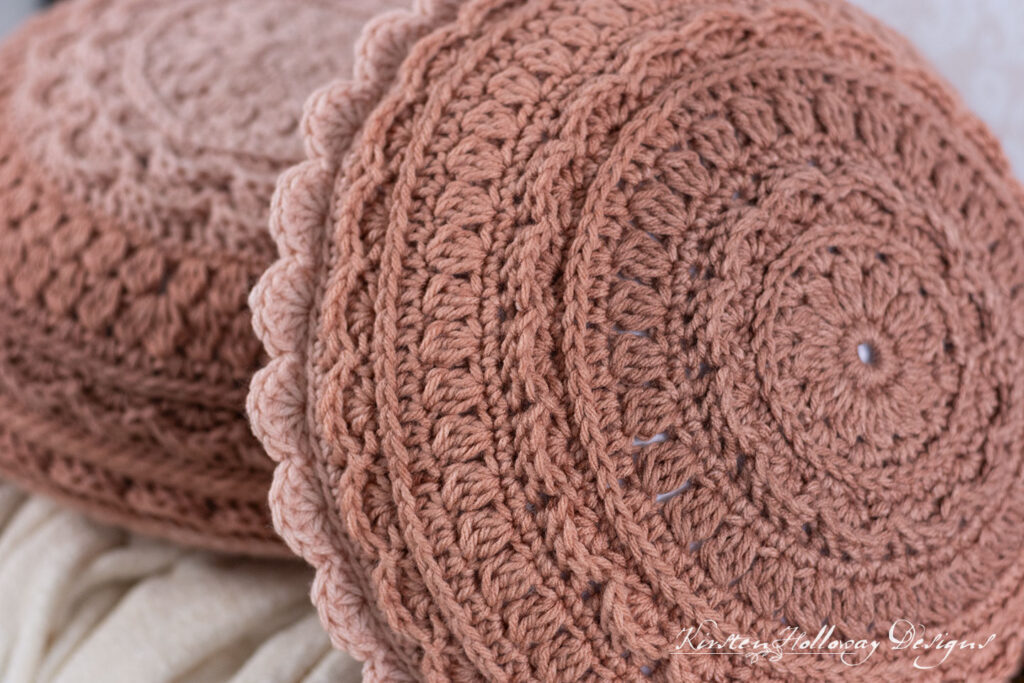
You will use shells, clusters and half double crochet in the 3rd loop to crochet round pillow covers that have swirls, petals, and delicate details reminiscent of cake shop goodies. Here’s a look at some of that texture up close:
I used Caron Jumbo Ombré in the colorway “Sepia” but I didn’t use the colors exactly as they came off the skein. Before beginning this project I wound the various colors into their own little cakes and strung them together to create the unique color gradients that you see. This winding process takes a little extra time, but after seeing how beautifully these cushions came out I knew it was worth it!

One of the reasons I like this yarn for crocheting pillows is that it is thick and sturdy and should hold up to some wear and tear. If you don’t have this yarn available in your area you can find it online, or substitute with Caron One Pound. Most other #4 yarns sold in big box stores in the US are thinner than this and may not produce the same results (and I really want you to love your pillows).
These pillow covers are crocheted in 2 halves: front and back, then joined with the flat slip stitch join that you may have used when assembling afghan squares. If you are not familiar with this method I’ve included a short tutorial at the bottom of the post.
Disclaimer: This post contains affiliate links. When you purchase something using these links a small percentage of the sales price goes to me. However, you do not pay any extra for the item you purchase.
Difficulty:
Easy/Intermediate
Techniques used: cluster stitches, shells, working in the 3rd loop of a half double crochet, post stitches, flat slip stitch join
Materials Needed:
6.5mm (K) hook, or hook needed to obtain gauge
Approximately 410-430 yards (per pillow cover) #4 Worsted weight Caron Jumbo Ombré in “Sepia” or color of your choice.
Yarn needle
Stitch markers
1 16″ pillow form insert per pillow <–These are the ones I used. The site says 15″ but the tag on the pillow itself says 16″.
Yarn winder for hacking your yarn
Stitches Used:
ch = chain
sl st = slip stitch
sc = single crochet
hdc = half double crochet
dc = double crochet
BPsc = back post single crochet
BPhdc = back post half double crochet
BPdc = back post double crochet
Additional Terms:
Working in the 3rd loop of hdc: Look at the top of the stitch, and locate the sideways “V”, bend the stitch to look at the back, and you should see another “V”. You’ll be working into the back loop of that “V”, this is called the 3rd loop.
3dc cluster = YO, insert hook into stitch, pull up a loop, YO, draw through 2 loops (1st stitch of cluster made), YO, insert hook into same st, pull up a loop, YO draw through 2 loops (2nd st of cluster made), YO, insert hook into same st, pull up a loop, YO draw through 2 loops (3rd st of cluster made), YO, draw through all loops on hook.
sk = skip
st/sts = stitch/stitches
sp/sps = space/spaces
prev = previous
Gauge:
Varies per pillow cover. See individual pillow patterns for gauge information.
Measurements:
Approximately 15” across before inserting pillow form.
Additional Notes:
-Ch 1 at beginning of round does not count as a stitch.
-Make sure you pull your joins snug to minimize seams. You will also want your ch-1 at the beginning of the round to be very small as well.
-I used 16” pillow forms in my 15” cushions. This makes them look more luxurious and “full”. No wimpy pillows for us!
-When working a round of 3dc clusters join the round to the ch-1 immediately following the cluster stitch. This helps to reduce the seam appearance.
-Caron Jumbo Ombre is a thicker #4 worsted weight yarn. You will not want to use finer #4 yarns such as Caron Simply Soft, Patons Classic Wool, Red Heart Unforgettable, or pretty much any of the Lion Brand yarns that are listed as #4 weight. Your cushion covers will be smaller, or much too hole-y to look good.
Cake Shoppe Cushions Round Pillow Pattern (US Terms):
There are 4 different styles of pillow: 2 styles that are fancier and more detailed, and 2 that are more plain and would work better as a pillow backing. They are all pretty in their own way however, and you are welcome to mix and match in whatever way is pleasing to you.
Hacking your yarn (Optional):
Before beginning this project you will want to wind the various colors of the skein into their own little cakes. This hacking process is optional, but it makes for more gradual ombré effects that are especially pleasing to the eyes. You are welcome to use a solid color yarn instead if you wish. I do not recommend variegated yarns because they hide the pretty stitch details.
Option 1 (Classic Layer Cake):
Round 1: ch 4, join with sl st to first ch.
Round 2: ch 1, 12 sc in ch-4 sp, join with sl st to first sc. (12)
Round 3: ch 1, (3dc cluster, ch 1) in each st around, join with sl st to first 3dc cluster. (12 3dc clusters, 12 ch-1 sps)
Round 4: ch 1, 3 hdc in each ch-1 sp around, join with sl st to first hdc. (36 hdc)
Round 5: ch 1, working in 3rd loop of hdc, 2 sc in first st, sc in next 2 sts, *2 sc in next st, sc in next 2 sts; repeat from * around, join with sl st to first sc. (48 sc)
Round 6: *sk st, 4 dc in next st, sk st, sl st in next st; repeat from * across, final sl st counts as join. (12 shells)
Round 7: ch 1, *work the following sts across each shell: BPhdc around first st, BPsc around next 2 sts, BPhdc around next st, move to next shell; repeat from * around, join with sl st to first hdc. (48)
Round 8: ch 1, 2 sc in first st, sc in next 3 sts, *2 sc in next st, sc in next 3 sts; repeat from * around, join with sl st to first sc. (60)
Gauge check: Your circle should measure 6” across at this point.
Round 9: ch 1, *3dc cluster, ch 1, sk st; repeat from * around, join with sl st to first 3dc cluster. (30 3dc clusters, 30 ch-1 sps)
Stitches in the following round will be worked in the clusters and ch-1 sps.
Round 10: ch 1, 2 hdc in first st, hdc in next st, 2 hdc in next st, hdc in next 2 sts, *2 hdc in next st, sc in next st, 2 hdc in next st, hdc in next 2 sts; repeat from * around, join with sl st to first hdc. (84)
Round 11: ch 1, working in 3rd loop of hdc, 2 sc in first st, sc in next 6 sts, *2 sc in next st, sc in next 6 sts; repeat from * around, join with sl st to first sc. (96)
Round 12: *sk st, 4 dc in next st, sk st, sl st in next st; repeat from * across, final sl st counts as join. (24 shells)
Round 13: ch 1, *work the following sts across each shell: BPhdc around first st, BPsc around next 2 sts, BPhdc around next st, move to next shell; repeat from * around, join with sl st to first BPhdc. (96)
Round 14: ch 1, 2 sc in first st, sc in next 7 sts, *2 sc in next st, sc in next 7 sts; repeat from * around, join with sl st to first sc. (108)
Round 15: ch 1, 3dc cluster, ch 1, sk st; repeat from * around, join with sl st to first 3dc cluster. (54 3dc clusters, 54 ch-1 sps)
Round 16: ch 1, 2 hdc in first st, hdc in next 8 sts, *2 hdc in next st, hdc in next 8 sts; repeat from * around, join with sl st to first hdc. (120)
Gauge Check: your circle should measure about 13” across at this point.
Round 17: working in 3rd loop of hdc, sc in each st around, join with sl st to first sc. (120)
Round 18: sk st, 4 dc in next st, sk st, sl st in next st; repeat from * across, final sl st counts as join. (30 shells)
Round 19: ch 1, *work the following sts across each shell: BPhdc around first st, BPsc around next 2 sts, BPhdc around next st, move to next shell; repeat from * around, join with sl st to first hdc. (120)
Round 20: ch 1, sc in each st around, join with sl st to first sc. (120)
Fasten off, and weave in ends.
Option 2 (Layer Cake Doubled):
Round 1: 6 sc in magic circle, join with sl st to first sc. (6)
Round 2: 2 sc in each st around, join with sl st to first sc. (12)
Round 3: ch 1, (3dc cluster, ch 1) in each st around, join with sl st to first 3dc cluster. (12 3dc clusters, 12 ch-1 sps)
Round 4: sk st, *(3dc cluster, ch 1, 3dc cluster, ch 1) in ch-1 sp, sk st, (3dc cluster, ch 1) in next ch-1 sp, sk st; repeat from * around, join with sl st to first 3dc cluster. (18 3dc clusters, 18 ch-1 sps)
Round 5: ch 1, *sk st, 3 hdc in ch-1 sp; repeat from * around, join with sl st to first hdc. (54)
Round 6: ch 1, working in 3rd loop of hdc, 2 sc in first st, sc in next 8 sts, *2 sc in next sc, sc in next 8 sts; repeat from * around, join with sl st to first sc. (60)
Round 7: sk st, 4 dc in next st, sk st, sl st in next st; repeat from * across, final sl st counts as join. (15 shells)
Round 8: ch 1, *work the following sts across each shell: BPhdc around first st, BPsc around next 2 sts, BPhdc around next st, move to next shell; repeat from * around, join with sl st to first hdc. (60)
Round 9: *sk st, 3 dc in next st, 3 dc in next st, sl st between the 2 BPhdc sts from prev round that are side by side; repeat from * around, final sl st counts as join. (15 6-dc shells)
Round 10: ch 1, *work the following sts across each shell: BPdc around first st, BPhdc around next st, BPsc around next 2 sts, BPhdc around next st, BPdc around next st, move to next shell; repeat from * around, join with sl st to first BPdc. (90)
Round 11: ch 1, 2 sc in first st, sc in next 14 sts, *2 sc in next st, sc in next 14 sts; repeat from * around, join with sl st to first sc. (96)
Round 12: ch 1, *(3 dc cluster, ch 1) sk st; repeat from * around, join with sl st to first hdc. (48 3dc clusters, 48 ch-1 sps)
Round 13: sk st, *(3dc cluster, ch 1, 3dc cluster) in ch 1 sp, sk st, [3dc cluster in next ch-1 sp, sk st] 3 times; repeat from * around, join with sl st to first 3dc cluster. (60 3dc clusters, 60 ch-1 sps)
Round 14: ch 1, *sk st, 2 hdc in ch-1 sp; repeat from * around, join with sl st to first hdc. (120)
Round 15: working in 3rd loop of hdc, sc in each st around, join with sl st to first sc. (120)
Round 16: *sk st, 4 dc in next st, sk st, sl st in next st; repeat from * around, final sl st counts as join. (30 shells)
Round 17: ch 1, *work the following sts across each shell: BPhdc around first st, BPsc around next 2 sts, BPhdc around next st, move to next shell; repeat from * around, join with sl st to first hdc. (120)
Fasten off, and weave in ends.
The following 2 options are more plain and would make pretty backings to your pillow fronts. They do have pretty stitches however, and you may wish to use them on the front as well! Option 3 is the one in front and option 4 is the one in the back.

Option 3 (Clusters):
Round 1: 6 sc in magic circle, join with sl st to first sc. (6)
Round 2: 2 sc in each st around, join with sl st to first sc. (12)
Round 3: ch 1, (3dc cluster, ch 1) in each st around, join with sl st to first 3dc cluster. (12 3dc clusters, 12 ch-1 sps)
Round 4: ch 1, sk st, *(3dc cluster, ch 1, 3dc cluster, ch 1, ) in ch 1 sp, sk st, (3dc cluster, ch 1) in next ch-1 sp, sk st; repeat from * around, join with sl st to first 3dc cluster. (18 3dc clusters, 18 ch-1 sps)
Round 5: ch 1, sk st, *(3dc cluster, ch 1, 3dc cluster, ch 1) in ch-1 sp, sk st, [3dc cluster, ch 1, sk st] 2 times; repeat from * around, join with sl st to first 3dc cluster. (24 3dc clusters, 24 ch-1 sps)
Gauge check: your circle should measure 5 3/4” across at this point.
Circles worked in multiples of 6 can take on a hexagon shape. I’m trying to avoid that with this cushion cover, so we will be switching where we do the cluster increases—that’s where the pattern reads: (3dc cluster, ch 1, 3dc cluster, ch 1), every so often.
Round 6: ch 1, sk st, [(3dc cluster, ch 1) in ch-1 sp, sk st] 2 times, sk st, (3dc cluster, ch 1, 3dc cluster, ch 1) in next ch-1 sp, sk st, *[(3dc cluster, ch 1) in ch-1 sp, sk st] 3 times, sk st, (3dc cluster, ch 1, 3dc cluster, ch 1) in next ch-1 sp, sk st; repeat from * around, join with sl st to first 3dc cluster. (30 3dc cluster, 30 ch-1 sps)
Round 7: ch 1, sk st, [(3dc cluster, ch 1) in ch-1 sp, sk st] 2 times, sk st, (3dc cluster, ch 1, 3dc cluster, ch 1) in next ch-1 sp, sk st, * [(3dc cluster, ch 1) in ch-1 sp, sk st] 3 times, sk st, (3dc cluster, ch 1, 3dc cluster, ch 1) in next ch-1 sp, sk st; repeat from * around omitting last 2 3dc clusters of repeat, join with sl st to first 3dc cluster. (36 3dc clusters, 36 ch-1 sps)
Gauge check: circle should measure 8 1/2” across at this point.
It’s time for another shift to minimize the hexagon shape and keep things more circular. Stitch markers may be useful for these sections so you don’t increase in the previous round’s increases.
Round 8: ch 1, sk st, *[(3dc cluster, ch 1) in ch-1 sp, sk st] 5 times, sk st, (3dc cluster, ch 1, 3dc cluster, ch 1) in ch-1 sp; repeat from * around, join with sl st to first 3dc cluster. (42 3dc clusters, 42 ch-1 sps)
Round 9: ch 1, sk st, [(3dc cluster, ch 1) in ch-1 sp, sk st] 5 times, sk st, (3dc cluster, ch 1, 3dc cluster, ch 1) in ch-1 sp, sk st, *[(3dc cluster, ch 1) in ch-1 sp, sk st] 6 times, sk st, (3dc cluster, ch 1, 3dc cluster, ch 1) sk st; repeat from * around omitting last 5 3dc clusters of repeat, join with sl st to first 3dc cluster. (48 3dc clusters, 48 ch-1 sps)
Round 10: ch 1, sk st, (3dc cluster, ch 1) in ch-1 sp, sk st, (3dc cluster, ch 1, 3dc cluster, ch 1) in ch-1 sp, sk st, *[(3dc cluster, ch 1) in ch-1 sp, sk st] 7 times, sk st; repeat from * around omitting last 3dc cluster of repeat, join with sl st to first 3dc cluster. (54 3dc clusters, 54 ch-1 sps)
Round 11: ch 1, 2 hdc in first st, hdc in next 8 sts, *2 hdc in next st, hdc in next 8 sts; repeat from * around, join with sl st to first hdc. (120)
Gauge check: circle should measure about 13” across at this point.
Round 12: working in 3rd loop of hdc, sc in each st around, join with sl st to first sc. (120)
Round 13: *sk st, 4 dc in next st, sk st, sl st in next st; repeat from * across, final sl st counts as join. (30 shells)
Round 14: ch 1, *work the following sts across each shell: BPhdc around first st, BPsc around next 2 sts, BPhdc around next st, move to next shell; repeat from * around, join with sl st to first hdc. (120)
Round 15: ch 1, sc in each st around, join with sl st to first sc. (120)
Fasten off, and weave in ends.
Option 4 (Shortbread Cookie):
Round 1: 6 sc in magic circle. (6)
Round 2: ch 1, 2 sc in each st around, join with sl st to first sc. (12)
Round 3: ch 1, 2 sc in first st, sc in next st, *2 sc in next st, sc in next st; repeat from * around, join with sl st to first sc. (18)
Round 4: ch 1, 2 sc in first st, sc in next 2 sts, *2 sc in next st, sc in next 2 sts; repeat from * around, join with sl st to first sc. (24)
Round 5: ch 1, 2 sc in first st, sc in next 3 sts, *2 sc in next st, sc in next 3 sts; repeat from * around, join with sl st to first sc. (30)
Circles worked in multiples of 6 can take on a hexagon shape. I’m trying to avoid that with this cushion cover, so periodically, we will be switching where we work the increases. Stitch markers may be useful for these sections so you don’t increase in the previous round’s increases
Round 6: ch 1, sc in next 3 sts, 2 sc in next st, *sc in next 4 sts, 2 sc in next st; rep from * around, sc in final st of round, join with sl st to first sc. (36)
Gauge check: Circle should measure 4” across at this point.
Round 7: ch 1, sc in next 4 sts, 2 sc in next st, *sc in next 5 sts, 2 sc in next st; repeat from * around, sc in final st of round, join with sl st to first sc. (42)
Round 8: ch 1, sc in next 5 sts, 2 sc in next st, *sc in next 6 sts, 2 sc in next st; repeat from * around, sc in final st of round, join with sl st to first sc. (48)
Round 9: *sk st, 5 dc in next st, sk st, sl st in next st; repeat from * across, final sl st counts as join. (12 shells)
Round 10: ch 1, *work the following sts across each shell: BPhdc around first st, BPsc around next 3 sts, BPhdc around next st, move to next shell; repeat from * around, join with sl st to first BPhdc. (60)
Round 11: ch 1, 2 sc in first st, sc in next 9 sts, *2 sc in next st, sc in next 9 sts; repeat from * around, join with sl st to first sc. (66)
Round 12: ch 1, 2 sc in first st, sc in next 10 sts, *2 sc in next st, sc in next 10 sts; repeat from * around, join with sl st to first sc. (72)
Round 13: ch 1, 2 sc in first st, sc in next 11 sts, *2 sc in next st, sc in next 11 sts; repeat from * around, join with sl st to first sc. (78)
It’s time for another shift to minimize the hexagon shape and keep things more circular.
Round 14: ch 1, sc in next 7 sts, 2 sc in next st, *sc in next 12 sts; repeat from * around, sc in last 5 sts of round, join with sl st to first sc. (84)
Gauge check: circle should measure 9” across at this point.
Round 15: ch 1, sc in next 8 sts, *2 sc in next st, sc in next 13 sts; rep from * around, sc in last 5 sts of round, join with sl st to first sc. (90)
Round 16: ch 1, sc in next 9 sts, *2 sc in next st, sc in next 14 sts; rep from * around, sc in last 5 sts of round, join with sl st to first sc. (96)
Round 17: sk st, 5 dc in next st, sk st, sl st in next st; repeat from * across, final sl st counts as join. (24 shells)
Round 18: ch 1, *work the following sts across each shell: BPhdc around first st, BPsc around next 3 sts, BPhdc around next st, move to next shell; repeat from * around, join with sl st to first hdc. (120)
Rounds 19-24: ch 1, sc in each st around, join with sl strong first sc. (120)
Fasten off, and weave in ends.
Joining the front and back covers:
Place your front and back pieces together, right sides facing out, join the 2 circles using a flat slip stitch join.
If you have not used this method before here is a short picture tutorial to help you out.
Important: Positioning of your hook and working yarn is everything in this technique. You will need to have your yarn run under the stitches you are working in, otherwise your join will not be absolutely flat.
For this join you will be working in the inner loops, marked with a needle in the picture below:

You will always enter the loops from the top, never from the bottom. This puts the bottom of the slip stitch inside the pillow cover so it is not visible on the outside.
Here is a close-up of where you will insert your hook the first time:

Now you will go through the inner loop on the other side. I have pointed it out with a needle. Be sure you insert your hook from the top:

Now you should have your hook inserted through both loops, and your working yarn, pointed out with an arrow, should be running under everything–not off to the side.

At this point there will be 3 loops on your hook. Yarn over and pull through all 3 loops:


You may need to wiggle your hook a little bit to get it through all 3 loops, but once you have completed that step your slip stitch is done and you can move on to crocheting the next one!
After a while your join should look like this:

I like how the outer loops that did not get worked through create a nice line to border the slip stitches in the middle.
Once you get a little under 2/3 of the way around gently stuff your 16” pillow insert inside. Continue working the remainder of the round with your pillow insert inside the pillow cover.
Fasten off and weave in ends,
OR
Add a Scalloped edge (Optional):
Want to add a little extra frill to this pillow? Try a scalloped edge!
You will need to eyeball this a little. The goal is to have your scallops stack on top of the shells you made near the end of your pillow front and back. *sk st, 5 dc in next st, sk st, sl st in next st; repeat from * around, final sl st counts as join.
Fasten off and weave in ends.
.sdg.
Want more gorgeous crochet patterns, and a little encouragement for your day? Sign up for my newsletter here! That way you’ll never miss out on special events, or freebies I’m offering.
JOIN ME ON SOCIAL MEDIA
I would love to see a picture when you’re done, so please feel free to come by my Facebook group and show off your finished project! Be sure to tag @kirstenhollowaydesigns when you share pictures of your project on Instagram!
You can also follow me on Facebook, Pinterest, Instagram, and Ravelry for more beautiful crochet patterns.
PATTERN TERMS AND CONDITIONS:
You are welcome to share the link to this pattern, using one image of your choice, on your site, but please do not share the written patterns themselves, this includes my Ravelry downloads or translations of these patterns, or use additional images. You do not have permission to use my images by themselves to create pinnable graphics for Pinterest, however they may be included in a roundup pin if there are 4 or more other patterns. If you sell finished items online, please do not use my pictures for your listings. I’m positive that your work is of high enough quality for you to sell the finished piece. Have confidence in your abilities! <3 Thank you!
This pattern was made to be used by individuals and small business crocheters alike. Selling your finished pieces in boutiques, at farmer’s markets, craft shows, and other local events is encouraged! Please credit/link Kirsten Holloway Designs when selling finished products online. The only thing I require is that this pattern not be used commercially to produce hundreds of thousands of copies. If you enjoyed this pattern or found it useful, why not share a link to this post with your friends?


Leave a Reply