You’ve run into a dilemma. You‘ve discovered some beautiful crochet design on Pinterest or Ravelry, but alas, you don’t know what the the terms are or how to read a crochet pattern, and the designer hasn’t put out a video, or step-by-step picture tutorial. What are you going to do? Mope? Of course not, because that’s not the kind of person you are, you fierce, strong, determined crochet gal, you!
This how-to guide is going to open a whole new world to you, and I can’t wait to hear all about your crochet successes! If you’re a beginner, or new to crochet and came here to learn how to read a crochet pattern, you’re in the right place! Even if you’ve been crocheting for 20 years, and have finally decided now is the time to begin reading crochet patterns, don’t worry–I’ve got you covered.
This How-to Guide covers the following topics:
- Pattern notes and the importance of reading them first
- Anatomy of a crochet stitch
- Common US Crochet Terms and their symbols and meanings
- How to read crochet patterns parentheses and brackets
- The Difference between US and UK Crochet Terms
- A Few Words on Multiples (or how to adjust the size of the crochet pattern)
Grab a hot cup of your favorite drink, pull up a chair and get cozy (I always learn better when I’m relaxed, and chances are that you will too).
Let’s start with some crochet pattern reading basics, before we dive into the terms themselves. These are a few things I wish someone had told me when I was learning to read patterns.

Click here if you’d like to sign up for my newsletter! It’s pressure free, filled with encouragement, crochet
tips and information, and has links to pretty patterns
It’s important to remember,
There is no right or wrong way to write a pattern
This is a source of frustration for many crocheters, but the fact is that patterns differ slightly from designer to designer, and even from magazine to magazine.* The stitch abbreviations are often the same (see the bottom of this post for differences in US vs. UK terms), but elements such as pattern repeats may be designated differently. Most reputable designers and magazines will have a crochet terms glossary at the beginning of the pattern. Look at this when in doubt.
**If you have a question about how to interpret a particular pattern, please contact the original designer. I do not have time to answer all the questions I am receiving as comments on this post. Thank you**
Becoming efficient at reading a crochet pattern takes a while
Like any skill, reading a crochet pattern will take some time to master. You may be able to crochet “Advanced” level patterns by looking at a video or picture tutorial, but grant yourself some grace if you struggle to read an “Easy” level pattern on your first try. We all have to start somewhere.
Commas are your friend
I’ll let you in on a little secret that I wish I had known when I first started out: if you’re struggling to read a crochet pattern, don’t look at the whole row or round instruction at once. Instead, take things one comma at a time.
If the pattern designer has a sequence written out such as this “sc, ch 2, sk st, sc” look at the commas, then do the step before the comma, then look for the next coma and do the step before it; little-bitty baby steps. Again, it may be frustrating if you can quickly follow a video, but if you stick with this, you’ll pick up how to read a crochet pattern in several tries.
First things first, read the pattern notes:
At the beginning of a pattern you will see several headings containing yarn, stitch, measurement, and gauge information. It is tempting to skip over these to get to the pattern, but restrain yourself, look them over, and you will likely end up saving yourself hours of frustration, and/or a ruined garment!
Skill ratings/levels:
This is how difficult an item is to crochet. There are 4 classifications: Beginner, Easy, Intermediate, and Advanced. “Beginner” patterns will often use a couple of basic stitches. “Easy” designs expand to include simple patterns made from a variety of stitches, and may include color changes and slightly more complex increases or decreases. “Intermediate” includes more difficult color work, complex stitches, or garment shaping. “Advanced” patterns may combine even more of these techniques, often in different ways, into one project.
Materials needed to complete the project:
Yarn type, and yardage, plus any notions you’ll need, such as ribbon, or buttons.
Stitches used:
A glossary of the crochet stitches you’ll need to complete the project (we’re almost to the part that will explain the terms themselves, so hang in there for just a few more minutes). Special stitches may also be listed in this section, or listed separately.
Specialty stitches:
Sometimes a pattern will have special stitches that they may not write out completely each time they show up in the pattern, as this would take too much room. Instead the designer will have the stitch mentioned in the terms glossary at the beginning of the pattern. Here are a few types that you may run into. Follow the designer’s instructions for forming these stitches as they can vary from pattern to pattern.
Puff
Shell
Bobble
V-stitch
Gauge information:
Gauge is the tension a crocheter needs to use to achieve the garment size. Making a gauge swatch is the most important, and unfortunately, the most neglected step of any crochet pattern. If you don’t want to end up frogging your entire project, and wasting valuable time (and brain cells), make a gauge swatch. You’ll thank me later. Typically, most gauges swatches are made by crocheting a square in the indicated stitch, measuring at least 4” across, by however many rows in height the designer specifies. If you crochet tightly, you may need to go up a hook size or two to match the designers gauge, inversely, if you have relaxed tension, you may need to go down a hook size or two.
Measurements:
This section will list the finished garment size or sizes.
Additional notes or assembly instructions:
Some pieces require additional instructions to put them together. This information may be listed near the top of a pattern, or near the end. Pay special attention to these sections. They will save you hours of time and frustration!

Helpful hint: Remember that a pattern is a “pattern” (remember making designs with those geometrically shaped blocks in kindergarten?) Most patterns marked “Beginner” or “Easy” will have specific (and predictable) pattern repeats or increases. For instance a hat that starts out with 12 double crochet stitches will usually increase by 12 stitches in each increase round. Likewise, a basket that starts out with 6 single crochet stitches should also increase by 6 each round. I cover stitch counts a little later on in this guide.
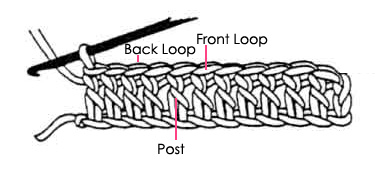
Anatomy of a crochet stitch:
Post – this is the main “body” of the stitch.
Front Loop – Look at the top of the stitch, and locate the sideways “V”. The front loop is the loop closest to you.
Back Loop – Look at the top of the stitch, and locate the sideways “V”. The back loop is the the loop farthest away from you.
3rd Loop/”yarn over” loop – This loop (which is the “yarn over”) is most visible at the back of the half double crochet stitch, but some patterns will ask you to work in the 3rd loop at the front. This will pop the top of the stitch forward (or backward) and make a ridge that looks knit.
Did you know? Many crochet pattern terms are acronyms!
This makes it easier to understand since “sc” stands for “single crochet”, and “hdc” stands for half double crochet. You may also see the first two letters used instead as in ch (for chain), tr (for treble crochet), or sk st (skip stitch). Patterns can be worked in rows (back and forth) or rounds. Rounds can either be joined, usually with a slip stitch, or continuous (don’t forget to use stitch markers to hold your spot!).
(Note: This guide only covers crochet terms and assumes you already have knowledge of how to crochet the most common stitches: chain, single crochet, half-double crochet, double crochet, etc. If you’re looking to learn how to crochet, you need to hop on over to YouTube and search for “learn how to crochet“. There are many good videos that will show you how.)
Common US Crochet Terms, and Abbreviations:
Once you finish reading through these terms I have included some links to a couple of easy hat patterns to help you practice the skills we just covered.
ch = chain
sp = space
ch-sp = chain space (can also be written as ch-1 sp, ch-2 sp, etc.)
sl st = slip stitch
sk st = skip stitch
sc = single crochet
hdc = half double crochet
dc = double crochet
tr = treble crochet
st/sts = stitch/stitches
tog = together
prev = previous
RS = right side
WS = wrong side
YO = yarn over
BLO/BL = back loop only (looking at the top of the stitch, you will see two “loops”. If you see this in a pattern, only work stitches in the back loop
FLO/FL = front loop only (looking at the top of the stitch, you will see two “loops”. If you see this in a pattern, only work stitches in the front loop
Magic Circle/Magic Ring = This is a special slip knot that you work your stitches in when beginning projects in the round (like hats). Here’s a link to a step-by-step picture tutorial.
You may also run into some stitches that combine terms, such as a FP (Front Post) or BP (Back Post) stitch with a dc (double crochet), hdc (half double crochet), or sc (single crochet) stitch:
FPdc = front post double crochet. Work stitch around the front of the post. Can also be FPtr, FPhdc, or FPsc.
BPdc = back post double crochet. Work stitch around the back of the post. Can also be BPtr, BPhdc, or BPsc
Decrease stitches are often written as follows: (Note: You may also see something like “dec in every 5th st” to mark a decrease in every 5th stitch.)
sc2tog = single crochet 2 together. This decrease tells you to crochet two single crochet stitches together. You may also run into sc3tog or sc4tog, etc.
dc2tog = double crochet 2 together. This is also a decrease, but with double crochet stitches. You may also see dc3tog or dc4tog, etc.
tr2tog = treble crochet 2 together. Same idea as above, but with treble crochet stitches.
CL = cluster. Similar to a bobble (described below), this is a group of stitches worked into one single stitch or space. They are worked in the same way a dc3tog or dc5tog is worked (crocheted half way before starting the next stitch) but will only be in one single stitch–they are NOT a decrease!
You may also run into special terms such as bobble, shell, picot or puff in a pattern. These should be defined by the designer at the top of the pattern. ALWAYS consult the designer’s notes to find out how the stitches are made, but in general:
Bobble = dc5tog in the same stitch. These are often, but not always followed by a single crochet that makes them bump out the front of the design.
Shell = 5 double crochet in the same stitch. Don’t confuse these with a cluster–they are 5 separate stitches that should fan out into a shell shape
Puff = yarn over, pull up a loop 4 times in same stitch, pull through all loops on your hook
Popcorn (can also be abbreviated “pc”) = 5 dc in same stitch, remove your hook from the working yarn (that loop that’s still on your hook), and put it through the top of the first dc you made, then poke your hook through that loop you dropped earlier and pull the two ends of your 5 dc together making a bit of a point at the top.
Picot = ch 3, slip stitch back into first ch. This makes a cute little bump that is most often used on the edges of lacy things.
Sometimes there are symbols in the middle of a pattern. Here are what they mean:
, = a pause between steps. If you see “ch 1, sc in next 3 sts, sk 2 sts, 5 dc in the next, sk 2 sts, sc in the next”, don’t get overwhelmed. Each comma is a place to pause before moving on to the next stitch. First, ch 1, then single crochet in the next 3 stitches, skip 2 stitches, and work 5 double crochet in the next stitch, skip 2 more stitches, and single crochet in the next stitch.
* = repeat the instructions as directed.
* to * = repeat the instructions inside the asterisks as many times as directed, or until the end of a row or round. Can also be in the middle of a row/round. Brackets [ ] or Parentheses ( ) may also be used in place of asterisks.
Try out your new skills (but don’t forget to scroll down for more pattern reading tips first!):
Here are a few easy hat patterns that you can crochet for hospitals, homeless centers, or friends and family.
- This hat pattern comes in 4 sizes. You’ll practice post stitches, and working in the back loop only (BLO).
- This hat pattern also comes in 4 sizes.You’ll practice working in the 3rd loop of a half-double crochet stitch, as well as gain experience alternating between single crochet and double crochet to create a fun texture.
- Once you master the skills above try this textured men’s beanie. Read the pattern notes to see how you can use a different hook size to make it smaller for the women in your family.
If hats aren’t something you want to jump into right away, try this beginner-friendly cowl made with chunky yarn,
- ”Sashay Around” cowl. It has pictures, and makes a great first project for kids and adults alike.
How to read crochet patterns parentheses and brackets:
Brackets may be used in a spot to tell you how many times to work the designated instructions, for example: “[dc, ch 1, sk st] 10 times” means to work the instructions in the brackets a total of 10 times before moving on to the next part of the pattern.
Parentheses often are used to tell you to work a group of stitches into one stitch, for example: “(sc, ch 2, sc)” means to work all of those stitches inside the parentheses in one single stitch before moving to the next stitch.
And, you’ll often notice numbers at the end of most well-written patterns. They may or may not be in parentheses. These are your stitch counts for the current row or round. For example, here is row 4 from my Primrose and Proper super scarf:
- Row 4: ch 3 (counts as first dc of row), turn, 2 dc in first ch-2 sp, *3 dc in next ch-2 sp; repeat from * across, in final ch-2 sp of row work only 2 dc, dc in top of ch-2 from prev row. (300 [192, 228])
The numbers at the end show the stitch count for the instructions as written (300), then it also shows two other counts if you want to make the scarf in different lengths [192] and [228]. When making garments you may see 4 or 5 different numbers at the end of each row. Each of these numbers is for a different size. Usually it will go (small, medium, large, XL, XXL), so if you’re making a “medium” just make sure your counts are always matching up with the 2nd number from the left. The designer should note the sizes beforehand to make it clearer (this is another reason to read the information at the beginning of a pattern).
The Difference between US and UK Crochet Terms
If you are in the US and follow a pattern from a UK designer, you will quickly notice some differences in terms!
There is no “sc”, but you will see htr and dtr, so what do these mean?
Some basic US terms, and their UK equivalent:
sc = dc
hdc = htr (half treble crochet)
dc = tr
tr = dtr (double treble)
If you want a more comprehensive list of US/UK terms, head on over to the Craft Yarn Council’s website, and check out their list.
A Few Words on Multiples
This is a slightly more advanced technique, but one that I wish I had known more about when I first started crocheting, so I’m including it here in the hope that it will help you too.
Sometimes you will run across a scarf or afghan pattern with the note “worked in multiples of 6 + 2” or something similar. This is helpful because with this information you can size the pattern up or down based on your needs! All you need to do is find the gauge, then do some simple multiplication, then add the required number of “extra” stitches (in this example, 2). If you had a queen-sized afghan that you wanted to make into a baby blanket, and it was written in multiples of 6 + 2, you would first find the gauging information. Let’s say, for example it’s 12 dc stitches in 4”. You will take that number (12) and multiply it by 3 to find out how many stitches are in 1 foot/12 inches (12 x 3=36). Once you know how many stitches are in a foot (36 in our case), you can multiply that number by the number of feet (in width or height) that you need your baby blanket to be. I’ll use 3 ft as an example: 36 x 3=108. So, your starting row needs to have 108 chains (conveniently, 108 is a multiple of 6), plus 2 more chains, for a total of 110. It is important to note that some people include the turning chain in this multiple count, and others do not. Most of the time it should be included.
Thank you so much for stopping in today! If you enjoyed this article, please consider following me on Facebook, Pinterest, Instagram, and Ravelry for more crochet tips and tricks. as well as free crochet patterns.
*This is where we practice being flexible–like a piece of yarn!
.
.
.
Umm, ok…Can someone help me out of the tangle I’m in? Anyone?
I have been crocheting for quite a while and I am doing a project and it says to ch 39 sc, what in the world does that mean hoping someone could help.
Ava,
It may mean that it wants you to make 39 foundation single crochet stitches to begin the project. When in doubt it’s always best to contact the original designer with any questions. 😊
I’m stuck 😞 Ch1, sk 1 st, dc in next st, – I understand that bit, ch1, skip 1 ch, dc – what does skip 1 chain mean. I can skip a stitch but no idea how to skip a chain.
Skipping a chain is the exact same idea as skipping a stitch. 😊
Hi! I’ve just started to crochet and am trying a granny square pattern that was listed as beginner/easy. I’m lost on row 2 already and the original designer has not replied, hoping you could help clarify?
I started my 8 chains, and slipped it into a circle. Round 1 I think I did ok because it looks like the picture provided. But I’m lost already on round 2. Do I chain 2 and then proceed to poke into the next stitch on the circle and treble it? Then I chain 2 more, but what do I do with that?
The centre of the granny squares are supposed to look like wagon wheels. Round 1 makes a tight circle and it looks like round 2 is supposed to be the spokes?
———————————————
Ch 8 using a contrast colour and join in the round with a sl st.
Round 1: Ch 2 (= 1st tr), tr 15 in the ring (=16 tr). Finish the round with a sl st in the 2nd ch at the beginning of the round.
Round 2: Ch 2 (= 1st tr), ch 2,
* tr 1 in the next tr, ch 2 *. Repeat * * 15 times (= 16 tr). Finish the round with a sl st in the 2nd ch at the beginning of the round.
From looking at what you’ve shared about round 2, it looks like you’ll be working alternating treble stitches and ch-2 stitches. So, working all tr stitches into the top of the tr stitches you crocheted in round 1, you’ll make a treble, then chain 2, *then work a treble into the top of the very next tr stitch, then chain 2; and repeat from * all the way around. Hopefully that works, and the original designer can get back to you to help you with any further questions!
Hi, I was wondering what “not applicable” means when used in a crochet pattern. I couldn’t find anything about it in any other articles so i was hoping you would know.
Without knowing more context about the pattern I couldn’t say. I’d recommend contacting the original designer and ask what they meant by that. 😊
Ok. HELP!!!
I have a pattern that says
2(3,3,3,3) dc in next dc. In another round it has 3(3,3,4,4). I’m not a beginner, but I’ve never seen this before
If they are at the end of the row or round they are usually stitch counts for additional sizes. If you have questions about a specific pattern I would encourage you to contact the designer directly. 😊
Hi, I’m a beginner! I have two questions. First, the pattern says “1 sl st back to ch sp” does that mean to crochet in the other direction? And then, when it says “in each of the next same st” does that just mean in the rest of the stitches.. Seems a complicated way to say it?
Thank you!
Joanna, try taking a look at this tutorial: https://kirstenhollowaydesigns.com/2021/01/how-to-crochet-in-the-3rd-loop-of-a-half-double-crochet-stitch.html It might help with locating the 3rd loop. 😊
What does it mean when they say sc in next 5 sc twice does it mean 2 sc in each sc or do you sc in next 5 sc. then go back and do it again
You will need to go back and crochet that sequence again. When in doubt about a pattern it is always best to send a message to the original designer so they can clarify. 🙂
Very helpful thank you. I have a question, I have a pattern that in the notes says:
Notes: Chain 3 at the beginning of rounds always counts as a double crochet.
Round 1: ch 3, sk first ch, dc in each ch, sl st to join.
Does that mean I need to make the first 3 chains a double crochet. But if that’s the case then why is it not just written as dc instead of ch?
Hope you can help me out?
Thank you.
This just means that a ch-3 is substituted for a dc stitch. You do not need to make a separate double crochet in place of the 3 chains because in this pattern ch 3 = dc.
I see thank you for your reply.
GM,
Thank you for all this information! Very helpful.
I have a pattern that says Hdc in between the 1st and 2nd hdc stich from previous row and in between each stich across. Ch 1, turn (14hdc).
I am confused on the in between phrase. Can you help me out?
thank you!
It sounds like you will be putting your hook between the stitches, next to the post of the stitch, instead of at the top where you normally insert your hook.
If you have any other questions about this pattern, I’d always encourage you to ask the original designer if you can track them down. 😊
Hello. I have hit a stumbling block with my crochet project. The pattern says:
Rnd 30: dc into next 10 st, skip 40 st, dc into next 10 (20st)
Rnd 31: dc1 in each st (20st)
I’m struggling with how to skip 40 stitches? Wondering if someone could help please?
Thanks very much
You will count forward in the row 40 stitches and start crocheting in the next stitch. This sounds like it will create an opening, maybe for a sleeve?
When in doubt, always contact the original designer as most are willing to provide pattern support for their own designs. 😊
What does this mean ? ” dc. 1 dc in each of next 2 dc”
This is the full step:
“4th rnd: Ch 3. *2 dc in next dc. 1 dc
in each of next 2 dc. Rep from * to last dc “
“dc” stands for double crochet in a pattern. So to work round 4 you would need to work 2 double crochet stitches in the first dc stitch, then 1 double crochet in each of the next two dc stitches (presumably these dc stitches you are working into would be from round 3). You’ll repeat that sequence from the * around.
Hope that helps!
Ideally, it’s always best to direct these kinds of questions to the designer who wrote the pattern. 😊
Hi there! I’m fairly new to this and a lot of your advice is helping me out so I thought I would pop a question in here. How would I go about a pattern that reads Multiples of 11+1 (add 1 for base chain)? Would the parentheses not be the same as adding one at the end ? I’ve seen another pattern that reads Multiples of 10+ 1 (add 2 for base chain) and im utterly lost. Thank you!
You would need to add an extra one for the base row–usually this is the turning chain. The +1 on the end of a multiple is a stitch meant to “finish” the design so it’s not flopping around half-done at the end of the row. For example if I were to alternate: *dc, ch 1, sk st; for a whole row I’d need to have one extra stitch at the very end to work a dc into, so that it began and ended in a neat and orderly manner.
I hope that has helped and not added to the confusion! When in doubt, it’s always best to ask questions of the original crochet pattern designer. 😊
My pattern tells me this:
I’m very new to reading patterns and I lie a challenge. I’m going to try making the filigree cardigan. The pattern says: Rs ch1, DC in first 20 FSC, skip next 2 fsc, she’ll in next FSC, skip next 2 fsc, DC in next 4 FSC; repeat from * 3 times, DC in last 6 FSC, turn – 4 shells.
I get everything until it says turn – 4 shells. As I still have 10 stitches left to the end of my row.
Thanks
The 4 shells are how many you should have once you’ve completed the row. It’s basically a summary. 🙂
Hi, I hope you could answer this for me. I’ve not seen a pattern written in this format.
This is one of the lines. My question is : what does the dash mean? I don’t know how to read ‘ch-2’ or is it simply just ‘chain 2 ‘
Hdc2tog, hdc across, 1 hdc in ch-2, ch 2, 1 hdc in ch-2, hdc to last 2 sts, hdc2tog, ch 2, turn.
Hi Debbie,
The dash denotes it as a space and you should not actually chain 2 in that instance. For the snippet you shared you would probably have made the chain-2 space in the previous row or round, and now when you se “1 hdc in ch-2” you will be working the hdc into that space. I hope that helps!
what does this mean in a pattern what does the X 6 mean in this Ch1, [sc, 2sc in next stitch] x 6 (18)
It stands for “times”. You will repeat what is in the brackets 6 times. I hope that helps!
Please help me with a pattern that says repeat rows 3and4 5times I really don’t understand. Thank You
You will repeat the instructions in rows 3 and 4 a total of 5 times. This should give you 10 rows of the design.
Hi Kristen, thank you for the information. I am working on a gengar pokemon and one of the direction for it’s spike is as follows:
– Small middle spike from head (make 1):
Round 1: sc 4 in MR (4)
Round 2: sc in each sc (4)
Round 3: inc (8)
Row 4: sc 4
Row 5: sc 4
My question is, how do you go from Round 3 to Round 4 and 5? It doesn’t mention to decrease, so I am not sure how to go from 8 to 4 stitches? Help! Thank you 🙂
Rows 4 and 5 don’t say they are rounds at the beginning, so you may want to double check if you really are decreasing or not. Sending the original designer a message to clarify the pattern is what I recommend. 🙂
I’m hoping you can help with this row in my unicorn pattern. I am decreasing from 51 down to 42 which means I have 9 stitches to decrease. The pattern says (sc in the next 4 sts dec/rpt) that means I can only decrease 8 times if I sc 4 and decrease stitches 5 & 6. I know how to decrease invisible but no matter how many times I look at this I’m baffled. I hope you can help.
Regards
Barbara
If you’re not getting the right stitch count I would recommend contacting the original designer and asking them to clarify their pattern.
Hey there, I am trying to follow this pattern but I don’t understand their instruction. It goes like this: At the end of row 3 it says – 7dc, 6 slip sts and 1 chain. Then it says Ch 3, turn. I don’t get it. Do they mean chain 4? I have never seen that before. Any help would be greatly appreciated.
That’s most likely a summary of what kinds of stitches were used in that row. Only ch 3 to turn if that is what the pattern says to do.
I have 2 questions: first I do not understand RS, I know it means right side but how can you tell?
Also I have a pattern for a scarf and it gives a Stitch Guide:
Block pattern
Row 1 etc.
Row 2 etc.
Rep rows 1 & 2 for pattern but then
Directions:
Ch. 34
Set-up row: Dc in 3rd ch from hook, *dc in next 3 ch, ch 1, sk1; rep from* to end ending with dc in last 4ch. turn
Work in Block Pattern until piece is 54″ ending with row 2 of pattern.
Do I start with Ch 34 and then the set-up row and then Row 1 & 2 from the block pattern above?
Yes, you will start with the “Directions” heading which tells you to ch 34. Then continue following the pattern until you reach 54″. 🙂
I am stuck on part of a pattern that says 5 sc in next sc. Does this mean I sc 5 times in the same stitch?
So insert hook, YO and pull a loop, YO and draw through both loops, then put the hook in the same place I started and repeat 4 times, all in the same initial stitch?
Thanks in advance! I have learned so much from your site already.
Yes, You are correct! 🙂
I’m glad to hear you’ve been learning a lot from my site! I love to teach and inspire others!
Hi,
Please help! I’ve got to do:
1ch, 1dc across (3 sfs) I’m stuck! This is rnd 2
I’ve done 1dc in 2nd chain from hook, 1dc in each next 2 chain (3 sts) in rnd 1
Many thanks!
Jo
You will be working 1 dc across the dc stitches you made in round 1, for a total of 3 stitches. 🙂
Hi there:
I am new to crocheting and hoping you can help me. It is a baby blanket. At the end of the first row (basically double chains) it say 41 ch-2 spaces. Can you please explain what this means. Thank you.
Michelle
Hi Michelle,
Thats the stitch count to help you keep track of your numbers. You should have 41 ch-2 spaces at the end of the designated row, ie. you’ll have chained 2 41 times (these may be separated by a slip stitch between the chains). 🙂
The baby cap pattern I’m crocheting has the instruction 1dc in each of the next 11 (3-2) dc.
I’m not sure what the (3-2) means? Can you help?
Without having more information I’m not entirely sure either. If this is a repeating section they may be telling you to dc in the next 11 sts for this row or round, next 3 sts in the following row/round, and next 2 sts the row/round after that.
Good morning, I’m crocheting a dinosaur for my grandson. Round 8-14 says Work 1sc in every sc in the round without finishing every round, then work 1sc in each of the first 5 sts to end up mid on top of neck-now rounds beg here. I’m not sure if how the 5 extra stitches work here. Than you for your help
Hi Lupe,
For rounds 8-14 you will be working in unjoined rounds (aka. leave off the slip stitch and chain 1 that most patterns call for at the end of a round). Your stitches will spiral instead of having a “seam”. I’m not sure how many stitches are supposed to be in those rounds (maybe 10?) but after completing rounds 8-14 you will work 5 sc in a new round which should put you at the midway point on the neck, then you’ll begin working on the next part of the pattern.
When working in unjoined rounds it’s always a good idea to use a stitch marker to mark your first stitch of the round so you don’t lose track of where you are.
I hope this helps!
Hi Kirsten
I am beginner and am learning to make a scarf. I am stuck with this pattern (shell pattern):
Ch 26.
1st row: (RS). (1 sc. Ch 3. 4 dc) in 2nd ch from hook. *Skip next 5 ch. (1 sc. Ch 3. 4 dc)
in next ch. Rep from * 3 times more. Turn.
2nd row: Ch 8 (counts as dc and ch 5). *Skip next 4 dc. 1 sc in top of next ch 3.
Ch 5. Rep from * 3 times more. Skip next 4 dc. 1 sc in top of last ch 3. Turn.
3rd row: Ch 1. (1 sc. Ch 3. 4 dc) in first sc. *Skip next ch-5 sp. (1 sc. Ch 3. 4 dc) in
next sc. Rep from * 3 times more. Skip next 5 ch. 1 sc in 3rd ch of ch 8. Turn.
I am able to follow the first row but lost starting from row 2.
What does it mean by Ch 8 (counts as dc and ch 5)? I don’t understand the instructions and hence I do not know where I should put in the stitches. Where do I do the 4dc and sc in top of next ch 3? What does it mean by top of next ch 3? Your help is appreciated, thanks!
Hi Gigi,
In this case the beginning chain 8 stands for a dc (as a chain 3) and then a chain 5. A chain 3 is often substituted for a dc at the beginning of a row or round. For round 2, after completing the ch 8, you will skip the 4 dc from the previous row and work a single crochet into the top of the ch 3 you made in row 1 (I’d interpret it as the 3rd ch out of the chain 3). After that you’ll chain 5, and then repeat from the * across. I hope that helps!
Hi Kirsten, The gauge for a pattern I’m working on says 20 stitches and 7 rows = 4 in in pattern.
The pattern is several rows of V stiches and then one of chain 5 sc. Do I work the swatch with the row of ch 5? or just the V stitches??
Hi Rhodeena,
Since it doesn’t say specifically what stitches you are to repeat to get the gauge, I’d send a message to the designer and ask them what stitches they are basing that gauge on.
Hi there, I’m doing the edging of a blanket and one round I’m stuck on has a ‘decrease’ at the of of this in brackets: [(dc, ch2, dc) in the next ch-3 sp, dc in the next ch-3 sp, (ch 2, dc in same sp) 3 times, (dc, ch 2, dc) in the next ch-3 sp, decrease] 10 times. I understand everything but what it’s asking me to do with the decrease. It doesn’t make sense to me to decrease the last dc, ch 2, dc
Hi Marcie,
The decrease at the end may be telling you to do a dc2tog (which is a typical decrease involving dc stitches) after doing the “(dc, ch 2, dc) in the next ch-3 sp”. It’s hard to say though without seeing the entire pattern.
Thanks for your fast reply. I just studied the pattern a little more and found specific instructions for that decrease stitch. I’m good to go… can’t believe I missed that!
Great! I’m glad you were able to get it figured out!
I don’t understand how to do the multiples of 8 +1 for example. I googled it and everyone shows this. I don’t get it. Wouldn’t you just chain 9? Also afgan is 170. How do I size it down for an infant?
0
00000000
Hi Nancy,
This is going to be a bit of a long reply, but hopefully it will help you make sense of things! Usually with multiples of a number plus 1 are figured like this. I’ll use your 8+1 as an example: Your beginning chain needs to be a multiple of 8, the closest amount of times 8 goes into 170 is 21, so you figure out 8×21=168, then you’ll add 1 additional chain for a total of 169 (I’m not sure where the number 170 comes from if they are asking you to work the afghan pattern in multiples of 8+1, and would need to have a bit more information about it). The additional chain may be a turning chain, or an ending stitch at the end of a row that completes a row, since every repeat doesn’t need a turning chain or an ending stitch you have the +1 instead of a multiple of 9. This is only part of the equation though! The sizing is done through gauge. Baby blankets vary in dimension so for this example I’m going to show you how to figure out a 36″ by 36″ receiving blanket size. Most crochet patterns will have gauge information written in. This is how many stitches are in 4″ (typically, unless otherwise noted). You will take that number and multiply it by 3 to figure out how many stitches are in a foot (4″x 3 = 12″), and then multiply that number by 3 to see how many stitches would be in 36″–the size of your receiving blanket. You would then chain the number that is a multiple of 8 that is closest to the number of stitches in 36″, and finally add 1.
And finally, the illustration showing the O’s is most likely related to crochet chart symbols. In crochet charts a “o” stands for a chain. A “o” stacked on top of another “o” usually denotes a turning chain.
Good luck on your project!
Thanks for your help. It makes more sense now.
Wonderful! I’m glad it helped you!
Hi, Kirsten. Thank you for this excellent post! I’m a reasonably experienced knitter but found this crochet pattern that looked fun: https://www.lovecrochet.com/us/kahlo-crop-top-in-paintbox-yarns-cotton-dk-downloadable-pdf?om_campaign=om_796c02568e5a_67_vrj72mmh&om_send=867d46fd7e3647859eb9ed706a981044&omhide=true&urm_content=ROW_split-A&utm_campaign=lc_na_pp_pattern_free_AUTOMATION&utm_content=ROW_split-A_LC_ROW_STAGE1&utm_medium=email&utm_source=Lovecrochet#kitbuilder-wrapper. Unfortunately, even to my untrained eye, the pattern seems to have a number of errors, though I muddled my way through until I got to the following inscrutable instruction: “ch 1, turn, dc (sc) on wrong side over tr (dc) sideways right to left over tr (dc) below.” Does “over dc” mean over the dc post??? I’d be so grateful if you could shed some light on what it means. I’d hate to have to abandon it and waste these pretty yarns!
Hi Erin,
It could mean over, or even possibly around the dc stitch. However, in this case since it is a more complex design, and you have questions about the overall accuracy, I would contact the designer or pattern company to find out exactly what they want you to do in that section.
Hi, what does it mean if your pattern says rnd 10-11: Ch 1, sc in each sc around, sl st to first sc?
Does it mean that you should follow the instructions for both round 10 and 11?
Hi Tanya,
Yes, that is correct. 🙂
I am working on a sleeve in a free pattern entitled; “Sunday’s Best” from Annie’s Attic. Size 2 toddler sweater. Can’t figure this out and almost down with sweater. . Rep rows 5-12 consecutively, and at the same time, inc 1 st at each end of this row and every 6th row 1 time, then every 4th row 2 time. ending with 38 sts at the end of last row.
Please help me.
Hi Sarah,
You will repeat rows 5-12 and increase (put two of the stitches the pattern asks for in one stitch) at the end of whatever row this was written for, plus increase on the 6th row from this one one time. After that you will increase at the end of every 4th row 2 times. This should put you at 38 stitches total.
I hope that helps!
Hi, I am working on a hat pattern which states putting a row of fpsc around dc of the previous row but it states to join with a slip stitch to the first stitch then says to back slip stitch so not to crochet in the posts. I’m not sure what the last instruction means
Hi Sandy,
To me it sounds like the designer is wanting you to slip stitch back into the previous stitch after you join the round. If you have extra information on what happens in the next round that you can share here it may explain why you were supposed to work backward and not work into the post stitches. 🙂
What does like 3rd row: ch2 – alternate *1 increase – 1dc* close with sl st.
4th row: ch2 – alternate *1 increase – 2dc*. Can not figure this out. Please help!!!
Hi Karen,
You will start out row 3 by chaining 2, then you will alternate increases (an increase is 2 of the designated stitches in the same stitch unless the pattern indicates otherwise) with a single dc in the next stitch. You will repeat this sequence to the end of the row. The 4th row is the same idea but you will alternate 2 dc in the same stitch followed by a single dc in the next 2 stitches to the end of the row.
Good luck!
This is from row 2 of Lattice Weave Throw. Please help. I love the pattern from Red Heart. .
How do read the *, **, then * once more, then repeat from * to **.
Hi Debbie,
Basically those asterisks are there to help with organizing the repeats of certain sections of the throw. You will repeat from the * to the final”;” which is at the end of the Lattice Panel section. Then you’ll repeat from the * to the final “;” again, ending with the “dc in next 28 ch” section between the * and the **, after you are done with that you should have 5 stitches left in the row, which you’ll work the double crochets into.
Hi kirsten,
I am looking at a pattern below.
Row 1 (right side): Sc in 2nd ch from
hook and in next 5 ch, *ch 2, skip next
3 ch, (sc, ch 2, sc) in next ch, ch 2, skip
next 3 ch, sc in next 5 ch; repeat from *
across to last ch, sc in last ch, turn—70
sc and 27 ch-2 spaces.
What do 27 ch-2 spaces means? Does this mean 27 sc in every chain 2 space?
Thanks,
Lin
When you follow the instructions in row 1, you will end up with a grand total of 70 single crochet stitches, and 27 chain-2 spaces in that row. The information after the dash is simply to help you keep track of the stitches you just made. 🙂 Usually that information will be put in parentheses instead of after a dash to better note that it is separate and not part of the row instructions themselves.
Brilliant, thanks Kirsten for your help.
This completely makes sense.
Lin
You’re welcome! I’m glad it helped! 🙂
Q: Pattern reads Chain 2 (counts as first dc)…then * 3 dc, 2 dc in the next, repeat from *
So do I, chain 2, then 2 dc in the next two chains, then 2 dc in the next stitch, THEN 3dc, 2dc thereafter?
Or, chain 2, 3dc 2dc thereafter?
Ugh, please help! Thank you in advance! 🙂
Hi Kathleen,
The asterisks tell you to repeat that section down the row, so, following exactly what you wrote above, you would begin the row by chaining 2, then you would work 3 dc in the next stitch, 2 dc into the stitch following that, and continue working 3 dc in the next stitch, 2 dc in the stitch following that until you came to the end of the row, or round: 3 dc stitches, 2 dc stitches, 3 dc stitches, 2 dc stitches, etc. Without seeing the pattern it almost sounds as if you are working in the round or creating a curve with this stitch sequence. Good luck!
You are a gem! Thank you so much for taking the time to help me!
You’re very welcome!
I’m new to crochet and would be happy if you could please explain this line to me:
Rounds 7-8: SC around (30 SC)
Does this mean that for round 7 there are 30 SCs and for round 8 there are also 30 SCs? This means 60 in total.
Or
Does it mean it is 30 SCs in total for round 7 and 8?
Thank you!
Hi Bel,
Rounds 7 will contain 30 sc, and round 8 will also contain 30 sc.
Hi,
I’m following a pattern… I’ve made a ring, I’ve done a round of sc and close with a slip stitch…
What I’m not getting is the next row I have to start with a sc, then work 8 popcorn stitches and finish with Ch 2, close round with dc in 1st sc
I’ve only ever closed using slip stitches, I can see that I have to dc in first sc but how does that close a ring?
Any help would be great thanks
Hi Alexandra, it sounds like this pattern is worked in “unjoined rounds”–essentially a spiral (your join will not be “flat”, but tilt upward as the new row begins). Work the stitches where the pattern tells you, and keep a stitch marker handy to mark the beginning of your rounds. This will make keeping track of stitch counts easier. 🙂
My poncho pattern says ch 64 beg cl in 4th ch from hook sk next 2 chs , sc in next ch , ch5, sk next5 chs. sc in next ch, sk next 2 chs, cl in next ch, rep from *3(4) times, turn. (5(6)cls, 8 (10) sc, 4 (5) ch- sps)
I don’t understand how to do the (5)(6) cls, (10) sc, 5) ch-sps?
Hi Janice,
Those are the number of clusters, single crochets, and chain spaces you should have at the end of your row or round. Those numbers are just to help you keep track of what you’ve done. 🙂
Kristen,
Thank you so much for this information. Having not done any crocheting for over 20 years, I can related to many of your comments.
I am crocheting a Jack O’Pumpkin candy bowl and having problems deciphering some of the directions for the sides and hope that you can help me.
Round 1: (outside : Ch 1, working in back loop only, sc in each st to end, join. Note: This is where you will attach the legs. (40)
Round 2: Turn to work from inside, ch 1 [hdc in next st, sl st in next st ], repeat to end, join. (40)
Round 3: This is the row I am having problems with says – Ch1, [sc 4 sts. 2 sc in next st]. repeat between [ ] to end, join (48)
Any assistance you can give me will be greatly appreciated.
Sharolyn
Hi Sharolyn,
Welcome back to the world of crochet!
Round 3 is an increase round. You’ll chain 1 at the beginning of the round, then place 1 single crochet in each of the next 4 stitches. Next, you’ll place 2 single crochet (your increase) in the following stitch. After that you’ll keep repeating that sequence around, and finally join the last stitch to the first with a slip stitch. ????
I hope that helps you make sense of things!
Happy crocheting!
What does sc in ch-4 sp means? Is a single crochet in the chain 5? Tks
Hi Wanda,
The first part tells you to put a single crochet in a chain 4 space, so at some earlier point in the pattern you were probably chaining 4. I don’t know exactly what you mean by “is a single crochet in the chain 5”, unless you started a row/round with a chain 5 that counts as a sc+ch-4 so, then you would continue the pattern as written, working into that space if directed to.
I hope that helps!
Hello,
What does ch ( counts as dc) mean?
What does 1 dc in each sc and ch-1 sp to end of row mean?
Thank you!!
Hi Brittany,
In the first one, the designated chain (ch) counts as a double crochet for whatever the pattern is that you’re working. The second one is asking you to put one double crochet stitch into each single crochet, AND also a double crochet into each chain 1 space (possibly the “single crochet, chain 1” sequence was something that was done in the previous row), and continue doing that until you arrive at the end of the designated row.
I hope that helps!
My pattern asks me to join next color in front barof first st, ch 1 , hdc in same front bar as joining. I know exactly where the front bar is but since I have never hdc, I cannot figure out if I hook onto the string or go over it or under it. It’s not like haven’t a v- chain where you have something to grab. I can’t find any tutorial on how to do it. Thanks
Hi Jamie, without seeing the pattern first I don’t know exactly what is going on here. It may possibly be creating a “Y” shaped stitch?
what does Round 1: ch5, Inc in 2nd ch from hook, sc 2, 5sc in the last ch. Continue on the other side of the chain base, sc 2, 3sc in the last ch. {14} andRound 2: Inc, sc 4, [Inc] 3 times, sc 4, [Inc] 2 times. {20}mean? please answer me .
Basically you will be forming an oval here. First you’ll chain 5, then inc (increase) in the 2nd chain from your hook. An increase is usually 2 of the designated stitches, and from reading the pattern they are most likely to be sc stitches (single crochet). Then you’ll single crochet in the next 2 chains, and put 5 single crochet in the last chain. After that you will continue working the rest of the round around on the other side of the chain. Once you complete that round you should have 14 stitches. It’s similar for the next round: you’ll increase (that’s 2 single crochet in the same stitch), single crochet in the next 4 stitches, then work 3 increase stitches in a row ([inc] 3 times). I think you can probably figure out the rest of the round from there. ???? Good luck on your project!
Question I have a pattern that states
(dc(ch,dc) 4 times. At the end of the end that pattern states you should have 12 5dc shells.
Why is this 5 and not 4?
Thanks for your assistence.
I don’t know for sure without looking at the pattern notes, but my guess is that the first dc is counted along with the (ch,dc) sequence which is repeated 4 times, for a total of 5 dc per shell.