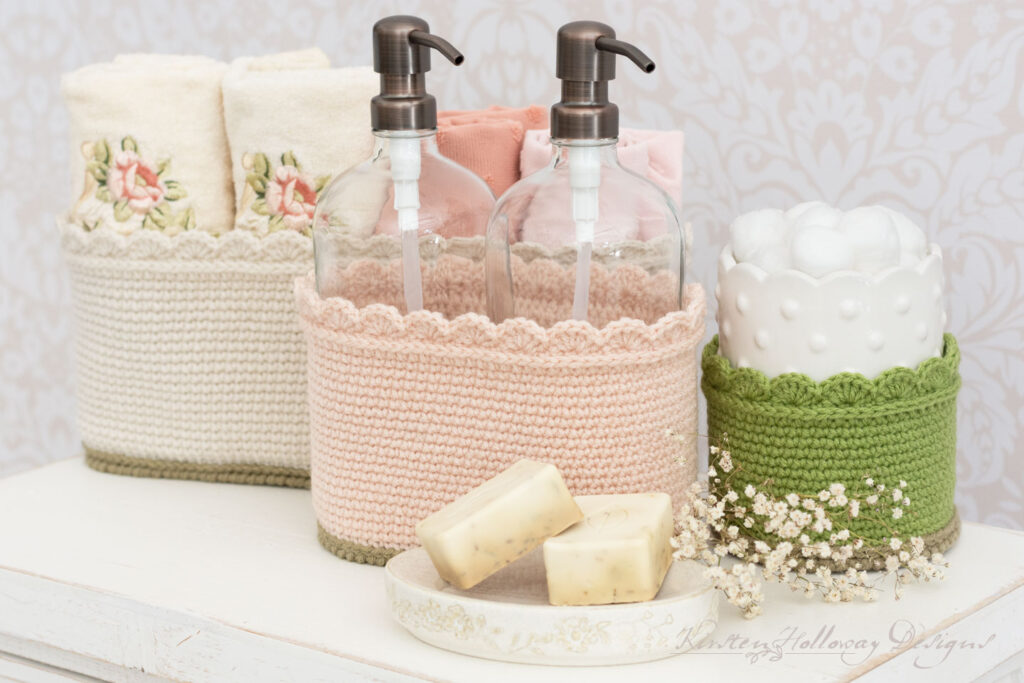
These small, versatile crochet organizer baskets come in 3 different shapes, and a total of 5 written sizes. Use them in your bathroom, or guest bedroom, for storing hand towels and/or washcloths, lotion, shampoo, conditioner, or body wash bottles in. Find the free crochet pattern instructions below, or purchase a print-optimized, ad-free PDF by clicking here.
Click here to add this to your Ravelry queue!
About a year and a half ago I designed some simple handbags and thought they would be gorgeous as baskets to organize toiletries in a guest bedroom, bathroom, or even to crochet to give gifts in.
I’ve reworked the crochet pattern and added a couple of additional sizes and styles so you can enjoy this design in your home. These easy crochet organizer baskets are simple, yet elegant, and they have a sweet, understated charm about them that will fit in to a variety of farmhouse, cottage-core, or shabby chic decor settings.
Delicate scallops line the top of the basket edges giving a soft, feminine look to your bathroom, guest room, or VRBO rental.

How to Crochet Small Organizer Baskets
For this crochet organizer pattern I primarily used single crochet stitches which and quick and easy to make. This nice thing about this stitch for baskets is that it can make them stiffer so that they hold their shape better than some. The tighter your tension the more sturdy the sides of your baskets will be.
This free crochet basket pattern comes in 3 shapes, and 5 total sizes, and is extremely versatile. Feel free to mix and match to create the set that works best for your guest room, or bathroom. You can even make them as gift baskets and fill them with goodies for mom, or a good friend. Keep scrolling down for the free pattern.
Disclaimer: This post contains affiliate links. When you purchase something using these links a small percentage of the sales price goes to me. However, you do not pay any extra for the item you purchase.
Difficulty:
Easy/Intermediate
Techniques used: shells, reverse single crochet (crab stitch), post stitches, working in the back loop only, half-double crochet in the 3rd loop.
Materials Needed:
- 3mm hook, or hook needed to obtain gauge
- 30 (small round basket), 40 (medium basket), 45-65 yards (large basket) yards #4 worsted weight yarn in tan, brown, or color of your choice for basket bottom (Color A), 85 (small round basket), 140 (medium basket), 150-190 (large basket) yards #4 worsted weight yarn in off-white, light pink, medium green, or color of your choice for basket sides, and bottom (Color B). You may use cotton or acrylic yarn for this project. See my notes for more information in the “Additional Notes” section.
- Yarn needle
- Scissors
- Stitch Markers
- (Optional) Sheet of plastic canvas for reinforcing bottom of basket/organizer
Stitches Used:
- ch = chain
- sl st = slip stitch
- sc = single crochet
- hdc = half double crochet
- dc = double crochet
- BPsc = back post single crochet
- rsc = reverse single crochet (crab stitch)
Additional Terms:
- hdc in the 3rd loop = Look at the top of the stitch, and locate the sideways “V”, bend the stitch to look at the back, and you should see another “V”. You’ll be working into the back loop of that “V”, this is called the 3rd loop.
- BLO = back loop only
- prev = previous
- st/sts = stitch/stitches
Gauge
- 16 sc in 4”, 10 rounds give approximately 2” of height
Measurements:
(These are approximate measurements)
- Small round organizer basket 5″ in diameter, by 4″-5 1/2″ tall
- Small oblong organizer basket: 3 3/4″ wide, by 7 3/4″ long, by 5 1/2″ tall
- Longer, narrower oblong organizer basket: 3″ wide, by 10″, 12″, or 14” long, by 5 1/2” tall
Additional Notes:
- ch-1 at beginning of round does not count as a stitch.
- Use tight tension when working these organizer baskets. They will end up stiffer and more “formed”.
- I used acrylic yarn because my hands won’t allow me to crochet this tightly with cotton anymore, but if your hands can handle it I’d encourage you to use #4 cotton yarn instead (Lily Sugar ‘n Cream yarn in “Jute”, “Ecru”, “Sage Green” and “Coral Rose” is what I would have used). Your stitches will be more crisp and the baskets can easily be hand-washed if needed.
- If you want use acrylic yarn and match my colors, I used Caron One Pound in “Taupe” for the bases of each organizer, and Loops and Threads Impeccable in “Fern” for the round basket, Bernat Super Value in “Primrose” for the medium size, and Caron One Pound in “Off White” for the largest size.
- Since this basket pattern does require tight tension don’t forget to take frequent breaks to drink a glass of water, and stretch.
Bathroom/Guest Bedroom Small Organizer/Gift Baskets (US Terms):
This basket pattern comes in 3 different styles and sizes. You will need to choose which one you want to make. I’m including length and width dimensions below along with some suggestions of what to stick inside of them so you know what to expect:
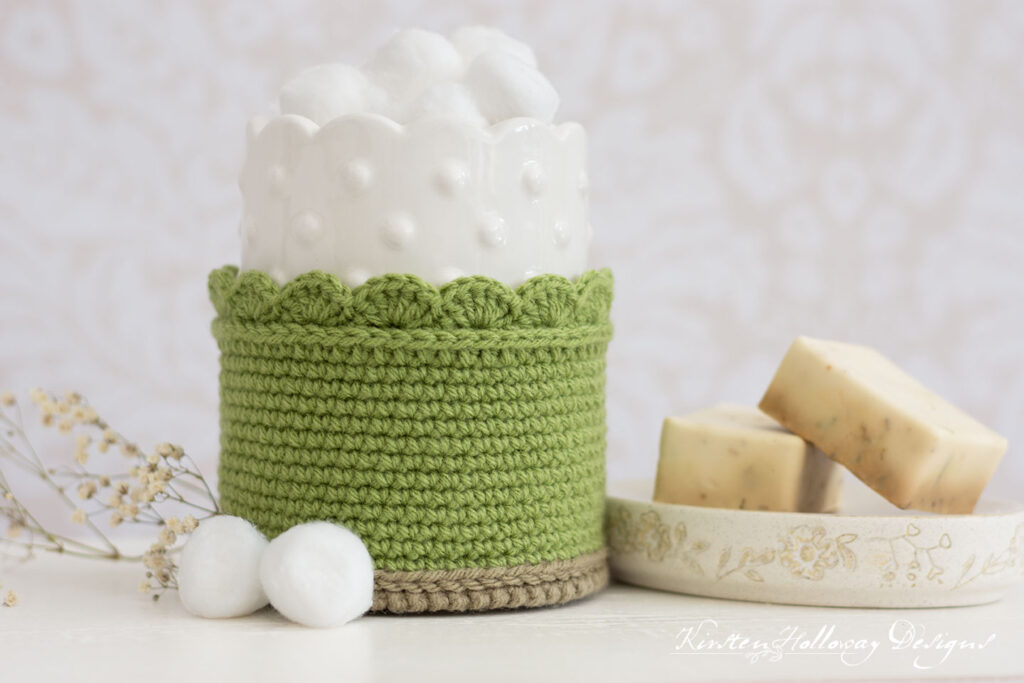
- Round basket: 5″ in diameter – Great for storing cotton balls, make-up brushes, small hair-care or lotion bottles, potentially could even store a roll of toilet paper)
- Wider, but shorter oblong basket: 3 1/2″ wide x 8 1/2″ in length – Great for storing hand towels, or larger jars of soap or shampoo (pictured are 32 oz glass bottles)
- Narrower, but longer oblong basket: 3″ x 10″, 12″, or 14″ in length – Great for storing hand towels, shampoo or lotion bottles.
Round Crochet Basket Pattern
Perfect for storing cotton balls, Q-tips, makeup brushes, small hair care bottles or lotion bottles. Finished dimensions are approximately 5″ in diameter, by 4″-5 1/2″ tall (pictured organizer is 4″ tall).
Round bottom (make 2):
Crochet your first circle in color A. Crochet your second circle in color B until round 9, then switch to color A for round 10.
Round 1: ch 1, 6 sc in magic circle, join with sl st to first sc. (6)
Round 2: ch 1, 2 sc in each st around, join with sl st to first sc. (12)
Round 3: ch 1, 2 sc in first st, sc in next st *2 sc in next st, sc in next st; repeat from * around, join with sl st to first sc. (18)
Round 4: ch 1, 2 sc in first st, sc in next 2 sts, *2 sc in next st, sc in next 2 sts; repeat from * around, join with sl st to first sc. (24)
Round 5: ch 1, 2 sc in first st, sc in next 3 sts, *2 sc in next st, sc in next 3 sts; repeat from * around, join with sl st to first sc. (30)
Round 6: ch 1, 2 sc in first st, sc in next 4 sts, *2 sc in next st, sc in next 4 sts; repeat from * around, join with sl st to first sc. (36)
Round 7: ch 1, 2 sc in first st, sc in next 5 sts, *2 sc in next st, sc in next 5 sts; repeat from * around, join with sl st to first sc. (42)
Round 8: ch 1, 2 sc in first st, sc in next 6 sts, *2 sc in next st, sc in next 6 sts; repeat from * around, join with sl st to first sc. (48)
If you want to make a tiny 3 1/2″ round basket you can stop increasing after completing round 8 and move straight to round 11 after completing 2 circles. Your stitch counts will be different, but everything else will be the same.
Round 9: ch 1, 2 sc in first st, sc in next 7 sts, *2 sc in next st, sc in next 7 sts; repeat from * around, join with sl st to first sc. (54)
Round 10: ch 1, 2 sc in first st, sc in next 8 sts, *2 sc in next st, sc in next 8 sts; repeat from * around, join with sl st to first sc. (60)
Special notes when making second circle: drop color B, and fasten off. Complete round 10 with color A.
You can make this organizer larger by doing more increase rounds. The rounds are worked in multiples of 6, but you will need to end on a round where your stitch count is divisible by 12. Just remember to switch to color A on whatever your last round ends up being for the second circle.
Optional instructions if using plastic to reinforce the bottom of the basket:
- Trace the outline of one of your circles on the plastic and cut it out about 1/4” smaller than your circle.
- Place your circles on top of each other with wrong sides facing together and right sides facing out. If you are using a piece of plastic that should be placed between the 2 sides.
In the following round you will join your circles together using reverse single crochet (also known as the crab stitch). You will be working through the back loops of each circle. This will create a decorative line. It is a stylistic element, but it’s also easier on the hands than going through both loops when maintaining such tight tension.
with Color A, working through BLO of both circles,
Round 11: rsc in each st around, join with sl st to first rsc.
The circle in color A will be the bottom of your organizer, and the circle in color B with the final round done in color A will be the inside of the basket. You will want the inside of the basket facing up for this next part.
One more thing, the outer edge of your project should be the “right side”. If it’s not then your basket will be inside out and the pretty details at the top will be on the inside of the organizer.
This section where you create the bottom of the basket is the most complex part of the pattern. Once you get past this it’s smooth sailing!
Note: if you have trouble getting your hook through both layers you may wish to use a slightly larger hook to open up the holes between the rounds first.
Round 12: working through both layers of the bottom, between rounds 10 and 11, BPsc in each st around, join with sl st to first BPsc. (60)
Round 13: Move working yarn to front, sl st around each st in round 12, join with sl st or invisible join.
Drop color A and fasten off.
The following round adds height. You will now complete round 14 a total 12 times for a basket that is almost 4″ tall, or 20 times for a 5 1/2” tall basket. If you want a taller basket you can keep adding rounds until it is about 1” shorter than the height you want, then move to the trim section. Continue using tight, even tension. This will help the sides of your organizer basket to be sturdier:
With color B,
Round 14: ch 1, sc in each st around, join with sl st to first st. (60)
Top Edging:
This adds a braided ridge, and the scalloped edge to your basket. If you don’t want scallops at the top you are welcome to substitute rsc for the shells in round 3 of the following section.
Round 1: ch 1, hdc in each st around, join with sl st to first sc. (60)
Round 2: ch 1, working in 3rd loop of hdc, sc in each st around, join with sl st to first sc. (60)
Round 3: *sk st, 5 dc in next st, sk st, sl st in next st; repeat from * around, final sl st counts as join. (15 shells)
Fasten off, and weave in ends.
Wider, but shorter oblong crochet basket organizer pattern:
Perfect for storing hand towels, or larger shampoo, and body wash bottles. Finished dimensions are approximately 3 3/4″ wide by 7 3/4″ in length, by 5 1/2″ tall.

Love these towels? You can find the Avanti Rosefan style hand towels over here.
Basket bottom (make 2)
Crochet your first oval in color A. Crochet your second oval in color B until round 6, then switch to color A for round 7.
Round 1: ch 18, 3 sc in second ch from hook, sc in next 15 sts, 3 sc in final st, continue working around end of chain and up other side, sc in next 15 sts, join with sl st to first sc. (36)
Round 2: ch 1, 2 sc in each of next 3 sts, sc in next 15 sts, 2 sc in each of next 3 sts, sc in next 15 sts, join with sl st to first sc. (42)
Round 3: ch 1, 2 sc in each of next 6 sts, sc in next 15 sts, 2 dc in each of next 6 sts, sc in next 15 sts, join with sl st to first sc. (54)
Round 4: ch 1, sc in first st, 2 sc in next st, [sc in next st, 2 sc in next st st] 4 times, sc in next 18 sts [2 sc in next st, sc in next st] 4 times, 2 sc in next st, sc in next 17 sts, join with sl st to first sc. (64)
Round 5: ch 1, [sc in next 2 sts, 2 sc in next st] 4 times, 2 sc in next st, sc in next 19 sts, [2 sc in next st, sc in next 2 sts] 4 times, 2 sc in next st, sc in next 17 sts, join with sl st to first sc. (74)
Round 6: ch 1, [sc in next 3 sts, 2 sc in next st] 4 times, sc in next 20 sts, [2 sc in next st, sc in next 3 sts] 4 times, 2 sc in next st, sc in next 17 sts, join with sl st to first sc. (84)
Special notes when making second oval: drop color B, and fasten off. Complete round 7 with color A.
Round 7: ch 1, sc in each st around, join with sl st to first sc. (84)
Your ovals should measure 3 1/2” wide by 7 1/2” long.
Fasten off, weave in ends for first oval, on second oval you can continue to round 8 without fastening off.
Optional instructions if using plastic to reinforce the bottom of the basket:
- Trace the outline of one of your ovals on the plastic and cut it out about 1/4” smaller than your oval.
- Place your ovals on top of each other with wrong sides facing together and right sides facing out. If you are using a piece of plastic that should be placed between the 2 sides.
Place your ovals on top of each other with wrong sides facing together and right sides facing out. If you are using a piece of plastic that should be placed between the 2 sides.
In the following round you will join your ovals together using reverse single crochet (also known as the crab stitch). You will be working through the back loops of each oval. This will create a decorative line. It is a stylistic element, but it’s also easier on the hands than going through both loops when maintaining such tight tension.
With Color A, working through BLO of both ovals,
Round 8: rsc in each st around, join with sl st to first rsc.
The oval in color A will be the bottom of your bag, and the oval in color B with the final round done in color A will be the inside of the basket. You will want the inside of the basket facing up for this next part.
One more thing, the outer edge of your project should be the “right side”. If it’s not then your basket will be inside out and the pretty details at the top will be on the inside of the organizer.
Fasten off, and weave in ends.
With color B facing you,
Round 9: working through both layers of the bottom, between rounds 7 and 8, BPsc in each st around, join with sl st to first BPsc. (84) Note: if you have trouble getting your hook through you may wish to use a slightly larger hook to open up the holes between the rounds.
Round 10: Move working yarn to front and sl st around each st in round 9, join with invisible join.
Drop color A and fasten off.
The following round adds height. Complete round 10, 20 times for a 5 1/2” tall basket once the top edging is added. Continue using tight, even tension. This will help the sides of your basket to be sturdier. Feel free to add or subtract rounds if you want a taller or shorter basket.
Join color B to first st in round 9,
Round 11: ch 1, sc in each st around, join with sl st to first sc. (84)
Once the basket is about 1” to 1 1/4” shorter than you’d like your finished piece to be, move to the top edging.
Top Edging:
This adds a braided ridge, and the scalloped edge to your basket. If you don’t want scallops at the top you are welcome to substitute rsc for the shells in round 3 of the following section.
Round 1: ch 1, hdc in each st around, join with sl st to first sc. (84)
Round 2: ch 1, working in 3rd loop of hdc, sc in each st around, join with sl st to first sc. (84)
Round 3: *sk st, 5 dc in next st, sk st, sl st in next st; repeat from * around, final sl st counts as join. (21 petals)
Fasten off, and weave in ends.
Narrower, but longer oblong crochet basket organizer pattern:
Perfect for storing hand towels, and/or shampoo, body wash, or lotion bottles. Finished dimensions are approximately 3″ wide, by 10″, 12″, or 14” in length, by 5 1/2” tall.

Basket bottom (make 2):
Crochet your first oval in color A. Crochet your second oval in color B until round 4, then switch to color A for round 5.
Round 1: ch 31, [39, 47], 3 sc in second ch from hook, sc in next 28 [36, 44] sts, 3 sc in final st, continue working around end of chain and up other side, sc in next 28 (36, 44) sts, join with sl st to first sc. (62, [78, 94])
Round 2: ch 1, 2 sc in each of next 3 sts, sc in next 28 [36, 44] sts, 2 sc in each of next 3 sts, sc in next 28 [36, 44] sts, join with sl st to first sc. (68 [84, 100])
Round 3: ch 1, 2 sc in each of next 6 sts, sc in next 28 [36, 44] sts, 2 sc in each of next 6 sts, sc in next 28 [36, 44] sts, join with sl st to first sc. (80 [96, 112])
Round 4: ch 1, sc in next 3 sts, 2 sc in each of next 6 sts, sc in next 34 [42, 50] sts, 2 sc in each of next 6 sts, sc in next 31 [39, 47] sts, join with sl st to first sc. (92 [108, 124])
Special notes when making second oval: drop color B, and fasten off. Complete round 5 with color A.
Round 5: ch 1, sc in each st around, join with sl st to first sc. (92 [108, 124])
Your ovals should be about 2 1/4-2 1/2” wide.
Fasten off, weave in ends for first oval, on second oval you can continue to round 6 without fastening off.
Optional instructions if using plastic to reinforce the bottom of the basket:
- Trace the outline of one of your ovals on the plastic and cut it out about 1/4” smaller than your oval.
- Place your ovals on top of each other with wrong sides facing together and right sides facing out. If you are using a piece of plastic place that between the 2 sides. You should now have a basket-bottom sandwich (please do not taste it-it’s far too stringy). 🤭
In the following round you will join your ovals together using reverse single crochet (also known as the crab stitch). You will be working through the back loops of each oval. This will create a decorative line. It is a stylistic element, but it’s also easier on the hands than going through both loops when maintaining such tight tension.
This section where you create the bottom of the basket is the most complex part of the pattern. Once you get past this it’s smooth sailing! Here is a picture of how the bottom of the basket should look as it comes together:
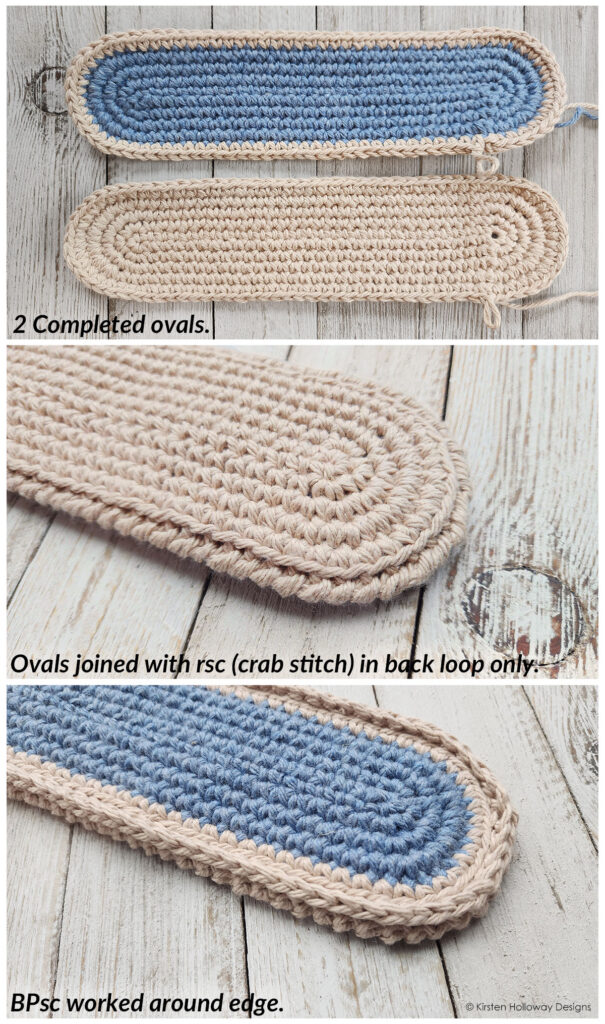
With Color A, working through BLO of both ovals,
Round 6: rsc in each st around, join with sl st to first rsc.
The oval in color A will be the bottom of your basket, and the oval in color B with the final round done in color A will be the inside of the basket. You will want the inside of the basket facing up for this next part.
One more thing, the outer edge of your project should be the “right side”. If it’s not then your basket will be inside out and the pretty details at the top will be on the inside of the organizer.
Fasten off, and weave in ends.
Round 7: working through both layers of the bottom, between rounds 5 and 6, BPsc in each st around, join with sl st. (92, 108, 124) Note: if you have trouble getting your hook through you may wish to use a slightly larger hook to open up the holes between the rounds.
Round 8: Move working yarn to front and sl st around each st in round 7, join with invisible join.
Drop color A and fasten off.
With color B,
Round 9: ch 1, sc, join with sl st to first sc. (92 [108, 124])
The following round adds height. Complete round 10 20 times for a 5 1/2” tall basket. Continue using tight, even tension. This will help the sides of your basket to be sturdier. Feel free to add or subtract rounds if you want a taller or shorter basket.
Round 10: ch 1, sc in each st around, join with sl st to first st. (92 [108, 124])
Once the basket is about 1” to 1 1/4” shorter than you’d like your finished piece to be, move to the top edging:
Top Edging:
This adds a braided ridge, and the scalloped edge to your basket. If you don’t want scallops at the top you are welcome to substitute rsc for the shells in round 3 of the following section.
Round 1: ch 1, hdc in each st around, join with sl st to first sc. (92 [108, 124])
Round 2: ch 1, working in 3rd loop of hdc, sc in each st around, join with sl st to first sc. (92 [108, 124])
Round 3: *sk st, 5 dc in next st, sk st, sl st in next st; repeat from * around, final sl st counts as join. (23, [27, 31] petals)
Fasten off, and weave in ends.
Want more gorgeous crochet patterns, and a little encouragement for your day? Sign up for my newsletter here! That way you’ll never miss out on special events, or freebies I’m offering.
JOIN ME ON SOCIAL MEDIA
I would love to see a picture when you’re done, so please feel free to come by my Facebook group and show off your finished project! Be sure to tag @kirstenhollowaydesigns when you share pictures of your project on Instagram!
You can also follow me on Facebook, Pinterest, Instagram, and Ravelry for more beautiful crochet patterns.
PATTERN TERMS AND CONDITIONS:
You are welcome to share the link to this pattern, using one image of your choice, on your site, but please do not share the written patterns themselves, this includes my Ravelry downloads or translations of these patterns, or use additional images. You do not have permission to use my images by themselves to create pinnable graphics for Pinterest, however they may be included in a roundup pin if there are 4 or more other patterns. If you sell finished items online, please do not use my pictures for your listings. I’m positive that your work is of high enough quality for you to sell the finished piece. Have confidence in your abilities! <3 Thank you!
This pattern was made to be used by individuals and small business crocheters alike. Selling your finished pieces in boutiques, at farmer’s markets, craft shows, and other local events is encouraged! Please credit/link Kirsten Holloway Designs when selling finished products online. The only thing I require is that this pattern not be used commercially to produce hundreds of thousands of copies. If you enjoyed this pattern or found it useful, why not share a link to this post with your friends?


Leave a Reply