This crochet cowl is warm and cozy for cool spring days. It uses the Herringbone Single Crochet stitch along with several other stitches that are all based on the basic single crochet stitch to create a cowl that works for either men or women. Customize yours with a floral statement tag, for women and girls, or keep it simple for the guys with a plain leather one.
Click here to add this to your Ravelry queue.
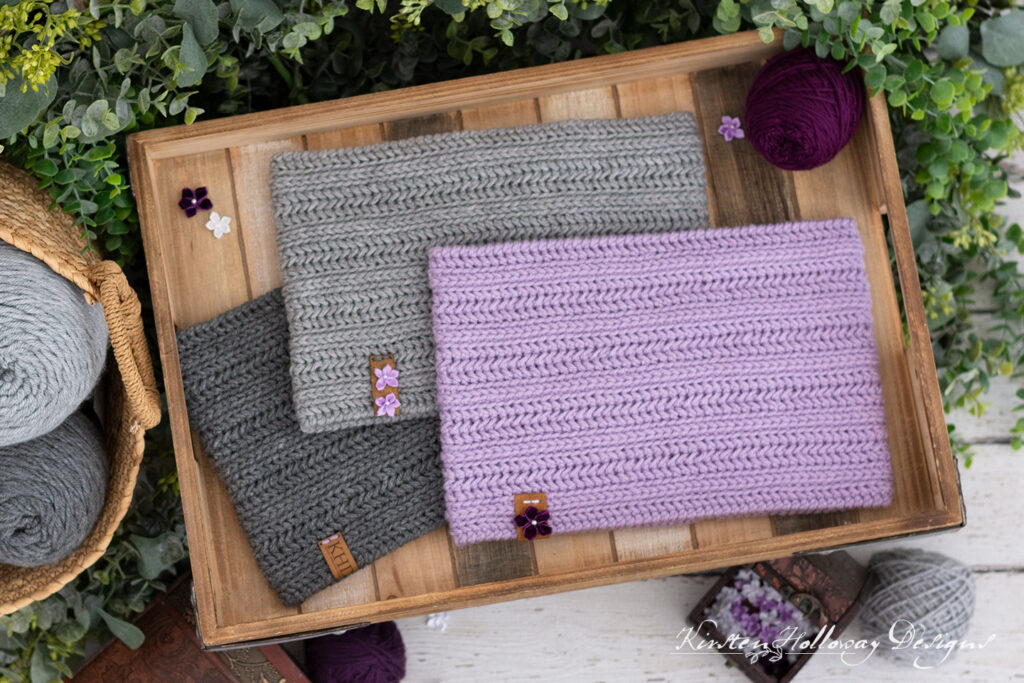
If you are looking for an easy cowl to crochet for a friend or family member that has more of an understated look, this crochet pattern is perfect. And, my favorite part is that the stitches give it a knit look!
Variations on the single crochet stitch are all you’ll need to know to crochet this cowl. It features the herringbone single crochet stitch, the crab stitch, and you’ll also become familiar with working in the back loop and the back bar of a single crochet. Who knew you could create such lovely texture with one stitch! And see how nice it looks in these different colors?!

If you are not familiar with the herringbone single crochet stitch I have included written instructions to help you out. I have a video tutorial in the works as well, but until I can finish that I’ll pop a link in the notes section to another designer’s tutorial that really helped me when I was learning this stitch. the unique thing about this stitch is that it is worked across 2 rounds or rows, and creates a zig-zag design the more rounds you add.
Normally this stitch is worked in rows, so to get it to work in rounds you will need to turn your work after joining the first round, and crochet in the opposite direction for the whole round of reversed herringbone single crochet. It may sound complicated at first but once you get a round or two done it will be a lot easier (I also explain it it more detail in the notes before the pattern starts). And, feel free to tear the row out a few times and work on matching your tension in round 2 of the herringbone single crochet stitch to that of round 1 if you need to. I just learned this stitch and even though I’ve been crocheting for a while it took a couple rounds for my tension to start being where I wanted it.
I used Red Heart Super Saver yarn for 2 of these cowls and a similar, store-brand yarn for the third, but you could easily substitute with Caron One Pound. One thing I love about Red Heart yarn is that it’s durable, and it softens right up after the first washing (use a delicates bag and wash before you add the tag in this pattern’s case). It also comes in a nice selection of colors so you can easily find something that’s right for anyone you might be crocheting this cowl for.

This design is based on a pattern by Dianne Hunt. I’ll be adding more of her work to my site over the next few months.
Difficulty:
Easy/Intermediate
Materials Needed:
5mm (H) hook, or hook needed to obtain gauge
3.25mm (D) hook for crab stitch edging
170, 200, 230, 265, 295 yards #4 worsted weight Red Heart Super Saver yarn in “Pale Plum”, “Grey Heather“, or Caron One Pound in “Soft Grey Mix“, or color of your choice
-Substitutes: Hobby Lobby “I Love This Yarn”, Loops and Threads “Impeccable”, Lion Brand “Vanna’s Choice”
Yarn needle
Stitch markers
Measuring Tape
(Optional) Small ribbon flowers, mine were Offray Ribbon Accents in Dark Purple, Violet, or White
(Optional) Customized leather label
(Optional) Sharp sewing needle, and thread
Stitches Used:
sl st = slip stitch
ch/chs = shain/chains
sc = single crochet
rsc (crab stitch) = reverse single crochet/crab stitch
Additional Terms:
BLO = back loop only
Back bar of sc = look at the back of the stitch and locate the short bar that runs horizontal. Work all designated stitches for the round into this bar. This is a different location than the back loop!
Herringbone sc (herringbone single crochet) = Insert your hook into the first loop you pulled up when making the first sc of the round. This will be about the center of the stitch and you’ll grab the strand of yarn to the left side of the stitch. Insert your hook into the stitch or chain from prev round, yo, pull up a loop (pay special attention to this loop because this is where you will insert your hook as you begin your next herringbone single crochet), there should be 3 loops on your hook, yo, draw through all 3 loops.
Reversed herringbone sc (reversed herringbone single crochet) = For this second row of the herringbone single crochet you will insert your hook through that same loop of your first reversed single crochet, then insert your hook back to front through the top of the herringbone single crochet stitch from the prev row, yo, draw up a loop, yo, draw through the 3 remaining loops on hook. Flipping your work over to see the other side as you work the first part of the stitch will be helpful as you start off.
Reversed sc (not to be confused with the Crab Stitch/rsc) = insert hook back to front, yo, pull up a loop (you will want to twist your hook away from you as you do this so the yarn does not fall off the end), yo, draw through both loops on your hook.
Gauge:
15 herringbone single crochet sts in 4”
15 sc in 4”
Measurements:
8” tall by,
Child: 11”
Small: 13”
Medium: 15”
Large: 17″
X-Large: 19″
Additional Notes:
-Ch-1 at beginning or round does not count as a stitch
-Your beginning chain will be much longer than your finished cowl will be. In my experience, the herringbone single crochet stitches tend to “shrink” the piece up quite a bit.
-This pattern can be worked with any amount of chains! Add or subtract from what I have listed to make boot cuffs, mug cozies, water bottle carriers, or cowls that can be double-wrapped.
-The Herringbone single crochet is worked across 2 rows or rounds. You will be turning and working in the opposite direction for the second round, and then you will turn back after joining and continue working in the same direction as the first round/all other rounds. See my notes in the pattern for more information.
-For best results when working the Herringbone single crochet, maintain relaxed even tension.
-Herringbone Single Crochet Video tutorial: https://youtu.be/8kEeaM-NG7Q
Lila Herringbone Cowl (US Terms):
If you already know how to crochet the herringbone single crochet you can scroll right down to the pattern. If you want to learn how to crochet the herringbone single crochet stitch, then this is where you’ll start.
How to Crochet the Herringbone Single Crochet
To begin with, think of how you make a single crochet:
Insert hook into stitch or chain, yo, draw up a loop (Pay attention to the position of this loop, because you will need to know where it is to begin your herringbone single crochet when we begin with that stitch), yo, pull through 2 loops.
Each regular round of herringbone single crochet will start with a normal single crochet.
First round – Herringbone Single Crochet
There are 2 basic parts to making each herringbone single crochet stitch, whether you are on round 1 or 2 of the stitch pattern:
- To begin the herringbone single crochet, insert your hook into that first loop that you pulled up when making the first sc, note: this will be about the center of the stitch, and you’ll grab that left strand of yarn.
- Now, insert your hook into the stitch or chain from your previous round, yo, pull up a loop (again, pay special attention to this loop because this is where you will insert your hook as you begin your next herringbone single crochet), there should be 3 loops on your hook, yo, draw through all 3 loops.
This completes your first herringbone single crochet. Your next herringbone single crochet stitch is going to start with inserting your hook through that loop I pointed your attention to just a moment ago in part 1, and finishing the stitch in part 2. Normally this stitch will be worked through both front and back loops at the top of a stitch, but there are rounds in the pattern below where you will be working in the back loop only.
Repeat these steps around the entire round, then join with a sl st to first your sc.
*Turn your work* You will be heading in the opposite direction for this next round.
Second round – Reversed Herringbone Single Crochet:
For this part of the stitch you will want to keep your working yarn in front of your work, not behind as usual. Your design will be facing away from you as you create it.
- Ch 1, with your working yarn in front of you, insert hook back to front, yo, pull up a loop, (as you pull the loop up you will want to twist your hook away from you so the yarn does not fall off the hook), yo, draw through both loops on your hook, this completes your first “reversed” single crochet for the row. Place a stitch marker in this first stitch to help you keep track of it.
- In the first round of herringbone single crochet you inserted your hook from top to bottom through that first loop you pulled up. For this second row of the herringbone single crochet you will insert your hook through that same loop of your first reversed single crochet, only in this 2nd round it will be facing away from you, then insert your hook back to front through the top of the next herringbone single crochet stitch from the previous row, yo, draw up a loop (pay special attention to this loop because this is where you will insert your hook as you begin your next reversed herringbone single crochet), yo, draw through the 3 remaining loops on hook.
Flipping your work over to see the other side as you work the first part of the stitch will be helpful as you start off. This was the key to helping me understand the stitch. Keep repeating part 2. When you arrive at the end of the round join with sl st to first reversed single crochet (marked with a stitch marker).
*Turn your work* You will be heading back the direction you just came.
Now that you have an idea of what you’ll be doing, let’s get this pattern started! The stitches are much easier than it may appear, but getting your mind around working a stitch backward to what you are used to does take a little bit of practice. Don’t get discouraged, just keep at it and you’ll have the motions down soon!
The pattern officially begins here:
Ch 85, [100, 115, 130, 145], join with sl st to first ch.
Round 1: ch 1, sc in first st, herringbone sc in each remaining st of round, join with sl st to first sc. (85 [100, 115, 130, 145])
Round 2: ch 1, working in BLO, sc in each st around, join with sl st to first sc. (85 [100,115, 130, 145])
Round 3: ch 1, working in back bar of sc, sc in each st around, join with sl to first sc. (85 [100,115, 130, 145])
In the following round you’ll be working the herringbone single crochet in the back loop only. It’s just like round 1, just worked in the back loop.
Round 4: ch 1, working in BLO, sc in first st, herringbone sc in each remaining st of round, join with sl st to first sc. (85 [100,115, 130, 145])
Turn your work and begin the next round.
Round 5: ch 1, reversed sc in first st (place stitch marker), reverse herringbone sc in each remaining st around, join with sl to first reversed sc where you placed the stitch marker. (85 [100,115, 130, 145])
Turn your work and begin the next round.
Round 6: ch 1, sc in first st, herringbone sc in each remaining st of round, join with sl st to first sc. (85 [100,115, 130, 145])
You have now worked all the stitches required for the body of this cowl. If you are a little hesitant or unsure how the stitch is worked you’ll have lots more opportunities to improve!
Repeat rounds 2-6 3 times for a child size, or 4 times for adult sizes. Note: Each round 2-6 repeat adds approximately 1 3/4” of height.
Your piece should measure almost 8” tall if making it for adults. If you would like to do more round repeats for a taller cowl you are welcome to do so, but you will need more yarn than what the pattern calls for.
Repeat rounds 2-4 once, and then continue to edging.
Ending rounds:
Round 1: ch 1, working in BLO, sc in each st around, join with sl st to first sc. (85, [100, 115, 130, 145])
Round 2: ch 1, working in back bar of sc, sc in each st around, join with sl to first sc. (85, [100, 115, 130, 145])
Round 3: ch 1, sc in first st, herringbone sc in each remaining st of round, join with sl st to first sc. (85, [100, 115, 130, 145])
Using 3.25mm hook,
Round 4: ch 1, rsc in each st around, join. (85, [100, 115, 130, 145])
Fasten off and weave in ends.
Top edging:
Using 3.25mm hook,
Attach yarn to round 1, rsc in each st around, join. (85, [100, 115, 130, 145])
Fasten off, and weave in ends.
Finishing
(Optional) Sew a leather tag to the bottom (or top). If you want a more decorative tag, use a small ribbon flower and a small, sharp sewing needle and thread to sew the flowers to the tag after you have sewed the tag onto the cowl. For a plain label, I turned my customized tags around so the back side was showing and then sewed the flowers on.
Want more gorgeous crochet patterns, and a little encouragement for your day? Sign up for my newsletter here! That way you’ll never miss out on special events, or freebies I’m offering.
JOIN ME ON SOCIAL MEDIA
I would love to see a picture when you’re done, so please feel free to come by my Facebook group and show off your finished project! Be sure to tag @kirstenhollowaydesigns when you share pictures of your project on Instagram!
You can also follow me on Facebook, Pinterest, Instagram, and Ravelry for more beautiful crochet patterns.
PATTERN TERMS AND CONDITIONS:
You are welcome to share the link to this pattern, using one image of your choice, on your site, but please do not share the written patterns themselves, this includes my Ravelry downloads or translations of these patterns, or use additional images. You do not have permission to use my images by themselves to create pinnable graphics for Pinterest, however they may be included in a roundup pin if there are 4 or more other patterns. If you sell finished items online, please do not use my pictures for your listings. I’m positive that your work is of high enough quality for you to sell the finished piece. Have confidence in your abilities! <3 Thank you!
This pattern was made to be used by individuals and small business crocheters alike. Selling your finished pieces in boutiques, at farmer’s markets, craft shows, and other local events is encouraged! Please credit/link Kirsten Holloway Designs when selling finished products online. The only thing I require is that this pattern not be used commercially to produce hundreds of thousands of copies. If you enjoyed this pattern or found it useful, why not share a link to this post with your friends?


Leave a Reply