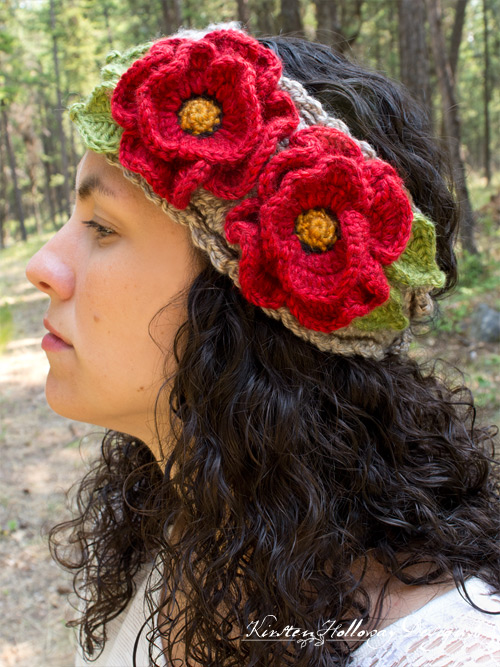
Welcome to part 1 of the Basket-full of Poppies Headband CAL!
Today we will be crocheting the headband, and next week we’ll move on to the beautiful poppy flowers and leaves. If you’re familiar with the “basket stitch” this part of the pattern should go fairly smoothly since it’s loosely based on that stitch. If you do get stuck however, I’ve included some tutorial pictures at the end of this crochet pattern post that will help to illustrate what your headband should look like as it grows.
Please don’t forget to visit my Facebook group and share you project and progress, as well as ask questions if needed. I’d love to see you there!
Here’s what you’ll need to complete this week’s section:
Materials Needed:
100 yards of Lion Brand Heartland yarn in “Grand Canyon”, plus small amount of yarn in “Sequoia”
4mm (G) hook, or hook needed to obtain gauge
Scissors
Yarn needle
7/8″ button
Stitches Used:
sl st = slip stitch
ch = chain
sc = single crochet
dc = double crochet
BPdc = back post double crochet
FPdc = front post double crochet
sc2tog = single crochet 2 together
Special Stitches:
Chainless starting double crochet – pull up a loop as tall as a regular dc (you’ll need to approximate if this is your first row), place index finger of your hook pressing firmly on the top of the loop to keep it steady, this way the loop doesn’t get larger or smaller. Wrap the hook over and behind the loop, yo, pull the yarn behind the wrapped yarn loop, yo again, and pull through the last 2 loops.
Gauge:
Headband: 4 stitches in an inch
Measurements:
Finished Headband: adult 22″, by 3.5″ wide with plenty of stretch, child’s, 20″, by 3.5″ wide, with plenty of stretch.
Headband (US terms):
Using color “Grand Canyon” (a sandy grey),
Row 1: ch 5, sc in second ch from hook, sc in next 3 sts, ch 1, turn. (4)
Rows 2-12: sc in each st across, ch 1, turn. (4)
Piece should measure 1″ wide by 3″ tall
Row 13: 2 sc in first stitch, sc in next 2 sts, 2 sc in the final st, ch 1 turn. (6)
Row 14: 2 sc in first stitch, sc in next 4 sts, 2 sc in the final st, ch 1 turn. (8)
Row 15: 2 sc in first stitch, sc in next 6 sts, 2 sc in the final st, ch 1 turn. (10)
Row 16: 2 sc in first stitch, sc in next 8 sts, 2 sc in the final st, ch 1 turn. (12)
Row 17: chainless starting double crochet in first st, BPdc around next 3 sts, FPdc around next 4 sts, BPdc around next 4 sts, turn. (12)
Row 18: chainless starting double crochet in first st, FPdc around next 3 sts, BPdc around next 4 sts, FPdc around next 4 sts, turn. (12)
Row 19: chainless starting double crochet in first st, FPdc around next 3 sts, BPdc around next 4 sts, FPdc around next 4 sts, turn. (12)
Row 20: chainless starting double crochet in first st, BPdc around next 3 sts, FPdc around next 4 sts, BPdc around next 4 sts, turn. (12)
Repeat rows 17-20 until headband measures 15″ tall for an teen or adult, or 13″ for child, then start decrease rows.
Decrease row 1: sc2tog, sc in next 8 sts, sc2tog, ch 1, turn. (10)
Decrease row 2: sc2tog, sc in next 6 sts, sc2tog, ch 1, turn. (8)
Decrease row 3: sc2tog, sc in next 4 sts, sc2tog, ch 1, turn. (6)
Decrease row 4: sc2tog, sc in next 2 sts, sc2tog, ch 1, turn. (4)
Ending the headband:
Rows 1-12: sc in each st across, ch 1, turn. (4)
Row 13: sc in the first st, ch 2, skip 2 sts, sc in the final st, ch 1, turn. (4)
Rows 14-15: sc in each st across, ch 1, turn. (4)
Row 16: sc2tog, sc2tog. (2)
Do not fasten off yet!
Continue with edging:
Round 1: ch 1, sc evenly around the edge of the headband. Join with sl st to first sc. (stitch count unimportant)
Round 2: ch 3, skip stitch, sl st in the next *ch 3, skip stitch, sl st in the next; repeat from * around, join to first stitch
Fasten off and weave in ends
Work this next round on the backside of the headband:
With contrasting or harmonizing color (I used Lion Brand Heartland in “Sequoia”), sl st very loosely along the round of sc. If you notice your slip stitches are tight, try going up a hook size or two for this step.
Fasten off and weave in ends.
Using a second contrasting yarn color, sew button to headband.
If you enjoy pictures, here are some images to help you through this process. They show you what each part should look like as you progress through the pattern.
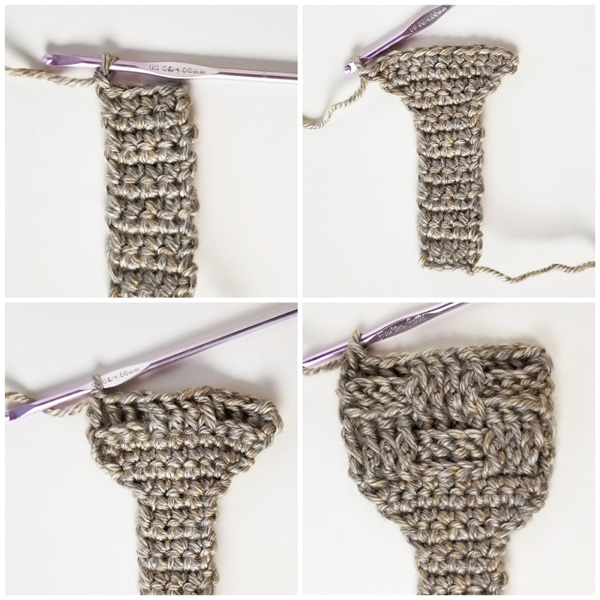 After you repeat rows 17-20 several times, you’ll end by following these steps:
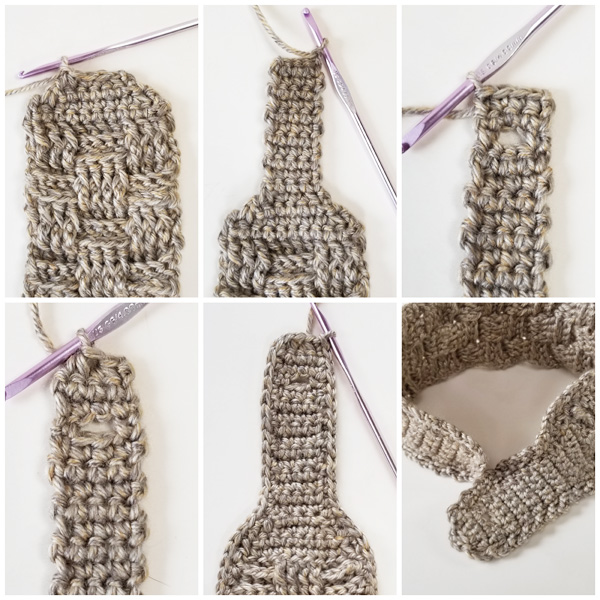
And that’s it for this week! See you next week when we start making this crochet project look pretty!


