Welcome to part 2 of the Basket-full of Poppies headband crochet-a-long! This week we will be crocheting the beautiful poppy flowers and delicate leaves then attach them to the headband. Flowers and leaves can be intimidating to some, but they don’t have to be! I’ve included easy step-by step images below the written instructions to make crocheting these embellishments a simple process. If you missed week 1 where we made the headband, follow this link to get caught up.
In addition to the instruction here, I have a wonderful Facebook group filled with helpful members who would love to support you in this process if you get stuck! If you’re not a member already, I’d love to have you join! <–Just follow that link.
Now, on to the instructions!

Materials Needed:
50 yards Lion Brand Heartland in “Everglades”, 50 yards of Lion Brand Heartland in “Redwood”, plus small amounts of “Black Canyon” and “Yellowstone”
3.25mm (D) hook (flowers and leaves)
Scissors
Yarn needle
Stitches Used:
sl st = slip stitch
ch = chain
sc = single crochet
dc = double crochet
tr = treble crochet
Measurements:
Flower: 3.5″ across
Additional Notes (for poppy flower only):
The ch 1 before or after dc stitches should be lose. You will be slip stitching into the ch 1 itself–not the ch-1 space.
Petals are worked over two rounds. You’ll be slip stitching up, and down the petals to begin and end the second round.
-Turn the flower into a pin for Veterans Day by gluing (or sewing) a 2″ circle of felt to the back of the flower. Attach a pin, and it’s ready to wear!
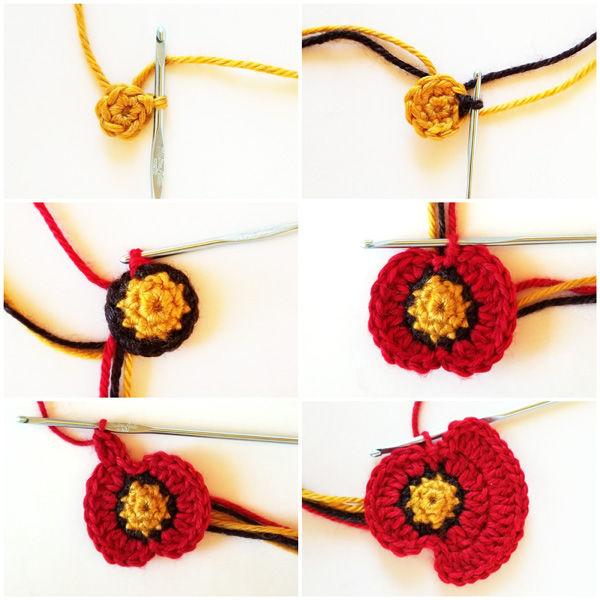
Poppy Flower instructions (US terms):
With color A (yellow)
Round 1: 6 sc in magic circle. Join with sl st to first sc. (6)
Round 2: ch 1, 2 sc in first stitch, sc in next stitch, *2 sc in the next, sc in next stitch; repeat from * around, join with sl st to first sc. (9)
With color B (black)
Round 3: ch 1, 2 sc in first stitch, sc in next 2 stitches, *2 sc in the next, sc in next 2 stitches; repeat from * around, join with sl st to first sc. (12)
With color C (red)
Round 4: ch 1, [2 dc in next 5 stitches], ch 1, sl st in next stitch, ch 1, [2 dc in next 5 stitches], ch 1, sl st in the next. (2 petals with 10 dc each)
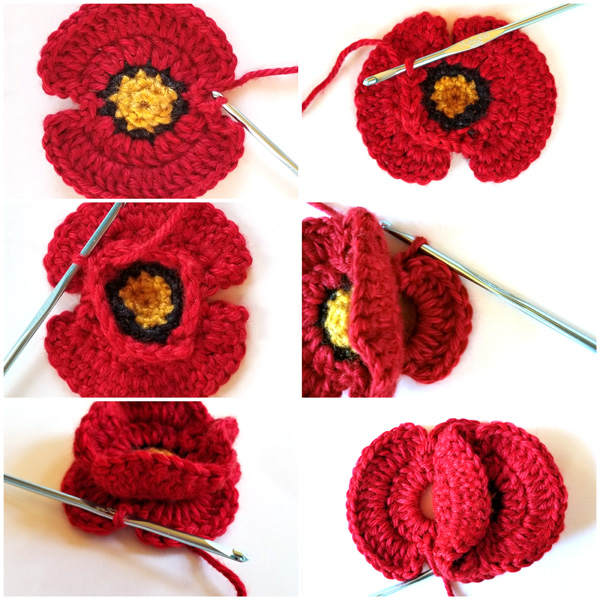
Round 5: sl st into ch 1 from previous round, and then sl st into the first dc of the round (this is the top of the first petal), ch 1, 2 dc in that first stitch, [2 dc in next 9 stitches], ch 1, sl st into final stitch of petal, sl st into ch 1 from previous round, sl st into sl st of previous round. Now you’ll start working up the side of the second petal: sl st into ch 1 from previous round, sl st into the first dc of the petal, ch 1, 2 dc in that first stitch, [2 dc in next 9 stitches], ch 1, sl st into final stitch of petal, sl st into ch 1 from previous round, sl st into sl st of previous round.
Round 6: flip the flower over and work this round at the back of the flower, behind the petals. sl st into next 4 stitches (this will be into the back of the petal that you made in round 4, and is simply to get you over toward the middle of the petal, to create some unevenness), ch 5, skip approximately 4 or 5 stitches (unevenness makes the flower look more natural), sl st, ch 5, skip 5 to 6 stitches, sl st, ch 5, skip 4 to 5 stitches, sl st, ch 5, sl st into first ch of round. (4 ch-5 spaces)
Round 7: flip the flower back over and work on the right side. Sl st into first ch 5 space, ch 1, 10 dc in ch 5 space, ch 1, sl st into same space *sl st into next ch 5 space, ch 1, 10 dc in ch 5 space, ch 1, sl st into same space* repeat * to * 3 more times. (4 petals with 10 dc in each)
Round 8: sl into first sl st from previous round, sl st into ch 1 from previous round, sl st into dc of first petal from previous round, ch 1, 2 dc in same stitch [2 dc in next 9 stitches] ch 1, sl st into final dc of petal, sl st into ch 1 *sl st into sl st from previous round, sl st into ch 1 from previous round sl st into dc of next petal from previous round, ch 1, 2 dc in same stitch [2 dc in next 9 stitches] ch 1, sl st into final dc of petal, sl st into ch 1; repeat from * around, join with sl st to first sl st. (4 petals with 20 dc in each)
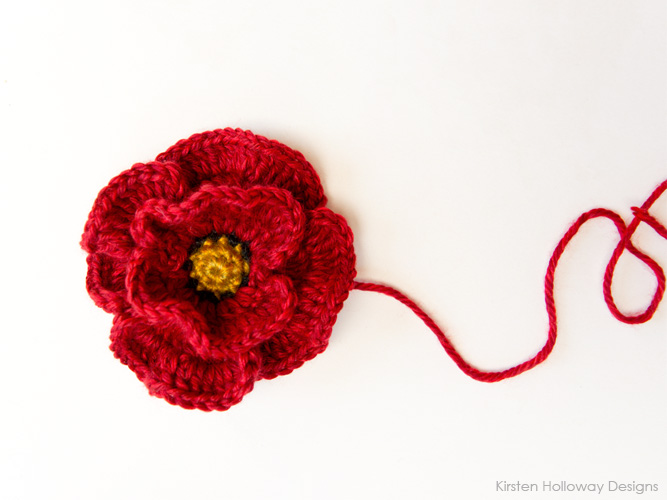
Leave a 18″ tail of yarn at the end of round 8. Use the tail to sew the flower securely to the headband.
Here are some pictures of the steps to help you out with crocheting the poppy (keep scrolling down for the leaves).:
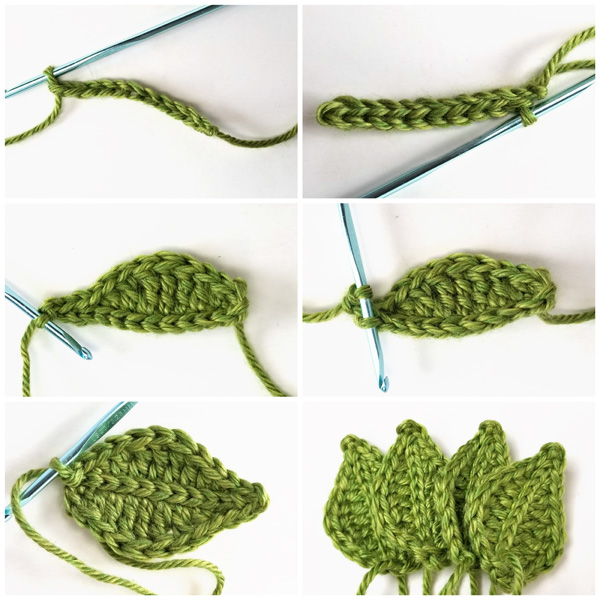
Leaves:
Make up to 4 using Lion Brand Heartland in “Everglades” (green)
ch 11, sl st into 2nd ch from hook, sl st into next 9 stitches (10)
ch 1, and work this pattern on the opposite side of the leaf that you just slip stitched along: sc in the first stitch, hdc in the next, dc in the next, tr in next 3 stitches, dc in the next, hdc in the next, sc in the next, sl st into next 2 stitches (you should be at the end of the leaf now), ch 1, sl st back into ch forming picot.
Work the rest of these stitches, coming up the other side, in the BLO (this is how you get the pretty v’s up the center of the leaf): sl st into first stitch, sc in the next, hdc in the next, dc in the next, tr in next 3 stitches, dc in the next, hdc in the next, sc in the final stitch. Sl st to ch 1 at the end.
Fasten off leaving a 12″ tail for sewing the leaf on, and weave in other end.
If you get stuck, here are the steps:
Tips for attaching the flowers and leaves:
Sew the center of your poppy to the headband first, then position your leaves under it and sew them on. Finish sewing the poppy to the band. You should sew over the tops of the leaves so they stick out from under the flower.
Fasten off securely and weave in ends.
And that’s it! You should have a beautiful crochet poppy flower headband to wear this fall. I’d love to see what you made, so please feel free to join my completely free Facebook group and share your headbands there. I can’t wait to see what you’ve created!
Click Here to return to Part 1
Disclaimer: This post contains affiliate links


