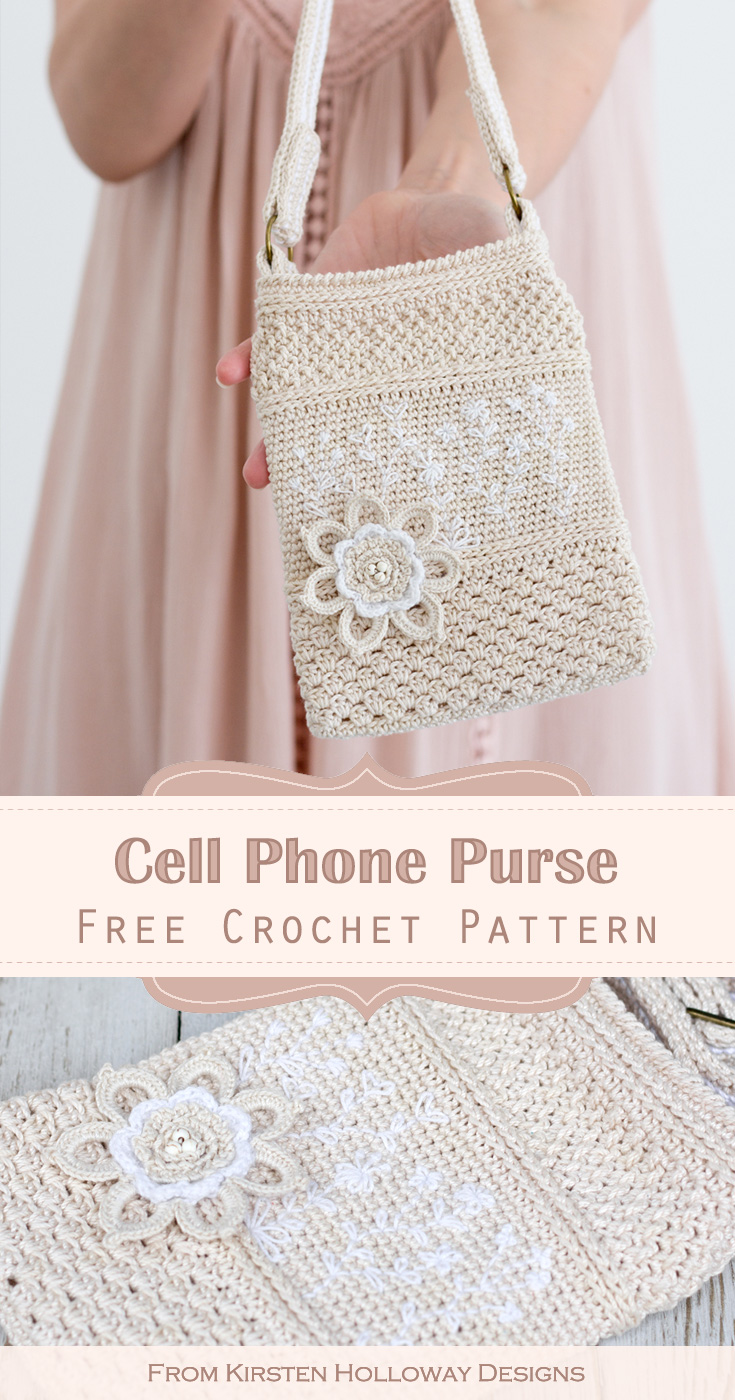
Crochet a cute cell phone purse with a strap and pocket for your ID or credit card! This free crochet pattern comes with several options for customizing your purse with either embroidered flowers, a layered flower, or fringe. Find the free crochet pattern instructions below, or purchase a print-optimized, ad-free PDF by clicking here.
Click here to add this pattern to your Ravelry queue!
 Disclaimer: This post contains affiliate links. When you purchase something using these links I earn a small commission on the sale. There is no extra cost to you.
Difficulty:
Easy/Intermediate
Techniques used: post stitches, working in the 3rd loop, working in the back loop, reverse single crochet, multi-layer flower, basic sewing, (optional) basic embroidery
Materials Needed:
2.55mm steel hook, or hook needed to obtain gauge – for bag
1.5mm steel hook – for flower
190-200 yards #3 Aunt Lydia’s Fashion Crochet Thread in “Natural”
15 yards #3 Aunt Lydia’s Fashion Crochet Thread in “White”
5-7 yards #10 Aunt Lydia’s Crochet Thread in “White”
5 yards #10 Aunt Lydia’s Crochet Thread in “Natural”
1/2” metal buckle – I picked up mine at Michael’s, but can’t find the same style in stock on their website. The brand name is “ArtMinds”
2 25mm metal rings
Yarn Needle
Scissors
3 small beads
Stitches Used:
ch = chain
sl st = slip stitch
sc = single crochet
dc = double crochet
hdc = half double crochet
FPdc = front post double crochet
rsc = reverse single crochet (crab stitch)
Measurements:
7 1/2” tall by 5 1/4” wide excluding strap
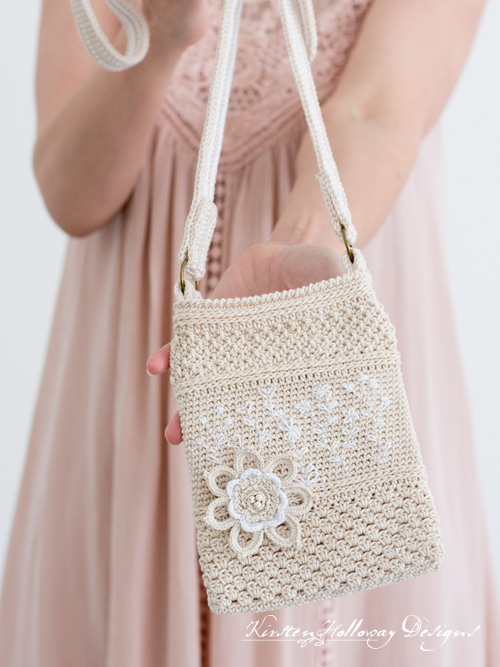
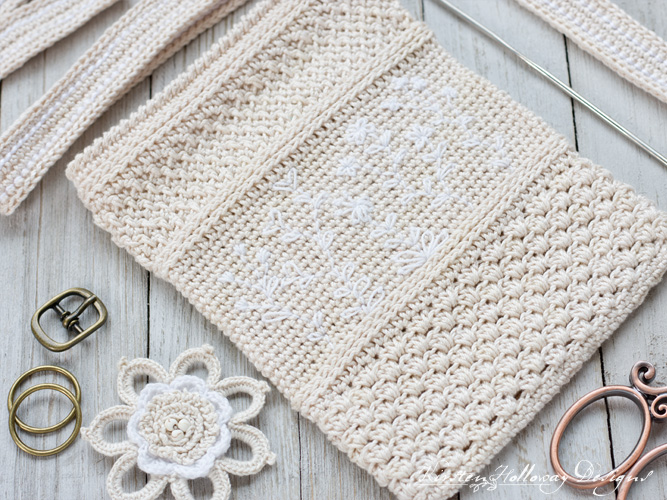
Summer weather is here which means it’s time to get outdoors! This gorgeous crochet purse is a nice pattern to make when you want to “travel light”. It has an optional pocket that can be added to the back to hold your ID, credit card or cash.
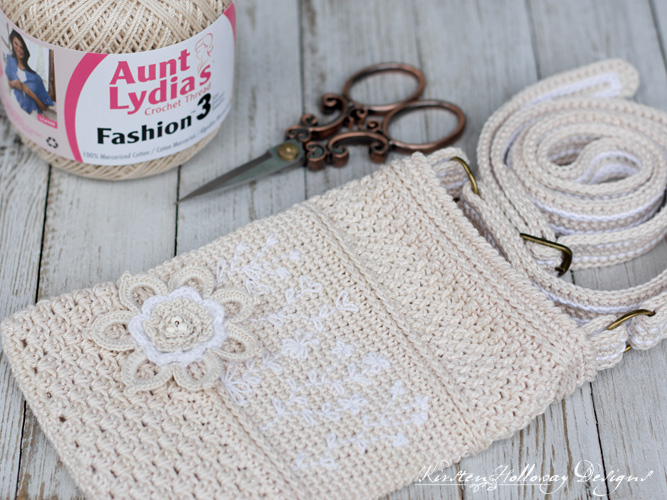
The perfect yarn to use for your purse
Aunt Lydia’s crochet thread has been a favorite of mine for quite a while. It is easy to work with, easy to care for since it’s cotton. Crochet thread does not have as much stretch to it as acrylic yarn, which will help your phone purse maintain its shape over the years. There’s also something more refined about using thread in crochet projects which is why I love making special occasion items with it.
This purse can be dressed up for a wedding, or down for more casual situations all because of the details you choose to add–I’ve included several options after the purse pattern! It is important to stick with #3 cotton thread to achieve the best look for the purse body and straps.
Additional Terms you’ll need to know:
Working in the 3rd loop of hdc. Instructions: Look at the top of the stitch, and locate the sideways “V”, bend the stitch to look at the back, and you should see another “V”. You’ll be working into the back loop of that “V”, this is called the 3rd loop.
Gauge:
26 sc sts in 4” of width, by 14 rows of height in 2”
Additional Notes:
-Ch-1 at beginning or round/row does not count as a stitch
-Use tighter tension when crocheting the straps and ID/credit card pouch. This will make them less prone to excessive stretching.
Cell Phone Carrying Case Pattern Tutorial (US Terms):
Click here to purchase an ad-free, print-optimized PDF of this pattern on LoveCrafts
Ch 33,
Round 1: sc in 2nd ch from hook and in next 30 sts, 2 sc in final st of row, continue working around to the other side of the chain, sc in next 31 sts, 2 sc in final st of row, join with sl st to first sc. (66)
Round 2: ch 1, *3 hdc in first st, sk 2 sts, *3 hdc in next st, sk 2 sts; repeat from * around, join with sl st to first hdc. (22 3-hdc groups)
Rounds 3-11: sl st across next 2 hdc, ch 1, *between 3-hdc group work 3 hdc move to next ; repeat from * around, join with sl st t first hdc (66)
Round 12: ch 1, hdc in each st across, join with sl st to first hdc. (66)
Round 13: ch 1, working all sts of round in 3rd loop of hdc, hdc in each st around, join with sl st to first hdc. (66)
Round 14: ch 1, working all sts of round in 3rd loop of hdc, sc in each st around, join with sl st to first hdc. (66)
Rounds 15-32: ch 1, sc in each st around, join with sl st to first sc. (66)
Round 33: ch 1, hdc in each st around, join with sl st to first hdc. (66)
Round 34: ch 1, working all sts of round in 3rd loop of hdc, hdc in each st around, join with sl st to first hdc. (66)
Round 35: ch 1, working all sts of round in 3rd loop of hdc, sc in each st around, join with sl st to first hdc. (66)
Round 36: ch 1, FPdc around first st, sc in next, * FPdc around next st, sc in next st; repeat from * around, join with sl st to first FPdc. (33 FPdc, 33 sc)
Round 37: ch 1, *sc in FPdc, FPdc around sc; repeat from * around, join with sl st to first sc. (33 sc, 33 FPdc)
Repeat rounds 36 and 37 2 more times
Round 42: ch 1, hdc in each st around, join with sl st to first hdc. (66)
Round 43: ch 1, working all sts of round in 3rd loop of hdc, hdc in each st around, join with sl st to first hdc. (66)
Round 44: ch 1, working all sts of round in 3rd loop of hdc, sc in each st around, join with sl st to first hdc. (66)
Round 45: ch 1, sc in each st around, join with sl st to first sc. (66)
Round 46: ch 1, using tight tension, rsc (crab stitch) in each st around, join with sl st to first rsc. (66)
Fasten off and weave in ends.
How to crochet straps for your purse
Short strap ends (make 2):
Ch 23,
Round 1: sc in second ch from hook, sc in each st across to end of row, 2 sc in final st, continue working around end, sc in each st across to end of row, 2 sc in final st, join with sl st to first sc.
Round 2: sc in each st across, at end of strap work 2 sc in next 2 sts, sc along other side, at end of strap work 2 sc in next 2 sts, join with sl st to first sc.
Round 3: sl st around edges of strap. This will be the front of the strap.
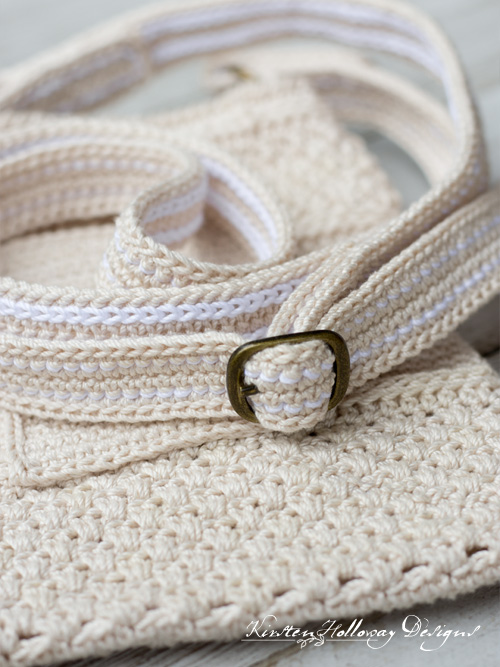
(Optional) Round 4: turn strap over, join white or color of your choice, sl st around strap between rounds 1 and 2.
Fasten off and weave in ends.
Strap part 1:
Ch 251,
Round 1: sc in second ch from hook, sc in each st across to end of row, 2 sc in final st, continue working around end, sc in each st across to end of row, 2 sc in final st, join with sl st t first sc.
Round 2: sc in each st across, at end of strap work 2 sc in next 2 sts, sc along other side, at end of strap work 2 sc in next 2 sts, join with sl st to first sc.
Round 3: sl st around edges of strap. This will be the front of the strap.
(Optional) Round 4: turn strap over, join white or color of your choice, sl st around strap between rounds 1 and 2.
Fasten off and weave in ends.
Strap part 2:
Ch 101,
Round 1: sc in second ch from hook, sc in each st across to end of row, 2 sc in final st, continue working around end, sc in each st across to end of row, 2 sc in final st, join with sl st to first sc.
Round 2: sc in each st across, at end of strap work 2 sc in next 2 sts, sc along other side, at end of strap work 2 sc in next 2 sts, join with sl st to first sc.
Round 3: Working around edge, dc 5 in center st at end of strap, sl st around edges of strap. This will be the front of the strap.
(Optional) Round 4: turn strap over, join white or color of your choice, sl st around strap between rounds 1 and 2.
Fasten off and weave in ends.
Putting your crochet cell phone bag together
Notes: I allowed 1 1/2″ for the strap ends to be sewed down. You can leave more or less. You are welcome to make the strap longer or shorter to fit your needs. This fits me well when worn over my shoulder or cross-body (I am 5′ 4″).
1. Fold each of your short strap ends in half around a 25mm O ring. Sew ends to sides of bag.
2. Fold ends of both straps (parts 1 and 2) over those same 25mm O rings, sew down. It doesn’t matter which side you put the buckle on, but I personally like to have it facing the front and not jingling around near my elbow.
3. Fold other end of strap part 2 over buckle, sew down. You will thread part 1 of your strap through the buckle. The pointy part of the buckle will fit between the stitches so you don’t need specific holes to adjust it longer or shorter.
Bag Accessories
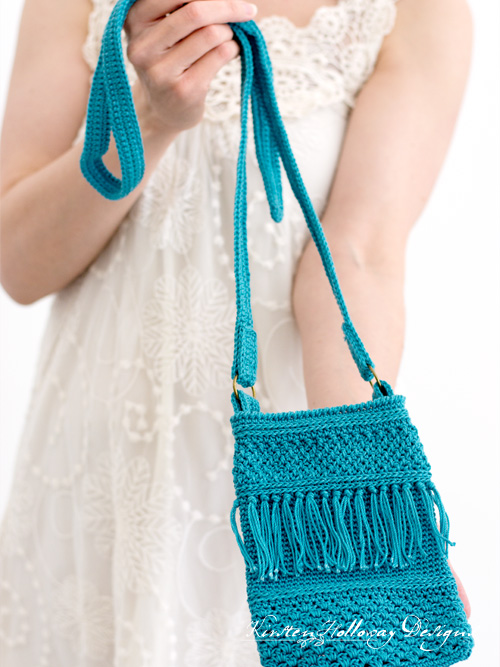
These are optional ways you can customize your bag. Mix and match to your heart’s content! The light colored bag in the preview has the driver’s license/credit card pouch, the embroidery flowers and the crochet flower, as well as the optional slip stitching in white along the straps. The teal bag has the fringe.
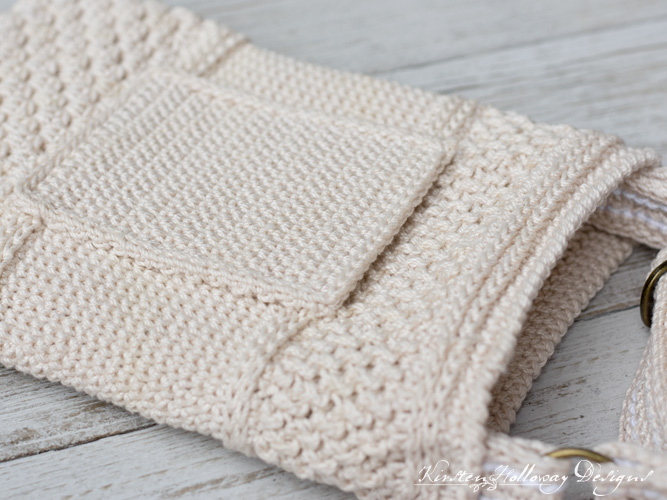
Driver’s license or Credit card pouch:
 Ch 19,
Row 1: sc in second ch from hook and in each st across, ch 1, turn. (18)
Rows 2-26: sc in each st across, ch 1, turn. (18)
Round 27: sl st evenly around edges of rectangle. This will be the front of the pouch.
Fasten off, and weave in ends.
Center rectangle in back of purse so that it covers the seam in the back. Pin in place and then sew the bottom and 2 sides leaving the top open.
Fasten off, and weave in ends.
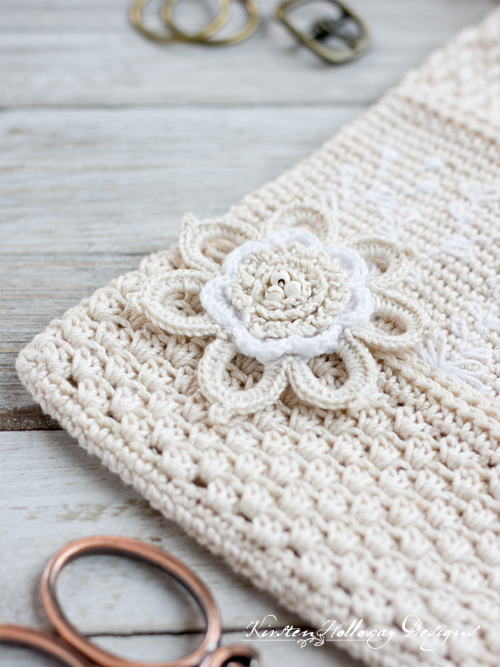
Flower:
Materials Needed:
5 yds Aunt Lydia’s #10 crochet thread in “Natural”
2-3 yds Aunt Lydia’s #10 crochet thread in “White”
1.5mm steel hook
Yarn needle
Scissors
Stitches Used:
ch = chain
sl st = slip stitch
sc = single crochet
hdc = half double crochet
dc = double crochet
BLO = back loop only
FLO = front loop only
sp/sps = space/spaces
Additional Terms:
Picot = ch 3, sl st back into first ch
Flower (US Terms):
 With “White” thread,
Round 1: 7 hdc in magic ring, join with sl st to first hdc. (7)
Round 2: ch 1, working in BLO, 2 sc in each st around, join with sl st to first sc. (14)
Round 3: ch 1, working in BLO, 2 sc in first st, sc in next st, *2 sc in next st, sc in next st; repeat from * around, join with sl st to first sc. (21)
Round 4: working in BLO, 2 sc in first st, sc in next 2 sts, *2 sc in next st, sc in next 2 sts; repeat from * around, join with sl st to first sc. (28)
Round 5: *sk st, 6 dc in next st, sk st, sl st; repeat from * around, final sl st counts as join. (7 6-dc shells or petals)
This next section is worked at the back of the flower in the petals you just completed. You will be slip stitching into the 3rd dc, chaining 8 and then slip stitching back into the 4th dc of each petal. If you’re uncertain of the spot feel free to use stitch markers to mark the 3rd and 4th dc stitch of each petal. The important thing is that you be as close to the center back of the petal as you can so the second round of petals lines up with the first round.
With “Natural” thread,
Round 6: ch 1, working at back of flower, *sl st into 3rd dc of 6-dc shell, ch 8, sl st into 4th dc of 6-dc shell, ch 1; join with sl st to first sl st. (7 ch-8 sps, 7 ch-1 sps)
Use tighter tension or switch to a smaller hook for this next round,
Round 7: *(10 hdc, picot, 10 hdc) in ch-8 sp, sl st into ch-1 sp; repeat from * around, final sl st counts as join.
Fasten off, leaving a 12” tail for sewing flower to bag.
Flower center:
These next 3 rounds will be worked from the outside in, in the FLO of the stitches in rounds 1-3. To begin a new round you will sl st over into the first st of the next round without fastening off between rounds. This way you have fewer ends to weave in when you are done.
With “Natural” thread,
Round 1: working in the FLO from round 3, *ch 3, sl st into next st; repeat from * around, sl st into next round to continue. (21 ch-3 sps)
Round 2: working in the FLO from round 2, *ch 2, sl st into next st; repeat from * around, sl st into next round to continue. (14 ch-2 sps)
Round 3: working in the FLO from round 1, *ch 2, sl st into next st; repeat from * around, sl st into next round to continue. (7 ch-2 sps)
Fasten off and weave in ends.
(Optional) Sew 3 small beads into the center of the flower.
Sew flower to lower left corner of bag at rounds 12-13.
How to add embroidered details to your bag
I have really enjoyed embroidering flowers onto various crochet pieces this spring. It is so easy and fairly quick once you do a couple of them. The best thing about embroidery flowers is they don’t have to be perfect! A little variation makes them look more artistic and fun. For this purse I wanted a very subtle flower pattern that would add a little something special to the over-all look of the design. You can choose to keep the same neutral color scheme, or take it up a notch by using contrasting, instead of complementing, tones.
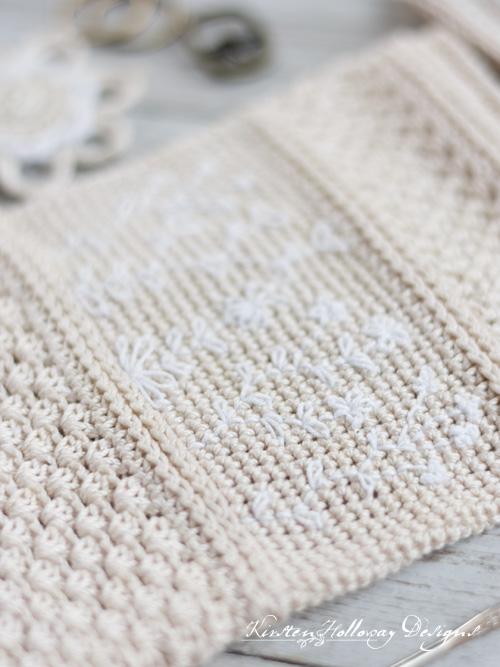
Embroider simple flowers on rounds 14-32 with “White” #10 thread using straight stitch, back stitch, lazy daisy stitch (detached chain stitch), and French knots. Use a complementing color that is tonally similar to the color you used for the bag to achieve a subtle look.
How to add fringe to your purse:

Cut 33 12” pieces of thread. Fold in half and pull through every other hdc in round 33. This will leave you with fringe that is 3” long on each side. Overhand knot to secure.
Snip looped ends to free your fringe.
Why did I do it this way? Because for me it’s easier to handle 1 12” piece of yarn vs 2 6” pieces of yarn and still have things line up evenly. If you’d prefer to wrangle 2 6” pieces have at it. I am not that coordinated haha!
Sewing a simple cloth lining:
Take a rectangular piece of fabric at least 15″ tall by 6″ wide and fold it in half, patterned sides facing, with the fold at the bottom. Lay your purse over the top, then trace the outline of the bag on the purse leaving at least 1/2″ for a seam allowance on the top and sides. Sew the sides of the liner following that 1/2″ seam allowance on your sewing machine, then zig-zag the rough edges so they don’t fray. Fold the top edges over 1/2″ and tack them in place by hand. Iron the seam and then sew by hand along the ironed seam into your purse.
Want more gorgeous crochet patterns, and a little encouragement for your day? Sign up for my newsletter here! That way you’ll never miss out on special events, or freebies I’m offering.
JOIN ME ON SOCIAL MEDIA
I would love to see a picture when you’re done, so please feel free to come by my Facebook group and show off your finished project! Be sure to tag @kirstenhollowaydesigns when you share pictures of your phone purse on Instagram!
You can also follow me on Facebook, Pinterest, Instagram, and Ravelry for more beautiful crochet patterns.
PATTERN TERMS AND CONDITIONS:
You are welcome to share the link to this pattern, using one image of your choice, on your site, but please do not share the written patterns themselves, this includes my Ravelry downloads or translations of these patterns, or use additional images. You do not have permission to use my images by themselves to create pinnable graphics for Pinterest, however they may be included in a roundup pin if there are 4 or more other patterns. If you sell finished items online, please do not use my pictures for your listings. I’m positive that your work is of high enough quality for you to sell the finished piece. Have confidence in your abilities! <3 Thank you!
This pattern was made to be used by individuals, and small business crocheters alike. Selling your finished pieces in boutiques, at farmer’s markets, craft shows, and other local events is encouraged! Please credit/link Kirsten Holloway Designs when selling finished products online. The only thing I require is that this pattern not be used commercially to produce hundreds of thousands of copies.
If you enjoyed this pattern or found it useful, why not share a link to this post with your friends?


I need some clarification on the FP DC and then SC portion. Do you SC into the next stitch after the post that was just worked? Or into the stitch of the post- does that make sense? The post is between two stitches really isn’t it? Help. Im half way through and now I’m stuck!
Yes, it should be the next stitch over. You should have a FPdc around every-other stitch. 🙂 I hope that helps!
Is the seam supposed to rotate while doing the middle section of single crochet stitches? I’ve torn it out several times but it keeps happening. I haven’t picked up or dropped a stitch. The seam has ended up a bit more than halfway on the flat side rather than on the folded edge. What am I doing wrong?
The seam may wander a little in certain parts, but if you start each round in the same stitch as the join whenever possible, the seam should stay straight for the majority of the project. 😊
Hi, I’m really having trouble with round 6 of the flower part. I can’t seem to figure out what you mean by the back part of the flower? And working in the 3rd and 4th dc stitch at the back of the flower? Your help would be great 😃 Thank you.
You will be flipping the flower over and working this round on the back side. I’ve included some notes before this round that may be helpful. 😊
Thank you 😄
You’re welcome!
what mean working of sts of round in 3rd loop of hdc. And also, i want to know mean for sts. Sorry for weak language. I am from Myanmar.
The 3rd loop of a hdc stitch is the yarn-over. Here’s a picture tutorial that explains more: https://kirstenhollowaydesigns.com/2021/01/how-to-crochet-in-the-3rd-loop-of-a-half-double-crochet-stitch.html
St or sts stands for stitch or stitches. 😊
Question, why do certain rows say chain 1, chain 1 …. I just want to make sure this is correct so I don’t end up with a hole that isn’t supposed to be there. thank you1
There should only be 1 ch-1 at the beginning of the round. I thought I had fixed this error before but I guess not. 😅 It should be fixed now.
Okay, i think I got it. You put 3hdc into the hole that was made by the two skipped stitches from row 2?
Yes, that is correct. It’s essentially a modified Granny square stitch worked with hdc instead of dc stitches.
Hello, I’m having trouble understanding rows 3-11:
“sl st across next 2 hdc, ch 1, *between 3-dc group work 3 hdc move to next ; repeat from * around, join with sl st t first hdc (66)”
Would you be able to clarify what this means? Thank you!
This is where you are working the granny stitch portion of the pattern. If you’ve ever made a granny square this is the same idea. You’ll begin the round by slip stitching over 2 stitches, then you will ch 1, then, between the groupings of 3dc in the previous round you will work 3 hdc, then move to the next space and repeat. 🙂
So I am confused. You ch33 but then you need 66.. Do I ch33 then sc and then chain another 33
Basically trying to figure out how to work around to other side of chain and do next 31 sc
You will chain the required number of chains work 33 stitches on one side, then instead of turning, you’ll just continue working around the end and up the other side of the chain. You should end up with a long skinny rectangle that has rounded ends. 😊 I hope that helps!
I’m struggling on understanding how to attach the straps and buckle. Do you have a video that help?
I do not have a video. You can try looking more closely at the pictures of the purse and see is that helps. The shortest “straps” will be attached at the mouth of the purse. Be sure to string the ring on first before folding the strap in half and sewing them down on either side of the opening. Next attach the long strap and the sorter straps to the rings on opposite sides. You’ll attach the buckle to the sorter strap. Poke the latch of the buckle through the crochet stitches near the end of the strap to hold the buckle in place, and then sew the end of the strap down. I hope that helps! If you need more visual help please feel free to come by my Facebook group: https://www.facebook.com/groups/KirstenHollowayDesigns I have some additional pictures I can share there. 🙂
Beautiful purse–would you be able to share the number of multiples to make it a little larger?
If not, I understand. Thank you.
Just keep repeating rounds of the different sections until it’s closer to the length you want. There’s no special multiple there. 🙂
Beautiful purse–would like to make it for a wedding this year, but a little bigger.
Would you share the multiples of stitches, to customize the size?
Hi Kari, I believe the phone purse is crocheted in multiples of 2+1. It’s very easy to customize! 😊
If I use #10 thread for the body of the bag would it come out too small? I kind of want it smaller than this, but I dont want it to be too small for an Iphone.
It will be quite a bit smaller. I’m not sure if your phone would fit, but you are welcome to try!
Thank you so much for creating such an elegant design. I am going to buy the yarn to make it soon.
You’re very welcome, Cynthia! Have fun crocheting it!