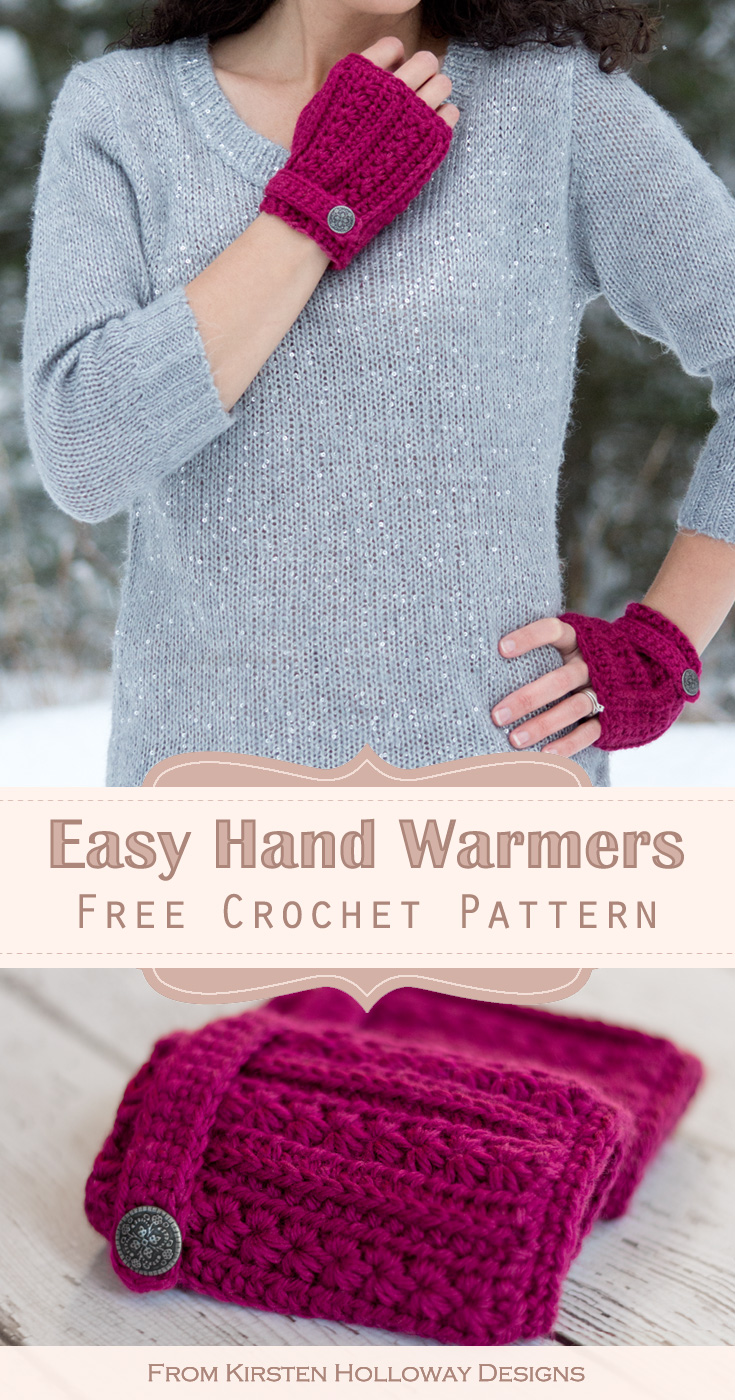
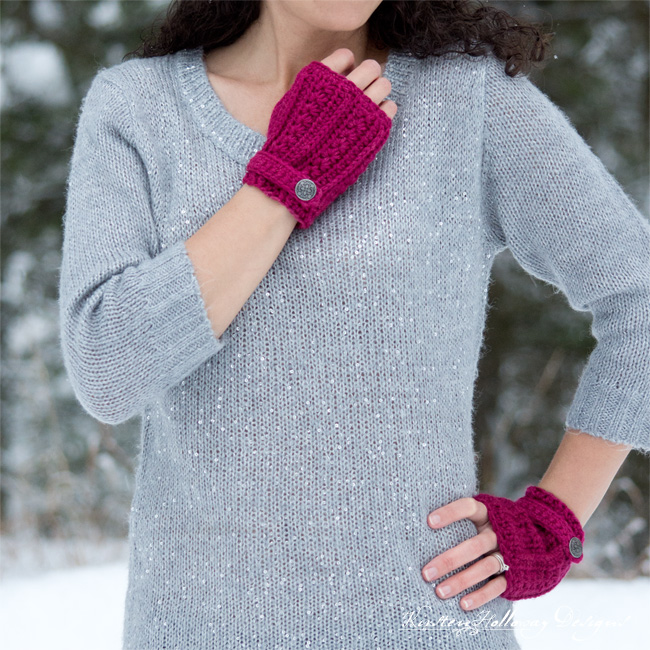
The star stitch gives the illusion of cute little hearts running in rows along the stylish Heartstrings crochet fingerless gloves pattern. They are a perfect cool weather fashion accessory for just about any occasion. Find the free crochet pattern instructions below, or purchase a print-optimized, ad-free PDF by clicking here.
Click here to add this to your Ravelry queue!

These easy fingerless mitts also make the perfect addition to the Heartstrings Ladies Slouch Hat
Disclaimer: This post contains affiliate links. When you purchase something using these links a small amount of the sales price goes to me to help keep this site, and the patterns on it free. You do not pay any extra for the item you purchase.
Difficulty:
Intermediate
Materials Needed:
4.5mm (7) hook, or hook needed to obtain gauge
5mm (H) hook for wrist bands if you crochet tightly
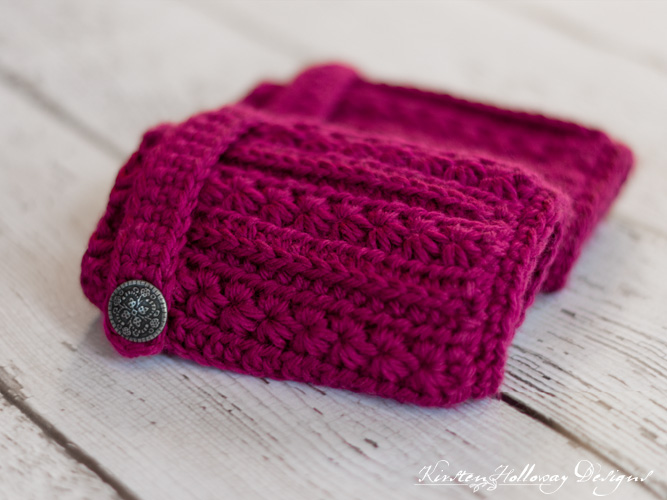
Approximately 125-150 yards of #4 Worsted weight Red Heart Soft in “Berry”, or color of your choice
Yarn needle
Scissors
Two, 5/8” buttons. Try the Pewter Ornate Round Shank Buttons, or the Black Pewter Ornate Round Shank Buttons from Hobby Lobby
Stitches Used:
ch/chs = chain/chains
sc = single crochet
hdc = half double crochet
sl st = slip stitch
BPhdc = back post half double crochet
FPhdc = front post half double crochet
Additional terms:
hdc in the 3rd loop = Look at the top of the stitch, and locate the sideways “V”, bend the stitch to look at the back, and you should see another “V”. You’ll be working into the back loop of that “V”, this is called the 3rd loop. When working in rows it will be facing you.
st/sts = stitch/stitches
prev = previous
Gauge:
17 hdc stitches to 4″, piece should measure 4″ wide, unstretched, after row 4.
Measurements:
Finished glove should measure, unstretched, 5″ tall by 3 1/2″ wide
Additional Notes:
-ch 1 at beginning of row does not count as stitch
-This pattern uses the Star Stitch for rows 3 and 4. I’ve included written instructions on both rows.
Heartstrings Fingerless Gloves Crochet Pattern (US Terms):
Click here to purchase an ad-free, print-optimized PDF of this pattern on LoveCrafts
OR
Pick up the printable version of this pattern on Etsy instead
Row 1: ch 18, hdc in 3rd ch from hook and in each chain across, ch 1, turn. (17)
Row 2: working in 3rd loop of hdc, hdc in each st across, ch 2, turn. (17)
Row 3: pull up a loop in the back of the second chain, pull up another loop in the side of the chain, there should be 3 loops on your hook, pull up a loop in next 3 sts so that you have 6 loops on your hook, yo, and pull through all 6 loops, begin next star: *ch 1, pull up a loop in the center/eye of the star just completed, pull up a loop in the front loop of the star you just made, pull up a loop right at the base of the stitch you pulled a loop through, pull up loops in the next 2 sts so that there are 6 loops on your hook, yo, and pull through all 6 loops; repeat from * across, note: be careful not to chain 1, after pulling a loop through all 6 loops or you’ll have an extra stitch, when you end the final star hdc in same stitch as the last stitch you drew up the last of your 6 loops in, ch 2 (does NOT count as a stitch), turn. (8 stars)
Row 4: 2 hdc in the center of each star across, hdc in final st of row, note: this is separate from the center of the star, ch 2 (counts as first hdc), turn. ( (17)
Your piece should be 4″ wide, unstretched, at this point. If it’s not, please consider going up a hook size or your glove will be very short!
Row 5: hdc in each st across, remembering to avoid stitching into the ch-2 at the beginning of row 4, ch 1, turn. (17)
Repeat rows 2-5, 3 more times, then work rows 2-4 once, omitting the ch-2 at the end of row 4. You should see your pattern repeat a total of 5 times at the end.
Continue with the finger band:
If you crochet with very tight tension, going up a hook size for this next section is recommended.
Round 1: turn glove sideways and begin working along the edge, ch 1, evenly space 20 sc for a small/med 22 sc for a large/x-large. Fold glove in half, join with sl st. (20, 22)
Round 2: ch 1, sc in each st around, join with sl st to first sc. (20, 22)
Knot securely and cut yarn leaving a short 5″ tail for sewing up the lower seam of the glove. Sew up about 1/2″ to 3/4″ so that the band you just stitched sits right about knuckle level, and side part you sewed comes just up under your thumb. Fasten off securely.
Wrist band:
Attach yarn to other end of fingerless glove, leaving an 8″ tail for sewing the top seam of the glove together. With the tail, sew part way down the side (about 3/4″ to 1″), leaving about 7 or 8 stitches for your thumb hole. Fasten off the tail securely, then continue working this next section with the other end of the yarn (this way there are fewer ends to weave in ).
Round 1: ch 1, working along the edge, evenly space 22 sc for a small/med, 24 sc for a large/x-large along the edge, join with sl st to first sc. (22,24)
Round 2: ch 1, FPhdc around next two sts, BPdc around next 2 sts *FPhdc around next two sts, BPdc around next 2 sts; repeat from * around. Note: the small/med pattern will end with two FPhdc, but you’ll be sewing the button flap on near that spot which should minimize the pattern unevenness. (22, 24)
Round 3: ch 1, FPhdc around next 2 sts, hdc in the next 2 sts *FPhdc around next 2 sts, hdc in the next 2 sts; repeat from * around, join with sl st to first FPhdc. (22, 24)
If you want a longer top cuff, repeat round 3 another time or two.
Slid the cuff over your hand to make sure it fits!
Fasten off, and weave in ends.
Button tab:
Row 1: ch 17 for a small/med, or 19 for large/x-large, sc into second ch from hook, sc in each st across, ch 1, turn. (16, 18)
Row 2: sc in each st across, at end of row turn the piece sideways and put 2 sc in the very end, continue sc around the other side.
Fasten off leaving a 5″ tail for sewing the button tab to the glove.
Line the straight end of the button tab up with the thumb hole seam. Sew it securely to the glove, just below the top band. Put the glove on and lay the button tab across your wrist and see how it lays. Position the button near the side of your wrist, keeping an eye on the spot, then take the glove off and sew it on.
The other glove will be made the same way, but the button tab will be sewn on the opposite side, so you don’t end up with two right hand or two left hand gloves.
Want more gorgeous crochet patterns, and a little encouragement for your day? Sign up for my newsletter here! That way you’ll never miss out on special events, or freebies I’m offering.
JOIN ME ON SOCIAL MEDIA
I would love to see a picture when you’re done, so please feel free to come by my Facebook group and show off your project! Be sure to tag @kirstenhollowaydesigns when you share pictures of your finished fingerless gloves on Instagram, and use #heartstringsfingerlessgloves
You can also follow me on Facebook, Pinterest, Instagram, and Ravelry for more beautiful crochet patterns.
PATTERN TERMS AND CONDITIONS:
You are welcome to share the link to this pattern, using one image of your choice, on your site, but please do not share the written patterns themselves, this includes my Ravelry downloads or translations of these patterns, or use additional images. You do not have permission to use my images by themselves to create pinnable graphics for Pinterest, however they may be included in a roundup pin if there are 4 or more other patterns. If you sell finished items online, please do not use my pictures for your listings. I’m positive that your work is of high enough quality for you to sell the finished piece. Have confidence in your abilities! <3 Thank you!
This pattern was made to be used by individuals, and small business crocheters alike. Selling your finished pieces in boutiques, at farmer’s markets, craft shows, and other local events is encouraged! The only thing I require is that this pattern not be used commercially to produce hundreds of thousands of copies.
If you enjoyed this pattern or found it useful, why not share a link to this post with your friends?


