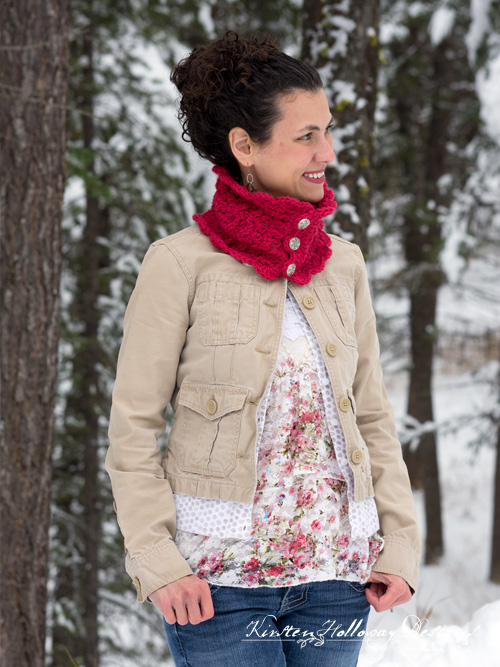
The Victorian Blush muffler, better known as a cowl or neck warmer, is a 1 skein project that’s sure to keep you warm this winter. The crochet pattern has many lace details and closes with buttons in the front. Find the free crochet pattern instructions below, or purchase a print-optimized, ad-free PDF by clicking here.
Click here to add this to your Ravelry queue!
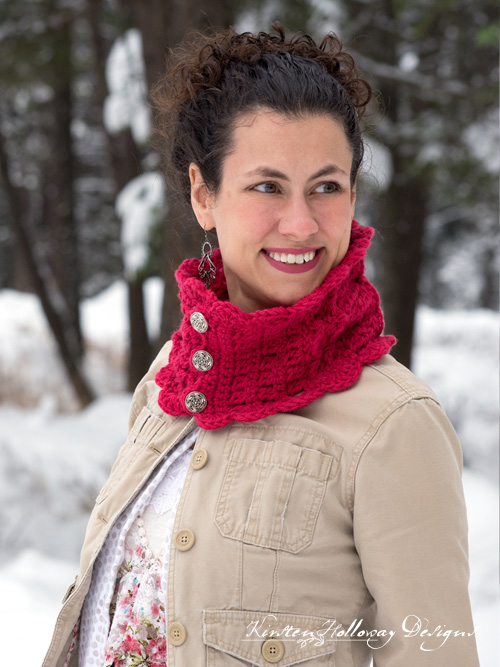
Winter officially arrived last week, and I’m surrounded by a wonderland of snow and ice! This event was the perfect opportunity to crochet something warm, cozy, and a little bit girly (ok, a lot girly)! It was about 28 degrees Fahrenheit when I took this picture, and my neck stayed toasty warm, while the rest of me froze. 😉
Part of this crochet pattern’s warmth comes from using a thicker, worsted weight yarn, and its lacy texture actually helps trap warm air, keeping you comfortable and looking cute at the same time. Win-win!
The details on this beautiful Victorian style neck warmer start at the back with the flower (the name of this cowl is actually inspired by a variety of peony!), then the sides are added one at a time. It is possible to make this longer if you wish, and I’ve included notes on how to do that, below.

Difficulty:
Intermediate
Materials Needed:
6mm (J) hook, or hook needed to obtain gauge
100 yards Caron One Pound in “Raspberry Wine” or color of your choice
scissors
yarn needle
3 7/8” or 1” silver buttons. I believe mine were made by “Le Bouton”.
Stitches Used:
sl st = slip stitch
ch= chain
sc = single crochet
sc2tog = single crochet 2 together
hdc = half double crochet
dc = double crochet
2dc cluster = dc2tog in same stitch
FPsc = front post single crochet
BPsc = back post single crochet
FPhdc = front post half double crochet
st/sts = stitch/stitches
Additional Terms:
Shell = 5 dc in same st
Gauge:
After round 4 your circle should measure 3 1/4″ across. Your flower should measure 6 3/4″ across when it is completed before you start working on the “arms” of the muffler.
“Arms”: 12 stitches in 4″
Measurements:
6 ¾” tall by about 22″ long
Additional Notes:
-ch 1 at beginning of round does not count as stitch
-Caron One Pound is a thicker worsted weight yarn. If you substitute a thinner worsted weight such as Caron Simply Soft, your measurements could be off.
-If you want a looser piece, it is possible to make this longer by repeating rows 7-19 as many times as you want. Please work the final rows the same. You will need to increase your shell count accordingly.
-This cowl has 2 “arms”. You will crochet the first arm right after you finish the center flower, without cutting your yarn. The second arm will be attached on the opposite side of the flower from your first “arm”. See pattern for additional notes.
Victorian Blush Muffler Cowl Pattern (US Terms):
Click here to purchase an ad-free, print-optimized PDF of this pattern on LoveCrafts
ch 4, join to first ch with sl st, forming a circle.
Round 1: ch 1, 12 sc in circle, join with sl st to first sc. (12)
Round 2: ch 1, 2dc cluster in same st as join, ch 1, *2 dc cluster, ch 1 in next st; repeat from * around, join with sl st to first 2dc cluster. (12 2dc clusters, 12 ch-1 sps)
Round 3: ch 1, sc in top of 2dc cluster, 2 sc in ch-1 sp from prev round *sc in top of 2dc cluster, 2 sc in ch-1 sp; repeat from * around, join with sl st to first sc. (36)
Round 4: (hdc, 2 dc) in first stitch, (2 dc, hdc) in next st, sl st in next st, *(hdc, 2 dc) in first st, (2 dc, hdc) in next, sl st in the next; repeat from * around. (12 petals)
Note: your edge will be rippled and not lay flat. This is ok.
Round 5: ch 2, sk st, *BPsc around each of the next 4 sts, sk 3 sts; repeat from * around, join with sl st to first BPsc. (48)
Round 6: *sk st, shell in next st, sk st, sl st in next st; repeat from * around, final sl st counts as join. (12 shells)
Once you get to the end of the round, turn. You will be working this next part on the wrong side of the muffler.
In this next row front post half double crochet stitches are worked around the double crochet stitches of the 5-dc shells made in round 6. Don’t forget to skip the slip stitches!
First arm:
Row 7: ch 1, [FPhdc around each of the next 5 dc sts, skip the sl st] 3 times, ch 1, turn. (15)
Row 8: *2dc cluster, ch 1, sk st; repeat from * across, 2 dc cluster in final st, ch 1, turn. (8 2dc clusters, 7 ch-1 sps)
Row 9: sc in each stitch across, ch 1, turn. (15)
Repeat rows 8 and 9 one more time
Row 12: sc in first st, sc in next st, [sk st, shell in next st, sk st, sl st in next st] 2 times, sk st, shell in next st, sk st, sc in next two sts, ch 1, turn. (4 sc, 3 shells)
You will be working into the slip stitches as well as around the 3 middle double crochet stitches of the shells in this next round. This will create a ridged texture on the front of the cowl.
Row 13: dc in first st, dc in next st, sk st, FPsc around each of the next 3 sts, sk st, dc in next st (this will be the sl st between the shells) *sk st, FPsc around next 3 sts, sk st, dc in next st; repeat from * across, dc in final st of row, ch 1, turn. (15)
Repeat rows 12 and 13 one more time
Repeat rows 8 and 9 two more times
Rows 20-22: sc in each st across, ch 1, turn. (15)
Turn piece sideways and work this row along the side.
Row 23: work 5 shells along the side of the cowl, using the shells from round 6 as a guide. I skipped about 1/4” between slip stitches and 5-dc shells. Your final slip stitch should be between the shells from round 6.
Fasten off, and weave in ends
Your cowl should measure about 14” long at this point.
Turn cowl over so you begin working round 7 on the back side.
Second arm:
Attach yarn to opposite side of flower, skipping 3 shells. This will be opposite the arm you just completed.
Repeat rows 7-19 one time, and then do one more repeat of rows 8 and 9.
This will give you one more row 8-9 repeat than the other side of the cowl has.

Row 22: sc in each st across, ch 1, turn. (15)
Row 23: sc in first 2 sts, ch 3, sc in each of the next 5 sts, ch 3, sc in each of the next 5 sts, ch 3, sc in next st, sc2tog, ch 1, turn. (14 sc, 3 ch-3 sps)
Row 24: sc in first st, sk st, 6 sc in ch-3 sp, sk st, sc in next 3 sts, sk st, 6 sc in ch-3 sp, sk st, sc in next 3 sts, 6 sc in ch-3 sp, sk st, sc in final st. (26)
Turn and work next section down the side of the cowl.
Work 6 shells along the side of the cowl, using the shells from round 6 as a guide. I skipped about 1/4” between slip stitches and shells. Your final slip stitch should be between the shells from round 6.
Fasten off, and weave in ends.
Attach yarn to other side of cowl closest to the flower, work 6 shells down the side.
Fasten off, and weave in ends.
Attach yarn to other unfinished side of cowl, closest to flower, work 5 shells along the edge, put 2-3 sc at the end to finish out the row.
Fasten off, and weave in ends.
Sew 3 buttons to the first side of the muffler that you completed, on sc rows.
Wear and be cozy! Get compliments on flower at the back of muffler when you wear your hair up. Feel beautiful, because you are.
Want more gorgeous crochet patterns, and a little encouragement for your day? Sign up for my newsletter here! That way you’ll never miss out on special events, or freebies I’m offering.
JOIN ME ON SOCIAL MEDIA
I would love to see a picture when you’re done, so please feel free to come by my Facebook group and show off your project! Be sure to tag @kirstenhollowaydesigns when you share pictures of your finished cowl on Instagram so I can see what you’ve made too!
You can also follow me on Facebook, Pinterest, Instagram, and Ravelry for more beautiful crochet patterns.
PATTERN TERMS AND CONDITIONS:
You are welcome to share the link to this pattern, using one image of your choice, on your site, but please do not share the written patterns themselves, this includes my Ravelry downloads or translations of these patterns, or use additional images. You do not have permission to use my images by themselves to create pinnable graphics for Pinterest, however they may be included in a roundup pin if there are 4 or more other patterns. If you sell finished items online, please do not use my pictures for your listings. I’m positive that your work is of high enough quality for you to sell the finished piece. Have confidence in your abilities! <3 Thank you!
This pattern was made to be used by individuals, and small business crocheters alike. Selling your finished pieces in boutiques, at farmer’s markets, craft shows, and other local events is encouraged! The only thing I require is that this pattern not be used commercially to produce hundreds of thousands of copies.
If you enjoyed this pattern or found it useful, why not share a link to this post with your friends?


I just came across this pattern. I wonder how you hook the buttons since there is no mention of adding button holes?
The button holes are made at the end of one of the “arms” of the cowl. Look at row 23 of the second arm. 😊
I love this pattern, and I have some leftover yarn in just the right colour! Making one for my mum, but I know that I’ll end up making one for myself, too. 🙂 Thank you for this!
You’re welcome! I hope you both enjoy wearing them!
Hello Kristen,
Row 7 , I have 15 stitch.
On row 8 states 2dc clusters 1 ch skip next st .
This means I should have a 2dc cluster in every other st. shoul I have 8 2dc cluster instead of 15.
Thank you for your beautiful patterns.
Hi Patricia,
Yes, you will have 8 2dc clusters with 1 ch in between each so that makes a total of 8 2dc clusters + 7 ch-1 sps, for a total row count of 15 stitches. 🙂
Thank you very much .I can now continue making it.
Please clarify for an advanced beginner Row 7. If I have 12 shells made with the 5DCs in Round 6 , how am I arriving at 15 in Row 7 if I HDC in each of the 5DCs I used to make shell in previous row? What am I HDC-ing into ? NOT each DC in Round 6 because that would mean 60 HDCs! Can you explain it a different way and take mercy on a novice? I love the pattern so far.
Hi Jane,
You are going to be working in rows starting with row 7, so your stitch count with be 15 for the row, not the round (You’ll be working across only 3 petals). This is making the first section that will wrap around your neck and button in the front. I hope that helps! 🙂
This might seem really a dumb questions, but I am a bit confused.
After making the circle, and doing 12 sc into it the instructions say to dc cluster. Which if I understand correctly it is the same as dc2together.
But, dc2togehter is the as a decrease.
How do I do a decrease right away into the same stitch as the ch stitch?
I am sure I am misunderstanding this, but I can’t figure it out.
Thanks for the help.
The dc cluster is basically a dc2tog but in the same stitch, not across two different stitches. This way it’s not a decrease. 🙂 Hopefully that helps clarify!
Oh man I love this design so much I’m making one for a gift but I’m running into a problem and I’m not sure what is going on! On Row 8 no matter how many times I look it over and do it I end up with 16 stitches instead of 15, which makes sense if it’s 2dc cluster 8 times…so I’m wondering is it supposed to be 16 or am I missing something? The row below has 15 stitches. I’m stumped! LOL Any help or clarification would be much appreciated! Which then the next row gives me 16 but if I repeat then I’ll end up with 18 next! AHHH
Hi Melissa, Thank you!
Since you begin and end row 8 with a 2 dc cluster it should be an odd number of stitches, so basically that would look a little like this if I were to chart it out with – being a chain, and 2dc being the cluster: 2dc-2dc-2dc-2dc-2dc-2dc-2dc-2dc. So yes, you will have the 2dc cluster 8 times, but the ch 1 only 7 times (the ch 1 to turn is not counted in this row). I hope that helps! Good luck on the rest of your project!
OMG I think I’m finally getting what I’m doing off it’s like decreasing not increasing but in the same stitch instead of across 2…oh my! I wish I had caught this sooner! LOL Ah well! No idea how I missed that! Facepalm! LOL
No worries! Yes, it’s 2dc in the same stitch-not a decrease. I’m so glad you got it figured out! 😀 Enjoy the rest of the project!
Thanks! Another gorgeous, girly pattern. I have a family reunion coming up this week, and I’ve made quite a bit of your creations as gifts 🙂 not sure where you are that you’ve already had snow, but good luck for this winter. Quebec has had only frost so far where I’m at (snow shouldn’t t be too far away). Reunion is in Georgia! Woohoo thanks again for this gorgeous pattern!
You’re welcome, Michelle! I hope your family members enjoy your beautiful gifts! I’m up in the northern part of Montana, but this much snow this early in the year is a little unusual. 🙂
Enjoy your trip to warmer climates!
Thanks! Just what I LOVE!!! This wil be my weekend project, greetings from the Netherlands
Francisca
Hi Francisca,
You’re welcome! I hope you have fun making it! 😀 Feel free to share a picture in my Facebook group when you get done!
https://www.facebook.com/groups/1959772917589390/
Hi kirsten after row 13 repeat 12&13 is row 14&15 then repeat row 8&9 2 more times will be row 16 .17. 18.&19 where is row 20? Please check thanks. ….
Thank you for your sharp eyes, Gwen! It should be fixed now!