
Taking good, professional looking pictures on a budget is possible, and I’ll show you how to save money while still getting the best listing pictures that will sell your product on Etsy, or other online shops. This article is specifically worded toward crochet items, but will work across all craft genres, and most importantly it will show you how to take good listing pictures without breaking the bank.
Crochet and other handmade goods have exploded in popularity over the last several years. You probably know of at least one friend who runs an online Etsy shop, or sells at local craft fairs, and maybe you’ve been thinking about doing the same, but the issue of photography and money has you hesitating, or second-guessing your strategy. Three words of advice: don’t be discouraged. Taking better Etsy pictures on a budget is possible!
As you discovered the other week, knowing how to read crochet patterns is a very exciting thing. Whole new worlds of pattern books and magazines open up giving you many more options when you go to create! If you’re one of those people who wants to take their new-found skill and turn it into a business–whether that means selling on-line on Etsy, or at a boutique/farmer’s market–knowing how to take good pictures is a must!
In fact, good photography is so important that it will make or break you in online marketplaces! Don’t panic though! I’m going to be covering money saving tips, as well as a few do’s and don’ts in today’s post to help you get on the right track, and stand out as you market your products. AND EVEN IF YOU DON’T PLAN TO SELL your work now, this information is something that can be used to improve your casual picture taking!
How you present your product will make the difference between someone scrolling by, and them actually clicking the link to purchase.
If you’ve worked doing any kind of sales before, you know how important marketing is, and if you haven’t, you’re about to learn. Take a look at the most popular listings on Etsy, and you’ll notice that many are shot on a neutral background in natural daylight.
Doing things this way allows the potential customer to see the product fairly close to how it will appear in real life. It also presents the product in its best light (no pun intended) and put the focus on what is being sold.
You typically have less than 3 seconds to capture your audience’s attention (if you’ve read this far already, it worked on you!) and, like it or not, on Etsy or Pinterest this is done through your photography skills.
Even if your product is perfectly made, if someone else has brighter, better quality images, their product will get more clicks.
So how can you, as a beginner, create images that catch people’s attention without the use of $1500 cameras and $100 backdrops? Keep reading.
It Doesn’t Have to Cost a Fortune – Shooting on a Budget
While having a professional grade DSLR (Digital Single-Lens Reflex) camera is nice, a simple point and shoot device, or a quality cell-phone, can often do the trick when you’re just starting out. Here are several money-saving tips and hacks that beginners can do to achieve good results, and not break the bank. If money isn’t as much of a holdup for you, I’ll let you snoop in my equipment bag at the bottom of the post.
Disclaimer: This post contains affiliate links. When you purchase something using these links a small amount of the sales price goes to me, but you do not pay any extra for the item you purchase.
- Backgrounds
Professional backgrounds can be spendy, but many craft stores, and online retailers have started selling rolls of paper under $20 that are printed to look like the white wood, slate, or marble backgrounds that are so popular right now. Sheets of white poster board can even work in a pinch for smaller items. If you want to take it to the next level, one simple hack is to buy several large sheets of foam board, and use spray adhesive or glue to attach paper back drops to the board. This makes a sturdier prop. It is important to note that paper or thin vinyl is not the longest lasting material, so when money isn’t as big of an issue, Ink & Elm is the company I purchase backdrops from, they are sturdy and the lighter colors especially hold up to a lot of wear and tear. - Lighting
Lighting is probably the most important element to achieving a good shot, and if there is anything you take away from this article it would be to make sure you’re always shooting your products in daylight, on a light background, avoiding direct sun. In my opinion, lighting will make or break your picture (and could make or break your sale). A good light box will compensate for this, but if you don’t have the money to invest in one right now, always shoot in indirect sunlight. I do not recommend using household lamps unless you absolutely have to. The light cast by most bulbs is yellow and will not give an accurate representation of the colors used in your piece. Yes, a good photo-editing program can correct much of this, but the goal of good photography is to rely minimally on them. (Note: If you are “techy” and feel confident digging into your camera’s user manual, I do share a tip further down in this post for correcting this using your camera’s “white balance” settings.) - Reflectors
This goes along with the lighting category, because sometimes you will have great light on one side of the product you are shooting, but not on the other, and the goal is to have the entire piece well-lit. You can create your own reflector using a piece of cardboard and aluminum foil. Find a good-sized box, cut out one of the sides, and cover it with aluminum foil. If you can’t find a good sized box, cover one of your foam boards in aluminum foil. Move the reflector around until your product is lit from all sides. Make an additional reflector if you need to. Since aluminum foil is highly reflective you may sometimes find it bounces too much light into your shot. An alternative option is to use a piece of white foam board or poster board instead which gives a much softer lightening effect. - Tripods
A good Tripod will be your best friend, and is a key part of achieving the clearest picture possible, especially if your light isn’t so great. If you have a higher-end camera, make sure your lenses also have VR (vibration reduction) turned on. If you can’t afford a nice tripod, you can make a monopod (single leg) out of a broom handle (unscrew the head from the handle first), or length of PVC pipe. In a pinch you can even brace against your body, by crouching down, tucking your arms in, and resting your elbows on your knees to reduce blur. If you’re shooting in daylight though, this should not be as much of an issue unless you deal with some kind of a tremor. - Props
Props can be fun and add interest to a picture, but you don’t want so many that they distract from your product, or make it hard for people to tell what you are selling. 1-2 props, aside from your background, are all you need for most shots. They should relate directly to the product and help a potential buyer gauge its size. Do not use coins for this purpose since that technique is outdated. Instead, if you sell cards try placing a nice pen next to the card, or if you sell dog collars place a food bowl in the background or a couple of dog treats next to the collar. - Photo editing programs
For years the industry standard for photo editing has been Photoshop, but what if you don’t want to pay the subscription fee or spend the time to learn it? There are other alternatives! Canva is popular because it’s free, and also allows for easy Pinterest pin creation. There is also an app for Apple devices or Android devices. Pixlr is another online photo editing program. There is also an Android app (I use this occasionally for images I post on Instagram). If you need an image editor with a bit more “oomph”, GIMP is a free program that has much of the same functionality as Photoshop does—it even reads files created with Photoshop! There’s quite a bit of a learning curve, but it is a powerful tool!
Basic Photography Do’s and Don’ts
Now that you know more about the equipment you’ll need to achieve those beautiful Etsy or Pinterest-worthy shots, let’s talk basic do’s and don’ts.
Here are a few Do’s:
1. Shoot outdoors in natural daylight, avoiding direct sun
Direct sun tends to wash out some colors, and/or leave harsh shadows. The goal of your shots is to capture as much true-to-color detail as you can, and the best way to do that is shooting in the shade. There are graphics programs that can lessen the effects of harsh contrast, but it’s faster and easier to shoot it right the first time.
Here is an example of a hank of yarn shot using my cellphone in direct sun. The color is actually pretty good, but that shadow is really distracting:

Here is the same hank of yarn shot on a light background in indirect light (outside in the shade on a sunny day):
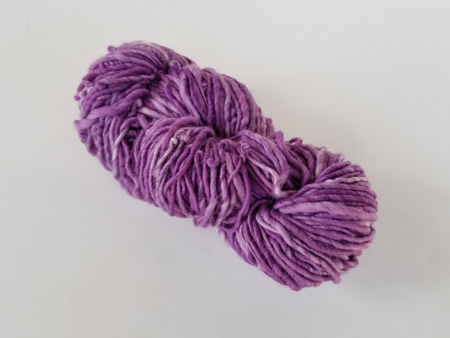
Look what happens when I edit the image just a little bit to brighten it up–not bad for a cell phone shot:

2. Shoot on a light, neutral colored background
This provides the best canvas to show off your product without distractions. Your audience is there for the item you made, not the background. Unless your background enhances the effect of your product, keep things minimal. As I mentioned earlier, white wood, slate, and marble backgrounds are popular for the crafting/DIY niche, but a plain white background can often be all you really need.
3. Get a variety of close-ups and full product shots
Show off your product from every angle. Your customer can’t pick up the item and look it over to make sure it fits their needs, so make it easy and do it for them by providing several different views (ie. Show shots of a flatlay, 3/4 angle, straight on, etc). You can use one or two small props to show size
4. If you’re photographing a person or animal, make sure the eyes are in focus
This is the part that grabs our attention. We are highly relational creatures who crave connection! I’m drawn to eyes in Amigurumi, stuffed animals, paintings, and figurines.
And some photography don’ts:
1. Don’t shoot at night, unless you have good quality studio lights or a light box.
It’s 10:30 at night, you just finished your latest project and are excited to share it with the world! But wait, shooting at night in the average home often gives pictures a yellow tint, at best, and most are grainy or blurry because, even though cell-phone cameras have come a long way, the light sensor just can’t get enough light to capture a high quality image. Unless you have a light-box (My friend Katie, from Salty Pearl Crochet highly recommends this light-box) or high quality indoor studio lighting set, avoid the night-time shoots.
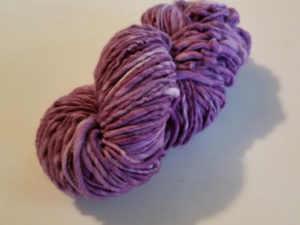
Here is an example of the same hank of yarn shot in a darkened room with artificial lighting (overhead light). This is NOT the kind of image you want to use to sell on Etsy, or other online venues. Would this inspire you to click? I didn’t think so.
2. Don’t shoot pictures that have people wondering more about the supplies on your desk, or pile of laundry in the background than they do your product.
Having a couple of well placed props is fine, but in general, clean and uncluttered is your goal. We all have a certain amount of clutter in our homes, yes, there are times that “keeping it real” is good, but this is not that time. Agree with me or not, we as humans are always in search of the “ideal”.
This is why magazines like Better Homes and Gardens, or Glamour are a thing. If we wanted to see “Disheveled Homes and Destroyed Gardens”, or peruse the latest in “Dirty Yoga Pants, and Messy Mom Hair” there would be magazines appropriately titled (And to be totally real with you, these later two accurately describe my life a good portion of the time, but, when I’m shooting something to sell, it’s a different story. Further confession: I would definitely peek at magazines titled like these, showing real snippets of mom life. Check out this cute “keeping it real” mom/daughter shoot if you need a smile break. 💕 )
3. Don’t use Flash
Using the built-in flash tends to lead to a very hash look (much like direct sunlight). It may light your subject up, but it also darkens your background, and doesn’t look as “professional”. Don’t get me wrong, professionals do use flash, but they know how to adjust the intensity to give a more natural look to the image. Unless you know how to do this, stay away from flash.
4. Don’t let fear of failure hold you back
Inaction due to fear is the number #1 killer of dreams. Do your best with the tools you have. If you don’t try you’ll never improve, and taking better shots is a goal all photographers (even the pros) are working toward.
Following these simple rules will help your product shine in the best possible way on Etsy and should encourage people to click through your listing photos for a closer look.
The More Advanced Technical Photography Stuff
If you want to improve your photography skills, getting comfortable with the settings on your camera or cell phone is a good idea. This section briefly covers a few basic settings that will improve the quality of your images. It is a general overview, meant for beginners, so I’ve purposely kept things short, and hopefully simple.
Most of the settings discussed here will be in your camera’s menu. There is a LOT more information on all of these settings and how they work together to achieve the perfect exposure that I haven’t covered, but hopefully this gives you a good starting point in your photography journey. Please refer to your owner’s manual for instructions on how to change them, as this section does not cover that.
White Balance
Remember when I mentioned how indoor light sources can leave your image with a yellow/orange tint? Manually adjusting your “white balance” can correct some of this (I still recommend shooting in natural daylight though). If your camera has the feature, the most common options are Shade, Sun, Fluorescent, and Incandescent. You will need to switch your shooting mode out of SR (Scene Recognition) or Auto in order to adjust these settings.
On a Samsung cell phone you can tap the “more” options in your camera app to access “pro” mode. Once in “pro” mode tap the button that says “Standard” or “Manual” to find settings to adjust the tint, saturation or amount of shadows in the shot.
Image Quality
Always shoot on the highest quality setting your camera will allow. Many cameras show this with a S, M, or L, referring to file size (small, medium, large). Always go with the L. This uses more space, but also makes images easier to edit because more information about the image (stored in pixels) is saved to your card. Many better quality cell phones have the option to actually shoot RAW which is the best quality image file you can get, and it is the same format most professional photographers use. On a Samsung, once in the camera app tap on your camera settings (gear) icon, and then choose “Save options” and tap “Save RAW copies” to turn that feature on.
Scene Selection
These settings that have been calibrated to help your camera work at its best in various situations. They should provide better results than shooting in full “auto” mode. They will usually appear as icons located on a wheel on the top of your camera, or in a settings menu (look at your owner’s manual to locate them): a person running (sports), a close-up of a person’s face (portrait), a flower (close-up), a night scene (night) , a landscape, etc. If you have a newer point and shoot camera, it will most likely have some or all of these scene options. The “portrait” or “close-up” modes are best for small items.
A note on Aperture/Shutter Speed
If you have photographer friends, more than likely you’ve heard them mention aperture, and shutter speed. Lower-end cameras automatically set these for you based on the “scene selection” you choose.
- Aperture refers to the opening in the lens that lets light in. It can be wide or narrow, depending on how much light is required to get the picture.
- Shutter speed is how long the shutter stays open to let in light, before it closes, in order to capture the shot.
These settings are typically only available to adjust individually on higher end cameras, and when paired with a quality light sensor, is how those beautiful blurry backgrounds are achieved. Basically, the more “wide open” the aperture, and the closer you are to your product, the blurrier the background will be.
Achieving blurry backgrounds on a cell phone:
On a cell phone you will have something called “Live focus” (Samsung), or “Portrait mode” (iPhone). These modes work best on products larger than 12″ by 12″ and will give the shot a blurrier background. Once you have taken the shot you should have the option to adjust the background blur. A word of caution: This isn’t a true background blur but is something the camera’s app generates. Because of that it needs to be used with care. It’s easy to quickly overdo on small items!
That was a lot of information to cover, and if you can’t take it all in right now, don’t worry. Bookmark this page, then come back to it in a day or two and reread the information. Implement the techniques a little at a time until they become second-nature.
Technique is something that is developed over months and years, and the more you immerse yourself into photography the better you will get (and the lighter your pocketbook will become).
Remember, the best shots tell a story. Your images should evoke emotions that capture your audience’s attention, as this will literally help you sell your products. Online marketplaces, and Etsy especially, are highly competitive, but if you take the time to take memorable photos, (and get your keywords right), you will notice a difference in your shop views and sales—even if you’re shooting on a budget!
Have a look in my camera bag
Disclaimer: This post contains affiliate links. When you purchase something using these links a small percentage of the sales price goes to me. However, you do not pay any extra for the item you purchase.
Here’s what I am personally using to shoot right now. Most of it falls in the low to mid-range as far as expense goes. I’ve also included links so you can purchase, or look at the reviews for yourself.
- Nikon D7200
This was an investment piece that I purchased shortly after beginning my foray into design. While it’s not the most high-end camera, it still has excellent performance in a variety of lighting and scene situations. The light sensor was one of the best in its price range at the time I purchased this. My rating 5/5 - Two SanDisk 256GB Memory Cards
These cards store a lot of images, and have been very reliable, but I still run out of room too frequently! This could be because I shoot in RAW format. 😉 My rating 5/5 - Ink and Elm Backdrops
If you want quality, long-lasting backdrops and floor drops, I can’t recommend these guys highly enough. Their backdrops are printed on durable vinyl, and ship in sturdy cardboard tubes that you can also use for storage. They are more expensive than rolls of paper, and absolutely worth every penny of the extra cost.
My rating 5/5 - Fancierstudio Lights
These are admittedly, fairly cheaply made, but they get the job done. The kit does not come with set-up instructions, which is a drawback if you’re not technically inclined. I have a 12 yr old that is particularly gifted in this area, so if you have a kid that has mechanical skill, call him or her over and have them do the work. 😉 I do plan to replace this in the future, but since I usually shooting outdoors, I’m in no rush.
My Rating 3.5/5 - Manfrotto Tripod
I love this tripod! If you need something set in just one place for the duration of your shoot, it’s excellent. It’s sturdy and I don’t have to worry about the camera “sagging”. The only reason I give it a 4 our of 5 is because if you have to move it around frequently to get lots of different angles (like I often do), this really isn’t the tripod for you. Moving things around and tightening them down takes a bit of time.
My Rating 4/5 - Targus Tripod*
I picked up a cheaper tripod at Walmart, and it’s done fairly well over the past 5 years but will eventually need to be replaced. The legs are telescoped and keep trying to collapse.
My rating 2/5
*This link is to a tripod similar to the one I have. They do not appear to sell the same one anymore.
I share a few more of my photography favorites over here, if you are interested.
Thank you so much for stopping by! If you found this guide helpful please consider sharing a link with your friends. Together we help each other. 💕


Leave a Reply