
The Desert Rose 12″ afghan square pattern is a stunning crochet design filled with texture and flowery details. The colors add much of the interest to this thick, warm block, so mix them up to match your living room or bedroom! Find the free crochet pattern instructions below, or purchase a print-optimized, ad-free PDF by clicking here.
Click Here to add this pattern to your Ravelry queue!
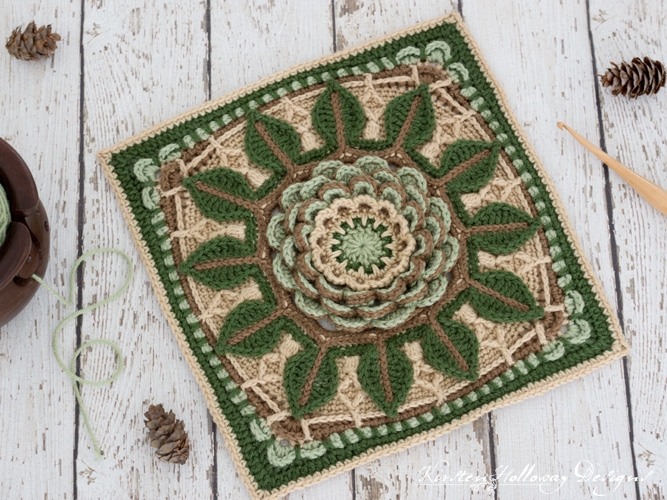
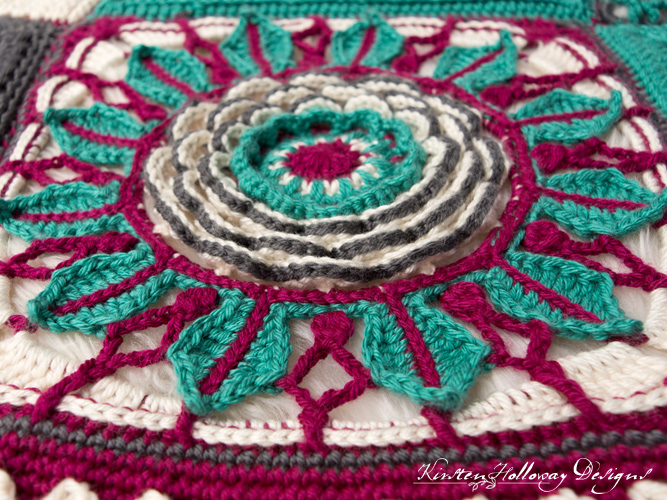
This stunning crochet pattern starts out with a detailed and colorful center, followed by 3 layers of petals. Leaves are then created in two parts. The bobbles and diamonds between the leaves can be worked in a solid color, or in multiple colors depending on the look you want to go for. Finally, the border is made with a variety of back post stitches, shells, clusters and single crochet stitches worked more like spike stitches. I’ve broken down each section in the notes so you can create your own color schemes.
I used Red Heart Super Saver, Red Heart with Love and even Red Heart Soft to make this beautifully textured afghan square. Red Heart makes so many different colors that I’m sure you’ll have not problem finding just the right hues to match your living room or bedroom. Try using the same 4 colors in different orders if you plan to use this square to make an entire afghan from this square. I can’t wait to see what you make from this!
The rich texture make this block an especially thick and warm one. For added warmth, you could lay a piece of batting on the back side of the afghan and sew a piece of flannel or fleece over the top. I’m feeling toasty just thinking about that!
Besides its original purpose, this afghan square pattern can be used to crochet a cushion, accent pillow, bag, or wall hanging. It has a little bit of a succulent flower feel and could go well with a Boho style bedroom or living room. You could even use the center part of the flower and leaves inside a hoop to create a nature-inspired dream catcher. If you decide to make a pillow-front from this pattern, I suggest you go up a hook size or two to make the square larger since most pillow inserts are not 12″x12″.

The Desert Rose afghan square pattern is part of the Creative Crossings Crochet-A-Long. You can read more about it, and find the other square patterns by following this link.
Difficulty:
Intermediate
Materials Needed:
4mm (G) hook, or hook needed to obtain gauge
5mm (H) hook, or hook needed to obtain gauge
255-300 yards of yarn in 4 colors. I recommend Red Heart Super Saver, Red Heart with Love, or Red Heart Soft for this project. The colors I used for the green and brown square are Red Heart Super Saver in Frosty Green, Medium Thyme, Café Latte, and Buff. For the pink and brown square, try Red Heart With Love in Tan, and Aran, Super Saver in Café Latte, and Red Heart Soft in Rose Blush.
Yarn needle
Scissors
Stitch Markers
Stitches Used:
sl sl = slip stitch
ch = chain
sc = single crochet
hdc = half double crochet
dc = double crochet
tr = treble crochet
BPsc = back post single crochet
BPhdc = back post half double crochet
BPdc = back post double crochet
BPtr = back post treble crochet
FPdc = front post double crochet
FPtr = front post treble crochet
Additional Terms:
Bobble = dc5tog in same stitch
tr cluster = tr3tog in same stitch (“Original” ending only)
Spike st = with working yarn on hook, insert hook through bottom of round 2/top of round 1, yo and draw up a loop to height of active round, pull working yarn through both loops
2dc cluster = dc2tog in same st
st/sts = stitch/stitches
sp/sps = space/spaces
sk = skip
Gauge:
3 ¼” across after round 5, 6” across after round 12.
Measurements:
12” by 12” when blocked.
Additional Notes:
-When color change is indicated, new color is joined in the same st where the previous color fastened off. Rounds that begin with a color change can be started as standing sc, or standing dc sts.
-Begin all rounds in same st as join unless otherwise noted.
-Color changes are merely suggestions. Mix and match to create your own unique styles. Imagine a whole blanket made with this square using the 4-5 different colors in different spots! Rounds 1-6 are the center of the flower, 7-13 are the petals, round 14 are the stems in the center of the leaves, round 16 is the leaves themselves, rounds 17-27 are the background behind the leaves, including the diamonds and bobbles, rounds 28-33 are the trim around the edge.
-The sc sts in round 31 will be worked more like spike stitches than regular sc sts. Keep tension loose so they lay correctly.
-This square is part of the Creative Crossings Crochet-A-Long. <–click the link to get more information and all the other patterns
Desert Rose Afghan Square Pattern (US Terms):
Click here to purchase an ad-free, print-optimized PDF of this pattern on LoveCrafts
Using 5mm (H) hook,
With color A (Frosty Green),
Round 1: 12 dc in magic circle. Join with sl st to first dc. (12)
Drop color A, and fasten off.
Join color B (Medium Thyme),
Round 2: 2 sc in each stitch around, join with sl st to first sc. (24)
Drop color B and fasten off.
Join color C (Buff),
Round 3: sc in first st, work spike st by inserting hook through bottom of round 2/top of round 1, yo and draw up a loop, pull through both loops (this will be an increase stitch), sc in next st from round 2 (your spike st may be covering it), * sc in next st, work spike st in next st between rounds 1 and 2, sc in next st from round 2 (your spike st may be covering it); repeat from * around, join with sl st to first sc. (36)
Round 4: *ch 3, sk 2 sts, sl st in next st; repeat from * around, final sl st counts as join. (12 ch-3 sps)
Round 5: *(4 sc, sl st) in ch-3 sp, sl st into next ch-3 sp; repeat from * around, final sl st counts as join. (12 petals)
Drop color C and fasten off.
Join color D (Café Latte),
Round 6: bend the petals forward, and work this round in the stitches you skipped in round 4: ch 1, sc in in first st, sc in the next st, ch 1, sk st, *sc in the next 2 sts, ch 1, sk st; repeat from * around, join with sl st to first sc. (36)
Drop color D and fasten off.
 Join color A,
Round 7: sl st into ch-1 sp from round 6, ch 4 *sl st in next ch-1 sp, ch 4; repeat from * around, join with sl st to first ch-1 sp. (12 ch-4 sps)
Round 8: sl st into first ch-4 sp, (hdc, 4 dc, hdc, sl st) in ch-4 sp, *sl st into next ch-4 space, (hdc, 4 dc, hdc, sl st) in ch-4 sp; repeat from * around, final sl st counts as join. (12 petals)
Round 9: working in the back of the petals just made, sl st over to center of first petal, *ch 4, sl st into center-back of next petal; repeat from * around, join with sl st to first ch-4 sp. (12 ch-4 sps)
Round 10: (hdc, 4 dc, hdc, sl st) in ch-4 sp, *sl st into next ch-4 sp, (hdc, 4 dc, hdc, sl st) in ch-4 sp; repeat from * around, final sl st counts as join. (12 petals)
Round 11: working in the back of the petals just made, sl st over to center of first petal, *ch 4, sl st into back of next petal; repeat from * around, join with sl st to first ch-4 sp. (12 ch-4 sps)
Round 12: (hdc, 4 dc, hdc, sl st) in ch-4 sp, *sl st into next ch-4 sp, (hdc, 4 dc, hdc, sl st) in ch-4 sp; repeat from * around, final sl st counts as join. (12 petals)
Drop color A and fasten off.
Join Color D,
Round 13: working in the back of the petals just made, sl st over to center of first petal, *ch 5, sl st into back of next petal; repeat from * around, join with sl st to first ch-5 sp. (12 ch-5 sps)
Switch to 4mm hook,
Round 14: ch 1, *(4 sc, using tight tension ch 11, sl st loosely into second ch from hook and using tight tension again into next 9 chs, 4 sc) in ch-5 sp, move to next ch-5 sp; repeat from * around, join with sl st to first sc. Note: each spike should measure exactly 2” long. Adjust your tension if they are coming out longer or shorter. (12 spikes, 96 sc)
Drop color A, and fasten off.
Join Color C,
Round 15: *BPsc around next 4 sts, ch 1, BPsc around next 4 sts; repeat from * around, join with sl st to first BPsc. (96 sc, 12 ch)
Drop color C and fasten off,
Join Color B,
Round 16: *BPsc around next 4 sc, work this next part up the spike you created in round 14 (sc, hdc, dc, tr in next 3 sts, dc, hdc, sc, sl st into end ch, ch 1, sl st back into ch forming picot, sl st into end ch again, then work this part down the spike, in the back loop (this will put the pretty “V’s” going up the center of your leaf): sc, hdc, dc, tr in next 3 sts, dc, hdc, sc) BPsc around next 4 sts; repeat from * around, join with sl st to first sc. (12 leaves)
Drop Color B and fasten off.
Join Color C,
Round 17: BPsc around next 4 sts, *sc in ch-1 sp behind leaves, BPsc around next 4 sts, ch 1, BPsc around next 4 sts; repeat from * around, ch 1, join with sl st to first sc. (108)
Round 18-19: ch 1, sc in each st around, join with sl st to first sc. (108)
Round 20: ch 1, sc in next 9 sts, *bobble in ch-1 sp from round 15, sc in same st making an increase, and in next 8 sts; repeat from * around, join with sl st to first sc. (120)
Round 21: ch 1, *sc in next 5 sts, sl st in the 6th ch at the back of the leaf center, sc in next 4 sts, 2 sc in top of bobble, join with sl st to first sc; repeat from * around, join with sl st to first sc. (132)
Round 22: ch 1, sc in next 5 sts, *sl st in the 5th ch at the back of the leaf center, sc in next 11 sts; repeat from * around, omitting last 5 sts on final repeat, join with sl st to first sc. (132)
Round 23: ch 1, sc in first st, tr in top of bobble from round 20, sc in next 3 sts, sl st in the 4th ch at the back of the leaf center, sc in next 3 sts, *tr around top of bobble from round 20, sc in next 3 sts, tr around top of same bobble, sc in next 3 sts, sl st in the 4th ch at the back of the leaf center, sc in next 3 sts; repeat from * around, omitting last sc in final repeat, join with sl st to first sc. (132)
Round 24: ch 1, sc in next 5 sts, *sl st in the 3rd ch at the back of the leaf center, sc in next 11 sts; repeat from * around, omitting last 5 sts on final repeat, join with sl st to first sc. (132)
Rounds 25: ch 1, sc in next 5 sts, *sl st in the 2nd ch at the back of the leaf center, sc in next 11 sts; repeat from * around, omitting last 5 sts on final repeat, join with sl st to first sc. (132)
Rounds 26: ch 1, tr2tog placing first leg around around last tr from round 23, place second leg around first tr from round 23, this will create the top of the diamond, sc in next 4 sts, sl st in the 1st ch at the back of the leaf center, sc in next 6 sts, *tr2tog placing first leg around nearest tr from round 23, and placing second leg around next tr from round 23, sc in next 4 sts, sl st in the 1st ch at the back of the leaf center, sc in next 6 sts; repeat from * around, join with sl st to first tr2tog. (132)

Round 27: ch 1, sc in next 11 sts, *hdc in next 3 sts, dc next 2 sts, 2 dc in next st (note: mark these 2 sts with a stitch marker because you will be working between them in the next round, and working a tr around each of them in round 29), dc in next 2 sts, hdc in next 3 sts, sc in next 22 sts; repeat from * around, omitting last 11 sts in final repeat, join with sl st to first sc. (136)
Drop Color C and fasten off.
Join Color D,
Round 28: BPsc in next 11 sts, *BPhdc around next 3 sts, BPdc around next 3 sts, 4 dc between 1st and second dc of corner, BPdc around next 3 sts, BPhdc around next 3 sts, sc around next 22 sts; repeat from * around, omitting last 11 sts on final round, join with sl st to first sc. (152)
Round 29: with color C, FPdc around top of tr2tog from round 26, with color D, sc in next 10 sts, *with color C, FPtr around tr2tog, with color D, sc in next 2 sts, hdc in next 2 sts, with color C, FPtr around first of “2 dc in same st” from round 27, BPhdc in next 2 sts, ch 2, BPhdc around next 2 sts, FPtr around second of “2 dc in same st” from round 27, with color D, hdc in next 2 sts, sc in next 3 sts, with color C, FPtr around tr2tog, with color D, sc in next 10 sts, with color C, FPdc around tr2tog, with color D, sc in next 10 sts: repeat from * around, join with sl st to FPdc. (152)
Drop Colors C and D and fasten off.
Join Color A,
Round 30: [2 sc in same st, sk st] 6 times, *2dc cluster, ch 1, sk st, 2dc cluster, sl st in next st, (hdc, dc) in next st, (dc, hdc) in next st, sl st in next st, (hdc, 4 dc, hdc) in ch-2 sp, sk st, sl st in next st, (hdc, dc) in next st, (dc, hdc) in next st, sl st in next st, 2dc cluster, ch 1, sk st, 2 dc cluster, sk st, [2 sc in same st, sk st] 11 times; repeat from * around omitting final 6 times of “2 sc in same st, sk st” sequence, join with sl st to first sc. (184 including sl sts)
Drop Color A and fasten off.
Join Color B,
Note: The sc sts in the following round will be worked more like spike stitches than regular sc sts.
Round 31: sc in first skipped st from previous round, [ch 1, sc in skipped st from prev round] 6 times, *ch 1, sc in same st as sl st, BPhdc around hdc, BPsc around next 2 dc, BPhdc around hdc, dc in same st as sl st, BPdc around hdc, BPhdc around next 2 dc, ch 1, BPhdc around next 2 dc, BPdc around hdc, dc in same st as sl st, sk st, [ch 1, sc in skipped st from prev round] 14 times; repeat from * around omitting final 7 “[ch 1, sc in skipped st from prev round]” sequences, ch 1, join with sl st to first sc. (188)
Round 32: ch 1, sc in next 11 sts, *hdc in next 12 sts, (hdc, ch 1, hdc) in ch-1 sp, sk st, hdc In next 12 sts, sc in next 22 sts; repeat from * around omitting last 11 sts of final repeat, join with sl st to first sc. (192)
Drop Color B and fasten off.
Join Color C,
Round 33: sc in next 24 sts, *(sc, ch 1, sc) in ch-1 sp, sk st, sc in next 47 sts; repeat from * around omitting final 24 sts on final repeat, join with sl st to first sc. (192 sc, or 48 sts per side not including ch-1 sp in corners)
Fasten off and weave in ends.
Finishing
With Color D, sl st around the edge of each petal in rounds 8, 10, and 12.
(Optional) Sew the ends of the leaf tips down by running a long piece of yarn through round 26 or 27 and tacking the leaf down each time you come to one. Nothing too technical, but you’ll want to make sure your leaves are laying straight.
Block.
Original Ending:
The original ending creates a more lacy square with a simpler edging. Blocking is very important to get the diamonds to lay nicely between the leaves.
Additional Notes:
The diamond shape between the petals is the trickiest part of this afghan square, but if you take it one step at a time and read the notes it will be easier to crochet. Even tension on your chains, coupled with blocking will ultimately make this section look its best.
With 4mm hook,
Join color B,
Round 15:
ch 1, *BPsc around next 3 sc, sk st, work this next part up the spike you created in the previous round: sc, hdc, dc, tr in next 3 sts, dc, hdc, sc, (sl st, ch 1, sl st) into end ch forming picot, sl st into end ch again, then work this part down the spike, in the back loop (this will create the pretty “V”s going up the center of your leaf): sc, hdc, dc, tr in next 3 sts, dc, hdc, sc, sk st, BPsc around next 3 sts; repeat from * around, join with sl st to first sc. (12 leaves)
Drop color C, and fasten off.
Join color C,
In this round you will be creating a “diamond” shape between each leaf with chains. The side “points” of the diamond should be slip stitched to the back of the center-most tr stitch of the leaf that you made in the prev round–essentially a “back post slip stitch”.
Round 16: ch 1, bobble in first st, ch 4, sl st around back post of third tr stitch, ch 9, sl st to top back of spike from round 14 under picot from round 15. Note: It will be a snug fit to get your hook in there and if you have a smaller hook handy that may speed up this process. *ch 9, sl st around 5th st from bottom of leaf, directly across from the sl st on the other side of the leaf, ch 4, bobble in 3rd BPsc, ch 4, sl st around back post of 5th st from bottom of leaf, ch 4, sl st into 5th ch of ch-9 just made (counting from top of leaf), (the best way to do this is to remove your hook from the chain loop and insert it through the 5th ch of ch-9, place the loop back on your hook and draw it through from the back, then continue with the instructions), ch 5, join with sl st to top back of spike from round 14 this will create a diamond-shaped opening with a bobble at the bottom; repeat from * around, after joining to top of final leaf, ch 5, sl st into 5th ch from top of first ch-9, ch 4, sl st around back post of 5th st from bottom of last leaf, ch 3, sl st into top of first bobble. (12 bobbles, 24 spaces, 12 “diamonds”)
Drop color B and Fasten off.
Switch to 5mm (H) hook,
Join color A to ch-5 sp,
In Round 16, the ch-9 spaces were divided into ch-4 space on the bottom half of the diamond and a ch-5 space in the upper half of the diamond. In this round we will be working into the upper ch-5 spaces.

Round 17: ch 1, *6 sc in ch-5 sp, (3 hdc, 3 dc) in next ch-5 sp, (2 dc, 4 tr, ch 1) in next ch-5 sp (4 tr, 2 dc) in next ch-5 sp, (3 dc, 3 hdc) in next ch-5 sp, 6 sc in next ch-5 sp; repeat from * around, join with sl st to first sc. (144)
Drop color B, and fasten off.
Join color D,
Round 18: ch 1, *BPsc around next 6 sts, FPdc around chains at top/back of leaf, BPsc around next st, BPhdc around next 5 sts, FPtr around “diamond” from round 16, BPdc around next 4 sts, BPtr around next 2 sts, (tr cluster, ch 2, tr cluster) in ch-1 sp, BPtr around next 2 sts, BPdc around next 4 sts, FPtr around “diamond” from round 16, BPhdc around next 5 sts, BPsc around next st, FPdc around chains at top/back of leaf, BPsc around next 6 sts, FPdc around “diamond” from round 16; repeat from * around, join with sl st to first BPsc. (172)
Drop color A, and fasten off.
Join color C,
Round 19: ch 1, sc in next 21 sts, *(2 sc, ch 2, 2 sc) in corner, sc in next 43 sts; repeat from * around, omitting 22 sts on final repeat, join with sl st to first sc. (47 sc/side, 188 sc)
Fasten off, and weave in ends.
With color C sl st around the edge of each petal in rounds 8, 10, and 12.
Fasten off, and weave in ends.
Block for best results.
Fasten off and weave in ends.
Want more gorgeous crochet patterns, and a little encouragement for your day? Sign up for my newsletter here! That way you’ll never miss out on special events, or freebies I’m offering.
JOIN ME ON SOCIAL MEDIA
I would love to see a picture when you’re done, so please feel free to come by my Facebook group and show off your project! Be sure to tag @kirstenhollowaydesigns when you share pictures of your finished square on Instagram and use #desertroseafghansquare.
You can also follow me on Facebook, Pinterest, Instagram, and Ravelry for more beautiful crochet patterns.
PATTERN TERMS AND CONDITIONS:
You are welcome to share the link to this pattern, using one image of your choice, on your site, but please do not share the written patterns themselves, this includes my Ravelry downloads or translations of these patterns, or use additional images. You do not have permission to use my images by themselves to create pinnable graphics for Pinterest, however they may be included in a roundup pin if there are 4 or more other patterns. If you sell finished items online, please do not use my pictures for your listings. I’m positive that your work is of high enough quality for you to sell the finished piece. Have confidence in your abilities! <3 Thank you!
This pattern was made to be used by individuals, and small business crocheters alike. Selling your finished pieces in boutiques, at farmer’s markets, craft shows, and other local events is encouraged! Please credit/link Kirsten Holloway Designs when selling finished products online. The only thing I require is that this pattern not be used commercially to produce hundreds of thousands of copies.
If you enjoyed this pattern or found it useful, why not share a link to this post with your friends?


