
Crochet a classic diaper cover or soaker for Newborns or 0-3 month old babies with this free pattern. It comes in two styles that will fit any modern baby’s wardrobe, and look especially cute in newborn photos. Find the free crochet pattern instructions below, or purchase a print-optimized, ad-free PDF by clicking here.
Click here to add this to your Ravelry queue!
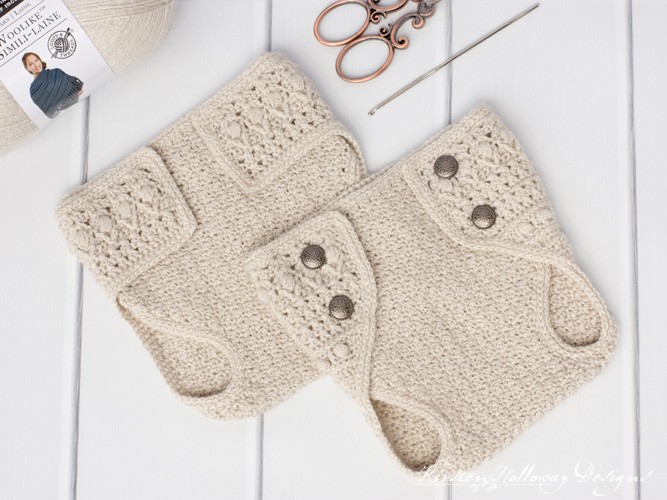
Crochet diaper covers are a classic addition newborn photography, and this set really ups the style factor. Vintage style is back in a big way, for modern babies (and their parents), making this diaper cover the perfect heirloom pattern to crochet as a baby shower gift. Look at all that texture! And those intricate buttons!
I chose to use Loops & Threads Woolike (available at Michael’s stores) because it is very soft and cozy for little babies skin. It is a very fine fingering weight yarn so it has a beautiful drape. It also comes in a wide selection of colors so you can customize the look of this crochet pattern to fit your needs.

The detailed crochet edging adds some stability and shaping to the design giving it better coverage. The final round of slip stitching especially helps to prevent this delicate yarn from stretching out as much as it otherwise would. It is also a place where you could add a pop of contrasting color!

I have worked to make this design beautiful but also gender neutral so it can work for baby boys or baby girls. I’ll share some pictures of this cover crocheted in other colors soon.
Difficulty:
Easy/Intermediate
Materials Needed:
2.55m steel hook, or hook needed to obtain gauge
175-225 yards Woolike fingering weight yarn in Beige
Yarn needle
Scissors
4 5/8″ buttons
6 snaps
Stitches Used:
ch = chain
sl st = slip stitch
sc = single crochet
hdc = half double crochet
dc = double crochet
FPsc = front post single crochet
sc2tog = single crochet 2 together
dc3tog = double crochet 3 together
FPtr2tog = front post treble crochet 2 together
sk = skip
yo = yarn over
st(s) = stitch(es)
sp(s) = space(s)
prev = previous
RS = right side
WS = wrong side
Additional Terms:
Puff st: YO, pull up a stitch 5 times, pull through 10 loops on hook, YO, pull through final 2 loops
Cross st: sk st, dc in next st, cross over st just made and dc in skipped st.
Shell = 4 dc in same st
Hdc puff st: YO, pull up a stitch 5 times, pull through 10 loops on hook, YO, pull through final 2 loops.
Cross st: sk st, dc in next st, cross over st just made and dc in skipped st.
Shell = 4 dc in same st
Seed Stitch: alternate sc and dc stitches across the designated row or partial row, then on the next row work a dc stitch in the sc stitch from the previous row, and a sc stitch in the dc stitch from the previous row.
Gauge:
2.55mm hook, using the seed stitch: 23 rows gives 4” of height. There will be 24 sts in 4” across.
Measurements:
Newborn: 6” tall by 6” wide
0-3 mos: 7” tall by 7” wide
Additional Notes:
Ch-1 at beginning of row does not count as a stitch
Since this is a garment, matching gauge is very important in order to achieve the correct fit.
Modern Classic Diaper Cover Style 1 (US Terms):

Diaper Cover Size Newborn – Style 1:
Ch 68,
Row 1 (RS): sc in second ch from hook, sc in each remaining st of row, ch 3 (counts as first dc of row 2), turn. (67)
Row 2 (WS): sk 2 sts, 4 dc in next st, *sk 3 sts, 4 dc in next; repeat from * across, when there are 3 sts left in row, sk 2 sts, dc in final st, ch 3 (counts as first dc of row 3), turn. (16 shells, 2 dc)
Row 3 (RS): sk 2 sts, 4 dc between 2nd and 3rd dc of shell, *sk 4 sts, 4 dc between 2nd and 3rd dc of shell; repeat from * across, when there are 3 sts left in row, sk 2 sts, dc in top of ch 3, ch 2 (counts as first hdc of row 4), turn. (16 shells, 2 dc)
Row 4 (WS): hdc in next st, *ch 1, sk st, 5 hdc puff between 2nd and 3rd dc of shell, ch 1, sk st, hdc in next 2 sts; repeat from * across (note: final hdc will be worked in top of ch-3 from prev row), ch 1, turn. (16 hdc puff sts, 34 hdc)
Row 5 (RS): *sc in next 2 hdc sts, sc in ch-1 sp, sk puff st, sc in ch-1 sp; repeat from * across putting 2 sc in final st of row, ch 1, turn. (67 sc)
Row 6 (WS): sc in each st across, ch 1, turn. (67)
You will now be working on 2 different rows. Your sc sts will be worked on row 7 as normal stitches, and your FPtr2tog sts will be worked around the hdc sts you made in row 4. They should form peaks over top of the puff sts. Remember to skip a stitch when you start making the sc sts again-the FPtr2tog counts as a st so you need to make room for it!
Row 7 (RS): sc in next 3 sts, *FPtr2tog placing first leg around hdc next to first puff st from row 4, place second leg around next hdc on other side of puff st from row 4, sc in next 3 sts; repeat from * across, ch 3 (counts as first dc of row 8), turn. (16 FPtr2tog, 51 sc)
Row 8 (WS): [Cross st across next 2 sts] 32 times, sk st, dc in final st of row, ch 3 (counts as first dc of next row), turn. (66)
Row 9 (RS): dc3tog, [cross st across next 2 sts] 30 times, dc3tog, ch 1, turn. (62)
Row 10 (WS): dc3tog, [cross st across next 2 sts] 28 times, dc3tog, ch 1, turn. (58)
Row 11 (RS): dc3tog, [cross st across next 2 sts] 26 times, dc3tog, ch 1, turn. (54
Cut yarn and fasten off. Reattach to other end of row with the right side facing you,
Row 12 (RS): sc in each st across, ch 1, turn. (54)
Row 13 (WS): FPsc in each st across, ch 1, turn. (54)
Row 14 (RS): dc3tog, ch 1, sk 2 sts, *puff in the next st, ch 1, sk st, hdc in next st, ch 1, sk st; repeat from * across, dc3tog in last 3 sts. (12 puffs, 11 hdc, 2 dc3tog)
Cut yarn and fasten off. Reattach to other end of row with the right side facing you,
Row 15 (RS): sc in dc3tog, *sc in ch-1 sp, sk puff st, sc in ch-1 sp, sc in hdc; repeat from * across, ch 1, turn. (37)
Row 16 (WS): FPsc in each st across, ch 1, turn. (37)
Row 17 (RS): sc2tog, dc in next st, *sc in next st, dc in next st; repeat from * across, sc2tog across final 2 sts of row, ch 1, turn. (35)
Row 18 (WS): sc2tog, dc in next st, *sc in next st, dc in next st; repeat from * across, sc2tog across final 2 sts of row, ch 1, turn. (33)
Row 19 (RS): sc2tog, dc in next st, *sc in next st, dc in next st; repeat from * across, sc2tog across final 2 sts of row, ch 1, turn. (31)
Row 20 (WS): sc2tog, dc in next st, *sc in next st, dc in next st; repeat from * across, sc2tog across final 2 sts of row, ch 1, turn. (29)
Row 21 (RS): dc in first st, *sc in next st, dc in next st; repeat from * across, ch 1, turn. (29)
Row 22 (WS): sc in first st, *dc in next st, sc in next st; repeat from * across, ch 1, turn. (29)
Repeat rows 21 and 22 4 more times, then continue with the next section,
Begin decrease (total st count decreases by 2 with each row),
Row 30: sc2tog, dc in next st, *sc in next st, dc in next st; repeat from * across, sc2tog across final 2 sts of row, ch 1, turn. (27)
Row 31:sc2tog, dc in next st, *sc in next st, dc in next st; repeat from * across, sc2tog across final 2 sts of row, ch 1, turn. (25)
Row 32: sc2tog, dc in next st, *sc in next st, dc in next st; repeat from * across, sc2tog across final 2 sts of row, ch 1, turn. (23)
Row 33: sc2tog, dc in next st, *sc in next st, dc in next st; repeat from * across, sc2tog across final 2 sts of row, ch 1, turn. (21)
Row 34: sc2tog, dc in next st, *sc in next st, dc in next st; repeat from * across, sc2tog across final 2 sts of row, ch 1, turn. (19)
Row 35: dc in first st, sc in next st *dc in next st, sc in next st; repeat from * across, dc in final st, ch 1, turn. (19)
Row 36: sc in first st, dc in next st *sc in next st, dc in next st; repeat from * across, sc in final st, ch 1, turn. (19)
Repeat rows 35 and 36 1 more time, then repeat row 35 once,
Begin increase (total st count increases by 2 with each row),
Row 40: (dc, sc) in first st, *dc in next st, sc in next st; rep from * across until 2 sts remain, dc in second to last st, (sc, dc) in final st, ch 1, turn. (21)
Row 41: (dc, sc) in first st, *dc in next st, sc in next st; rep from * across until 2 sts remain, dc in second to last st, (sc, dc) in final st, ch 1, turn. (23)
Row 42: (dc, sc) in first st, *dc in next st, sc in next st; rep from * across until 2 sts remain, dc in second to last st, (sc, dc) in final st, ch 1, turn. (25)
Row 43: (dc, sc) in first st, *dc in next st, sc in next st; rep from * across until 2 sts remain, dc in second to last st, (sc, dc) in final st, ch 1, turn. (27)
Row 44: (dc, sc) in first st, *dc in next st, sc in next st; rep from * across until 2 sts remain, dc in second to last st, (sc, dc) in final st, ch 1, turn. (29)
Row 45: (dc, sc) in first st, *dc in next st, sc in next st; rep from * across until 2 sts remain, dc in second to last st, (sc, dc) in final st, ch 1, turn. (31)
Row 46: (dc, sc) in first st, *dc in next st, sc in next st; rep from * across until 2 sts remain, dc in second to last st, (sc, dc) in final st, ch 1, turn. (33)
Row 47: (dc, sc) in first st, *dc in next st, sc in next st; rep from * across until 2 sts remain, dc in second to last st, (sc, dc) in final st, ch 1, turn. (35)
Row 48: (dc, sc) in first st, *dc in next st, sc in next st; rep from * across until 2 sts remain, dc in second to last st, (sc, dc) in final st, ch 1, turn. (37)
Row 49: dc in first st, *sc in next st, dc in next st; repeat from * across, ch 1, turn. (37)
Row 50: sc in first st, *dc in next st, sc in next st; repeat from * across, ch 1, turn. (37)
Repeat rows 49-50 4 more times, then repeat row 49 one more time,
Fasten off and weave in ends.
Edging (worked on the right side):
Round 1: With the diaper cover laying flat, with right side up, join yarn to top, left flap, sc evenly down the side of the flap and diaper cover until you come to the end of the 10 or so rows that do not increase, sc2tog 5-6 times along the decreasing rows until you get to the crotch (this will create a slightly fitted “bottom”), then sc evenly along rest of that side, continue along the top of what will be the front of the cover, then down the other side through crotch, sc2tog 5-6 times along the decreasing rows until you get to the 10 rows that do not increase at the back of the cover, sc evenly along the rest of that side and up the flap then continue around the cover. In the corners work (sc, ch 1, sc). Join with sl st to first sc.
Round 2: ch 1, sc in each st around placing (sc, ch 1, sc) in the corners, join with sl st to first sc.
Fasten off and weave in ends.
Round 3: sl st loosely around the entire diaper cover between rounds 1 and 2.
Fasten off and weave in ends.
Sew 2 5/8” buttons to front cover about 2″ in from the sides of front. They should fit between the second row of shells and the second or third row of cross stitches. Optional: Sew three snaps to each flap in a triangle arrangement to further support the flap. Do not substitute Velcro for the snaps!
Diaper Cover Size 0-3 Months – Style 1:
Ch 84,
Row 1 (RS): sc in second ch from hook, sc in each remaining st of row, ch 3 (counts as first dc of row 2), turn. (83)
Row 2 (WS): sk 2 sts, shell in next st, *sk 3 sts, shell in next st; repeat from * across, when there are 3 sts left in row, sk 2 sts, dc in final st, ch 3 (counts as first dc of row 3), turn. (20 shells, 2 dc)
Row 3 (RS): sk 2 sts, shell between 2nd and 3rd dc of shell from prev row, *sk 4 sts, shell between 2nd and 3rd dc of shell from prev row; repeat from * across, when there are 3 sts left in row, sk 2 sts, dc in top of ch 3, ch 2 (counts as first hdc of row 4), turn. (20 shells, 2 dc)
Row 4 (WS): hdc in next st, *ch 1, sk st, 5 hdc puff between 2nd and 3rd dc of shell from prev row, ch 1, sk st, hdc in next 2 sts; repeat from * across (note: final hdc will be worked in top of ch-3 from prev row), ch 1, turn. (20 hdc puff sts, 42 hdc)
Row 5 (RS): *sc in next 2 hdc sts, sc in ch-1 sp , sk puff st, sc in ch-1 sp; repeat from * across putting 2 sc in final st of row, ch 1, turn. (83 sc)
Row 6 (WS): sc in each st across, ch 1, turn. (83)
You will now be working on 2 different rows. Your sc sts will be worked on row 7 as normal sts, and your FPtr2tog sts will be worked around the hdc sts you made in row 4. They should form peaks over top of the puff sts. Remember to skip a stitch when you start making the sc sts again-the FPtr2tog counts as a st so you need to make room for it!
Row 7 (RS): sc in next 3 sts, *FPtr2tog placing first leg around hdc next to first puff st from row 4, place second leg around next hdc on other side of puff st from row 4, sc in next 3 sts; repeat from * across, ch 3 (counts as first dc of row 8), turn. (20 FPtr2tog, 63 sc)
Row 8 (WS): [Cross st across next 2 sts] 40 times, sk st, dc in final st of row, ch 3 (counts as first dc of next row), turn. (82)
Row 9 (RS): [Cross st across next 2 sts] 40 times, dc in top of ch 3, ch 1, turn. (82)
Row 10 (WS): dc3tog, [cross st across next 2 sts] 38 times, dc3tog, ch 1, turn. (78)
Row 11 (RS): dc3tog, [cross st across next 2 sts] 36 times, dc3tog, ch 1, turn. (74)
Cut yarn and fasten off. Reattach to other end of row with the right side facing you,
Row 12 (RS): sc in each st across, ch 1, turn. (74)
Row 13 (WS): FPsc in each st across, ch 1, turn. (74)
Row 14 (RS): dc3tog, ch 1, sk 2 sts, *puff in the next st, ch 1, sk st, hdc in next st, ch 1, sk st; repeat from * across, dc3tog in last 3 sts (52)
Cut yarn and fasten off. Reattach to other end of row with the right side facing you,
Row 15 (RS): sc in dc3tog, *sc in ch-1 sp, sk puff st, sc in ch-1 sp, sc in hdc; repeat from * across, ch 1, turn (52)
Row 16 (WS): sk st, FPsc in each st across, ch 1, turn. (51)
Row 17 (RS): sc2tog, dc in next st, *sc in next st, dc in next st; repeat from * across, sc2tog across final 2 sts of row, ch 1, turn. (49)
Row 18 (WS): sc2tog, dc in next st, *sc in next st, dc in next st; repeat from * across, sc2tog across final 2 sts of row, ch 1, turn. (47)
Row 19 (RS): sc2tog, dc in next st, *sc in next st, dc in next st; repeat from * across, sc2tog across final 2 sts of row, ch 1, turn. (45)
Row 20 (WS): sc2tog, dc in next st, *sc in next st, dc in next st; repeat from * across, sc2tog across final 2 sts of row, ch 1, turn. (43)
Row 21 (RS): sc2tog, dc in next st, *sc in next st, dc in next st; repeat from * across, sc2tog across final 2 sts of row, ch 1, turn. (41)
Row 22 (WS): sc2tog, dc in next st, *sc in next st, dc in next st; repeat from * across, sc2tog across final 2 sts of row, ch 1, turn. (39)
Row 23 (RS): dc in first st, *sc in next st, dc in next st; repeat from * across, ch 1, turn. (39)
Row 24 (WS): sc in first st, *dc in next st, sc in next st; repeat from * across, ch 1, turn. (39)
Repeat rows 23 and 24 4 more times, then continue with the next section,
Begin decrease (total st count decreases by 2 with each row),
Row 33: sc2tog, dc in next st, *sc in next st, dc in next st; repeat from * across, sc2tog across final 2 sts of row, ch 1, turn. (37)
Row 34: sc2tog, dc in next st, *sc in next st, dc in next st; repeat from * across, sc2tog across final 2 sts of row, ch 1, turn. (35)
Row 35: sc2tog, dc in next st, *sc in next st, dc in next st; repeat from * across, sc2tog across final 2 sts of row, ch 1, turn. (33)
Row 36: sc2tog, dc in next st, *sc in next st, dc in next st; repeat from * across, sc2tog across final 2 sts of row, ch 1, turn. (31)
Row 37: sc2tog, dc in next st, *sc in next st, dc in next st; repeat from * across, sc2tog across final 2 sts of row, ch 1, turn. (29)
Row 38: sc2tog, dc in next st, *sc in next st, dc in next st; repeat from * across, sc2tog across final 2 sts of row, ch 1, turn. (27)
Row 39: sc2tog, dc in next st, *sc in next st, dc in next st; repeat from * across, sc2tog across final 2 sts of row, ch 1, turn. (25)
Row 40: sc2tog, dc in next st, *sc in next st, dc in next st; repeat from * across, sc2tog across final 2 sts of row, ch 1, turn. (23)
Row 41: sc2tog, dc in next st, *sc in next st, dc in next st; repeat from * across, sc2tog across final 2 sts of row, ch 1, turn. (21)
Row 42: sc2tog, dc in next st, *sc in next st, dc in next st; repeat from * across, sc2tog across final 2 sts of row, ch 1, turn. (19)
Row 43: dc in first st, sc in next st *dc in next st, sc in next st; repeat from * across, dc in final st, ch 1, turn. (19)
Row 44: sc in first st, dc in next st *sc in next st, dc in next st; repeat from * across, sc in final st, ch 1, turn. (19)
Repeat rows 43 and 44 1 more time, then repeat row 43 one more time,
Begin increase (total st count increases by 2 with each row),
Row 48: (dc, sc) in first st, *dc in next st, sc in next st; rep from * across until 2 sts remain, dc in second to last st, (sc, dc) in final st, ch 1, turn. (21)
Row 49: (dc, sc) in first st, *dc in next st, sc in next st; rep from * across until 2 sts remain, dc in second to last st, (sc, dc) in final st, ch 1, turn. (23)
Row 50: (dc, sc) in first st, *dc in next st, sc in next st; rep from * across until 2 sts remain, dc in second to last st, (sc, dc) in final st, ch 1, turn. (25)
Row 51: (dc, sc) in first st, *dc in next st, sc in next st; rep from * across until 2 sts remain, dc in second to last st, (sc, dc) in final st, ch 1, turn. (27)
Row 52: (dc, sc) in first st, *dc in next st, sc in next st; rep from * across until 2 sts remain, dc in second to last st, (sc, dc) in final st, ch 1, turn. (29)
Row 53: (dc, sc) in first st, *dc in next st, sc in next st; rep from * across until 2 sts remain, dc in second to last st, (sc, dc) in final st, ch 1, turn. (31)
Row 54: (dc, sc) in first st, *dc in next st, sc in next st; rep from * across until 2 sts remain, dc in second to last st, (sc, dc) in final st, ch 1, turn. (33)
Row 55: (dc, sc) in first st, *dc in next st, sc in next st; rep from * across until 2 sts remain, dc in second to last st, (sc, dc) in final st, ch 1, turn. (35)
Row 56: (dc, sc) in first st, *dc in next st, sc in next st; rep from * across until 2 sts remain, dc in second to last st, (sc, dc) in final st, ch 1, turn. (37)
Row 57: (dc, sc) in first st, *dc in next st, sc in next st; rep from * across until 2 sts remain, dc in second to last st, (sc, dc) in final st, ch 1, turn. (39)
Row 58: (dc, sc) in first st, *dc in next st, sc in next st; rep from * across until 2 sts remain, dc in second to last st, (sc, dc) in final st, ch 1, turn. (41)
Row 59: (dc, sc) in first st, *dc in next st, sc in next st; rep from * across until 2 sts remain, dc in second to last st, (sc, dc) in final st, ch 1, turn. (43)
Row 60: dc in first st, *sc in next st, dc in next st; repeat from * across, ch 1, turn. (43)
Row 61: sc in first st, *dc in next st, sc in next st; repeat from * across, ch 1, turn. (43)
Repeat rows 60-61 5 more times then repeat row 60 one more time.
Fasten off, and weave in ends.
Edging (worked on the right side):
Round 1: With the diaper cover laying flat, with right side up, join yarn to top, left flap, sc evenly down the side of the flap and diaper cover until you come to the end of the 10 or so rows that do not increase, sc2tog 5-6 times along the decreasing rows until you get to the crotch (this will create a slightly fitted “bottom”), then sc evenly along rest of that side, continue along the top of what will be the front of the cover, then down the other side through crotch, sc2tog 5-6 times along the decreasing rows until you get to the 10 rows that do not increase at the back of the cover, sc evenly along the rest of that side and up the flap then continue around the cover. In the corners work (sc, ch 1, sc). Join with sl st to first sc.
Round 2: ch 1, sc in each st around placing (sc, ch 1, sc) in the corners, join with sl st to first sc.
Fasten off and weave in ends.
Round 3: sl st loosely around the entire diaper cover between rounds 1 and 2.
Fasten off and weave in ends.
Sew 2 5/8” buttons to front cover about 2″ in from the sides of front. They should fit between the second row of shells and the second or third row of cross stitches. Optional: Sew three snaps to each flap in a triangle arrangement to further support the flap. Do not substitute Velcro for the snaps!
Crochet Diaper Cover Pattern Style 2 (US Terms):

Crochet Diaper Cover for Newborn – style 2:
Ch 68,
Row 1 (RS): sc in second ch from hook, sc in each remaining st of row, ch 3 (counts as first dc of row 2), turn. (67)
Row 2 (WS): sk 2 sts, 4 dc in next st, *sk 3 sts, 4 dc in next; repeat from * across, when there are 3 sts left in row, sk 2 sts, dc in final st, ch 3 (counts as first dc of row 3), turn. (16 shells, 2 dc)
Row 3 (RS): sk 2 sts, 4 dc between 2nd and 3rd dc of shell, *sk 4 sts, 4 dc between 2nd and 3rd dc of shell; repeat from * across, when there are 3 sts left in row, sk 2 sts, dc in top of ch 3, ch 2 (counts as first hdc of row 4), turn. (16 shells, 2 dc)
Row 4 (WS): hdc in next st, *ch 1, sk st, 5 hdc puff between 2nd and 3rd dc of shell, ch 1, sk st, hdc in next 2 sts; repeat from * across (note: final hdc will be worked in top of ch-3 from prev row), ch 1, turn. (16 hdc puff sts, 38 hdc)
Row 5 (RS): *sc in next 2 hdc sts, sc in ch-1 sp, sk puff st, sc in ch-1 sp; repeat from * across putting 2 sc in final st of row, ch 1, turn. (67 sc)
Row 6 (WS): sc in each st across, ch 1, turn. (67)
You will now be working on 2 different rows. Your sc sts will be worked on row 7 as normal stitches, and your FPtr2tog sts will be worked around the hdc sts you made in row 4. They should form peaks over top of the puff sts. Remember to skip a stitch when you start making the sc sts again-the FPtr2tog counts as a st so you need to make room for it!
Row 7 (RS): sc in next 3 sts, *FPtr2tog placing first leg around hdc next to first puff st from row 4, place second leg around next hdc on other side of puff st from row 4, sc in next 3 sts; repeat from * across, ch 3 (counts as first dc of row 8), turn. (16 FPtr2tog, 51sc)
Row 8 (WS): [Cross st across next 2 sts] 32 times, sk st, dc in final st of row, ch 3 (counts as first dc of next row), turn. (66)
Row 9 (RS): [Cross st across next 2 sts] 32 times, dc in top of ch 3 (counts as first dc of next row), turn. (66)
Row 10 (WS): sl st over 13 sts, ch 3, [Cross st across next 2 sts] 19 times, dc in next st, ch 3 (counts as first dc of next row), turn. (40)
Row 11 (RS): [Cross st across next 2 sts] 19 times, dc in next st. (40)
Cut yarn and fasten off. Reattach to other end of row with the right side facing you,
Row 12 (RS): sc in each st across, ch 1, turn. (40)
Row 13 (WS): sk st, FPsc in each remaining st across, ch 2 (counts as first hdc of next row) turn. (39)
Row 14 (RS): hdc in next st, *ch 1, sk st, 5 hdc puff in the next, ch 1, sk st, hdc in next st; repeat from * across, hdc in final st of row. (12 hdc, 9 puff sts)
Cut yarn and fasten off. Reattach to top of ch-2 at other end of row with the right side facing you,
Row 15 (RS): sc in next 2 hdc sts, *sc in ch-1 sp, sk puff st, sc in ch-1 sp, sc in hdc; repeat from * across, sc in final st of row, ch 1, turn. (30)
Row 16 (WS): sk st, FPsc in each remaining st across, ch 1, turn. (29)
Row 17 (RS): sc in first st, dc in next st, *sc in next st, dc in next st; repeat from * across, sc in final st, ch 1, turn. (29)
Row 18 (WS): dc in first st, sc in next st *dc in next st, sc in next st; repeat from * across, sc in final st, ch 1, turn. (29)
Repeat rows 17-18 6 more times then repeat row 17 one more time,
Begin decrease (total st count decreases by 2 with each row),
Row 30: sc2tog, *dc in next st, sc in next st; repeat from *until there are 2 sts left in row, sc2tog, ch 1, turn. (27)
Row 31: sc2tog *sc in next st, dc in next st; repeat from * until there are 2 sts left in row, sc2tog, ch 1, turn. (25)
Row 32: sc2tog *dc in next st, sc in next st; repeat from * across until there are 2 sts left in row, sc2tog, ch 1, turn. (23)
Row 33: sc2tog *sc in next st, dc in next st; repeat from * until there are 2 sts left in row, sc2tog in next st, ch 1, turn. (21)
Row 34: sc2tog *sc in next st, dc in next st; repeat from * until there are 2 sts left in row, sc2tog, ch 1, turn. (19)
Row 35: ch 1, *dc in next st, sc in next st; repeat from * across, dc in final st, turn (19)
Row 36: ch 1, *sc in next st, dc in next st; repeat from * across, sc in final st, turn. (19)
Repeat rows 35 and 36 1 more times, then repeat row 35 once more.
Begin increase (total st count increases by 2 with each row),
Row 40: (dc, sc) in first st, *dc in next st, sc in next st; rep from * across until 2 sts remain, dc in second to last st, (sc, dc) in final st, ch 1, turn. (21)
Row 41: (dc, sc) in first st, *dc in next st, sc in next st; rep from * across until 2 sts remain, dc in second to last st, (sc, dc) in final st, ch 1, turn. (23)
Row 42: (dc, sc) in first st, *dc in next st, sc in next st; rep from * across until 2 sts remain, dc in second to last st, (sc, dc) in final st, ch 1, turn. (25)
Row 43: (dc, sc) in first st, *dc in next st, sc in next st; rep from * across until 2 sts remain, dc in second to last st, (sc, dc) in final st, ch 1, turn. (27)
Row 44: (dc, sc) in first st, *dc in next st, sc in next st; rep from * across until 2 sts remain, dc in second to last st, (sc, dc) in final st, ch 1, turn. (29)
Row 45: (dc, sc) in first st, *dc in next st, sc in next st; rep from * across until 2 sts remain, dc in second to last st, (sc, dc) in final st, ch 1, turn. (31)
Row 46: (dc, sc) in first st, *dc in next st, sc in next st; rep from * across until 2 sts remain, dc in second to last st, (sc, dc) in final st, ch 1, turn. (33)
Row 47: (dc, sc) in first st, *dc in next st, sc in next st; rep from * across until 2 sts remain, dc in second to last st, (sc, dc) in final st, ch 1, turn. (35)
Row 48: (dc, sc) in first st, *dc in next st, sc in next st; rep from * across until 2 sts remain, dc in second to last st, (sc, dc) in final st, ch 1, turn. (37)
Row 49: dc in first st, *sc in next st, dc in next st; repeat from * across, ch 1, turn. (37)
Row 50: sc in first st, *dc in next st, sc in next st; repeat from * across, ch 1, turn. (37)
Repeat rows 49-50 5 more times then repeat row 50 one more time. Then begin edging,
Edging (worked on the right side):
Round 1: With the diaper cover laying flat, with right side up, join yarn to top, left flap, sc evenly down the side of the flap and diaper cover until you come to the end of the 10 or so rows that do not increase, sc2tog 5-6 times along the decreasing rows until you get to the crotch (this will create a slightly fitted “bottom”), then sc evenly along rest of that side, continue along the top of what will be the front of the cover, then down the other side through crotch, sc2tog 5-6 times along along the decreasing rows until you get to the 10 rows that do not increase at the back of the cover, sc evenly along the rest of that side and up the flap then continue around the cover. In the corners work (sc, ch 1, sc). Join with sl st to first sc.
Round 2: ch 1, sc in each st around placing (sc, ch 1, sc) in the corners, join with sl st to first sc.
Fasten off and weave in ends.
Round 3: sl st loosely around the entire diaper cover between rounds 1 and 2.
Fasten off and weave in ends.
Sew 2 5/8” buttons to front cover about 2″ in from the sides of front. They should fit between the second row of shells and the first row of cross stitches. Optional: Sew three snaps to each flap in a triangle arrangement to further support the flap. Do not substitute Velcro for the snaps!
Crochet Diaper Cover for Size 0-3 months – style 2:
Ch 84,
Row 1 (RS): sc in second ch from hook, sc in each remaining st of row, ch 3 (counts as first dc of row 2), turn. (83)
Row 2 (WS): sk 2 sts, shell in next st, *sk 3 sts, shell in next st; repeat from * across, when there are 3 sts left in row, sk 2 sts, dc in final st, ch 3 (counts as first dc of row 3), turn. (20 shells, 2 dc)
Row 3 (RS): sk 2 sts, shell between 2nd and 3rd dc of shell from prev row, *sk 4 sts, shell between 2nd and 3rd dc of shell from prev row; repeat from * across, when there are 3 sts left in row, sk 2 sts, dc in top of ch 3, ch 2 (counts as first hdc of row 4), turn. (20 shells, 2 dc)
Row 4 (WS): hdc in next st, *ch 1, sk st, 5 hdc puff between 2nd and 3rd dc of shell from prev row, ch 1 sk st, hdc in next 2 sts; repeat from * across (note: final hdc will be worked in top of ch-3 from prev row), ch 1, turn. (20 hdc puff sts, 42 hdc)
Row 5 (RS): *sc in next 2 hdc sts, sc in ch-1 sp , sk puff st, sc in ch-1 sp; repeat from * across putting 2 sc in final st of row, ch 1, turn. (83 sc)
Row 6 (WS): sc in each st across, ch 1, turn. (83)
You will now be working on 2 different rows. Your sc sts will be worked on row 7 as normal sts, and your FPtr2tog sts will be worked around the hdc sts you made in row 4. They should form peaks over top of the puff sts. Remember to skip a stitch when you start making the sc sts again-the FPtr2tog counts as a st so you need to make room for it!
Row 7 (RS): sc in next 3 sts, *FPtr2tog placing first leg around hdc next to first puff st from row 4, place second leg around next hdc on other side of puff st from row 4, sc in next 3 sts; repeat from * across, ch 3 (counts as first dc of row 8), turn. (20 FPtr2tog, 63 sc)
Row 8 (WS): [Cross st across next 2 sts] 40 times, sk st, dc in final st of row, ch 3 (counts as first dc of row 9), turn. (82)
Row 9 (RS): [Cross st across next 2 sts] 40 times, dc in top of ch 3, ch 1, turn. (82)
Row 10 (WS): sl st over 17 sts, ch 3, [Cross st across next 2 sts] 24 times, dc in next st, ch 3 (counts as first dc of next row), turn. (50)
Row 11 (RS): [Cross st across next 2 sts] 24 times, dc in next st. (50)
Cut yarn and fasten off. Reattach to other end of row with the right side facing you,
Row 12 (RS): sc in each st across, ch 1, turn. (50)
Row 13 (WS): FPsc in each st across, sc in final st, ch 2 (counts as first hdc of next row) turn. (51)
Row 14 (RS): hdc in next st, *ch 1, sk st, 5 hdc puff in the next, ch 1, sk st, hdc in next st; repeat from * across, hdc in final st of row. (15 hdc, 12 puff sts)
Cut yarn and fasten off. Reattach to other end of row with the right side facing you,
Row 15 (RS): sc in next 2 hdc sts, *sc in ch-1 sp, sk puff st, sc in ch-1 sp, sc in hdc; repeat from * across, sc in final st of row, ch 1, turn. (39)
Row 16 (WS): FPsc in each st across, ch 1, turn. (39)
Row 17 (RS): sc in first st, dc in next st, *sc in next st, dc in next st; repeat from * across, sc in final st, ch 1, turn. (39)
Row 18 (WS): dc in first st, sc in next st *dc in next st, sc in next st; repeat from * across, dc in final st, ch 1, turn. (39)
Repeat rows 17-18 7 more times, then repeat row 17 one more time,
Begin decrease (total st count decreases by 2 with each row),
Row 34: sc2tog, dc in next st, *sc in next st, dc in next st; repeat from * across, sc2tog across final 2 sts of row, ch 1, turn. (37)
Row 35: sc2tog, dc in next st, *sc in next st, dc in next st; repeat from * across, sc2tog across final 2 sts of row, ch 1, turn. (35)
Row 36: sc2tog, dc in next st, *sc in next st, dc in next st; repeat from * across, sc2tog across final 2 sts of row, ch 1, turn. (33)
Row 37: sc2tog, dc in next st, *sc in next st, dc in next st; repeat from * across, sc2tog across final 2 sts of row, ch 1, turn. (31)
Row 38: sc2tog, dc in next st, *sc in next st, dc in next st; repeat from * across, sc2tog across final 2 sts of row, ch 1, turn. (29)
Row 39: sc2tog, dc in next st, *sc in next st, dc in next st; repeat from * across, sc2tog across final 2 sts of row, ch 1, turn. (27)
Row 40 : sc2tog, dc in next st, *sc in next st, dc in next st; repeat from * across, sc2tog across final 2 sts of row, ch 1, turn. (25)
Row 41: sc2tog, dc in next st, *sc in next st, dc in next st; repeat from * across, sc2tog across final 2 sts of row, ch 1, turn. (23)
Row 42: sc2tog, dc in next st, *sc in next st, dc in next st; repeat from * across, sc2tog across final 2 sts of row, ch 1, turn. (21)
Row 43: sc2tog, dc in next st, *sc in next st, dc in next st; repeat from * across, sc2tog across final 2 sts of row, ch 1, turn. (19)
Row 44: dc in first st, sc in next st *dc in next st, sc in next st; repeat from * across, dc in final st, ch 1, turn. (19)
Row 45: sc in first st, dc in next st *sc in next st, dc in next st; repeat from * across, sc in final st, ch 1, turn. (19)
Repeat rows 44 and 45 1 more time, then repeat row 44 once.
Begin increase. Total st count increases by 2 with each row.
Row 49: (dc, sc) in first st, *dc in next st, sc in next st; rep from * across until 2 sts remain, dc in second to last st, (sc, dc) in final st, ch 1, turn. (21)
Row 50: (dc, sc) in first st, *dc in next st, sc in next st; rep from * across until 2 sts remain, dc in second to last st, (sc, dc) in final st, ch 1, turn. (23)
Row 51: (dc, sc) in first st, *dc in next st, sc in next st; rep from * across until 2 sts remain, dc in second to last st, (sc, dc) in final st, ch 1, turn. (25)
Row 52: (dc, sc) in first st, *dc in next st, sc in next st; rep from * across until 2 sts remain, dc in second to last st, (sc, dc) in final st, ch 1, turn. (27)
Row 53: (dc, sc) in first st, *dc in next st, sc in next st; rep from * across until 2 sts remain, dc in second to last st, (sc, dc) in final st, ch 1, turn. (29)
Row 54: (dc, sc) in first st, *dc in next st, sc in next st; rep from * across until 2 sts remain, dc in second to last st, (sc, dc) in final st, ch 1, turn. (31)
Row 55: (WS): (dc, sc) in first st, *dc in next st, sc in next st; rep from * across until 2 sts remain, dc in second to last st, (sc, dc) in final st, ch 1, turn. (33)
Row 56: (dc, sc) in first st, *dc in next st, sc in next st; rep from * across until 2 sts remain, dc in second to last st, (sc, dc) in final st, ch 1, turn. (35)
Row 57: (dc, sc) in first st, *dc in next st, sc in next st; rep from * across until 2 sts remain, dc in second to last st, (sc, dc) in final st, ch 1, turn. (37)
Row 58: (dc, sc) in first st, *dc in next st, sc in next st; rep from * across until 2 sts remain, dc in second to last st, (sc, dc) in final st, ch 1, turn. (39)
Row 59: (dc, sc) in first st, *dc in next st, sc in next st; rep from * across until 2 sts remain, dc in second to last st, (sc, dc) in final st, ch 1, turn. (41)
Row 60: (dc, sc) in first st, *dc in next st, sc in next st; rep from * across until 2 sts remain, dc in second to last st, (sc, dc) in final st, ch 1, turn. (43)
Row 61: dc in first st, *sc in next st, dc in next st; repeat from * across, ch 1, turn. (43)
Row 62: sc in first st, *dc in next st, sc in next st; repeat from * across, ch 1, turn. (43)
Repeat rows 61-62 5 more times, then repeat row 61 one more time. Then begin edging,
Edging (worked on the right side):
Round 1: With the diaper cover laying flat, with right side up, join yarn to top, left flap, sc evenly down the side of the flap and diaper cover until you come to the end of the 10 or so rows that do not increase, sc2tog 5-6 times along the decreasing rows until you get to the crotch (this will create a slightly fitted “bottom”), then sc evenly along rest of that side, continue along the top of what will be the front of the cover, then down the other side through crotch, sc2tog 5-6 times along the decreasing rows until you get to the 10 rows that do not increase at the back of the cover, sc evenly along the rest of that side and up the flap then continue around the cover. In the corners work (sc, ch 1, sc). Join with sl st to first sc.
Round 2: ch 1, sc in each st around placing (sc, ch 1, sc) in the corners, join with sl st to first sc.
Fasten off and weave in ends.
Round 3: sl st loosely around the entire diaper cover between rounds 1 and 2.
Fasten off and weave in ends.
Sew 2 5/8” buttons to front cover about 2″ in from the sides of front. They should fit between the second row of shells and the first row of cross stitches. Optional: Sew three snaps to each flap in a triangle arrangement to further support the flap. Do not substitute Velcro for the snaps!
I would love to see a picture when you’re done, so please feel free to come by my Facebook group and show off your project! Be sure to tag @kirstenhollowaydesigns when you share pictures of your finished diaper cover on Instagram, and use #ModernClassicDiaperCover!
You can also follow me on Facebook, Pinterest, Instagram, and Ravelry for more crochet patterns.
Pattern Terms and Conditions:
You are welcome to share the link to this pattern, using one image of your choice, on your site, but please do not share the written patterns themselves, or use additional images. You do not have permission to use my images by themselves to create pinnable graphics for Pinterest, however they may be included in a roundup pin if there are 4 or more other patterns.
This pattern was made to be used by individuals, and small business crocheters alike. Selling your finished pieces in boutiques, at farmer’s markets, craft shows, and other local events is encouraged! Please credit/link Kirsten Holloway Designs when selling finished products online. The only thing I require is that this pattern not be used commercially to produce hundreds of thousands of copies. Also, if you sell finished items online, please do not use my pictures for your listings. I’m positive that your work is of high enough quality for you to sell the finished piece. Have confidence in your abilities! <3 Thank you!
Sharing a link to this post with your friends is also always appreciated!


