
Learn how to crochet an antique style lace choker with this easy wedding pattern. Small flowers, and a pretty ribbon add vintage charm to this project. Find the free crochet pattern instructions below, or purchase a print-optimized, ad-free PDF by clicking here.
Click here to add to your Ravelry queue!

Disclaimer: This post contains affiliate links. When you purchase something using these links a small amount of the sales price goes to me to help keep this site, and the patterns on it free. You do not pay any extra for the item you purchase.
Difficulty:
Easy/Intermediate
Techniques used: surface slip stitching, picots, shells
Materials Needed:
25 yards Aunt Lydia’s #10 Thread in Natural, small amount of thread in Orchid Pink, and Olive
1.5mm hook – choker
1.4mm hook – rosette, leaves
Scissors
Yarn needle
1 yd 3/8” ribbon in pink to match rosette
2 20mm brass ribbon crimps
3 6mm brass jump rings
12mm antique brass lobster clasp
6″ brass chain
2 Needle-nose pliers for working with the jewelry fittings
Stitches Used:
sl st = slip stitch
ch = chain
sc = single crochet
dc = double crochet
Additional Terms:
Picot: ch 3, sl st back into same st
Measurements:
Child size 9 1/2” long by 1 1/4” tall (excluding jewelry fittings)
Adult size 11 1/2” long by 1 1/4” tall (excluding jewelry fittings)
Additional Notes:
-ch 1 at beginning of row or round does not count as a stitch
-If you don’t want to mess with the jewelry fittings, you can use a longer ribbon and tie it at the back of the neck instead.
-This choker includes instructions for making a child’s size choker that flower-girls can wear. Those stitch counts will be in [ ] at the end of the row.
-This choker should shrink up when you add the slip stitching details. Don’t be alarmed if it is a little longer when you first begin the pattern.
Antique Lace Wedding Choker (US Terms):
Click here to purchase an ad-free, print-optimized PDF of this pattern on LoveCrafts
Ch 106 for women, [ch 82 for kids],
Row 1: sc into second ch from hook, sc in each ch across, ch 4 (counts as dc + ch 1), turn. (105, [81])
Row 2: sk st, (dc, ch 1) in next st, *sk st (dc, ch 1) in next st; repeat from * across, ch 1, turn. (53 dc, 52 ch [41 dc, 40 ch])
Row 3: sc into first st, sc in ch-1 sp, *sc in next st, sc in ch-1 sp; repeat from * across, in ch-4 sp at the end of row work 1 sc in the ch-4 sp, and place 1 sc in the 3rd ch. (105, [81])
This next step is worked around the 2 sides and what will end up being the bottom of the choker. It is not a true row, neither is it a true round. In row 5 you will continue working down the top of row 3 making the picots at the top of the choker.
Row 4: Turn the piece sideways, sc evenly across the end (approximately 5 sc), then continue working around on the other side of the piece: sc into first 2 sts, *sk 2 sts, dc, [dc, picot] 3 times, dc in same st, sk 2 sts, sc in next st; repeat from * across, sc in final 2 sts of row, sc evenly across other end of choker, join with sl st to sc in row 3. (17 picot shells [13 picot shells],
Row 5: sc in next 3 sts, picot, sc in next 3 sts, picot; repeat from * across, sc in final 2 sts of round (35 picots, [26 picots])
Fasten off and weave in ends.

With Orchid Pink thread,
Sl st evenly between the two rows of sc at the top of the choker, around the end, between the row of sc and shells at the bottom of the choker, and up the other side.
Fasten off and weave in ends.
Assembling the choker:
Cut 3/8″ ribbon 2″ longer than your choker. Coat the ends with fray check and let dry. Working from the front side, pull ribbon up from back side, thread through row 2 starting at the second dc. Thread under the next two dc, and over the next 2 dc until you reach the end. Make sure your ribbon is coming out the back under both ends.
Thread the ribbon ends through the back side of the choker and clamp in place with ribbon crimps.
Join lobster clasp with jump ring to one end of choker.
Join 6″ chain with jump ring to other end. Join 3rd jump ring to the end of the chain. This jump ring at the end is purely decorative. If you don’t want to include it you don’t have to.
Crocheting the flower and leaf accessories:
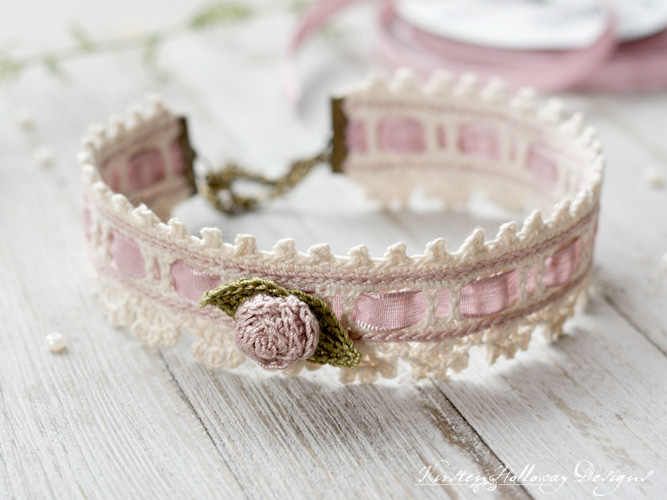
Flowers and leaves add visual appeal to your choker. You can crochet a single rosette, or put a 2 or 3 in a cluster if you want a bolder look. Tighter tension will make these accessories smaller, and more delicate looking, while using relaxed tension will yield larger embellishments.
Rosette:
With 1.4mm hook,
Ch 34,
Row 1: sc in second ch from hook and in each ch across, ch 1, turn. (33) Row 2: sl st in first st, *sk st, 5 dc in next st, sk st, sl st in next st; repeat from * across. (8 shells)
Fasten off leaving 12” tail for sewing the rose together and sewing it to the choker.
Roll up petals tightly with front side facing outward. Sew together using 12” tail. Use the rest of the tail to sew the leaves to the bottom of the rosette when you are done making them.
Leaf (make 2):
With 1.4mm hook,
Leaving 6” tail for sewing leaf to band,
Ch 10,
sl st into 2nd ch from hook and into next 8 chains,
Ch 1, continue working around other side: sc in first st, hdc in next st, dc in next 4 sts, hdc in next st, sc in next st, sl st in next st, at end of leaf work (sl st, ch 2, sl st), continue working around other side of leaf: sl st in next st, sc in next st, hdc in next st, dc in next 4sts, hdc in next st, sc in next st.
Fasten off, and weave in end.
Sew rosette to leaves with tail left over from sewing rosette together.
Sew rosette to choker with leaf tails. You may use sewing thread for this step instead if you prefer.
I would love to see a picture when you’re done, so please feel free to come by my Facebook group and show off your finished project! Be sure to tag @kirstenhollowaydesigns when you share pictures of your choker on Instagram!
You can also follow me on Facebook, Pinterest, Instagram, and Ravelry for more crochet patterns.
PATTERN TERMS AND CONDITIONS:
You are welcome to share the link to this pattern, using one image of your choice, on your site, but please do not share the written patterns themselves, or use additional images. You do not have permission to use my images by themselves to create pinnable graphics for Pinterest, since this causes confusion for the person visiting the link, however the image may be included in a roundup pin if there are 4 or more other patterns.
This pattern was made to be used by individuals, and small business crocheters alike. Selling your finished pieces in boutiques, at farmer’s markets, craft shows, and other local events is encouraged! Please credit/link Kirsten Holloway Designs when selling finished products online. The only thing I require is that this pattern not be used commercially to produce hundreds of thousands of copies. Also, if you sell finished items online, please do not use my pictures for your listings. I’m positive that your work is of high enough quality for you to sell the finished piece. Have confidence in your abilities! <3 Thank you!
Sharing a link to this post with your friends is also always appreciated!


