
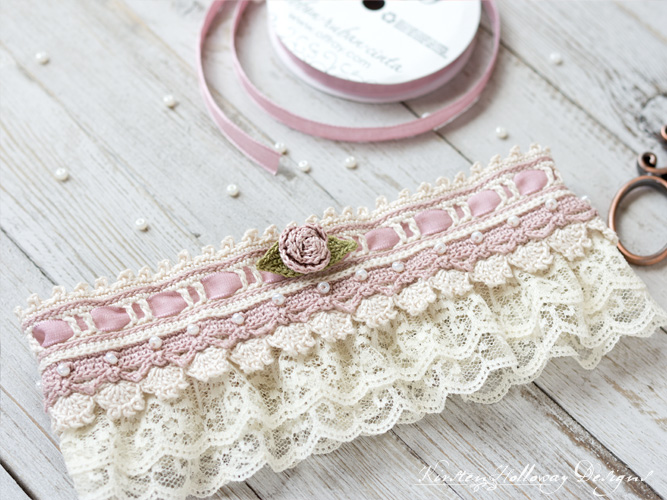
Crochet a beautiful lace wedding garter with this free pattern. It has many shells and picots giving it vintage charm. A lace ruffle can be sewn to the bottom for an ultra feminine look! Find the free crochet pattern instructions below, or purchase a print-optimized, ad-free PDF by clicking here.
Click here to add this to your Ravelry queue!
This design does require some hand sewing but the result is well worth it!
Disclaimer: This post contains affiliate links. When you purchase something using these links a small amount of the sales price goes to me to help keep this site, and the patterns on it free. You do not pay any extra for the item you purchase.
Difficulty:
Intermediate
Techniques used: surface slip stitching, picots, shells, crocheting with beads, hand sewing
Materials Needed:
35-40 yards Aunt Lydia’s #10 Thread in Natural, 10-15 yards in Orchid Pink, for the contrast stripe on the garter and flower,plus a small amount of thread in Olive for the leaves
1.5mm hook – choker
1.4mm hook – rosette, leaves
Scissors
Yarn needle
1 yard 1/2″ elastic band
1 yard 3/8” ribbon in pink
1 yard 2” ribbon in pink for satin sleeve
(Optional–if you want to make the sleeve from fabric instead of a ribbon) 1/4 yard satin fabric that matches ribbons
1 yard 2″ 2-tier lace trim in Natural
#6 or #8 Pearl Beads
Flexible beading needle
Fray check
Sewing thread to match the two main colors of the garter
Tiny sewing needle for stitching the satin sleeve to the garter
Stitches Used:
sl st = slip stitch
ch = chain
sc = single crochet
hdc = half double crochet
dc = double crochet
sk = skip
st(s) = stitch(es)
sp(s) = space(s)
Additional Terms:
Small Picot: ch 2, sl st into first ch
Picot: ch 3, sl st into first ch
Shell: 6 dc in same st
Picot shell: sk 2 sts, (2 dc, [dc, picot] 3 times, 2 dc) in same st, sk 2 sts, sc in next st
Measurements:
3 1/4″ tall with lace ruffle. XS size is 18” in circumference before elastic is added, 16” afterward. See notes below for additional sizing instructions.
Additional Notes:
-ch 1 at beginning of row or round does not count as a stitch
-The crochet part of the pattern is pretty easy, but the garter does involve a lot of hand sewing for the finishing touches. You could leave some of those off if you wanted, but it would be a much more plain design.
I attach my beads a little differently than most so they pop through on the front of the design. Please watch this video to see how I do it. Your beads will be larger than the ones I used in the video so they should sit nice and pretty right out front so everyone can see them.
How to size your garter
The garter is designed to sit at mid-thigh level on your leg. It is up to you to decide if that is where you want it to sit. Measure the circumference on your leg at this point then choose which size works best. Remember, you can always cinch the elastic in if it ends up being a little big, but this pattern doesn’t have a whole lot of give if you make it too small.
XS = starting chain: 168, fits leg circumference: 16-18″
S = starting chain: 192, fits leg circumference: 18-20.5″
M = starting chain: 216, fits leg circumference: 20.5-23″
L = starting chain: 240, fits leg circumference: 23-26″
XL = starting chain: 264, fits leg circumference: 26-28.5
2XL = starting chain: 288, fits leg circumference: 28.5-31″
If you need to make the pattern larger or smaller these notes should help you make sense of the design:
The pattern is worked in multiples of 12. Each multiple gives approximately 1.3” of length. For example, this pattern has 14 multiples of 12 which equals 168 for the XS size, and 24 multiples of 12 for the 2XL size. Try increasing by 2 multiples of 12 (24 sts=approximately 2.5″ of length) for each size larger that you want to go. (Yes, you could make a really fancy headband for babies by adjusting it down.)
Antique Wedding Set Garter Pattern (US Terms):
Click here to purchase an ad-free, print-optimized PDF of this pattern on LoveCrafts
With Natural,
Ch 168 (192, 216, 240, 264, 288), join with sl st to first ch.
Round 1: ch 1, sc in each ch around, join with sl st to first sc. (168 [192, 216, 240, 264, 288])
Round 2: ch 4 (counts as first dc + ch 1), sk st, *dc in next st, sk st; repeat from * around, join with sl st to 3rd ch. (84 [96, 108, 120, 132, 144] dc, 84 [96, 108, 120, 132, 144] ch-1 sps)
Round 3: ch 1, sc in each ch around, join with sl st to first sc. (168 [192, 216, 240, 264, 288])
Round 4: ch 1, *sc in next 3 sts, picot; repeat from * around, join with sl st to first sc. (56 [64, 72, 80, 88, 96] picots, 168 [192, 216, 240, 264, 288] sc)
Fasten off, weave in ends
Attach yarn to other side of Garter:
Round 1: ch 1, hdc in each st around, join with sl st to first hdc. (168 [192, 216, 240, 264, 288])
With Orchid Pink, string 28 (32,36, 40, 44, 48) #6 or #8 pearl beads onto your working yarn with a flexible beading needle,
Round 2: working in 3rd loop of hdc, sc in each st around, join with sl st to first sc. (168 [192, 216, 240, 264, 288])
I work my bead stitches a little different than most crocheters so that the beads pops out on the front instead of the back of the piece. Watch this video before you begin the next round if you have not done so already!
Round 3: ch 1, pull up bead in first st, sc in next 5 sts, *pull up bead in next st, sc in next 5 sts; repeat from * around, join with sl st to first sc. (168 [192, 216, 240, 264, 288])
Round 4: ch 1, hdc in each st around, join with sl st to first hdc. (168 [192, 216, 240, 264, 288])
In this next round you will be creating little triangle shapes with a tiny picot at the point, and a ch-3 which looks like a picot between each triangle. The tiny picots create a sharp point (well, they should look sharp at least). Blocking and sewing them in place after you complete the crochet part of this garter will help them live up to their full potential. Nobody likes dull picots. 😉
Round 5: *(ch 3, sl st in same st, ch 4, sl st in back into last ch made creating a tiny picot, ch 3), sk 5 sts, sl st into next st; repeat from * around, final sl st counts as join. (28 [32,36, 40, 44, 48] “triangle” shapes)
Drop Orchid Pink and fasten off.
With Natural,
Round 6: attach yarn to 3rd loop of hdc in round 4, working in 3rd loop of hdc, sc in each st around, join with sl st to first sc. (168)
Round 7: ch 1, sc in each st around, join with sl st to first sc. (168 [192, 216, 240, 264, 288])
The tiny picots you made in round 5 should line up between each picot shell in the following round. The ch-3 “picot” should fall at the center of each picot shell. If they are not, adjust your sl st count over to accommodate this.
Round 8: sl st over 5 sts, ch 1, sc in same st, *sk 2 sts, (2 dc, [dc, small picot] 3 times, 2 dc) in same st, sk 2 sts, sc in next st; repeat from* around omitting last sc in final repeat. (28 [32,36, 40, 44, 48] picot shells)
Fasten off, and weave in ends.
With Orchid Pink, sl st around garter between rounds 3 and 4,
Fasten off and weave in ends
With Orchid Pink, sl st around garter between round 1 and round 1 (this is not a typo, this is denoting round 1 on the top and round 1 on the bottom).
Fasten off and weave in ends.
You will now crochet the rosette and leaves. You can choose to have the rosette match the thread you used earlier on the lower part of your garter, or you can make the flower a different color. It would be nice to match the brides colors
Rosette:
With Orchid Pink thread and 1.4mm hook,
Ch 34,
Row 1: sc in second ch from hook and in each ch across, ch 1, turn. (33)
Row 2: sl st in first st, *sk st, 5 dc in next st, sk st, sl st in next st; repeat from * across. (8 shells)
Fasten off leaving 12” tail for sewing the rose together and sewing it to the choker.
Roll up petals tightly with front side facing outward. Sew together using 12” tail. You should have enough leftover to sew the flower and leaves to the garter a little later.
Leaf:
With Olive thread and 1.4mm hook,
Ch 10, sl st into 2nd ch from hook and into next 8 chains. Ch 1, continue working around other side: sc in first st, hdc in next st, dc in next 4 sts, hdc in next st, sc in next st, sl st in next st, at end of leaf work (sl st, ch 2, sl st), continue working around other side of leaf: sl st in next st, sc in next st, hdc in next st, dc in next 4sts, hdc in next st, sc in next st.
Fasten off, and weave in ends
Dampen the top of your garter and block round 2 so that your double crochets are wide enough for the 3/8″ ribbon to thread through them without complaint.
Assembling the Garter:
This is the time consuming part of the design. I promise that it will be worth it. I am no seamstress, and my hand-sewing skills are rudimentary at best. This was the order I put my garter together in order to try to get the best possible look, and in the interest of keeping everything as unrumpled as possible during the whole harrowing ordeal process of assembly.

1. Flip your garter inside out. Now is the perfect time to see if those ends you wove in earlier are staying put. Sew down contrasting color’s triangle picot “points” from round 5 with matching color of thread. This will help them not to flop around or curl up and hide which unassisted picots are wont to do.
2. Pin lace ruffle to sc round right above shells. Notice which direction your pins are going. Take them out and turn them around so they don’t jab the daylights out of your hand. Baste in place.
Measuring the elastic and making the satin sleeve:
1: Measure leg circumference one more time, just to make sure.
2. Cut elastic 1″ longer than leg circumference. If you are also not adept at sewing you may want to give yourself an extra inch, or 5 here–I won’t judge. You will end up overlapping the ends and sewing them together a little later on.
3. I designed this with a very rich satin fabric band. I understand not everyone enjoys poking their fingers repeatedly with a needle for fun like I seem to. If you want a very simple and easy elastic band without the hassle of sewing a satin one, follow these instructions: Pin elastic band to garter evenly below round with decorative ribbon. (Pin in 4 places: side to side, then place those sides together and mark the sides again). this will help keep your elastic even and help to ensure you don’t end up with too much, or not enough elastic at the end. We like happy endings, remember?
If you are a glutton for punishment, or really enjoy sewing, follow these instructions. Please note there are 2 levels of torture here:
Level 2 (for maximum induction of gray hairs and frown lines, but extra brownie points with future mother-in-laws):
1. Cut a rectangle shape out of cardboard 2″ wide by 1″ longer than the circumference of the garter. This is for seam allowance (for example, the XS garter is 18″ in circumference, so your fabric strip should be at least 19″ in length). You may even wish to allow yourself an extra inch or two just in case. This is not a step you want to go back and repeat, trust me.
2. Take your 1/4 yard satin fabric and lay it flat on the table wrong side up. Speak nicely to it as you smooth it out straight. Once it’s laid out straight, place the cardboard pattern you just made on top and trace the outline with a pencil–don’t breathe while doing this. Using a very sharp rotary tool, carefully follow the lines you just traced. Since they are on the back side of the fabric they’ll be hidden when you sew the tube together! If all went well you should now have a nice, semi-rectangular piece of fabric. Mine was shaped more like a parallelogram.
Level 1 (for sanity’s sake and the sake of your beautician, and all that have to come in close contact with you while you make this):
This is what I would have done had I thought of it before I was almost done doing this the first way I described above. 😬
1. Take a 2″ wide satin ribbon and cut it 1″ longer than the circumference of the garter and follow the instructions below.
See how simple that was? ONE easy step.
Assembling your satin sleeve:
1. Fold over the short side over with front sides facing and sew into a narrow tube. Leave 1/4″ for seam allowance along the edge. Dab fray check along the raw edge. Don’t let it get on any of the parts that will actually show. If using a 2″ ribbon like I highly recommend you shouldn’t need to do this step since the edges are already finished! Turn tube right-side out. This can be quite the experience in and of itself. I used a very long double-ended afghan hook to convince my sleeve to turn inside out more quickly. Once turned right side out your sleeve should measure 3/4″ across.
2. Iron flat on low heat with the seam going down the center of one of the sides. Pin the tube to the inside of the garter with the seam facing the garter. This will hide it and make the sleeve neater.
You’re coming down the home stretch (this is your reminder to stand up, stretch and get a drink of water.)
With the garter inside out, pin the satin sleeve to the garter below the bottom round of slip stitching and where you have attached the lace. Use the edge of the lace and the slip stitching as a guide to keep the sleeve straight. Using the tiniest, sharpest sewing needle you possess, use the invisible stitch to sew the sleeve to the back side of the garter. This is the same one that is demo’d in all those crafty videos–it really does work! If you don’t know which one I am talking about watch this video.
Thread elastic through sleeve. Putting a large safety pin on each end will make it so you don’t lose your elastic inside the sleeve since the elastic should be shorter than the tube. Sew the ends of the elastic together with 1-2″ of overlap depending on how tight you want your garter to fit.

Sew the ends of the satin tube together. Line up the seam with the ruffle’s seam for a more professional look.
Sew the rosette to the front of the garter on round 2. Pick only 2 dc stitches to attach it to. Do not block any other spaces or dc stitches as this is where you will weave a ribbon in the next step (it will go behind the two dc that you attach the rosette to).
Cut length of 3/8″ ribbon 1″ longer than the circumference of the garter. Thread it through round 2: Over 2, under 2. Coat the ends with fray check, then sew them together.

That’s it! You’ve completed the project! You deserve a 2 week vacation and your favorite meal (we don’t count calories after a stressful project, right?)!
Set your garter in a safe place for your big day and make a mental note to warn the bridesmaids before you throw it at the garter toss since it weighs a ton, could give someone a black eye if it hit them wrong, and probably could survive a nuclear blast with all the fray check and sewing thread that was used. 😀
Join me on social media
I would love to see a picture when you’re done, so please feel free to come by my Facebook group and show off your project! Be sure to tag @kirstenhollowaydesigns when you share pictures of your finished garter on Instagram, and use #antiqueweddingsetgarter!
You can also follow me on Facebook, Pinterest, Instagram, and Ravelry for more beautiful crochet patterns.
Pattern Terms and Conditions:
You are welcome to share the link to this pattern, using one image of your choice, on your site, but please do not share the written patterns themselves, this includes my Ravelry downloads or translations of these patterns, or use additional images. You do not have permission to use my images by themselves to create pinnable graphics for Pinterest, however they may be included in a roundup pin if there are 4 or more other patterns. If you sell finished items online, please do not use my pictures for your listings. I’m positive that your work is of high enough quality for you to sell the finished piece. Have confidence in your abilities! <3 Thank you!
This pattern was made to be used by individuals, and small business crocheters alike. Selling your finished pieces in boutiques, at farmer’s markets, craft shows, and other local events is encouraged! The only thing I require is that this pattern not be used commercially to produce hundreds of thousands of copies.
If you enjoyed this pattern or found it useful, why not share a link to this post with your friends?


