This elegant 12 inch afghan block square has a simple center edged with a pretty flower petal design along the edge. Use it as a contrast square to tone down a highly textured blanket, or by itself to create an afghan that is beautiful and unique. Find the free crochet pattern instructions below, or purchase a print-optimized, ad-free PDF by clicking here.
Click here to add this to your Ravelry Queue!
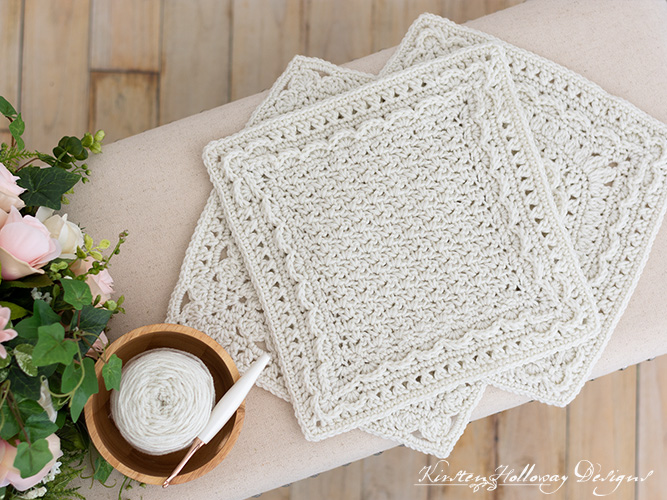
When I created the original Secret Garden square set I didn’t realize the crochet patterns would be so popular that they would need an add-on the following week, but here we are! 😄 To off-set the beautiful lacy details of those squares I have created a more basic square to act as “negative space” to let the eyes rest from looking at all the loveliness of the flowers. Because of that this 12 inch square has been affectionately nicknamed the “garden plot” square because it’s got a very basic stitch texture in the place where all the flower details were in the other squares, and it mimics what is there in a real garden before the flowers grow! (We crochet designers do try to be clever in naming patterns sometimes…🤭 )
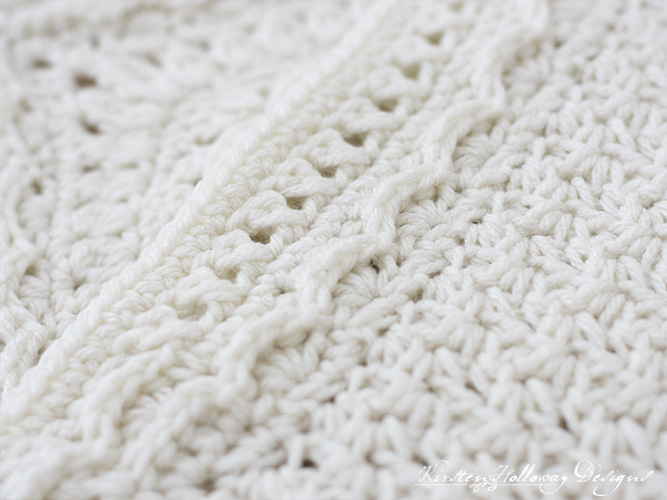
The center of the square is crocheted using the Wattle Stitch which is very quick and easy to master: it’s crocheted just like a V-stitch–only lopsided because it has a sc as one of the “legs”. The outer edges pick up the same floral details that the second square in my Secret Garden series uses. You will need to know how to crochet post stitches, cross stitches, and shells. If you have crocheted the second version of the Secret Garden square pattern this part should be a breeze.
I never get tired of looking at that beautiful crochet texture!

I used Red Heart With Love in “Eggshell” for this square because of how elegant it looks. Bonus: it’s very soft and has a nice drape. I can imagine this square combined with the other 2 in the series to create the most beautiful wedding blanket for a special couple!
Disclaimer: This post contains affiliate links. When you purchase something using these links a small percentage of the sales price goes to me. However, you do not pay any extra for the item you purchase.
Difficulty:
Easy/Intermediate
Techniques used: post stitches, shell stitches, cross stitches, 3dc cluster stitches
Materials Needed:
5mm (H) hook, or hook needed to obtain gauge
135-150 yds #4 worsted weight Red Heart With Love in Eggshell, or the color of your choice.
Yarn needle
Scissors
(Optional) Stitch markers
Stitches Used:
ch = chain
sl st = slip stitch
sc = single crochet
dc = double crochet
BPsc = back post single crochet
BPhdc = back post half double crochet
BPdc = back post double crochet
Additional Terms:
Cross Stitch = sk st, dc in next st, cross over st just made, dc in skipped st.
sk = skip
st/sts = stitch/stitches
sp/sps = space/spaces
prev = previous
Gauge:
Center of square should measure 7 1/2″ by 7 1/2″ before edging section is started.
Measurements:
12″ x 12″ when finished
Additional Notes:
-ch 1 at beginning of row or round does not count as a stitch.
-See notes in pattern for more information.
Secret Garden Square: New Beginnings (US Terms):
Click here to purchase an ad-free, print-optimized PDF of this pattern on LoveCrafts
Leaving 12” tail (for minimizing the gap between the chain row and the first row of the Wattle Stitch), Ch 27,
Row 1: sc in 2nd ch from hook, (sc, ch 1, dc) in next st, sk 2 sts * (sc, ch 1, dc), sk 2 sts; repeat from * across, sc in final st of row, ch 1, turn. (8 wattle stitches, 2 sc)
Row 2: sc in first st, sk st, (sc, ch 1, dc in ch-1 sp), sk 2 sts; repeat from * across, skip only 1 st on final repeat, sc in final sc of row, ch 1, turn. (8 wattle stitches, 2 sc)
Gauge check: your piece should measure 7 1/2” wide.
Repeat row 2 17 times, or until you have a square that measures 7 1/2 ”-7 1/2”.
You will now begin the edging for the center of the square. Work stitches as evenly as you can along the raw edges. The first edging round is probably the most challenging part of the whole square since I’m relying on you to figure out the spacing. I had 18 rows of the Wattle stitch and worked a sequence alternating 2 sc in next st, sc in next st along the raw edges of the square (the ch-1 turning ch typically got 1 sc stitch while the sc at the end of each row got 2 sc stitches worked into the side). The most important thing with this section is that you end up with 28 sts on each side. Work a ch-2 to turn the corners.
Edging:
(Fun Fact: This edging should work on any blanket that is worked in multiples of 4)
Round 1: side 1: 2 sc in first st, sc in next 24 sts, 2 sc in final st, (28 sts made), ch 2, side 2: evenly space 28 sc along raw edge, ch 2, side 3: 2 sc in first st, sc in next 25 sts, 2 sc in final st of row, ch 2, side 4: 2 sc in first st, evenly space 26 more sts along raw edge, ch 2 (this will be your corner space), join with sl st to first sc. (28 sc on each side, 4 ch-2 sps)
Round 2: ch 1, hdc in same st as join, hdc in next st, *sl st in next st, [sk st, 4 dc in next st, sk st, sl st in next st] 6 times (6 shells made), *ch 1, hdc in same st as last sl st worked, hdc in next st, (2 hdc, ch 1, 2 hdc) in ch-2 sp, (corner mad) hdc in each of the next 2 sts (Note: the first st is easy to miss so push back the 2 hdc sts just made so you don’t accidentally skip over it); repeat from * around, omitting last 2 hdc sts in final repeat, join with sl st to first hdc. (24 shells, 32 hdc)
Round 3: ch 1, BPsc around each of the next 2 hdc, *work the following sts across each shell: BPhdc around first st, BPsc around next 2 sts, BPhdc around next st, move to next shell] 6 times, *BPsc around next 4 sts, (sc, ch 1, sc) in ch-1 sp, BPsc around next 4 sts; repeat from * around omitting last 2 BPsc in final repeat, join with sl st to first BPsc. (34 sts each side, 4 ch-1 sps)
Round 4: sl st over 1 to first BPhdc of prev round, ch 1, *sc in next 24, sts, *sk st, 4 dc in next st, sk st, sl st in next st, sk st, 6 dc in ch-1 sp, sk st (Note: this stitch will be hiding under the 6dc so don’t accidentally skip 2 stitches here), sl st in next st, 4 dc in next st, sk st; repeat from * around, join with sl st to first sc. (96 sc, 8 4dc shells, 4 6dc shells)
Begin your first cross stitch of the round in the same stitch as join.
Round 5: ch 1, *cross stitch across next 24 sts (12 cross stitches made), * BPdc around next st, BPhdc around next 2 sts, BPdc around next 3 sts, BPhdc around next st, ch 1, BPhdc around next st, BPdc around next 3 sts, BPhdc around next 2 sts, BPdc around next st; repeat from * around, join with sl st to first sc.
Round 6: ch 1, sc in each st around, (sc, ch 1, sc) in each corner, join with sl st to first sc. (40 sts per side)
Fasten off, and weave in ends.
Use 12″ tail to sew the original chain and the first row of the Wattle Stitch together so there isn’t so much of a gap.
Block if desired.
Want more gorgeous crochet patterns, and a little encouragement for your day? Sign up for my newsletter here! That way you’ll never miss out on special events, or freebies I’m offering.
JOIN ME ON SOCIAL MEDIA
I would love to see a picture when you’re done, so please feel free to come by my Facebook group and show off your finished project! Be sure to tag @kirstenhollowaydesigns when you share pictures of your squares on Instagram!
You can also follow me on Facebook, Pinterest, Instagram, and Ravelry for more beautiful crochet patterns.
PATTERN TERMS AND CONDITIONS:
You are welcome to share the link to this pattern, using one image of your choice, on your site, but please do not share the written patterns themselves, this includes my Ravelry downloads or translations of these patterns, or use additional images. You do not have permission to use my images by themselves to create pinnable graphics for Pinterest, however they may be included in a roundup pin if there are 4 or more other patterns. If you sell finished items online, please do not use my pictures for your listings. I’m positive that your work is of high enough quality for you to sell the finished piece. Have confidence in your abilities! <3 Thank you!
This pattern was made to be used by individuals, and small business crocheters alike. Selling your finished pieces in boutiques, at farmer’s markets, craft shows, and other local events is encouraged! Please credit/link Kirsten Holloway Designs when selling finished products online. The only thing I require is that this pattern not be used commercially to produce hundreds of thousands of copies.
If you enjoyed this pattern or found it useful, why not share a link to this post with your friends?
“He hath made every thing beautiful in his time: also he hath set the world in their heart, so that no man can find out the work that God maketh from the beginning to the end.” Ecclesiastes 3:11


Hi Kirsten,
I love the crochet pattern, it is beautiful! I bought both patterns yesterday. I know this is my error, but I am having a hard time getting the measurement right on this. I have had to go up to a 9mm hook and it just doesn’t look very good, I know I crochet tighter than most, but this seems excessive. lol
My other issue is on row one I finish with 9 waddle stitches. I know it is my error, just hoping you can give me words of wisdom.
Thanks so much,
Kathleen
Hi Kathleen,
I’m sorry you are having trouble with this square. What kind of yarn are you using? Having to go up to a 9mm hook makes me wonder if your yarn is quite a bit thinner than the kind I used. If you are coming up with more Wattle stitches it may be because you did not skip enough chains at the beginning or between each wattle stitch. I hope this helps!
This block looks exquisite. I cannot wait to try it.
Hi Kirsten 😊 absolutely love this sqare and i’m desperate to make it. But, i’m currently making a blanket for the MIL and it would go perfectly. Is there anyway i can make it smaller (6×6) ? Can i skip any rounds to halve it? Do you have a video tutorial at all? Thank you so much for sharing 🤗
You can make it smaller if you use a #1 or #2 yarn and a smaller hook to crochet the pattern with. I don’t know if the square will be exactly 6″, but it should be significantly smaller than 12″x12″. Good luck! 😊
I love this square! although for some reason even using a 5.5, I am coming out to only 6 1/2 inches across for the middle, not sure why.
Kathleen,
You may need to go up another hook size. I have pretty relaxed tension. 😅 I hope that works!
Hi I’m making your square patterns (all five ) to make a quilt and I have a question about this one… you say the center wattle stitch section should be 7.5*7.5 but mine is only measuring 7 ? I’m using worsted weight cotton yarn and a 5mm hook the first two squares I made came out the exact right size
I’d recommend you go up a hook size for this part of the square and see if that gets you to the correct measurements. You can go back to the 5mm hook for the rest of the project. 😊
Hello, this square is beautiful. I’d like to make it. The English text is difficult for me. Don’t have a cartoon procedure? Thank you Šárka from Czech Republic
Hi Śărka,
Im sorry, I do not have a chart or diagram available. I only have the written instructions for this pattern.
Hi Kirsten
I am loving making secret garden and this addition is perfect
Thank you for creating such wonderful patterns
You’re welcome, Jo! I’m glad you are having fun crocheting these squares. 😊
Just started a secret garden square, love the pattern! Learned a few things. Thanks for the addition .
You’re welcome! I’m so glad you liked the crochet pattern!
Do you have any Afghan patterns that are made with crochet thread like doilies are crocheted with. I have a new great-granddaughter and I would like to make her an afghan out of thread. Thanks. Marian Warner
Marian,
Unfortunately I do not because my hands won’t hold up to that much crocheting with thread. However, You are welcome to take any of my afghan squares and crochet them with #10 thread and a 1.5mm hook. I bet they would turn out very cute! 😁 I’d love to see a picture of such a project if you ever decide to take it on!
Just found my new winter project!
This is STUNNING!
Have fun crocheting your new afghan! 😁