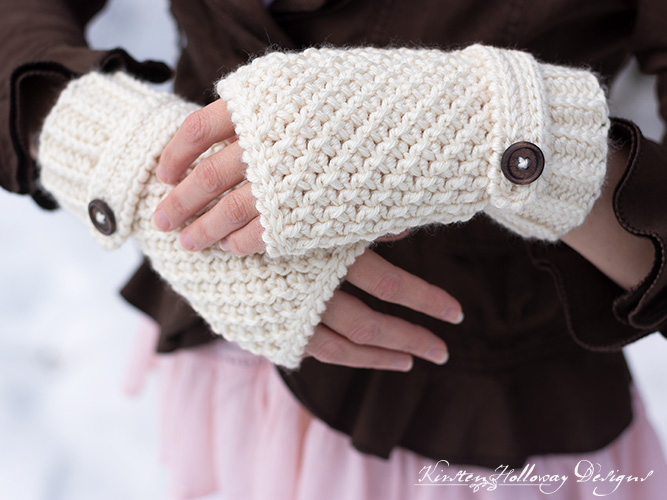
Keep your hands warm in cool weather with these gorgeous fingerless gloves. The crochet pattern comes in 3 sizes and will fit toddlers, kids, and teen/adults. The wrist strap with buttons adds an extra touch of class and style to the design. Find the free crochet pattern instructions below, or purchase a print-optimized, ad-free PDF by clicking here.
Click here to add this to your Ravelry queue!
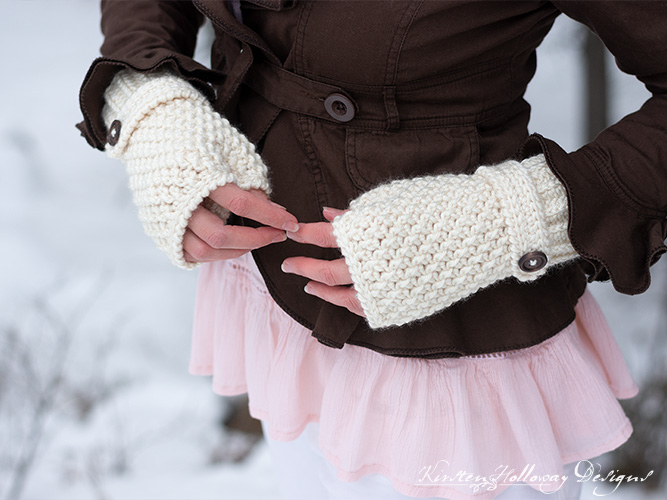
Not everyone is in the dead of winter like I am, so I hope it’s not too early to start breaking out the fingerless gloves designs for you to crochet! These stylish hand warmers look complicated, but the stitches are really quite basic. The majority of the mitt is just FPdc and sc stitches alternated. I’ve listed all the stitches used before the pattern begins so you can make sure you understand what is required.

I love how the off-white yarn gives these hand warmers an elegant feel. From certain angles this stitch pattern takes on a diagonal design that gives these fingerless mitts their understated, but still eye-catching, look.
Make it a set with the matching double seed stitch slouch hat pattern that also comes in 3 sizes.
Want convertible mittens in this design instead? Find that pattern over here!

Because of the simplicity of the stitch design these mitts can work for boys as well. I made a toddler size test pair in a heathered grey, and I’m sure these could look nice for church or some other special occasion. Paired with a wool pea coat and newsboy hat, I think you’d have something that’s classy and comfortable for little ones.
Disclaimer: This post contains affiliate links. When you purchase something using these links a small amount of the sales price goes to me to help keep this site, and the patterns on it free. You do not pay any extra for the item you purchase.
Difficulty:
Easy/Intermediate
Techniques used: half-double crochet in the 3rd loop, reverse single crochet, surface slip stitching, front post double crochet, and single crochet 2 together.
Materials Needed:
75, 110, 180 yards #4 worsted weight Red Heart Soft in the color of your choice.
3.75mm hook (band)
5mm hook, or hook needed to obtain gauge (body)
Yarn needle
Scissors
2 20mm buttons – child and adult sizes (optional)
4 3/8″ buttons – toddler size (optional)
Stitch Markers
Stitches used:
sl st = slip stitch
sc = single crochet
hdc = half double crochet
dc = double crochet
sc2tog = single crochet 2 together
FPdc = front post double crochet
rsc = reverse single crochet (crab stitch)
Additional Terms:
hdc in the 3rd loop = Look at the top of the stitch, and locate the sideways “V”, bend the stitch to look at the back, and you should see another “V”. You’ll be working into the back loop of that “V”, this is called the 3rd loop.
st/sts = stitch/stitches
prev = previous
Measurements:
Toddler (2-4 yrs) Fingerless Mitt: 3 1/2” wide at widest point, by 4 1/2” long
Child (6-9 yrs) Fingerless Mitt: 4″ wide at widest point, by 5 1/4″ long
Adult Fingerless Mitt: 4 1/2” wide at widest point, by approximately 6” long.
Gauge:
Alternating FPdc in next st, sc in next st: 7 sts in 2” using 5mm hook. 12 rows of the same stitch gives 4” of height.
Additional Notes:
-Ch 1 at beginning of round does not count as a stitch.
-This pattern can be made longer or shorter based on your preference. After you have done a few rounds the stitch pattern should be fairly evident and you can add more rounds on the finger opening if needed.
-Pull your joins snug to minimize the seam.
–If you need an in-between size for your 5 and 6 yr olds: try crocheting the toddler pattern with a hook size larger, or crochet the kid’s size with a hook size smaller than what I have called for, or what it takes you to meet gauge.
Double Seed Stitch Mitts (US Terms):
Toddler (2-4 YRS) Fingerless Mitts Pattern (make 2):
Wrist band:
This makes a short 1 1/8” wide wrist band.
With 3.75mm hook,
Row 1: Leaving a 6″ tail, ch 6, hdc in 2nd ch from hook, hdc in each st across. (5)
Rows 2-18: ch 1, turn, working in 3rd loop of hdc from prev row, hdc in each st across. (5)
The band should measure about 6” long by approximately 1 1/8” wide and wrap comfortably around the child’s wrist.
Fold band in half and join row 18 to row 1 with a sl st.
Sew ends of band together with 6” tail.
Fingerless mitt body:
Using 5mm (H) hook, working along side of band,
Round 1: ch 1, sc in each st around, join with sl st to first sc (place stitch marker in sl st). (18)
Round 2: ch 1, sc in first st, FPdc around same st, sc in next st, *FPdc around next st, sc in next st; repeat from * around, dc in sl st where st marker is, join with sl st to first sc. (20)
Round 3: ch 1, FPdc around first st, *sc in next st, FPdc around next st; repeat from *around, join with sl st to first FPdc (place stitch marker in sl st). (20)
Round 4: ch 1, dc in top of first st, sc in same st, FPdc around next st, *sc in next st, FPdc around next st; repeat from * around, sc in sl st where stitch marker is, join with sl st to first dc. (22)
Round 5: ch 1, sc in first st, FPdc around next st, *sc in next st, FPdc around next st; repeat from * around, join with sl st to first sc (place stitch marker in sl st). (22)
Round 6: ch 1, sc in first st, FPdc around same st, sc in next st, *FPdc around next st, sc in next st; repeat from * around, dc in sl st where stitch marker is, join with sl st to first sc. (24)
Round 7: ch 1, FPdc around first st, sc in next st, *FPdc around next st, sc in next st; repeat from *around, join with sl st to first FPdc (place stitch marker in sl st). (24)
We will now make the thumb hole. Your thumb hole should take up 6 stitches. We’ll come back and add the thumb after we complete the body of the mitten. Slip stitches are not included in end of round counts for the following round.
Round 8: sl st over 3 sts, ch 1, [FPdc around sc, sc in next st] 9 times, sk 3 sts, join with sl st to first FPdc. (18)
Round 9: ch 1, sc in first st, FPdc around next st, *sc in next st, FPdc around next st; repeat from * around, join with sl st to first sc. (18)
If you want a slightly longer mitt you may add the next round. Otherwise, move on to the trim.
Round 10: ch 1, FPdc around first st, sc in next st, *FPdc around next st, sc in next st; repeat from * around, join with sl st to first FPdc. (18)
Trim:
With 3.75mm hook,
Round 1: ch 1, rsc in each st around.
With 5mm hook, continuing to work in the reverse direction,
Round 2: sl st loosely along outside of glove between round 1 of the trim and the last round of the body of the mitt.
Fasten off, and weave in ends.
Thumb:
You will first work a sc2tog to close the gap that resulted from creating the thumb hole in round 8. The first part of the sc2tog will be worked in the sc and the dc where your stitch markers are. This sc2tog just serves to fill a gap and will be skipped in round 2 of the thumb.
Attach yarn to bottom of thumb hole closest to the body of the fingerless mitt,
Round 1: ch 1, sc2tog to close gap in round 8 of fingerless mitt body, FPdc around sc, *sc in next st, FPdc around next sc; repeat from * around, join with sl st to first sc2tog. (7)
With 3.75mm hook,
Round 2: ch 1, rsc in each st around.
Round 3: with 5mm hook, sl st loosely along outside of thumb between round 1 and round 2.
Fasten off, and weave in ends.

Wrist Strap:
With 3.75mm hook, leaving 6″ tail, ch 12,
Round 1: sc in 2nd ch from hook (place st marker in skipped ch) and in next 10 sts, 3 sc in final st of row, continue working sc down around other side in the next 10 sts, in ch-1 turning chain (with stitch marker) at end of row work 2 sc, join with sl st to first sc.
Using tight tension,
Round 2: ch 1, rsc in each st and ch-1 sp around.
Using relaxed tension, and continuing to work in the reverse direction,
Round 3: sl st in each st around between rounds 1 and 2.
Fasten off leaving a 6″ tail.
Center button strap on front of mitt just below wrist band. Sew to mitt with 6″ tails. You may sew a small ⅜” button onto each end of the strap.
Weave in all ends.
Repeat these instructions for second fingerless mitt.
Child (6-9 yrs) Fingerless Mitts Pattern (make 2):
Wrist band:
This makes a short 1 1/4” wide wrist band.
With 3.75mm hook,
Row 1: Leaving a 6″ tail, ch 7, hdc in 2nd ch from hook, hdc in each st across. (6)
Rows 2-20: ch 1, turn, working in 3rd loop of hdc from prev row, hdc in each st across. (6)
The band should measure about 6 1/2” long by approximately 1 1/4” wide and wrap comfortably around the child’s wrist.
Fold band in half and join row 20 to row 1 with a sl st.
Sew ends of band together with 6” tail
Fingerless mitt body:
Using 5mm (H) hook, working along side of band,
Round 1: ch 1, sc in each st around, join with sl st to first sc (place stitch marker in sl st). (20)
Round 2: ch 1, sc in first st, FPdc around same st, sc in next st, *FPdc around next st, sc in next st; repeat from * around, dc in sl st where st marker is, join with sl st to first sc. (22)
Round 3: ch 1, FPdc around first st, sc in next st, *FPdc around next st, sc in next st; repeat from *around, join with sl st to first FPdc (place stitch marker in sl st). (22)
Round 4: ch 1, dc in top of first st, sc in same st, FPdc around next st, *sc in next st, FPdc around next st; repeat from * around, sc in sl st where stitch marker is, join with sl st to first dc. (24)
Round 5: ch 1, sc in first st, FPdc around next st, *sc in next st, FPdc around next st; repeat from * around, join with sl st to first sc (place stitch marker in sl st). (24)
Round 6: ch 1, sc in first st, FPdc around same st, sc in next st, *FPdc around next st, sc in next st; repeat from * around, dc in sl st where stitch marker is, join with sl st to first sc. (26)
Round 7: ch 1, FPdc around first st, sc in next st, *FPdc around next st, sc in next st; repeat from *around, join with sl st to first FPdc (place stitch marker in sl st). (26)
Round 8: ch 1, dc in top of first st, sc in same st, FPdc around next st, *sc in next st, FPdc around next st; repeat from * around, sc in sl st where stitch marker is, join with sl st to first dc. (28)
Round 9: ch 1, sc in first st, FPdc around next st, *sc in next st, FPdc around next st; repeat from * around, join with sl st to first sc (place stitch marker in sl st). (28)
Round 10: ch 1, sc in first st, FPdc around same st, sc in next st, *FPdc around next st, sc in next st; repeat from * around, dc in sl st where stitch marker is, join with sl st to first sc. (30)
We will now make the thumb hole. Your thumb hole should take up 8 stitches. We’ll come back and add the thumb after we complete the body of the mitt. Slip stitches are not included in end of round counts for the following round.
Round 11: sl st over 4 sts, ch 1, [FPdc around sc, sc in next st] 11 times, sk 4 sts, join with sl st to first FPdc. (22)
Round 12: ch 1, sc in first st, FPdc around next st, *sc in next st, FPdc around next st; repeat from * around, join with sl st to first sc. (22)
Round 13: ch 1, FPdc around first st, sc in next st, *FPdc around next st, sc in next st; repeat from * around, join with sl st to first FPdc. (22)
If you want a slightly longer mitt you may repeat round 12 again. Otherwise, move on to the trim.
Trim:
With 3.75mm hook,
Round 1: ch 1, rsc in each st around.
With 5mm hook, continuing to work in the reverse direction,
Round 2: sl st loosely along outside of glove between round 1 of the trim and the last round of the body of the mitt.
Thumb:
You will first work a sc2tog to close the gap that resulted from creating the thumb hole in round 13. The first part of the sc2tog will be worked in the sc and the dc where your stitch markers are. This sc2tog just serves to fill a gap and will be skipped in round 2 of the thumb.
Attach yarn to bottom of thumb hole closest to the body of the fingerless mitts,
Round 1: ch 1, work sc2tog in top of sc and top of dc from round 13 to close gap from that round, FPdc around sc, *sc in next st, FPdc around next sc; repeat from * around, join with sl st to first sc2tog. (9)
With 3.75mm hook,
Round 2: ch 1, rsc in next 8 sts, sk sc2tog st, join. (8)
With 5mm hook, continuing to work in the reverse direction,
Round 3: sl st loosely along outside of thumb between round 1 and round 2.
Fasten off, and weave in ends.
Wrist strap:
With 3.75mm hook, leaving 6″ tail, ch 14,
Round 1: sc in 2nd ch from hook (place st marker in skipped ch) and in next 12 sts, 3 sc in final st of row, continue working sc down around other side in the next 13 sts, in ch-1 turning chain (with stitch marker) at end of row (ch 1, 2 sc, ch 1), join with sl st to first sc.
Round 2: ch 1, rsc in each st and ch-1 sp around.
With 5mm hook, continuing to work in the reverse direction,
Round 3: sl st in each st around between rounds 1 and 2.
Fasten off leaving an 8″ tail.
Position end of button strap on top of wrist near seam. Sew to mitt with 8″ tail. Tack other end of button strap to opposite side of mitt with 6″ tail. Use this same tail to sew a 20mm button on about ½” to ¾” from the end of the strap. Remember, your left and right mitts will have the straps attach on opposite sides of the mitts.
Adult Fingerless Mitts Pattern (make 2):
Wrist band:
This makes a short 1 1/2” wrist band.
With 3.75mm hook,
Row 1: Leaving a 6″ tail, ch 8, hdc in 2nd ch from hook, hdc in each st across. (7)
Rows 2-22 (24): ch 1, turn, working in 3rd loop of hdc from prev row, hdc in each st across. (7)
The smaller, 22 row wrist band should measure 7” long.
The larger, 24 row wrist band should measure 8” long. Fold band in half and join row 22 (24) to row 1 with a sl st.
Sew ends of band together with 6” tail.
Mitt body:
Pick the round 1 Instructions based on which wrist band you made. You should end up with 24 sc after round 1 either way.
Using 5mm (H) hook, working along side of band,
Round 1 (smaller wrist band): ch 1, 2 sc in first st, sc in each st around, 2 sc in final st, join with sl st to first sc (place stitch marker in sl st). (24)
Round 1 (larger wrist band): ch 1, sc in each st around, join with sl st to first sc (place stitch marker in sl st). (24)
Round 2: ch 1, sc in first st, FPdc around same st, sc in next st, *FPdc around next st, sc in next st; repeat from * around, dc in sl st where st marker is, join with sl st to first sc. (26)
Round 3: ch 1, FPdc around first st, sc in next st, *FPdc around next st, sc in next st; repeat from *around, join with sl st to first FPdc (place stitch marker in sl st). (26)
Round 4: ch 1, dc in top of first st, sc in same st, FPdc around next st, *sc in next st, FPdc around next st; repeat from * around, sc in sl st where stitch marker is, join with sl st to first dc. (28)
Round 5: ch 1, sc in first st, FPdc around next st, *sc in next st, FPdc around next st; repeat from * around, join with sl st to first sc (place stitch marker in sl st). (28)
Round 6: ch 1, sc in first st, FPdc around same st, sc in next st, *FPdc around next st, sc in next st; repeat from * around, dc in sl st where stitch marker is, join with sl st to first sc. (30)
Round 7: ch 1, FPdc around first st, sc in next st, *FPdc around next st, sc in next st; repeat from *around, join with sl st to first FPdc (place stitch marker in sl st). (30)
Round 8: ch 1, dc in top of first st, sc in same st, FPdc around next st, *sc in next st, FPdc around next st; repeat from * around, sc in sl st where stitch marker is, join with sl st to first dc. (32)
Round 9: ch 1, sc in first st, FPdc around next st, *sc in next st, FPdc around next st; repeat from * around, join with sl st to first sc (place stitch marker in sl st). (32)
Round 10: ch 1, sc in first st, FPdc around same st, sc in next st, *FPdc around next st, sc in next st; repeat from * around, dc in sl st where stitch marker is, join with sl st to first sc. (34)
Round 11: ch 1, FPdc around first st, sc in next st, *FPdc around next st, sc in next st; repeat from *around, join with sl st to first FPdc (place stitch marker in sl st). (34)
Round 12: ch 1, dc in top of first st, sc in same st, FPdc around next st, *sc in next st, FPdc around next st; repeat from * around, sc in sl st where stitch marker is, join with sl st to first dc. (36)
We will now make the thumb hole. Your thumb hole should take up 10 stitches. We’ll come back and add the thumb after we complete the body of the mitt. Slip stitches are not included in end of round counts for the following round.
Round 13: sl st over 5 sts, ch 1, place stitch marker in sc (this will be from round 12), [FPdc around sc, sc in next st] 13 times, on final time place st marker in same st as last sc was worked (this will also be a FPdc from round 12), sk 5 sts, join with sl st to first FPdc. (26)
Round 14: ch 1, sc in first st, FPdc around next st, *sc in next st, FPdc around next st; repeat from * around, join with sl st to first sc. (26)
Round 15: ch 1, FPdc around first st, sc in next st, *FPdc around next st, sc in next st; repeat from * around, join with sl st to first FPdc. (26)
If you want a slightly longer mitt you may repeat round 14 again. Otherwise, move on to the trim.
Trim:
With 3.75mm hook,
Round 1: ch 1, rsc in each st around.
Round 2: with 5mm hook, sl st loosely along outside of glove between round 1 of the trim and the last round of the body of the mitt.
Thumb:
You will first work a sc2tog to close the gap that resulted from creating the thumb hole in round 13. The first part of the sc2tog will be worked in the sc and the dc where your stitch markers are. This sc2tog just serves to fill a gap and will be skipped in round 2 of the thumb.
Attach yarn to bottom of thumb hole closest to the mitten body,
Round 1: ch 1, work sc2tog in top of sc and top of dc from round 13 to close gap from that round, FPdc around sc, *sc in next st, FPdc around next sc; repeat from * around, join with sl st to first sc2tog. (11)
Round 2: ch 1, sk sc2tog st, *sc in next st, FPdc around next st; repeat from * around, join with sl st to first sc. (10)
With 3.75mm hook,
Round 3: ch 1, rsc in each st around, join.
With 5mm hook, continuing to work in the reverse direction,
Round 4: sl st loosely along outside of thumb between round 2 and round 3.
Fasten off, and weave in ends.
Wrist strap:
with 5mm hook, leaving 6″ tail, ch 19,
Round 1: sc in 2nd ch from hook (place st marker in skipped ch) and in next 16 sts, 3 sc in final st of row, continue working sc down around other side in the next 17 sts, in ch-1 turning chain (with stitch marker) at end of row (ch 1, 2 sc, ch 1), join with sl st to first sc.
With 3.75mm hook,
Round 2: ch 1, rsc in each st and ch-1 sp around.
With 5mm hook, continuing to work in the reverse direction,
Round 3: sl st in each st around between rounds 1 and 2.
Fasten off leaving an 8″ tail.
Position end of button strap on top of wrist near seam. Sew to mitt with 8″ tail. Tack other end of button strap to opposite side of mitt with 6″ tail. Use this same tail to sew a 20mm button on about ½” to ¾” from the end of the strap. Remember, your left and right mitts will have the straps attach on opposite sides of the mitts.
Weave in all ends.
Want more gorgeous crochet patterns, and a little encouragement for your day? Sign up for my newsletter here! That way you’ll never miss out on special events, or freebies I’m offering.
JOIN ME ON SOCIAL MEDIA
I would love to see a picture when you’re done, so please feel free to come by my Facebook group and show off your finished project! Be sure to tag @kirstenhollowaydesigns when you share pictures of your project on Instagram!
You can also follow me on Facebook, Pinterest, Instagram, and Ravelry for more beautiful crochet patterns.
PATTERN TERMS AND CONDITIONS:
You are welcome to share the link to this pattern, using one image of your choice, on your site, but please do not share the written patterns themselves, this includes my Ravelry downloads or translations of these patterns, or use additional images. You do not have permission to use my images by themselves to create pinnable graphics for Pinterest, however they may be included in a roundup pin if there are 4 or more other patterns. If you sell finished items online, please do not use my pictures for your listings. I’m positive that your work is of high enough quality for you to sell the finished piece. Have confidence in your abilities! <3 Thank you!
This pattern was made to be used by individuals and small business crocheters alike. Selling your finished pieces in boutiques, at farmer’s markets, craft shows, and other local events is encouraged! Please credit/link Kirsten Holloway Designs when selling finished products online. The only thing I require is that this pattern not be used commercially to produce hundreds of thousands of copies. If you enjoyed this pattern or found it useful, why not share a link to this post with your friends?


Leave a Reply