A cute, all-purpose crossbody bag that works for just about any occasion and time of year! This free crochet pattern uses 12″ squares to create a unique looking tote that will work as a project bag or purse.
Click here to add this pattern to your Ravelry queue!

I’ve wanted to design a bag from 12″ squares for quite a while but wasn’t sure how I wanted the squares to look. I needed something that would have some fun texture and still be functional. Enter this gorgeous messenger-style “Written On My Heart” crossbody crochet bag which is a mash-up of shabby-chic meets elegance. This pattern does require a bit of sewing, but the extra effort is worth it!
The crochet pattern combines pretty scallops and no-fuss cluster stitches for an elegant and feminine looking tote that fits in just as well at the beach as it does a weekend in the mountains.

I’ve used Lily Sugar ‘n Cream cotton yarn from Yarnspirations for this bag since it can get wet without ruining the project. Yes, this crochet pattern was supposed to be released during the summer. Things happen folks. 😂
Another reason I love using cotton yarn for bags is that gives nice stitch definition. When I noticed the new “Jute” color in stock at my local Michael’s store I knew it would be perfect for this project!
I ended up crocheting and frogging the shoulder strap about 5 or 6 times–at least–but you’d never know it. This yarn is sturdy–it takes a beating and keeps on looking gorgeous, so I’m confident when you use it for your bag that it will hold up well.

Let’s get this project started!
Disclaimer: This post contains affiliate links. When you purchase something using these links a small amount of the sales price goes to me to help keep this site, and the patterns on it free. You do not pay any extra for the item you purchase.
Difficulty:
Easy/Intermediate
Techniques used: clusters, post stitches, shells, surface slip stitches, reverse single crochet, half-double crochet in the 3rd loop.
Materials Needed:
3.25mm hook (bag straps and handles only)
4mm (G) hook (bag straps and handles only)
5mm (H) hook, or hook needed to obtain gauge
Approximately 720-740 yards Lily Sugar ‘n Cream cotton yarn in “Jute”
1 1/2” antique brass buckle
2 1 1/2″ antique brass rectangles
Yarn needle
Scissors
18″ 4.5mm natural cotton cord
2 ft thin twine
Stitch markers
Large safety pins
(Optional) 1 yd calico or flowered fabric to line bag.
Stitches Used:
sl st = slip stitch
ch = chain
sc = single crochet
hdc = half double crochet
dc = double crochet
2dc cluster – dc2tog worked in same st (straps and handles)
3dc cluster = dc3tog worked in same st (body of the bag)
BPhdc = back post half double crochet
BPdc = back post double crochet
BPtr = back post treble crochet
FPsc = front post single crochet
FPhdc = front post half double crochet
FPdc = front post double crochet
rsc = reverse single crochet (crab stitch)
Additional Terms:
hdc in the 3rd loop = Look at the top of the stitch, and locate the sideways “V”, bend the stitch to look at the back*, and you should see another “V”. You’ll be working into the back loop of that “V”, this is called the 3rd loop.
Back bar of sc – Instructions: Look at the back of the stitch and locate the short bar that runs horizontal. Work all stitches for that section into this bar.
sp/sps = space/spaces
st/sts = stitch/stitches
prev = previous
Gauge:
14 hdc in 4″. Gauge is not particularly important for this project.
Measurements:
Bag is 17″ wide, by 18″ tall at tallest point (excluding shoulder strap), by 8″ deep at shallowest point.
Additional Notes:
-ch-1 at beginning or ending of row does not count as st.
-ch-3 at end of row counts as a dc stitch.
-I’ve written a lot of notes on this and shared several tutorial pictures in the pattern itself. Please look over the pattern in its entirety before you begin.
Crossbody Tote Bag Pattern (US Terms)
Click here to purchase an ad-free, print-optimized PDF of this pattern on LoveCrafts
Make 3 squares following these instructions:
Ch 38,
Row 1: hdc in 2nd ch from hook, hdc in each remaining ch, ch 1, turn. (37)
Row 2: working in 3rd loop of hdc, sc in each st across, ch 3 (counts as first dc of next row) turn. (37)
Row 3: working in next st, *(3dc cluster, ch 1, sk st); repeat from * across, do not skip final st of row, work a dc in that st instead, ch 1, turn. (18 3dc clusters, 17 ch-1 sps, 1 ch-3, 1 dc)
In the following row each stitch, whether it is a 3dc cluster, a ch-1 sp, or dc (or ch-3), gets a sc worked into it.
Row 4: sc in each st across, final sc of row will be worked in top of ch-3 from prev row, ch 3 (counts as first dc of next row), turn. (37)
Repeat rows 3 and 4 2 more times, then repeat row 3 once more, omitting turning chain at end of row.
Fasten off, and weave in ends.
Row 10 follows the same idea as the row 4 repeat.
With front side of piece facing you, attach yarn to top of ch-3,
Row 10: hdc in each st across, ch 1, turn. (37)
Row 11: working in 3rd loop of hdc, sc in each st across, ch 1, turn. (37)
Row 12: sc in first st, *sk 2 sts, 7 dc in next st, sk 2 sts, sc in next; repeat from * across, ch 1, turn. (6 shells, 7 sc)
In the following row FP stitches will be worked around 5 of the 7 sts of each shell, while the sc sts between the shells will get a BPtr worked around them.
Row 13: dc in first st, *sk st, FPdc around next st, FPhdc around next st, FPsc around next st, FPhdc around next st, FPdc around next st, sk st, BPtr around next st (place stitch marker); repeat from * across, in final st omit FPtr and work a dc instead, ch 1, turn. (37)
Row 14: sc in first st, *sk 2 sts, 7 dc in next st, sk 2 sts, sc in next; repeat from * across, ch 1, turn. (6 shells, 7 sc)
Row 15: dc in first st, *sk st, FPdc around next st, FPhdc around next st, FPsc around next st, FPhdc around next st, FPdc around next st, sk st, BPtr around BPtr 2 rows below where you placed the stitch marker, place stitch marker in BPtr; repeat from * across, in final st omit FPtr and work a dc in top of sc instead, ch 1, turn. (37)
Repeat rows 14 and 15 1 more time.
Row 18: sl st in first st (place stitch marker), *sk 2 sts, 7 dc in next st, sk 2 sts, sc in top of BPtr from prev row (place stitch marker); repeat from * across omitting sc in final st and working a sl st there instead, place st marker in final sl st. (6 shells, 5 sc, 2 sl sts)
Fasten off, weave in ends.
In this next section you will repeat the textured shells pattern (rows 12-18 that you just completed), on the other side of the piece.
With front of piece facing you, Attach yarn to row 1,
Repeat rows 12-18 to get 4 rows of stacked shells. Do not fasten off, but continue working around the corner in round 19:
Round 19: continue down side of piece, evenly work 36 sc along edge, when you arrive at the shells work this sequence across them: [sc in next 3 sts, 2 sc in next st, sc in next 3 sts, FPdc around BPtr 2 rows below, move to next shell] 6 times, continue down side of piece, evenly work 36 sc along edge, when you arrive at the shells work this sequence across them: [sc in next 3 sts, 2 sc in next st, sc in next 3 sts, FPdc around BPtr 2 rows below, move to next shell] 6 times, join with sl st to first sc of round.
This next round is worked in the back bar of the sc sts from the prev round, and across the back of the shells you made 2 rounds back. The “back bar” is not the same thing as the “back loop”.
Round 20: ch 1, *working in back bar of sc, sc in next 36 sts, ch 1, sc in marked st, [ch 4, sc in next marked st from round 18] 6 times, ch 1; repeat from *, join with sl st to first sc. (86 sc, 12 ch-4 sps)
Round 21: ch 1, *hdc in next 36 sts, (2 hdc, ch 1, 2 hdc) in ch-1 sp, sk st, [6 hdc in next ch-4 sp, sk st] 6 times, sk st, (2 hdc, ch 1, 2 hdc) in ch-1 sp; repeat, join with sl st to first hdc. (160 hdc, 4 ch-1 sps)
Round 22: ch 1, working in 3rd loop of hdc, sc in each st around, in ch-1 sps at corners work (sc, ch 1, sc), Jon with sl st to first sc. (168 sc, 4 ch-1 sps, 42 sts per side)
Fasten off, and weave in ends.
Optional (but highly recommended) finishing instructions:
There will be some gaps behind the last row of shells on each end of the square. If you plan to put smaller things in this bag, but do not wish to line it, you have the option of sewing these shells down to the row of hdc behind them to reduce gaps and get your shells to lay neatly.
Thread a yarn needle with a 18″ length of yarn and run it through the row of hdc stitches that you worked in the ch-4 sps behind the shells. Tack the center 3 sts of each shell to the hdc row, and continue running your yarn through the hdc row until you get to the next shell. Repeat this until you come to the end of the row.
Fasten off and weave in ends.
Repeat these instructions on the other end of the square.

Crossbody Bag Assembly Instructions:
Once you have 3 squares made fold them diagonally so they make a triangle shape. Make sure the design is going the same way on each triangle. Stack the triangles on top of each other with the shell design to your left.
Starting at the right side of the bag, place the first triangle vertically with its shell design toward the bottom and the center “point” pointing to the left. Place the next triangle horizontally with its center “point” pointing up toward the top of your workspace and the flat side closest to you. Place the next triangle vertically with its shell design toward the center “point” pointing right. Here is a picture with some arrows that shows you how to place them.

Pin the bag together with large safety pins (stitch markers could also work in a pinch).
Sew bag together at seams. I used a whip stitch, but you can use whatever stitch you are most comfortable with. You could also crochet them together from the inside if you prefer using your favorite joining method. Pay careful attention to the seam at the bottom of the V where all 3 of your squares meet up making sure this is joined tightly without any gaps. This will be a stress point and you may wish to sew a few extra stitches in to reinforce it.
Fasten off, and weave in all ends securely.
Crocheting the Bag Straps
Shoulder Strap:
The body of this bag should sit around hip level. The strap length is 30″, but you will be folding the ends over by 3″ on each side so the strap comes out closer to 24″ in length. The strap holders will add another 3″ to the total length. I’m pretty petite so you may need to adjust your strap length depending on where you want the bag to fall on you. My gauge was about 14 2dc cluster sts in 4″ once the strap was completely finished. Stitch counts are not particularly important in rounds 2-3.
Additional Notes:
-Use slightly tighter tension for the straps so they do not “grow” as much with use.
-This strap will be longer when you begin, but it will shrink up a bit as you add the crab stitch edging and surface slip stitching. Measurements are based on a completely finished strap.
With 4mm (G) hook,
Ch 106 for a 30” strap,
Row 1: 2dc cluster in 3rd ch from hook, 2dc cluster in each st across, dc in final st of row, ch 1, do not turn, instead continue working the next round around the corner, into the side of the dc you just completed. (103 2dc clusters, 2 ch, 1 dc)
Round 2: 4 sc in side of dc, continue around the corner working 1 sc in each st on the bottom edge of row 1, when you get to the other end of the strap work 4 st into side of ch-2 (this will be 2 sc in each ch), continue around the corner working 1 sc in each st across on top edge of row 1, sc into final dc of row 1, join with sl st to first sc.
Using 3.25mm hook,
Round 3: ch 1, rsc in each st around.
You now get to decide which style of shoulder strap you want to add to your bag:

- If you want the flat shoulder strap do not cut your yarn and fasten off. Continue to Flat Shoulder Strap Finishing Instructions instead.
- If you want a rounded shoulder strap, cut your yarn and fasten off and continue to Rounded Shoulder Strap Finishing Instructions.
Flat Shoulder Strap finishing instructions (Easy):
With 4mm hook,
Round 1: with right side of strap facing you, slip stitch around the entire strap between rounds 2 and 3. This will add a pretty “braided” look to the top side of the strap, and it also reinforces the strap so it will not stretch out as quickly.
Fasten off, and weave in ends.
Continue to “strap holders” section.
Rounded Shoulder Strap Finishing Instructions (Intermediate):
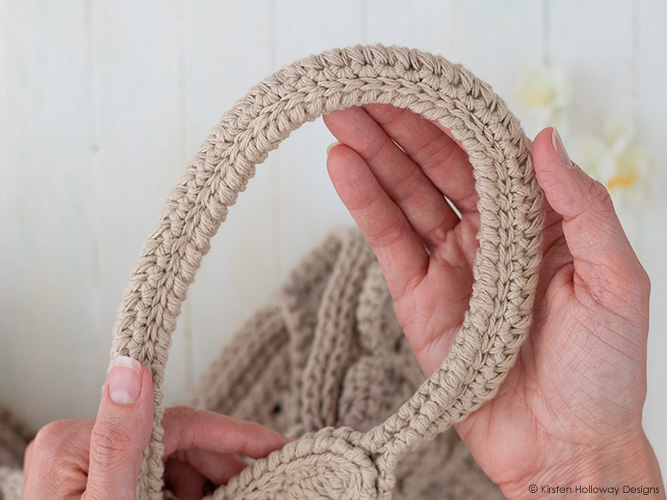
Measure 7″ from both ends of shoulder strap. You will fold these ends over to finish your strap in a little bit. Cut length of 4.5mm cotton rope approximately 2-3″ longer than the remaining strap (you will trim off the excess later). This rope will lay at the center of your strap giving it some extra durability and shape. I do not recommend crocheting this style of strap without putting the rope through the center because otherwise the cluster stitches will be more prone to catching on things with nothing to support them internally.
Tie off one end tightly with piece of heavy-duty thread or twine. You’ll whip the other end once you know exactly how long the center of your rounded strap will be. I have a step-by-step tutorial on how to “whip” the end of a cotton cord so that it does not fray out over here. Coat ends of rope with fray check if you wish.
Note: It is possible to crochet this next section without cutting the yarn and reattaching it multiple times, but the transitions between slip stitching through one layer to 2 layers and back to one layer will leave a little extra string that will be visible if you are up close. Not a huge deal, but I thought it looked more professional without the extra bits of string showing, so that’s how I’ve written it below:
Count 24 sts from end of strap (approximately 7” from end), with front side showing, sl st between rounds 2 and 3 continuing around end of strap and up the other side the same distance.
Cut yarn, and fasten off.
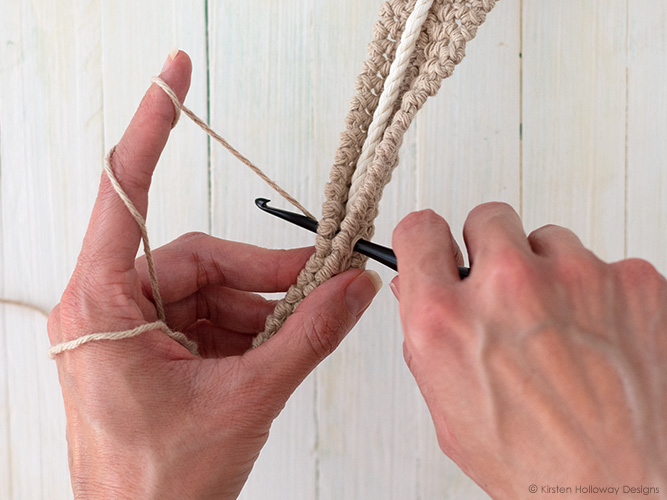
Place the rope in the center of the strap and fold the strap over the rope. Continue where you left off by slip stitching both sides of the strap together with a new piece of yarn (the rope should be in the center as shown below):
Once you are 24 sts (approximately 7”) from other end of strap cut yarn, and fasten off.
Continue where you left off slip stitching through only 1 layer of the strap and work around the end and up to the other side the same distance.
You can now trim your rope so it fits neatly in the center of your strap and whip the other end so it doesn’t fray out.
Fasten off, and weave in ends running them through the center of both ends of the rope a few times as you go. This will help to prevent the strap from growing in length as you use the bag.
Strap holders (make 2):
Using 4mm hook, and leaving an 18” tail, Ch 43,
Row 1: 2dc cluster in 3rd chain from hook, 2dc cluster in each st across, dc in final st of row, ch 1, do not turn, instead continue working the next round around the corner, into the side of the dc you just completed.
Round 2: 4 sc in side of dc, continue around the corner working 1 sc in each st on the bottom edge of row 1, when you get to the other end of the strap work 4 st into side of ch-2 (this will be 2 sc in each ch), continue around the corner working 1 sc in each st across on top edge of row 1, sc into final dc of row 1, join with sl st to first sc.
Using 3.25mm hook,
Round 3: ch 1, using tight tension, rsc in each st around.
Using 4mm hook,
Round 4: with right side of strap facing you, slip stitch around the entire strap between rounds 2 and 3. This will add a pretty “braided” look to the top side of the strap, and it also reinforces the strap so it will not stretch out as quickly.
Fasten off, and weave in ends.
Your strap holders should be about 12” long when you finish. I have made them long on purpose so that they will stick further down in the bag and limit a certain amount of stretching on the bag itself. When folded in half and sewn in place they will be about 6” long.
Strap Assembly Instructions:

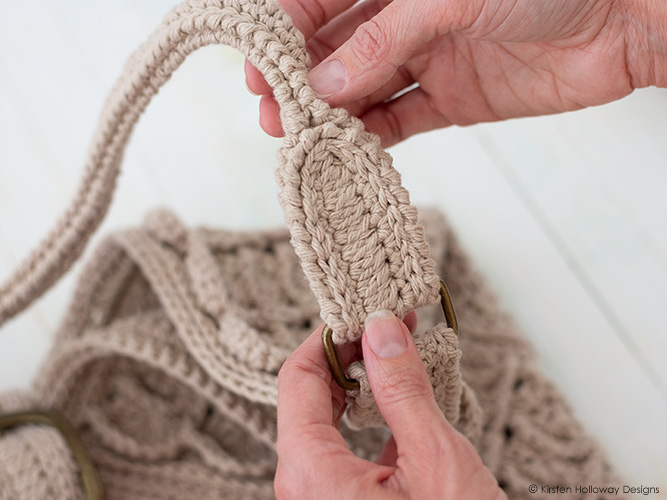
Take a strap holder and thread it through the metal rectangle until the rectangle is at the center of the strap holder. Position strap holder 1 1/2” above edge of bag (this will be at the top corner point of one side of your bag). Sew the ends of the strap holder to the inside of the bag at the corners with the 18” tail.
Repeat for the other end.
Sew the strap holders into the inside of the bag, one at each end.
Attach one end of the shoulder strap to each of the metal rectangles. Fold the ends over approximately 3″ until the bottoms of the straps meet up with where your rope ended. Sew the strap ends in place. Repeat for other end of strap.
They should look like this when you are finished:
Closure for middle of bag:
This short strap can go at the center of the bag, at its lowest part, as a sort of closure to help keep things in your bag.

Make 1 strap following the instructions for the strap holders (above).
Sew the closure strap to back of purse on the inside with 18” tail. The front side with the surface slip stitching will be facing the back of the bag so that it is showing on the front once you run the strap through the buckle. My strap extended about 4” down inside the purse. This provides plenty of room to securely attach the strap, and it also provides a little extra stability to the bag structure to minimize some of the stretching that will happen over time.
Short strap to hold buckle:
Using 4mm hook, and leaving an 12” tail, ch 15,
Row 1: sk 2 sts, 2dc cluster in 3rd ch from hook, 2dc cluster in each st across, dc in final st of row, ch 1, do not turn, instead continue working the next round around the corner, into the side of the dc you just completed. (12 2dc clusters, 1 dc, 1 ch-2)
Round 2: 4 sc in side of dc, continue around the corner working 1 sc in each st on the bottom edge of row 1, when you get to the other end of the strap work 4 st into side of ch-2 (this will be 2 sc in each ch), continue around the corner working 1 sc in each st across on top edge of row 1, sc into final dc of row 1, join with sl st to first sc.
Using 3.25mm hook,
Round 3: ch 1, using tight tension, rsc in each st around.
Using 4mm hook,
Round 4: with right side of strap facing you, slip stitch around the entire strap between rounds 2 and 3. This will add a pretty “braided” look to the top side of the strap, and it also reinforces the strap so it will not stretch out as quickly.

Fasten off, and weave in end.
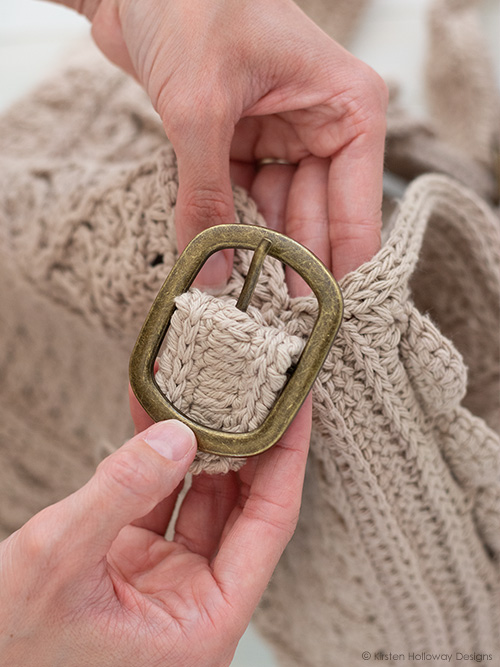
Fold the short strap in half and thread the buckle on. Poke the prong through the strap between the 2dc cluster stitches.
Using 12″ tail, sew to front of bag so top of strap is sitting at lowest part of “V”:
You are welcome and encouraged to sew a lining for this bag. That was my original plan, but life has been throwing some unexpected things my way. Here are a couple of links to fabrics that I think might be fun:
Scandi Folk Flowers
William Morris Honeysuckle Fabric
You can read the oldest and best Love Letter here.
“The LORD hath appeared of old unto me, saying, Yea, I have loved thee with an everlasting love: therefore with lovingkindness have I drawn thee.”
-Jeremiah 31:3
SDG
Want more gorgeous crochet patterns, and a little encouragement for your day? Sign up for my newsletter here! That way you’ll never miss out on special events, or freebies I’m offering.
JOIN ME ON SOCIAL MEDIA
I would love to see a picture when you’re done, so please feel free to come by my Facebook group and show off your finished project! Be sure to tag @kirstenhollowaydesigns when you share pictures of your project on Instagram!
You can also follow me on Facebook, Pinterest, Instagram, and Ravelry for more beautiful crochet patterns.
PATTERN TERMS AND CONDITIONS:
You are welcome to share the link to this pattern, using one image of your choice, on your site, but please do not share the written patterns themselves, this includes my Ravelry downloads or translations of these patterns, or use additional images. You do not have permission to use my images by themselves to create pinnable graphics for Pinterest, however they may be included in a roundup pin if there are 4 or more other patterns. If you sell finished items online, please do not use my pictures for your listings. I’m positive that your work is of high enough quality for you to sell the finished piece. Have confidence in your abilities! <3 Thank you!
This pattern was made to be used by individuals and small business crocheters alike. Selling your finished pieces in boutiques, at farmer’s markets, craft shows, and other local events is encouraged! Please credit/link Kirsten Holloway Designs when selling finished products online. The only thing I require is that this pattern not be used commercially to produce hundreds of thousands of copies. If you enjoyed this pattern or found it useful, why not share a link to this post with your friends?


