Crochet these delicate, Victorian inspired, lacy boot cuffs with #10 thread. The free crochet pattern comes with several options so you can customize the perfect look. Find the free crochet pattern instructions below, or purchase a print-optimized, ad-free PDF by clicking here.
Click here to add this pattern to your Ravelry queue!

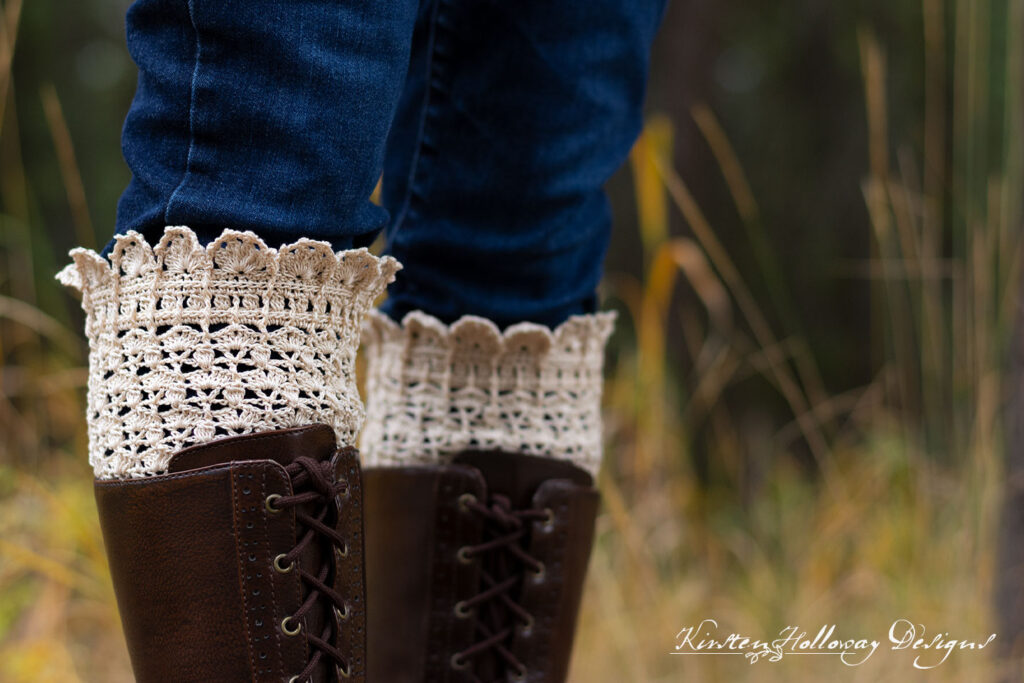
I’m a big believer that lace can be worn year round! These gorgeous feminine boot cuffs are proof. The crochet pattern can be adjusted to fit anyone from kids to adults, and they look nice with a variety of boot styles.
This crochet boot cuff pattern started out as a simple, one-color boot cuff with a fairly basic pattern repeat, but, as you know, I can’t seem to stick with “basic” especially when working with #10 thread!
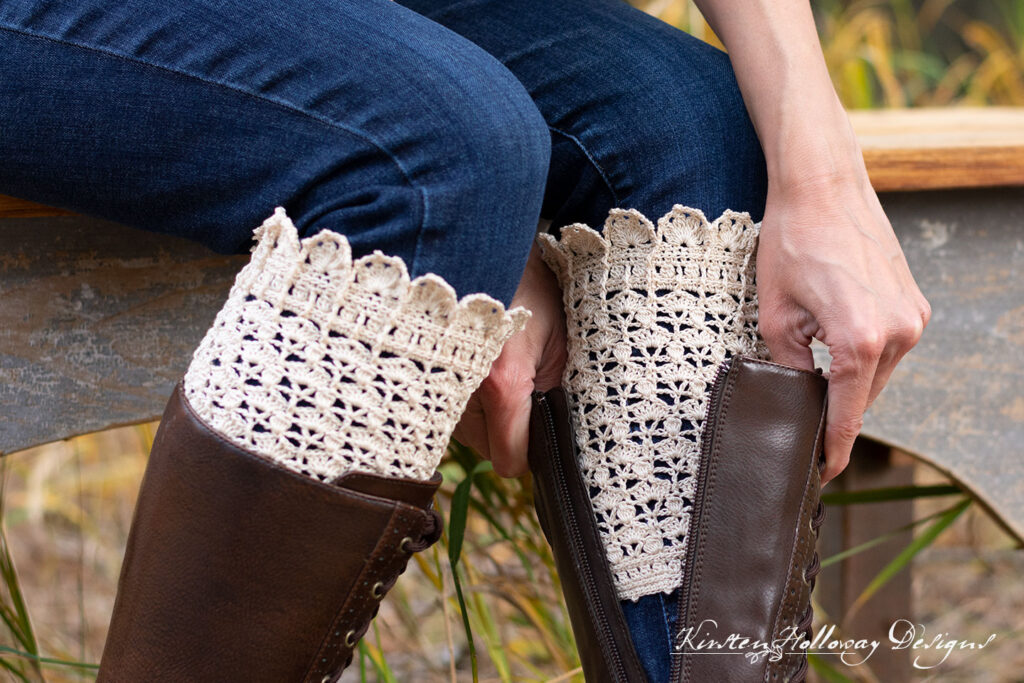
Because of that you get the benefit of having 3 different style options! Choose between a floral lace trim at the top, or go with a simple picot trim. Repeat the lacy stitch all the way up, or add a corded tie with beads for extra interest!
Whatever style you end up choosing, these vintage style boot cuffs are sure to become a favorite in your wardrobe.

This is a very detailed pattern with lots of options, but don’t let that scare you! It’s not as hard as it looks, however, it is time consuming, especially if you decide to add all of the surface slip stitched embellishments. I did not write those into the pattern because they can be used in so many different places, but as a general rule I put them in to highlight the braided looking ridges made by working in the 3rd loop of a had or back bar of a sc, which you can see in the picture below. Make sure you have *very* relaxed tension when working these or your boot cuff will not have enough stretch to go over your calves.
Difficulty:
Intermediate
Materials Needed:
350-750 yds #10 Aunt Lydia’s Crochet Thread in Natural, Olive, Golden Yellow or color of your choice
15-30 yds #10 Aunt Lydia’s Crochet Thread in Fudge Brown, or Natural (for accent colorwork)
1.5mm steel hook
Yarn needle
Scissors
Tape measure
(Optional) Flower Spacer Bead Strands
(Optional) Rope Edge Bead Caps
(Optional) Beads for ends of cord ties
(Optional) Scalloped Bead Cones
(Optional) Stitch markers
Stitches Used:
ch = chain
sl st = slip stitch
sc = single crochet
hdc = half double crochet
dc = double crochet
FPdc = front post double crochet
FPtr = front post treble crochet
2dc cluster = dc2tog in same stitch
3dc cluster = dc3tog in same stitch
5dc cluster = dc5tog in same stitch
3tr cluster = tr3tog in same stitch
sc2tog = single crochet 2 together
Additional Terms:
Picot = ch 2, sl st back into first ch.
V-stitch = (dc, ch 1, dc) in same stitch.
hdc in the 3rd loop = Look at the top of the stitch, and locate the sideways “V”, bend the stitch to look at the back*, and you should see another “V”. You’ll be working into the back loop of that “V”, this is called the 3rd loop.
Back bar of sc – Instructions: Look at the back of the stitch and locate the short bar that runs horizontal. Work all stitches for that section into this bar.
FPdtr = front post double treble crochet. Wrap working yarn around hook 3 times, pull through 2 loops 4 times.
st/sts = stitch/stitches
sp/sps = space/spaces
prev = previous
sk = skip
Gauge:
Gauge is not particularly important since these will be made to your calf circumference.
Measurements:
12”, 14”, 16” or 18”, by 6 1/4″ tall (without lace), or 7” tall (with lace).
Pattern Notes:
-Ch 1 at beginning of round does not count as a stitch.
-Ch 4 at beginning of round counts as dc+1.
-All rounds are started in joining stitch.
-This pattern is written in multiples of 6 and is very adaptable. I’ve included stitch counts for adult sizes, but this could even be made for children.
–Surface slip stitched “line” details are optional, but they are best added as you go. I worked them to highlight the “ridges” that the hdc in the 3rd loop and sc in the back bar create. They can be added at the end, but it is much more time consuming to do things that way! It is imperative that you use *very relaxed tension* if you decide to add these details, otherwise your boot cuff will shrink in and not fit over your calves.
-If you wish to change colors I’ve written in some places where you can do this. Feel free to switch things up and make these boot cuffs your own though!
–This pattern contains a lot of notes. Please read through them before you begin.
Pumpkin Spice Boot Cuffs Crochet Pattern (US Terms):
Click here to purchase an ad-free, print-optimized PDF of this pattern on LoveCrafts
This pattern is worked from the bottom to the top. I used single crochet stiches at the bottom to make it more snug, and half double crochet stitches near the top to allow for more stretch over the calf.
Measure the circumference of the largest part your calf. You will want to chain in multiples of 6 so that the band is 1” smaller than the circumference of your calf. My calves measure 13” around, so my beginning chain was 12”, unstretched. These cuffs should have a good amount of stretch and fit over your jeans. If you will only be wearing them with a dress and not with jeans you may wish to make them a little bit more snug as they will stretch over time. Just stick to that multiple of 6 whatever you decide.
Here are some rough estimates:
Small = 12”, ch 90
Medium = 14”, ch 108
Large = 16”, ch 120
X-Large = 18”, 138
Working in multiples of 6, ch 90, [108, 120, 138], join with sl st to first ch,
Round 1: ch 1, sc in each st around, join with sl st to first sc. (90 [108, 120, 138])
Round 2: ch 1, working in back bar of sc, sc in each st around, join with sl st to first sc. (90 [108, 120, 138])
(Optional color change: You may switch to a different color on round 3 if you wish. Switch back to your main color when beginning round 4.)
Round 3: ch 1, *(2dc cluster, ch 1), sk st; repeat from * around, join with sl st to first 2dc cluster. (45 [54, 60, 69]) 2dc clusters, 45 [54, 60, 69] ch-1 sps).
Round 4: ch 1, *sk st, 2 sc in ch-1 sp; repeat from * around, join with sl st to first sc. (90 [108, 120, 138])
Round 5: ch 1, working in back bar of sc, sc in each st around, join with sl st to first sc. (90 [108, 120, 138])
Round 6: ch 1, *5 dc cluster in next st, ch 1, sk 2 sts, V-stitch in next, ch 1, sk 2 sts; repeat from * around, join with sl st to first 5dc cluster. (15 [18, 20, 23] 5dc clusters, 15 [18, 20, 23] v-stitches)
In the following round you will be working a split shell in each ch-1 sp that is at the center of the v-stitches you made in the prev round. Each 5dc cluster will get a hdc worked in the top. This idea will be repeated in round 10.
Round 7: ch 1, *hdc in top of 5dc cluster, sk 2 sts, (3 dc, ch 1, 3 dc) in ch-1 sp at center of v-stitch, sk 2 st; repeat from * around, join with sl st to first hdc. (15 [18, 20, 23] split shells, 15 [18, 20, 23] hdc)
Round 8: ch 1, *FPdc around hdc, ch 3, sk 3 sts, sc in ch-1 sp, ch 3, sk 3 sts; repeat from * around, join with sl stop first FPdc. (15 [18, 20, 23] FPdc, 15 [18, 20, 23] sc, 30 [36, 40, 46] ch-3 sps)
In the following round you will be skipping the 3 chains and working only on the top of the FPdc sts and the top of the sc sts from the prev round. This idea will be repeated in round 12.
Round 9: ch 4, dc in same st (counts as first v-stitch of round), ch 1, sk 3 sts, 5 dc cluster in next st, ch 1, sk 3 sts, *V-stitch in next, ch 1, sk 3 sts, 5dc cluster in next, ch 1, sk 3 sts; repeat from * around, join with sl st to 3rd ch. ( 15 [18, 20, 23]) split shells, 15, [18, 20, 23] v-stitches)
Round 10: ch 1, *(3 dc, ch 1, 3 dc) in ch-1 sp at center of v-stitch, sk 2 sts, hdc in top of 5dc cluster; repeat from * around, join with sl st to first dc. (15 [18, 20, 23] split shells, 15 [18, 20, 23] hdc)
Round 11: sl st over 3 sts to ch-1 sp, ch 1, *sc in ch-1 sp, ch 3, sk 3 sts, FPdc around hdc, ch 3, sk 3 sts; repeat from * around, join with sl stop first FPdc. (15 [18, 20, 23] FPdc, 15 [18, 20, 23] sc, 30 [36, 40, 46] ch-3 sps)
Round 12: ch 1, *5 dc cluster in next st, ch 1, sk 3 sts, V-stitch in next, ch 1, sk 3 sts; repeat from * around, join with sl st to first 5dc cluster. (15 [18, 20, 23] 5dc clusters, 15 [18, 20, 23] v-stitches)
You now get to choose between adding a tie or leaving it off.
Boot Cuffs Without Ties:
Repeat rounds 7-12 (in the above section) until your boot cuff measures 5” tall. Each repeat adds about 1 1/2” of height. For reference, I repeated rounds 7-12 2 times. If you want a shorter boot cuff you can omit one of the round 7-12 repeats.
Repeat rounds 7-8, then continue to Top Edging.
Boot Cuffs With Ties:
This creates the space for the tie. The actual corded ties will be created later.

Repeat round 7-12 1 more time.
Repeat rounds 7-8 then continue with the rest of the pattern:
Round 21: ch 1, *sk st, 3 hdc in ch-3 sp; repeat from * around, join with sl st to first hdc. (90 [108, 120, 138])
Round 22: ch 1, working in 3rd loop of hdc, sc in each st around, join with sl st to first sc. (90 [108, 120, 138])
Rounds 23-24: ch 1, hdc in each st around, join with sl st to first hdc. (90 [108, 120, 138])
Round 25: ch 1, working in 3rd loop of hdc, sc in each st around, join with sl st to first sc. (90 [108, 120, 138])
In the following round you will be slip stitching into the tops of the first few sts in the round. This is to move you forward in the round and position the center of the split shells above the top of the FPdc sts from your last round 8 repeat. This positioning will be important for when you add the top edging.
Round 26: sl st across next 3 sts *sc in next st, sk 2 sts, (3 dc, ch 1, 3 dc) in next st, sk 2 sts; repeat from * around, join with sl st to first sc. note: your final split shell of this round will be worked into one of the slip stitches at the beginning of the round. (15 [18, 20, 23] split shells, 15 [18, 20, 23] ch-1 sps, 15 [18, 20, 23] sc)
Continue to Top Edging.
Top Edging:
Round 1: ch 1, FPdc around sc, ch 3, sk 3 sts, sc in ch-1 sp, ch 3, sk 3 sts; repeat from * around, join with sl stop first FPdc. (15 [18, 20, 23] FPdc, 15 [18, 20, 23] sc, 30 [36, 40, 46] ch-3 sps)
Round 2: ch 1, *sk st, 3 hdc in ch-3 sp; repeat from * around, join with sl st to first hdc. (90 [108, 120, 138])
Round 3: ch 1, working in 3rd loop of hdc, sc in each st around, join with sl st to first sc. (90 [108, 120, 138])
You now get to choose whether you want lace at the top of your boot cuff (pictured on the off-white or yellow boot cuff), or if you want a more plain edge with picots (pictured on the green boot cuff).
Top Edge With Lace:
In the following round you will be working on 2 different rounds. It looks complex in the instructions but it’s really very simple. Here’s the gist of things: The FPtr stitches will be worked around the FPdc and the sc sts from your final round 8 repeat. You may wish to mark them before you begin. You will be working the 3dc cluster stitches in the tops of your sc sts from round 2 of the top edging. Each 3dc cluster stitch will have 2 skipped stitches between them. The FPtr stitches essentially “float” between those 2 skipped stitches.
Here are some pictures to help if you are a visual learner:
Skipping 2 stitches in the current round.

A completed 3dc cluster and ch 1. Your next FPtr will get worked around the FPdc 2 rounds below.
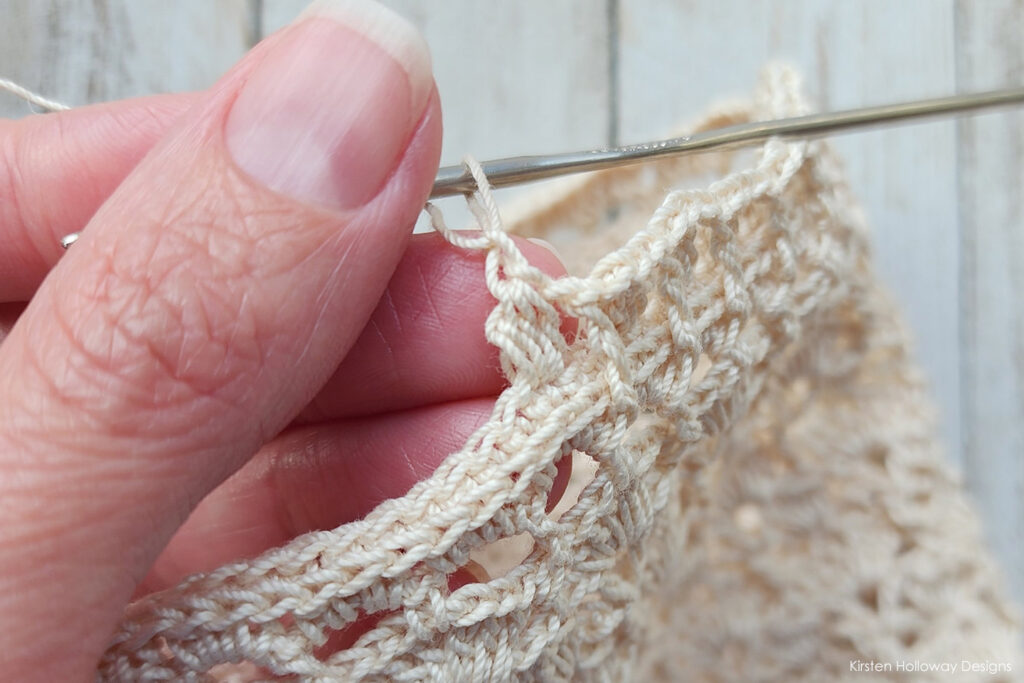
Here’s how the round should look after you complete a few repeats.

Round 4: ch 1, FPtr around FPdc 2 rounds below (round 8 repeat) ch 1, in current round: sk st, 3dc cluster in next st, ch 1, FPtr around sc 2 rounds below, ch 1, in current round: sk 2 sts, 3dc cluster, ch 1, *FPtr around FPdc 2 rounds below, ch 1, in current round: sk 2 sts, 3dc cluster in next st, ch 1, FPtr around sc 2 rounds below, ch 1, in current round: sk 2 sts, 3dc cluster in next st, ch 1; repeat from * around, note: you will only skip 1 st before joining, join with sl st to first FPtr. (30 [36, 40, 46] FPtr, 30 [36, 40, 46] 3dc clusters, 60 [72, 80, 92] ch-1 sps)
Round 5: ch 1, *sk st, hdc in ch-1 sp, hdc in top of 3dc cluster, hdc in ch-1 sp; repeat from * around, join with sl st to first sc. (90, [108, 120, 138])
Round 6: ch 1, working in 3rd loop of hdc, sc in each st around, join with sl st to first sc. (90, [108, 120, 138])
Round 7: ch 1, *sc in next 3 sts, ch 2, sc in next 3 sts, ch 1; repeat from * around, join with sl st to first sc. (90 [108, 120, 138] sc, 15 [18, 20, 23] ch-2 sps, 15 [18, 20, 23] ch-1 sps)
(Optional color change for round 8. Switch back to main color for round 9)
Round 8: ch 2, sk 3 sts, ([3tr cluster, ch 2] 4 times) in ch-2 sp, sk 3 sts, sl st in ch-1 sp, ch 2; repeat from * around, omitting ch-2 on final repeat, final sl st counts as join. (15 [18, 20, 23] petals)
Round 9: ch 1, *FPtr around FPtr from round 3, [(3 sc, picot) in ch-2 sp] 4 times, 3 sc in next ch-2 sp; repeat from * around, join with sl st to first FPtr. (15 [18, 20, 23] FPtr, no need to keep track of all the sc stitches)
Fasten off, and weave in ends.
The lace trim at the top will benefit from some blocking after you complete the project.
Finishing and Extra embellishments for Lacy Edge:
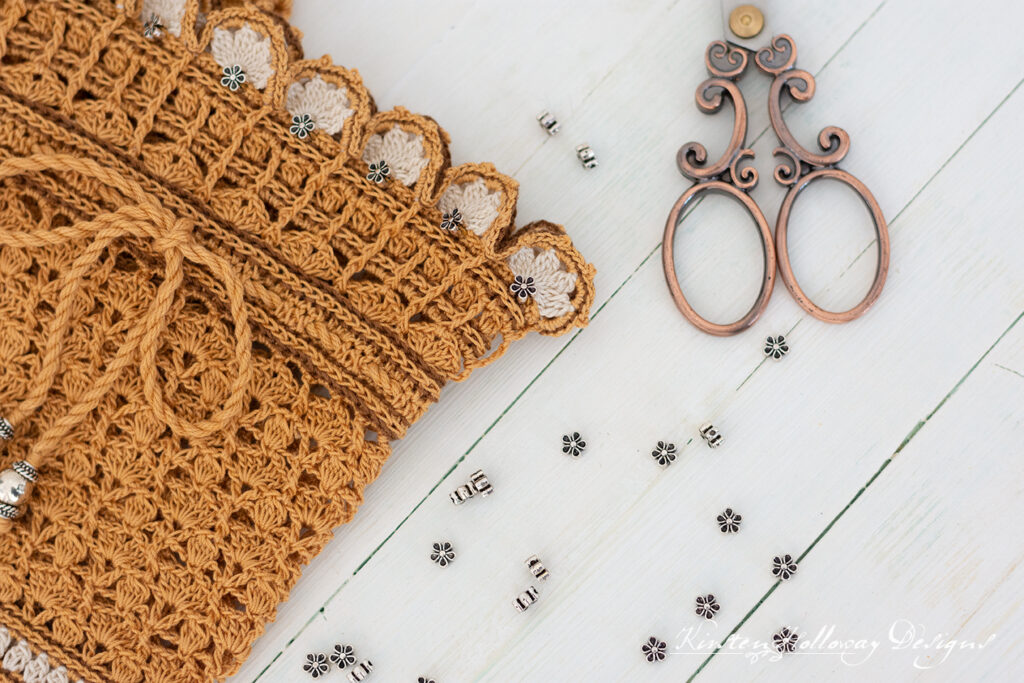
Add small flower beads to the center of each crocheted flower. If you sew them in place using one long piece of heavy duty thread, be sure not to sew them too tightly. The cuff needs to have some stretch so the beads don’t pop off when you stretch the cuff over your calf.
To get the flower lace to stand up I slip stitched with brown thread along the edge in round 9.
Fasten off, and weave in all ends.
Continue to bottom edging.
Top Edge with Picots:
This edging was designed to have a color change, and to make that step easier I have changed how the pattern is written. It produces a look that is very close to the lacy top edging, but there are some slight differences and you don’t have to work across 2 rounds at the same time. If you do not wish to change colors you can technically follow the Top Edge with Lace instructions through round 6, and then follow the instructions in the Bottom Edging for round 7.
Drop color A.
With color B,
Round 4: beginning in 2nd st of round, *3dc cluster in next st, ch 2, sk 2 sts; repeat from * around, join with sl st to first 3dc cluster. (30 3dc clusters)
Drop color B and fasten off.
With color A,
Round 5: hdc in first ch-2 sp, *hdc in top of cluster, 2 hdc in next ch-2 sp; repeat from * around omitting last hdc on final repeat. (90 [108, 120, 138] hdc)
Round 6: ch 1, working in 3rd loop of hdc, sc in each st around, join with sl st to first sc. (90 [108, 120, 138] sc)
(Optional) Add slip stitched accents before moving on to next round.
In the following round do not skip a stitch for the FPdtr sts to sit. The FPdtr sts “float” in front and will actually increase your stitch count. In the round after this one you will reduce to get your stitch counts back to what they were in round 5. Maintain very relaxed tension when working your FPdtr sts so that your boot cuff does not start to curl over at the top. Block this section after you complete it for best results.
Round 7: ch 1, *sc in next, 3 sts, using very relaxed tension FPdtr around sc from round 1, sc in next 3 sts, using very relaxed tension FPdtr around FPdc from round 1; repeat from * around, join with sl st to first sc. (90 [108, 120, 138] sc, 30 [36, 40, 46] FPdtr)
Round 8: ch 1, *sc in next 2 sts, sc2tog, picot, sc in next 2 sts, sc2tog; repeat from * around, join with sl st to first sc. (90 [108, 120, 138])
Fasten off, and weave in ends.
Continue to bottom edging.
Bottom edging:
Attach yarn to bottom of boot cuff,
Round 1: ch 1, *sc in next 6 sts, picot; repeat from * around, join with sl st to first sc. (90 [108, 120, 138] sc, 15 [18, 20, 23] picots)
Fasten off, and weave in ends.
Creating the Corded Ties:

To create your twisted cords you will need to cut 4-6 lengths of thread just a little over double the length you want your ties to be. For the smallest boot cuff size I used 2-yard lengths and my ties ended up coming out about 32″ in length after they were twisted. For reference, I used 4 strands of thread doubled over to create the ties for the green boot cuffs, and 6 strands of thread doubled over for the yellow boot cuffs.
Here’s the way I calculated the lengths. You can adjust this number if you want longer or shorter ties:
Take the circumference of the boot cuff you are making and add 20 (each end of the ties hung down 10″ giving me enough room to tie a bow). This is the number of inches that you’ll want your finished corded ties to be. In my case 12″ + 20″ = 32″. Double that number and then give yourself an extra 12-16″ to allow for the cord to shrink as it is twisted up.
How to Make a Corded Rope from Crochet Thread:
- Knot one end of your strands of thread. Make sure the thread strands are not tangled up–you want them laying as flat as possible before you begin twisting.
- Ask a spouse, child, or friend to hold one end of the threads. Stand so that the thread is taught between you both. You can tape one end of the threads to a table if you do not have someone to hold the other end for you.
- Start twisting your thread in one direction. After you have twisted the threads for a while your cord should start to tighten up and twist back over on itself. Test this every so often by stepping toward the person holding the other end of your threads. The more twisting, the tighter the twists in the finished cord will be. It’s up to you how tight you want the twists to be. This twisting process only took me about 2-3 minutes or so.
- Once you have the desired amount of twist in your cords fold the strands in half, You’ll get a mess of twisted knots, but use your fingers to stretch the twists out until they are even.
- Knot the ends together so the cord does not come undone.
- Once your cord has been created, weave it through the tie round (round 23): over-under, over-under skipping 3 stitches at a time.
To finish your ties you can simply knot the ends, or you can thread beads* and/or bead caps on the cords and then knot them and fray the ends. To keep my beads from traveling up the cord I whipped my ties just above the top of the bead <–click for a tutorial.
If you decide to leave tassels sticking out below the bottom of your beads trim the ends off so they are even.
*If you add beads to the ends of your ties you will want to double knot the bow when you tie it so it doesn’t come undone as you walk.
Now that you have completed your boot cuffs, can you see why I’ve referred to these as the “$1000 boot cuffs”? 🤣 They are so pretty, but rather time consuming to crochet!
Enjoy wearing them or gifting them to friends and family! 💕
Want more gorgeous crochet patterns, and a little encouragement for your day? Sign up for my newsletter here! That way you’ll never miss out on special events, or freebies I’m offering.
JOIN ME ON SOCIAL MEDIA
I would love to see a picture when you’re done, so please feel free to come by my Facebook group and show off your finished project! Be sure to tag @kirstenhollowaydesigns when you share pictures of your project on Instagram!
You can also follow me on Facebook, Pinterest, Instagram, and Ravelry for more beautiful crochet patterns.
PATTERN TERMS AND CONDITIONS:
You are welcome to share the link to this pattern, using one image of your choice, on your site, but please do not share the written patterns themselves, this includes my Ravelry downloads or translations of these patterns, or use additional images. You do not have permission to use my images by themselves to create pinnable graphics for Pinterest, however they may be included in a roundup pin if there are 4 or more other patterns. If you sell finished items online, please do not use my pictures for your listings. I’m positive that your work is of high enough quality for you to sell the finished piece. Have confidence in your abilities! <3 Thank you!
This pattern was made to be used by individuals and small business crocheters alike. Selling your finished pieces in boutiques, at farmer’s markets, craft shows, and other local events is encouraged! Please credit/link Kirsten Holloway Designs when selling finished products online. The only thing I require is that this pattern not be used commercially to produce hundreds of thousands of copies. If you enjoyed this pattern or found it useful, why not share a link to this post with your friends?


These are amazing. They are beautiful. I haven’t crocheted with crochet thread in years, but may have to do these. Wonderful job.
Thank you, Sandi! I’m glad you like the boot cuffs pattern and hope you enjoy crocheting a pair for yourself soon!
So beautiful!
Thank you, Dawn! I’m glad you like the boot cuffs pattern!