This beautiful crochet beanie hat has lots of floral details. It’s made from lighter weight yarn but due to the dense stitch pattern it makes a perfect chemo cap! Crochet it in one color, or use multiple shades of yarn to mix it up and create a one-of-kind hat for yourself, or someone special. Find the free crochet pattern instructions below, or purchase a print-optimized, ad-free PDF by clicking here.
Click here to add this to your Ravelry queue!
These richly textured hats are inspired by a couple of dear ladies in my church who are fighting cancer and needed some pretty “chemo cap” style hats to wear. I wanted something that would be both beautiful and offer full coverage to their heads as they heal from the treatments.
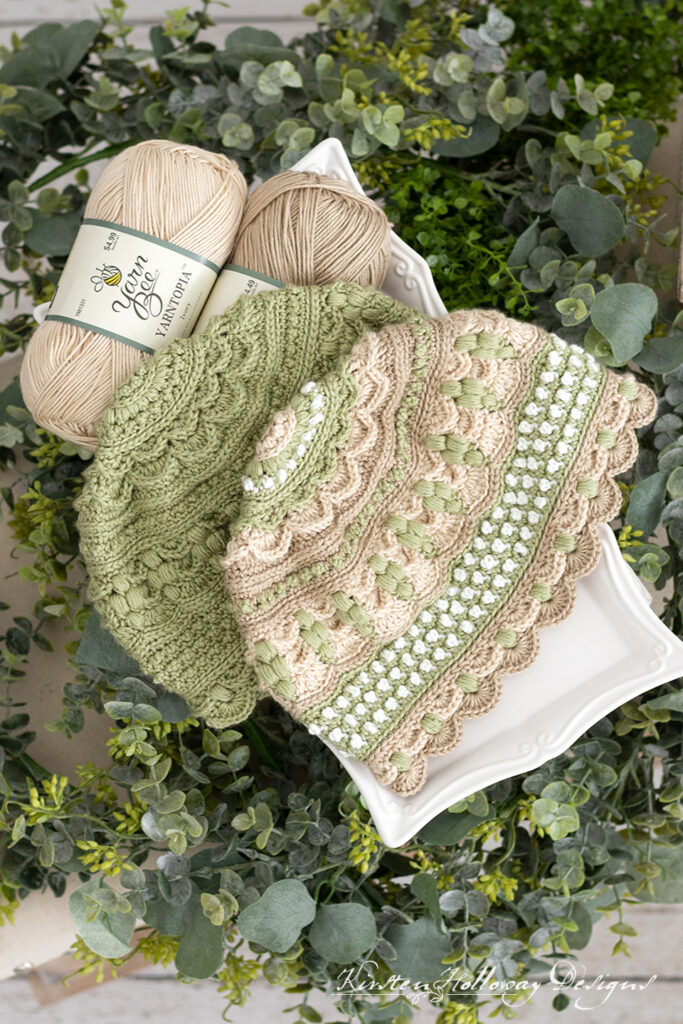
I decided to crochet these chemo caps with a #2 sport weight yarn since Spring is just around the corner and I didn’t want these hats to be too warm to wear as the weather improves. The yarn I used is acrylic but it feels a lot like tencel or bamboo. It is so soft and I hope it will be comfortable on tender heads. 1 skein of each is sufficient to crochet the multi-colored hat, or you can use 1 skein of the solid color and still have some leftover. You can find Yarntopia yarn at Hobby Lobby, or you can substitute another #2 weight yarn of your choice. Lion Brand Coboo or Truboo would be a fairly close match even though they are rated as a #3.
This beanie is roomy enough to add a light lining if you wish, (I would not recommend that you try to crochet it with most #3 or #4 weight yarns, or you will end up a huge hat). You may even want to go down a hook size from what I recommend here if you need a more snug fit.
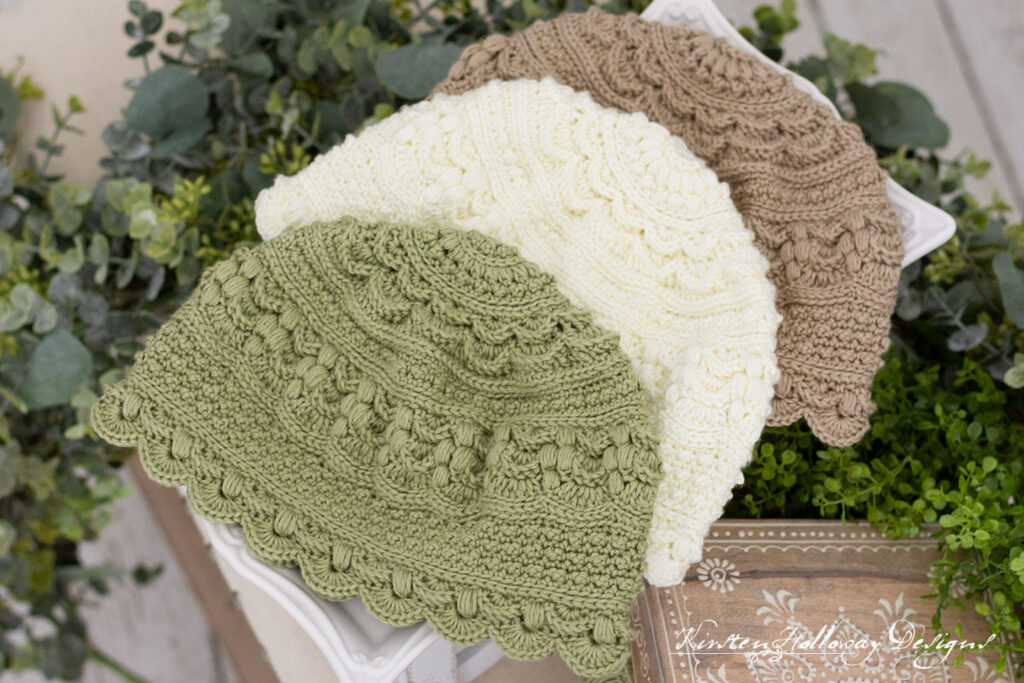
One of the features of this hat is that it lends itself quite well to color changes. Just for fun I started playing with color while doing another test run of the pattern and I couldn’t stop! I have included a version of this beanie with color changes below the main design. It is more challenging, and time consuming to crochet this way, but the end result is very special.

I tried to fill this crochet design with lots of floral accents from the bold flower design at the top to the more abstract white “Baby’s Breath”, or “Lily of the Valley” polka-dots near the lower portion of the hat. Puff stitches look like clusters of grapes or berries through the upper mid section and are repeated again near the bottom edge.

You can choose to use muted colors for a more subtle look, or you can choose bright hues for a truly stunning statement piece. It is my hope that whether you crochet this for yourself, or for a friend, that this little hat will brighten your day and bring a smile to your face.
Yet now hear, O Jacob my servant; and Israel, whom I have chosen: Thus saith the LORD that made thee, and formed thee from the womb, which will help thee; Fear not, O Jacob, my servant; and thou, Jesurun, whom I have chosen. For I will pour water upon him that is thirsty, and floods upon the dry ground: I will pour my spirit upon thy seed, and my blessing upon thine offspring: And they shall spring up as among the grass, as willows by the water courses (emphasis added).
Isaiah 44:1-3
Difficulty:
Intermediate
Materials Needed:
3.25mm (D) hook, or hook needed to obtain gauge
260-280 yds #2 Yarn Bee Yarntopia in colors of your choice. Pictured is Hummus, Ivory, Sage, and White.
Yarn needle
Scissors
Stitch markers (optional)
Stitches used:
sl st =slip stitch
sc = single crochet
hdc = half double crochet
dc = double crochet
tr = treble crochet
BPdc = back post double crochet
BPhdc = back post half double crochet
BPsc = back post single crochet
sc2tog = single crochet 2 together
Additional Terms:
Puff stitch = yo, pull up a loop 5 times in same st, yo, pull through 10 loops, yo pull through final 2 loops.
Small puff stitch = yo, pull up a loop 3 times in same st, yo, pull through 6 loops, yo, pull through final 2 loops.
Picot single crochet (psc) = Insert hook through top of stitch, yo, pull up a loop, [yo, draw through 1 loop] 3 times making a ch 3, yo, draw through final 2 loops on hook. Pull your ch-3 sp towards the front of your work instead of pushing it toward the back.
BLO = back loop only
Back bar of sc = Look at the back of the stitch and locate the short bar that runs horizontal. Work all stitches for the round into this bar. This is a different location than the back loop!
st/sts = stitch/stitches
sp/sps = space/spaces
Prev = previous
Gauge:
Circle should measure 4” across if you worked the original beginning, and 4 1/4” across if you worked the alternative beginning option, after round 8.
Measurements:
Women’s hat: 10 1/2″ wide, by 8″ tall.
Additional Notes:
-Ch 1 at beginning of round is not counted as a stitch.
-It is imperative that you know the difference between the “back bar” and the “back loop”. You will lose a lot of textured details, and your piece will be more prone to puckering if you work in the back loop when the directions call for working in the “back bar” instead, especially at the beginning.
-The multicolored beanie requires you to work with several colors of yarn at the same time–there are a bunch of mid-round color changes. If you’re not familiar with color changes you will be after you finish this design! I carried my yarn down the inside of the hat as much as possible to reduce the amount of ends I had to weave in later.
-Color changes can be made by pulling your new color through the last 2 loops of the previous stitch.
Verdant Spring Beanie Pattern (US Terms):
Click here to purchase an ad-free, print-optimized PDF of this pattern on LoveCrafts
OR
Pick up the printable version of this pattern on Etsy instead
There are 2 different ways to start this hat. The original way is more simple, but I’ve also included a fancier, alternative way. If you decide to start out with the alternative method please note that you will join back up at the pattern at round 4–even though you just worked a round 4. If you are looking for the colorized version of this design it is below this plain colored version, so keep scrolling. 🙂
Alternative start (more complex):
Round 1: 9 hdc in magic circle, join with sl st to first hdc. (9)
Round 2: ch 1, working in BLO, (sc, psc) in first st, *(sc, psc) in next st; repeat from * around, join with sl st to first sc. (18)
Round 3: ch 1, sc in each st around, join with sl st to first sc. (18)
Round 4: ch 1, working in back bar of sc, (Small puff, ch 1) in each st around, join with sl st to first Small puff. (18 Small puffs, 18 ch-1 sps)
Continue pattern starting at round 4, below. Your circle will cup a little bit, but should start to flatten out after you complete round 8.
Original start (easier):
Round 1: 12 dc in magic circle, join with sl st to first dc. (12)
Round 2: ch 1, BPsc around each st around, join with sl st to first BPsc. (12)
Round 3: ch 1, (Small puff, ch 1, Small puff, ch 1) in first st, (Small puff, ch 1) in next st, *(Small puff, ch 1, Small puff, ch 1) in next st, (Small puff, ch 1) in next st; repeat from * around, join with sl st to first Small puff. (18 Small puff sts, 18 ch-1 sps)
If you decided to do the alternative start, you’ll pick the pattern back up here:
Round 4: ch 1, *(psc, sc) in ch-1 sp, sk st; repeat from * around, join with sl st to first psc. (18 psc, 18 sc)
Round 5: ch 1, sc in each st around, join with sl st to first sc. (36)
Round 6: ch 1, working in BLO, 2 sc in first st, sc in next 2 sts, *2 sc in next st, sc in next 2 sts; repeat from * around, join with sl st to first sc. (48)
Round 7: ch 1, working in back bar of sc, sc in each st around, join with sl st to first sc. (48)
In rounds 8 and 10 sl sts are not counted as stitches. You will skip over them when working rounds 9 and 11.
Round 8: *sk st, 5 dc in next st, sk st, sl st in next st; repeat from * around, final sl st counts as join. (12 5dc shells)
Gauge check: Circle should measure 4” across if you worked the original beginning and 4 1/4” across if you worked the alternative beginning option.
Round 9: ch 1, *working across shell: BPdc around first st, BPhdc around next st, BPsc around next st, BPhdc around next st, BPdc around next st, move to next shell; repeat from * around, join with sl st to first BPdc. (60)
Round 10: *sk st, (hdc, 2 dc) in next st, 3 tr in next st, (2 dc, hdc) in next st, sk st, sl st between posts of the 2 BPdc sts from prev round; repeat from * around, final sl st counts as join. (12 large petals consisting of 9 sts each)
Round 11: ch 2, *working across shell: BPdc around next 2 sts, BPhdc around next st, BPsc around next 3 sts, BPhdc around next st, BPdc around next 2 sts; repeat from * around, join with sl st to first BPdc. (108)
Round 12: ch 1, hdc in each st around, join with sl st to first hdc. (108)
Round 13: working in 3rd loop of hdc, sc in each st around, join with sl st to first sc. (108)
Round 14: ch 1, working in BLO, sc in each st around, join with sl st to first sc. (108)
Round 15: ch 1, sc in first st, psc in next st, *sc in next st, psc in next st; repeat from * around, join with sl st to first sc. (54 sc, 54 psc)
Round 16: ch 1, sc in each st around, join with sl st to first sc. (108)
Round 17: ch 2, working in BLO, sc in each st around, join with sl st to first sc. (108)
Round 18: ch 1, working in back bar of sc, sc in each st around, join with sl st to first sc. (108)
Round 19: * (sc, ch 1) in next st, sk st, sc in next st, sk st, 5 dc in next st, sk st; repeat from * around, join with sl st to first sc. (18 shells, 36 sc, 18 ch-1 sps)
In the following 4 rounds you will be creating diamond shapes with puff stitches in between each shell, or petal shape:
Round 20: ch 1, *sk st, Puff in ch-1 sp, sk st, working across shell: BPdc around next st, BPhdc around next st, BPsc around next st, BPhdc around next st, BPdc around next st; repeat from * around, join with sl st to first Puff st. (18 Puff sts, 18 BPsc, 36 BPhdc, 36 BPdc)
Round 21: ch 1, *sc in top of puff, sk st, (hdc, dc) in next st, 3 tr in next st, (dc, hdc) in next st, sk st; repeat from * around, join with sl st to first sc. (18 shells, 18 sc)
Round 22: ch 1, Puff between beginning ch and Puff from round 20, ch 1, sk st, Puff between Puff and BPdc from round 20, working across shell: sk st, BPhdc around dc, BPsc around next 3 tr sts, BPhdc around dc, sk st, *Puff between BPdc from and puff stitch from round 20, ch 1, sk st, Puff between Puff and BPdc from round 20, working across shell: sk st, BPhdc around dc, BPsc around next 3 tr sts, BPhdc around dc, sk st; repeat from * around, join with sl st to first Puff. (36 Puff sts, 18 shells)
Round 23: ch 1, sk st, *Puff in ch-1 sp, sk 2 sts, 2dc in next st, 3 tr in next st, 2 dc in next st, sk 2 sts; repeat from * around, join with sl st to first Puff. (18 Puff sts, 18 shells)
Round 24: ch 1, sk st, *working in BLO, sc in next 3 sts, 2 sc in next st, sc in next 3 sts, sl st in top of puff; repeat from * around, join with sl st to first Puff. (144)
Round 25: ch 2, sk st, *working in back bar of sc, sc in next 6 sts, sc2tog; repeat from * around, final sc2tog will be worked in final st of round and in first skipped st of same round, join with sl st to first sc. (126)
Round 26: ch 2, sk st, *working in BLO, sc in next 5 sts, sc2tog; repeat from * around, join with sl st to first sc. (108)
Round 27: ch 1, psc in first st, sc in next st, *psc in next st, sc in next st; repeat from * around, join with sl st to first psc. (108)
Round 28: ch 1, sc in each st around, join with sl st to first sc. (108)
Round 29: ch 1, sc in first st, psc in next st, *sc in next st, psc in next st; repeat from * around, join with sl st to first sc (108)
Round 30: ch 1, sc in each st around, join with sl st to first sc. (108)
Round 31: ch 1, psc in first st, sc in next st, *psc in next st, sc in next st; repeat from * around, join with sl st to first psc. (108)
Round 32: ch 1, sc in each st around, join with sl st to first sc. (108)
Round 33: ch 1, working in BLO, sc in each st around, join with sl st to first sc. (108)
Round 34: ch 1, working in back bar of sc, sc in each st around, join with sl st to first sc. (108)
Round 35: *(sc, ch 1) in next st, sk st, sc in next st, sk st, 5 dc in next st, sk st; repeat from * around, join with sl st to first sc.(18 shells, 36 sc, 18 ch-1 sps)
Round 36: ch 1, *sk st, Puff in ch-1 sp, sk st, working across shell: BPdc around next st, BPhdc around next st, BPsc around next st, BPhdc around next st, BPdc around next st; repeat from * around, join with sl st to first Puff st. (18 Puff sts, 18 BPsc, 36 BPhdc, 36 BPdc)
Round 37: ch 1, *9 dc in top of puff st, sk 2 sts, sl st in next st, sk 2 sts; repeat from * around, join with sl st to first dc. (18 large shells)
Fasten off, and weave in ends.
Verdant Spring Multicolored Beanie Pattern (US Terms):
So maybe you want to add some color to your life! Here is the colorized version of the hat pattern. It’s the same pattern as above, but with suggested color changes written in. There are a lot of them. You are welcome to follow what I did or you can do something completely different!
Color key:
Color A: Hummus (medium brown)
Color B: Ivory (tan)
Color C: Sage (green)
Color D: White
With color A,
Round 1: 9 hdc in magic circle, join with sl st to first hdc. (9)
Drop color A,
Join color B,
Round 2: ch 1, working in BLO, (sc, psc) in first st, *(sc, psc) in next st; repeat from * around, join with sl st to first sc. (18)
Round 3: ch 1, sc in each st around, join with sl st to first sc. (18)
Drop color B, and fasten off.
Your circle will cup a little bit at this point, but should start to flatten out after you complete round 8.
Join color C,
Round 4: ch 1, working in back bar of sc, (Small puff, ch 1) in each st around, join with sl st to first Small puff. (18 Small puffs, 18 ch-1 sps)
In the following round you will be changing colors every stitch. Pull the next color you use through the last 2 loops of the previous stitch.
Round 5: ch 1, *(with color D, psc, with color C, sc) in ch-1 sp; repeat from * around, join with sl st to first psc. (18 psc, 18 sc)
Drop color D, and fasten off.
With color C,
Round 6: ch 1, sc in each st around, join with sl st to first sc. (36)
Round 7: ch 1, working in BLO, 2 sc in first st, sc in next 2 sts, *2 sc in next st, sc in next 2 sts; repeat from * around, join with sl st to first sc. (48)
Round 8: ch 1, working in back bar of sc, sc in each st around, join with sl st to first sc. (48)
In rounds 9 and 11 sl sts are not counted as stitches. You will skip over them when working rounds 10 and 12.
Round 9: *sk st, 5 dc in next st, sk st, sl st in next st; repeat from * around, final sl st counts as join. (12 5dc shells)
Gauge check: Circle should measure 4 1/4” across.
Drop color C,
With color B,
Round 10: ch 1, *working across shell: BPdc around first st, BPhdc around next st, BPsc around next st, BPhdc around next st, BPdc around next st, move to next shell; repeat from * around, join with sl st to first BPdc. (60)
Round 11: *sk st, (hdc, 2 dc) in next st, 3 tr in next st, (2 dc, hdc) in next st, sk st, sl st between posts of the 2 BPdc sts from prev round; repeat from * around, final sl st counts as join. (12 large petals consisting of 9 sts each)
Drop color B,
With color A,
Round 12: ch 2, *working across shell: BPdc around next 2 sts, BPhdc around next st, BPsc around next 3 sts, BPhdc around next st, BPdc around next 2 sts; repeat from * around, join with sl st to first BPdc. (108)
Round 13: ch 1, hdc in each st around, join with sl st to first hdc. (108)
Round 14: working in 3rd loop of hdc, sc in each st around, join with sl st to first sc. (108)
Round 15: ch 1, working in BLO, sc in each st around, join with sl st to first sc. (108)
Round 16: ch 1, sc in first st, with color C, psc in next st, *with color A, sc in next st, with color C psc in next st; repeat from * around, join with sl st to first sc. (54 sc, 54 psc)
Drop color C,
With color A,
Round 17: ch 1, sc in each st around, join with sl st to first sc. (108)
Round 18: ch 2, working in BLO, sc in each st around, join with sl st to first sc. (108)
Drop color A,
With color B,
Round 19: ch 1, working in back bar of sc, sc in each st around, join with sl st to first sc. (108)
Round 20: * (sc, ch 1) in next st, sk st, sc in next st, sk st, 5 dc in next st, sk st; repeat from * around, join with sl st to first sc. (18 shells, 36 sc, 18 ch-1 sps)
With color C,
Round 21: ch 1, *sk st, Puff in ch-1 sp, sk st, with color B, working across shell: BPdc around next st, BPhdc around next st, BPsc around next st, BPhdc around next st, BPdc around next st; repeat from * around, join with sl st to first Puff st. (18 Puff sts, 18 BPsc, 36 BPhdc, 36 BPdc)
Round 22: ch 1, *sc in top of puff, sk st, (hdc, dc) in next st, 3 tr in next st, (dc, hdc) in next st, sk st; repeat from * around, join with sl st to first sc. (18 shells, 18 sc)
Drop color B,
With color C,
Round 23: ch 1, Puff between beginning and Puff from round 21, ch 1, sk st, Puff between Puff and BPdc from round 21, with color B, working across shell: sk st, BPhdc around dc, BPsc around next 3 tr sts, BPhdc around dc, sk st, *With color C, Puff between BPdc from and puff from round 21, ch 1, sk st, Puff between Puff and BPdc from round 21, with color B, working across shell: sk st, BPhdc around dc, BPsc around next 3 tr sts, BPhdc around dc, sk st; repeat from * around, join with sl st to first Puff st. (36 Puff sts, 18 shells)
Drop color B,
With color C,
Round 24: ch 1, sk st, *Puff in ch-1 sp, sk 2 sts, with color B, 2dc in next st, 3 tr in next st, 2 dc in next st, sk 2 sts; repeat from * around, join with sl st to first Puff. (18 puff sts, 18 shells)
Drop colors B and C,
With Color A,
Round 25: ch 1, sk st, *working in BLO, sc in next 3 sts, 2 sc in next st, sc in next 3 sts, sl st in top of Puff; repeat from * around, join with sl st to first Puff. (144 sc)
Drop color A,
With color C,
Round 26: ch 2, sk st, *working in back bar of sc, sc in next 6 sts, sc2tog; repeat from * around, final sc2tog will be worked in final st of round and in first skipped st of same round, join with sl st to first sc. (126)
Round 27: ch 2, sk st, *working in BLO, sc in next 5 sts, sc2tog; repeat from * around, join with sl st to first sc. (108)

Drop color C,
In the next section you will be changing colors every stitch in the rounds with the psc stitches. I made my psc stitches in white (Color D), and used the Sage green (color C) as the background. This process is rather time consuming, but it adds a nice pop of color and texture to the hat. You can go with my color scheme, or do something completely different!
With color D,
Round 28: ch 1, psc in first st, with color C, sc in next st, *with color D, psc in next st, with color C, sc in next st; repeat from * around, join with sl st to first psc. (108)
Round 29: ch 1, sc in each st around, join with sl st to first sc. (108)
Round 30: ch 1, sc in first st, with color D, psc in next st, *with color C, sc in next st, with color D, psc in next st; repeat from * around, join with sl st to first sc (108)
Drop color D,
With color C,
Round 31: ch 1, sc in each st around, join with sl st to first sc. (108)
Drop color C,
With color D,
Round 32: ch 1, psc in first st, with color C, sc in next st, *with color D, psc in next st, with color C, sc in next st; repeat from * around, join with sl st to first psc. (108)
Drop color D and fasten off.
With color C,
Round 33: ch 1, sc in each st around, join with sl st to first sc. (108)
Drop color C,
With color A,
Round 34: ch 1, working in BLO, sc in each st around, join with sl st to first sc. (108)
Drop color A,
With color B,
Round 35: ch 1, working in back bar of sc, sc in each st around, join with sl st to first sc. (108)
Round 36: *(sc, ch 1) in next st, sk st, sc in next st, sk st, 5 dc in next st, sk st; repeat from * around, join with sl st to first sc. (18 shells, 36 sc, 18 ch-1 sps)
Drop color B and fasten off.
With color C,
Round 37: ch 1, *sk st, Puff in ch-1 sp, sk st, with color A, working across shell: BPdc around next st, BPhdc around next st, BPsc around next st, BPhdc around next st, BPdc around next st; repeat from * around, join with sl st to first Puff st. (18 Puff sts, 18 BPsc, 36 BPhdc, 36 BPdc)
Drop color C and fasten off.
With color A,
Round 38: ch 1, *9 dc in top of Puff st, sk 2 sts, sl st in next st, sk 2 sts; repeat from * around, join with sl st to first dc
Fasten off, and weave in all ends.
.sdg.
Want more gorgeous crochet patterns, and a little encouragement for your day? Sign up for my newsletter here! That way you’ll never miss out on special events, or freebies I’m offering.
JOIN ME ON SOCIAL MEDIA
I would love to see a picture when you’re done, so please feel free to come by my Facebook group and show off your finished project! Be sure to tag @kirstenhollowaydesigns when you share pictures of your project on Instagram!
You can also follow me on Facebook, Pinterest, Instagram, and Ravelry for more beautiful crochet patterns.
PATTERN TERMS AND CONDITIONS:
You are welcome to share the link to this pattern, using one image of your choice, on your site, but please do not share the written patterns themselves, this includes my Ravelry downloads or translations of these patterns, or use additional images. You do not have permission to use my images by themselves to create pinnable graphics for Pinterest, however they may be included in a roundup pin if there are 4 or more other patterns. If you sell finished items online, please do not use my pictures for your listings. I’m positive that your work is of high enough quality for you to sell the finished piece. Have confidence in your abilities! <3 Thank you!
This pattern was made to be used by individuals and small business crocheters alike. Selling your finished pieces in boutiques, at farmer’s markets, craft shows, and other local events is encouraged! Please credit/link Kirsten Holloway Designs when selling finished products online. The only thing I require is that this pattern not be used commercially to produce hundreds of thousands of copies. If you enjoyed this pattern or found it useful, why not share a link to this post with your friends?


