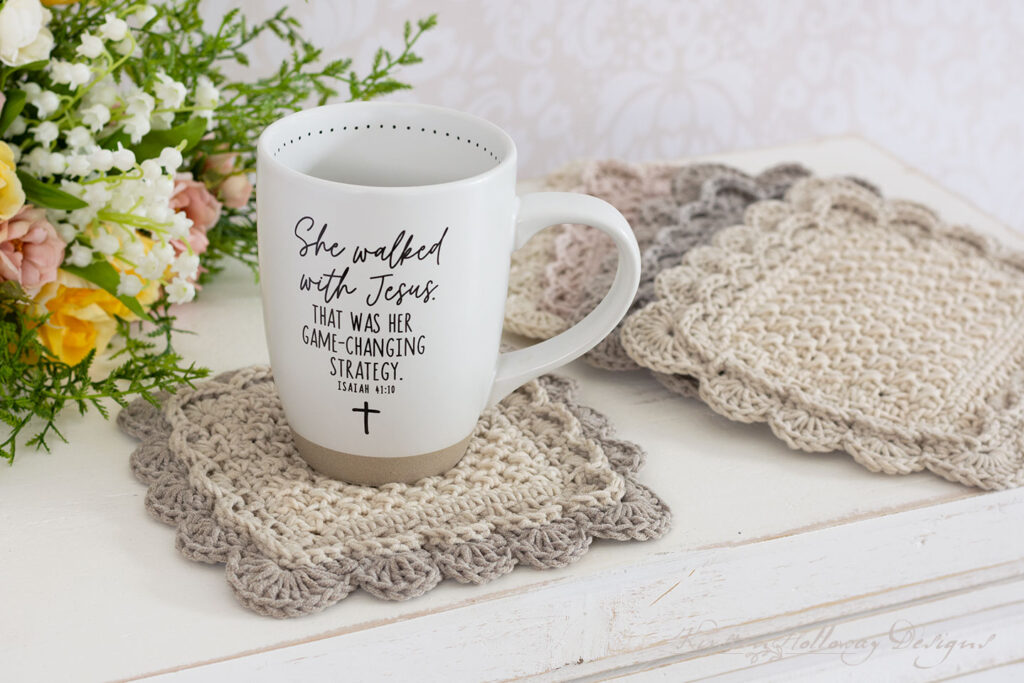
Crochet a set of elegant, mug rugs to set your hot drinks on, or to give to friends and neighbors as a thoughtful housewarming gift. This quick and easy crochet pattern features a textured center and pretty scallops to trim the edges. Find the free crochet pattern instructions below, or purchase a print-optimized, ad-free PDF by clicking here.
This dainty mug rug came about as a swatch to test my math for the edging on my Parfait baby blanket. You all liked it so much that I had to fancy it up a little bit and put it in it’s own post. 🙂
I really love the soft colors in some of the cotton cakes skeins but since I don’t care for yarns with sudden color changes I almost never buy them. This quick little project was the perfect place to use that kind of yarn though because it doesn’t require a lot of yarn and the colors really are beautiful together. There’s some yarn hacking involved, however it’s very simple and I’ve explained what you need to do at the beginning of the pattern below.

Caron Cotton Cakes is listed as a #4 yarn but it’s closer to a #3 light weight yarn. It’s soft and easy on the hands which is always a plus for me, and projects crocheted with finer yarns always look so pretty. I picked up mine at my local Michael’s craft store, but you can also find it online if your store is out.
Crochet a set for Mom (that’s my mom’s favorite mug in the picture below), or as a gift for a friend or neighbor’s housewarming. This little mug rug works up super fast and list I said earlier, it uses only a little bit of yarn! The pattern also comes in 2 sizes with instructions for how to modify the sizing further if needed. Let’s get to work!

Disclaimer: This post contains affiliate links. When you purchase something using these links a small percentage of the sales price goes to me. However, you do not pay any extra for the item you purchase.
Difficulty:
Easy
Techniques used: Spike stitches, shell stitches, working in the front loop only, back post stitches.
Materials Needed:
1 skein #4 Caron Cotton Cakes yarn in “Lighthouse” (available exclusively at Michael’s)
-Approximately 55 yds for square coaster, or 65 yds for rectangle coaster
4mm hook, or hook needed to obtain gauge
Yarn needle
Scissors
Stitch markers (Optional)
Yarn winder (Optional)
Stitches Used:
ch = chain
sc = single crochet
dc = double crochet
BPhdc = back post half double crochet
BPsc = back post single crochet
Additional Terms:
Spike st = using relaxed tension, insert hook into front loop of stitch from previous row, draw up a loop, complete as you would a regular single crochet.
FLO = front loop only
st/sts = stitch/stitches
sp/sps = space/spaces
sk = skip
prev = previous
Gauge:
14 sc in 4”, however, gauge is not particularly important for this project.
Measurements:
Square: 6 3/4″ wide x 6 3/4″ tall
Rectangular: 8 1/4” wide x 6 3/4” tall
Additional Notes:
-Ch 1 at beginning of row does not count as a stitch.
-This pattern comes in 2 sizes: a square mug rug and a rectangular mug rug. Want a larger (or smaller) mug rug? Work the center in multiples of 4+3 (+ 1 for your first row’s turning chain). Your rows also need to be in the same multiple, minus the +1 turning chain.
-The piece will curl a bit until you finish with the last round of shells. Using relaxed tension when making the spike stitches will reduce the amount of curl.
-Caron Cotton Cakes yarn is closer to a #3 weight. Trying to make this in another cotton such as Lily Sugar ‘n Cream will give you a much larger mug rug.
-A small picture tutorial is included at the bottom of this post to help you keep track of your rows and show you what they should look like.
-If you don’t want a textured center it’s possible to just use regular single crochet throughout the body of the piece and then add the fancy edging over that.
Scalloped Mug Rug Coaster Pattern (US Terms):
Click here to purchase an ad-free, print-optimized PDF of this pattern on LoveCrafts
Before you begin there is a little bit of yarn “hacking” to get the colors to flow as I show them in my mug rugs. This yarn has stripes or sections of several different colors. You’ll want to grab your yarn winder and wind up the individual colors into smaller cakes. You can wind up the sections by hand too, but a yarn winder is faster. Once one color is wound, snip the yarn and create your next small cake. A single stripe of color was enough for me to complete the middle and 2 edging rounds of the rectangular mug rugs, but I’d have to join a new color once I got about 2 shells on the edging finished.
Once you have your yarn colors divvied up move to the next part of the pattern.

I’ve included some images showing how this coaster comes together below the written pattern so you can keep track of your your mug rug should be looking.
Ch 16, [20],
Row 1: sc in 2nd ch from hook, sc in each remaining st of row, ch 1, turn. (15, [19])
Row 2: working in FLO, sc in each st across, ch 1, turn. (15, [19])
Row 3: sc in first st, *spike st through front loop of next st from row 1, sc in next st; repeat from * across, ch 1, turn. (15, [19] sts: 8, [10] sc, 7, [9] spike sts)
Row 4: working in FLO, sc in each st across, ch 1, turn. (15, [19])
Row 5: spike through front loop of sc from row 3, sc in next st, spike through front loop of sc from row 3; repeat from * across, ch 1, turn. (15, [19] sts: 7, [9] sc, 8, [10] spike sts)
Repeat rows 2-5 2 times, then repeat rows 2-3 but do not turn at the end of row 3.
Mug Rug Edging:

Round 1: continuing around corner and down raw edge of piece, evenly space 15 sc, note: that’s 1 sc per row, ch 1, work 15, [19] sc across bottom, ch 1, evenly space 15 sc along second raw edge, ch 1, work 15, [19] sc across top, ch 1, join with sl st to first sc. (60, [68] sc, 4 ch-1 sps)
Round 2: ch 1, sc in first st (same st as join) *ch 1, sk st, sc in next st* repeat from * to * to end of row, (sc, ch 1, sc) in ch-1 sp at corner, sc in next st, **ch 1, sk st, sc in next st** repeat from ** to ** to end of row, (sc, ch 1, sc) in ch-1 sp at corner, sc in next st; repeat entire round from *, join with sl st to first sc. (7 [9] ch-1 sps on top and bottom, 7 ch-1 sps across sides, 4 ch-1 sps at corners)
Round 3: sl st into first ch- sp, *[sk st, 5 dc in next ch-1 sp, sk st, sl st into next ch-1 sp] 3 times, sk 2 sts, 8 dc in ch-1 sp at corner, sk 2 sts, sl st into nxt ch-1 sp, [sk st, 5 dc in next ch-1 sp, sk st, sl st into next ch-1 sp] 4 times, sk 2 sts, 8 dc in ch-1 sp at corner, sk 2 sts, sl st into next ch-1 sp; repeat from * around, final sl st counts as join. (12, [14] 5-dc shells, 4 8-dc shells)
(Optional: drop main color and join complementing or contrasting color,)
Round 4: ch 1, *working across shell: BPhdc around first st, BPsc around next 3 sts, BPhdc around last st of shell*, repeat from * to *, when you arrive at end of row work this sequence across the shell in the corner: BPhdc around next 2 sts, BPsc around next 2 sts, ch 1, BPsc around next 2 sts, BPhdc around next 2 sts; repeat from * around, join with sl st to first BPhdc.
Round 5: *sk 2 sts, 6 dc in next st, sk 2 sts, sl st between the 1st and 2nd BPhdc in a row from prev round; repeat from * to end of row, sk 4 sts, in ch-1 sp at corner work 11 dc, sk 4 sts, sl st between the 1st and 2nd BPhdc in a row from prev round, repeat entire round from *, final sl st counts as join. (12, [14] 6-dc shells, 4 11-dc shells)
Fasten off, weave in ends.
Block if desired.
The following pictures are meant to help you keep track of your progress as your mug rug is coming together. Please let me know if you have a hard time reading the text on the pictures. I can leave it off and reupload and just let you know what rows are in what set of images if that works better.

On rows 3 and 5 your spike stitches will alternate.

Edging rounds:


Feel free to change your color for these last 2 rounds if you like:


And that’s it! Now you can make a whole set of coasters! Happy gift-giving!
.sdg.
Want more gorgeous crochet patterns, and a little encouragement for your day? Sign up for my newsletter here! That way you’ll never miss out on special events, or freebies I’m offering.
JOIN ME ON SOCIAL MEDIA
I would love to see a picture when you’re done, so please feel free to come by my Facebook group and show off your finished project! Be sure to tag @kirstenhollowaydesigns when you share pictures of your project on Instagram!
You can also follow me on Facebook, Pinterest, Instagram, and Ravelry for more beautiful crochet patterns.
PATTERN TERMS AND CONDITIONS:
You are welcome to share the link to this pattern, using one image of your choice, on your site, but please do not share the written patterns themselves, this includes my Ravelry downloads or translations of these patterns, or use additional images. You do not have permission to use my images by themselves to create pinnable graphics for Pinterest, however they may be included in a roundup pin if there are 4 or more other patterns. If you sell finished items online, please do not use my pictures for your listings. I’m positive that your work is of high enough quality for you to sell the finished piece. Have confidence in your abilities! <3 Thank you!
This pattern was made to be used by individuals and small business crocheters alike. Selling your finished pieces in boutiques, at farmer’s markets, craft shows, and other local events is encouraged! Please credit/link Kirsten Holloway Designs when selling finished products online. The only thing I require is that this pattern not be used commercially to produce hundreds of thousands of copies. If you enjoyed this pattern or found it useful, why not share a link to this post with your friends?


