This fall themed baby bonnet pattern is full of sugar and spice and everything nice! It comes with instructions for creating an optional rosette, as well as notes for adding beads, but it looks just as cute plain. Crochet one for your little pumpkin’s fall pictures.
Click here to add this pattern to your Ravelry queue
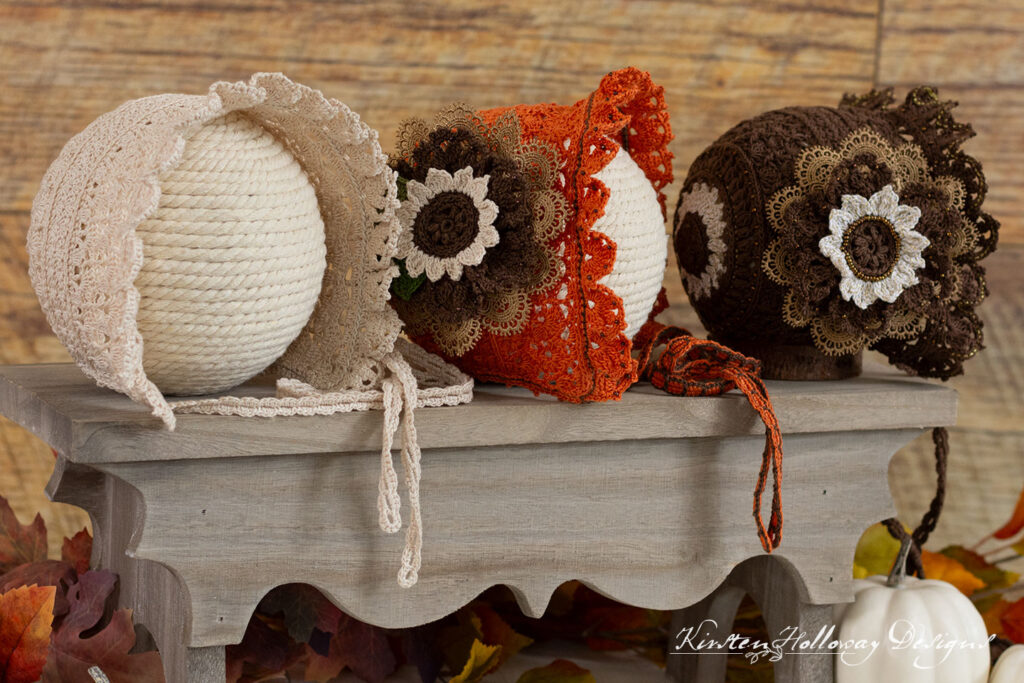
Earth tones are some of my favorite hues and fall is a perfect time to crochet something pretty with them! While this bonnet also works well for Spring I have stuck with the Autumn theme, adding pumpkin leaves and sunflowers to the rosette. Since many of you also liked the idea of a rose instead of a sunflower for the rosette I have also included a simple rose pattern at the bottom of this post.

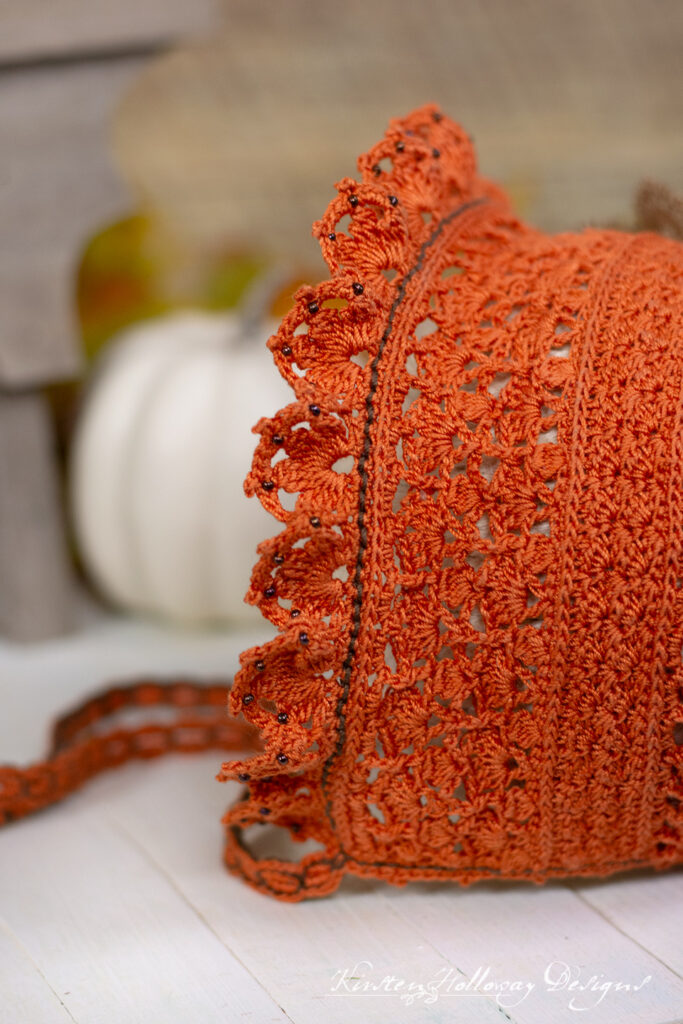
Originally these bonnets weren’t going to have a lot of extra details (I’ll share a picture of a plain version a little further down the page), but when the day I had been planning to photograph them turned out to be exceptionally dark and cloudy, I thought it might be fun to dress the bonnets up with some beaded details and surface slip stitching. …And since I can never seem to do anything half-way when it comes to design, this is the result:

I love how the gold thread and glass beads add a little extra sparkle to that rich brown thread, don’t you?!
It was also my first time using metallic crochet thread in one of my designs, and the little flower design on the back matches the sunflower rosette perfectly!
I have not put exact instructions for the beading or surface slip stitched details because I want you to have fun and be creative this this project. I used a lot of scraps that I had laying around, so what you have in your craft supplies collection is going to make this bonnet uniquely yours.
One word of caution if you do add beads, please make sure that the baby is never left unattended while wearing this. It’s not a toy, and beads and even flower embellishments can easily end up in little mouths if busy fingers are left to play with the bonnet.
So maybe beads and flowery accents aren’t your thing, or maybe you’re in a hurry to get this done and gifted to that new little granddaughter or niece. I get it. Here’s a version of this bonnet without any “extras”. I think it’s still positively stunning.

Just a couple more little notes and then let’s get started!
This bonnet comes in 2 sizes. 3-6 months, and 6-12 months. Due to the stitch pattern I came up with it’s not a matter of just adjusting the stitch counts to change the size, so I have a couple of other options:
- For a newborn bonnet: use #30 thread and a 1.15mm hook and follow the 6-12 month bonnet. I have notes in the pattern on gauge if you decide to try this option.
- For a 0-3 month bonnet: try using #20 thread and a 1.25mm hook and follow the 6-12 month bonnet. I have not tested this option, but I believe it should work out well.
- For a 12-18 month bonnet: Try using a 2mm hook and follow the 6-12 month bonnet pattern.
- For an adult-sized bonnet: try using #1 sock/fingering weight yarn and a 3mm-4mm hook (depending on how tight your tension is). I have not tested this option either, but from past experience turning a baby bonnet into an adult-sized bonnet, I think it should be pretty close.
Disclaimer: This post contains affiliate links. When you purchase something using these links a small percentage of the sales price goes to me. However, you do not pay any extra for the item you purchase.
Difficulty:
Intermediate/Advanced
Techniques Used: hdc in the 3rd loop, 5dc clusters, Puff stitches, V-stitch
Materials Needed:
1.5mm steel hook, or hook needed to obtain gauge
Approximately 150-175 yards #10 Aunt Lydia’s Crochet thread in Pumpkin, Fudge Brown, or Natural
-Small amount of green thread in 2 harmonizing colors for pumpkin leaves, and medium brown for surface slip stitched detail, and, (optional) Natural/Metallic Gold crochet thread for the sunflower detail at the back of the bonnet, or for the separate sunflower embellishment.
1 skein of Metallic Gold embroidery floss for slip stitched details
Yarn needle
Scissors
13” of 2” wide gold lace trim
Heavy-duty thread
(Optional) 12/0 Antique Brass beads
(Optional) Beading needle
(optional) Sewing thread to match the color of your bonnet
(Optional) Sewing needle
Stitch markers
Stitches Used:
ch = chain
sl st = slip stitch
sc = single crochet
hdc = half double crochet
dc = double crochet
3tr cluster = tr3tog in same st
5dc cluster dc5tog in same st
FPdc = front post double crochet
BPdc = back post double crochet
Additional Terms:
hdc in the 3rd loop = Look at the top of the stitch, and locate the sideways “V”, bend the stitch to look at the back and you should see another “V”. You’ll be working into the back loop of that “V”, this is called the 3rd loop.
Small puff stitch: yo, pull up a loop 3 times in same st, yo, pull through 6 loops, yo, pull through final 2 loops
Puff stitch: yo, pull up a loop 4 times in same st, yo, pull through 8 loops, yo, pull through final 2 loops
V-stitch: (dc, ch 1, dc) in same st
Small picot: using tight tension, ch 2, sl st back into first st
RS = right side
WS = wrong side
sk = skip
st/sts = stitch/stitches
sp/sps = space/spaces
prev = previous
Gauge:
Circle should measure 4” across if crocheting with #10 thread, or 2 3/4” across if crocheting with #30 thread and a 1.15mm hook after round 10.
Measurements:
3-6 months: 6″ front to back, 6 1/2″ tall top to bottom at front of bonnet
6-12 Months: 6 1/2” front to back, by 7” tall top to bottom at front of bonnet.
Additional Notes:
Ch 1 at beginning of round/row does not count as stitch
-It is possible to make a preemie/newborn size of this bonnet following the 6-12 months pattern using #30 thread and a 1.15mm hook.
–THIS BONNET IS NOT A TOY. Beads and small flower details can pose a choking hazard. Do not leave the baby unsupervised while wearing it.
Pumpkin Spice Baby Bonnet (US Terms):
3-6 month size bonnet:
You will need to cut your yarn and reattach it in 3 places on this bonnet in order to keep things looking like they do on the 6-12 mos size (which I designed first). I tried to keep the ends you’d have to weave in to a minimum, but the stitch direction is a little different and since I like to have my cluster stitches and shell stitches on the “right side” of a piece I wrote things this way.
Round 1: 8 sc in magic circle, join with sl st to first sc. (8)
Round 2: ch 1, *(small puff st, ch 2); repeat from * around, join with sl st to first puff. (8 small puff sts, 8 ch-2 sps)
Round 3: ch 1, *sk st, 3 hdc in ch-2 sp; repeat from * around, join with sl st to first hdc. (24)
Round 4: ch 1, working in 3rd loop of hdc, 2sc in first st, sc in next 2 sts, *2 sc in next st, sc in next 2 sts; repeat from *around, join with sl st to first sc. (32)
(Optional: use a contrasting or complementing color in round 5. Switch back to main color in round 6.)
Round 5: ch 2, *3tr cluster, ch 3, sk st; repeat from * around, join with sl to first 3tr cluster. (16 3 tr clusters, 16 ch-3 sps)
Round 6: ch 1, *4 hdc in next ch-3 sp; repeat from * around, join with sl st to first hdc. (64)
Round 7: ch 1, working all sts of round in 3rd loop of hdc, 2 sc in first st, sc in next 7 sts, *2 sc in next st, sc in next 7 sts; repeat from *around, join with sl st to first sc. (72)
Round 8: ch 1, *puff st, ch 2, sk st; repeat from * around, join with sl st to first puff st. (36 puff sts, 36 ch-2 sps)
Round 9: ch 1, *3 hdc in ch-2 sp; repeat from * around, join with sl st to first hdc. (108)
Round 10: ch 1, working all sts of round in 3rd loop of hdc, sc in each st around, join with sl st to first sc. (108)
Circle should measure 4” across if crocheting with #10 thread.
Round 11: ch 1, hdc in first st, sk 2 sts, (3dc, ch 1, 3dc) in next st, sk 2 sts, *hdc in next st, sk 2 sts, (3dc, ch 1, 3dc) in next st, sk 2 sts; repeat from * around, join with sl st to first hdc. (18 shells, 18 hdc)
Round 12: ch 1, *FPdc around hdc, ch 3, sk 3 sts, sc in ch- sp, ch 3, sk 3 sts; repeat from * around, join with sl stop first FPtr (18 FPdc, 18 sc, 36 ch-3 sps)
In the following round you will start off crocheting only in the tops of the FPdc and sc sts skipping over the ch-3 sts in between. Toward the end of the round you will begin to create a gap at what will be the bottom of the bonnet where the baby’s neck will go.
Round 13: ch 4, dc in same st (counts as first V-stitch of round), ch 1, sk 3 sts, 5 dc cluster in next st, ch 1, sk 3 sts, [V-stitch in next, ch 1, sk 3 sts, 5dc cluster in next, ch 1, sk 3 sts] 14 times, V-stitch in next st, note: you should now have 6 ch-3 sps left in your round, ch 1 (place st marker in ch. This will mark the end of your next row), work 2 sc in side of dc just made, (place st markers in both of those 2 sc sts), 3 hdc in ch-3 sp, sk st, [4 hdc in next ch-3 sp, sk st] 4 times, 3 hdc in next ch-3 sp, 2 sc in ch-4 sp at beginning of round, (place st markers in both of those 2 sc sts), join with sl st to 3rd ch. (16 V-stitches, 15 5dc clusters, 22 hdc, 4 sc)
Working in the same direction that you have been,
Row 14: (ch 1, dc, ch 1, 3 dc) in first v-stitch, sk 2 sts, hdc in top of 5dc cluster, *sk 2 sts, (3 dc, ch 1, 3 dc) in ch-1 sp at center of v-stitch, sk 2 sts, hdc in top of 5dc cluster; repeat from * across, 3dc, ch 1, dc in final v-stitch of row, ch 1, turn. (2 half-shells, 14 shells, 15 hdc)
Up until this point all of the work that you have done on this bonnet has been with the “right-side” or RS showing. We will now switch to working back and forth in rows.
Row 15 (WS): sk st, sc in ch-1 sp, [ch 3, sk 3 sts, BPdc around hdc, ch 3, sk 3 sts, sc in ch-1 sp] 15 times, ch 1, turn. (16 sc, 15 BPdc, 30 ch-3 sps)
Row 16 (RS): hdc in first st, *3 hdc in ch-3 sp, sk st; repeat from * across, hdc in final st of row, ch 1, turn. (92)
Row 17 (WS): working all sts of row in 3rd loop of hdc, sc in each st across, ch 1, turn. (92)
Row 18 (RS): sc in first st, *(sc, hdc, dc) in next st, sk 2 sts; repeat from * across, sc in final st of row, ch 1, turn. (92)
Row 19 (WS): *(sc, hdc, dc) in top of sc, sk 2 sts; repeat from * across, sc in last 2 sts of row, ch 1, turn. (92)
Repeat rows 18 and 19.
Row 22 (RS): hdc in each st across, ch 1, turn. (92)
Row 23 (WS): working all sts of row in 3rd loop of hdc, sc in each st across, ch 1, turn. (92)
The first part of the next round will be worked across the front of the bonnet, and the later portion will be worked along the bottom and neck opening of the bonnet. I’ve done it this way so that you have fewer ends to weave in later. So long as you placed your stitch markers in round 13 the later portion of round 24 should go smoothly. Don’t forget to work the entire bracketed sequence along the bottom the designated number of times or your stitch count will be off and the bottom won’t be “sucked in” along the back of the neck opening. I found that marking my sc2tog stitches helped me keep better track of things. The 2 turning chains in this round do not count as stitches.
Round 24 (RS): hdc in first st, [sk 2 sts, (3dc, ch 1, 3dc) in next st, sk 2 sts, hdc in next st] 15 times, skip final st in row, ch 1, and continue working down around corner, work 12 sc evenly along bottom edge, note: your first sc will be worked into the side of the hdc you just completed, (place stitch marker in first sc), sl st into first marked st, sk second marked sc st from round 13, sc in next 2 sts, [sc2tog, sc in next 2 sts] 5 times, sk 2 marked sts, evenly work 12 sts along bottom edge (place st marker in last sc made), you should now be at the beginning of the round, ch 1, join with sl st to first hdc. (15 shells, 16 hdc, 36 sc, 5 sc2tog)
Row 25 (RS): ch 1, dc in first st, [ch 3, sk 3 sts, sc in ch-1 sp, ch 3, sk 3 sts, FPdc around hdc from prev row] 14 times, ch 3, sk 3 sts, sc in ch-1 sp, ch 3, sk 3 sts, dc in final st of row. (14 FPdc, 15 sc, 30 ch-3 sps, 2 dc)
Cut thread, and fasten off.
With right side of bonnet facing you, attach thread in top of first dc from row 25,
Row 26 (RS): V-stitch in first dc, [ch 1, sk 3 sts, 5dc cluster in next st, ch 1 sk 3 sts, V-stitch in next st] 15 times. (16 V-stitches, 15 5dc clusters, 30 ch-1 sps)
Cut thread, and fasten off.
With right side of bonnet facing you, attach thread to ch-1 sp in center of first V-st of row 26,
Row 27 (RS): (dc, ch 1, 3 dc) in ch-1 sp at center of V-stitch, sk 2 sts, hdc in top of 5dc cluster, [sk 2 sts, (3 dc, ch 1, 3 dc) in ch-1 sp at center of v-stitch, sk 2 sts, hdc in top of 5dc cluster] 14 times, sk 2 sts, (3dc, ch 1, dc) in ch-1 sp at center of final V-Stitch, ch 1, turn. (14 shells, 2 half shells, 15 hdc)
Row 28 (WS): sk st, sc in ch-1 sp, [ch 3, sk 3 sts, BPdc around hdc, ch 3, sk 3 sts, sc in ch-1 sp] 15 times, repeat from * across, ch 1, turn. (16 sc, 15 BPdc, 30 ch-3 sps)
Row 29 (RS): hdc in top of sc, 3 hdc in first ch-3 sp, *sk st, 3 hdc in next ch-3 sp; repeat from * across, hdc in final sc st of row, ch 1, turn. (92)
Row 30 (WS): working in 3rd loop of hdc, sc in each st across, ch 1, turn. (92)
Row 31 and row 32 will be L shaped. See notes below this row.
Row 31 (RS): sc in next 4 sts, ch 3, sc in next 3 sts, [ch 1, sc in next 3 sts, ch 3, sc in next 3 sts] 14 times, sc in final st of row, ch 1, continue working down around corner, working 10 sc evenly along bottom edge, join with sl st to marked st from round 24. (102 sc, 15 ch-3 sps, 14 ch-1 sps)
Cut thread, and fasten off.
In the following round you will create the flowery “shells” on the front of the bonnet. Count over approximately 42 sts from where you last fastened off and attach working thread next to second stitch marker placed in round 24.
Round 32 (RS): work 10 sc evenly along bottom edge, ch 1, turn corner and work this next row of flowery shells across the front of the bonnet (where you made the ch-3 and ch-1 sps in row 31), sc in first st, *ch 1, sk 3 sts, ([3tr cluster, ch 2] 3 times, 3tr cluster, ch 1), sk 3 sts, sc in ch-1 sp; repeat from * across, final sc will be worked in final st of row instead of in a ch-1 sp. (26 sc, 15 flowery shells)
Round 33 is essentially a continuation of round 32 and picks up immediately where that round stops. I have done it this way to hopefully make the instructions clearer. You will begin with what will be the left tie, then continue working around the bottom edge of the bonnet creating small picots, after which you will create the right tie, and finish up by adding the picots to the flowery shells.
Round 33 (RS): ch 1, continue working around corner of bonnet, sc in next 2 sts, ch 104, sk 4 sts, sl st in 5th ch from hook, [ch 2, sk 2 sts, sl st in next st] 33 times, sl st back into bonnet, this completes the first layer of your tie. You will now complete the second layer of the tie, ch 1, remove hook, pass ch-1 behind tie, insert hook, with RS facing you, sl st into first ch-2 sp, [(3 sc, sl st), move to next ch-2 sp] 33 times, (6 sc, sl st) in ch-4 sp at end of tie, move to next ch-2 sp, [(3 sc, sl st), move to next ch-2 sp] 33 times, sl st back into bonnet body, sc in next 3 sts, picot, [sc in next 5 sts, picot] 12 times, sc in next 3 sts, ch 104, sk 4 sts, sl st in 5th ch from hook, [ch 2, sk 2 sts, sl st in next st] 33 times, sl st back into bonnet, this completes the first layer of your tie. You will now complete the second layer of the tie, ch 1, remove hook, pass ch-1 behind tie, insert hook, sl st into first ch-2 sp, [(3 sc, sl st), move to next ch-2 sp] 33 times, (6 sc, sl st) in ch-4 sp at end of tie, move to next ch-2 sp, [(3 sc, sl st), move to next ch-2 sp] 33 times, sl st back into bonnet body, sc in next 2 sts, ch 1, you will now be working across the flowery shells you made in round 34, [(2 sc , picot) in ch-1 sp, [4 sc, picot in ch-3 sp] 3 times, 2 sc in ch-1 sp, sl st in sc] 15 times, join with sl st to first sc of round.
Fasten off, and weave in all ends.
Optional beading and slip stitch details:
Using a contrasting color of crochet thread, slip stitch around back of bonnet between rounds 7 and 8. Sew beads to the tops of the puff stitches in round 8 by running your sewing thread between the stitches in round 9. Sew more beads to the tops of the puff stitches in round 2 by running your sewing thread between the stitches in round 3. Beads can also be added to the cluster shells running across the front of the bonnet if you wish.
I used 2 strands of gold embroidery floss to accent my brown bonnet. Separating the strands out of an entire skein of floss is a bit time consuming, but that extra bit of sparkle is very pretty.
On my orange bonnet I slip stitched across the front, down the length of the ties, and around the bottom with brown thread.
6-12 month size bonnet:
Round 1: 8 sc in magic circle, join with sl st to first sc. (8)
Round 2: ch 1, *(small puff st, ch 2); repeat from * around, join with sl st to first puff. (8 small puff sts, 8 ch-2 sps)
Round 3: ch 1, *sk st, 3 hdc in ch-2 sp; repeat from * around, join with sl st to first hdc. (24)
Round 4: ch 1, working in 3rd loop of hdc, 2 sc in first st, sc in next 2 sts, *2 sc in next st, sc in next 2 sts; repeat from *around, join with sl st to first sc. (32)
Round 5: ch 2, *3tr cluster, ch 3, sk st; repeat from * around, join with sl to first 3tr cluster. (16 3 tr clusters, 16 ch-3 sps)
Round 6: ch 1, *4 hdc in next ch-3 sp; repeat from * around, join with sl st to first hdc. (64)
Round 7: ch 1, working all sts of round in 3rd loop of hdc, 2 sc in first st, sc in next 7 sts, *2 sc in next st, sc in next 7 sts; repeat from *around, join with sl st to first sc. (72)
Round 8: ch 1, *puff st, ch 2, sk st; repeat from * around, join with sl st to first puff st. (36 puff sts, 36 ch-2 sps)
Round 9: ch 1, *3 hdc in ch-2 sp; repeat from * around, join with sl st to first hdc. (108)
Round 10: ch 1, working all sts of round in 3rd loop of hdc, 2 sc in first st, sc in next 8 sts, *2 sc in next st, sc in next 8 sts; repeat from * around, join with sl st to first sc. (120)
Circle should measure 4” across if crocheting with #10 thread, or 2 3/4” across if crocheting with #30 thread and a 1.15mm hook.
Round 11: ch 1, 5dc cluster in first st, ch 1, sk 2 sts, V-stitch in next st, ch 1, sk 2 sts, *5 dc cluster in next st, ch 1, sk 2 sts, V-stitch in next, ch 1, sk 2 sts; repeat from * around, join with sl st to first 5dc cluster. (20 5dc clusters, 20 v-stitches)
Round 12: ch 1, *hdc in top of 5dc cluster, sk 2 sts, (3 dc, ch 1, 3 dc) in ch-1 sp at center of v-stitch, sk 2 st; repeat from * around, join with sl st to first hdc. (20 shells, 20 hdc)
Round 13: ch 1, *FPdc around hdc, ch 3, sk 3 sts, sc in ch- sp, ch 3, sk 3 sts; repeat from * around, join with sl stop first FPdc. (20 FPdc, 20 sc, 40 ch-3 sps)
In the following round you will start off crocheting only in the tops of the FPdc and sc sts skipping over the 3 chain sts in between. Toward the end of the round you will begin to create a gap at what will be the bottom of the bonnet where the baby’s neck will go.
Round 14: ch 4, dc in same st (counts as first v-stitch of round), ch 1, sk 3 sts, 5 dc cluster in next st, ch 1, sk 3 sts, [V-stitch in next, ch 1, sk 3 sts, 5dc cluster in next, ch 1, sk 3 sts] 16 times, V-stitch in next st, note: you should now have 6 ch-3 sps left in your round, ch 1 (place st marker in ch. This will mark the end of your next row), work 2 sc in side of dc just made, (place st markers in both of those 2 sc sts), 3 hdc in ch-3 sp, sk st, [4 hdc in next ch-3 sp, sk st] 4 times, 3 hdc in next ch-3 sp, 2 sc in ch-4 sp at beginning of round, (place st markers in both of those 2 sc sts), join with sl st to 3rd ch. (18 V-stitches, 17 5dc clusters, 22 hdc, 4 sc)
Working in the same direction that you have been,
Row 15: (ch 1, dc, ch 1, 3 dc) in first v-stitch, sk 2 sts, hdc in top of 5dc cluster, *sk 2 sts, (3 dc, ch 1, 3 dc) in ch-1 sp at center of v-stitch, sk 2 sts, hdc in top of 5dc cluster; repeat from * across, 3dc, ch 1, dc in final v-stitch of row, ch 1, turn. (2 half-shells, 16 shells, 17 hdc)
Up until this point all of the work that you have done on this bonnet has been with the “right-side” or RS showing. We will now switch to working back and forth in rows.
Row 16 (WS): sk st, *sc in ch-1 sp, ch 3, sk 3 sts, BPdc around hdc, ch 3, sk 3 sts; repeat from * across, ch 1, turn. (34 ch-3 sps, 18 sc, 17 BPsc)
Row 17 (RS): hdc in first st, [3 hdc in ch-3 sp, sk st] 34 times, hdc in final st of row, ch 1, turn. (104)
Row 18 (WS): working all sts of row in 3rd loop of hdc, sc in each st across, ch 1, turn. (104)
Row 19 (RS): sc in first st, *(sc, hdc, dc) in next st, sk 2 sts; repeat from * across, sc in final st of row, ch 1, turn. (104)
Row 20 (WS): *(sc, hdc, dc) in top of sc, sk 2 sts; repeat from * across, sc in last 2 sts of row, ch 1, turn. (104)
Repeat rows 19 and 20.
Row 23 (RS): hdc in each st across, ch 1, turn. (104)
Row 24 (WS): working all sts of row in 3rd loop of hdc, sc in each st across, ch 1, turn. (104)
The first part of the next round will be worked across the front of the bonnet, and the later portion will be worked along the bottom and neck opening of the bonnet. I’ve done it this way so that you have fewer ends to weave in later. So long as you placed your stitch markers in round 14 the later portion of round 25 should go smoothly. Don’t forget to work the entire bracketed sequence along the bottom the designated number of times or your stitch count will be off and the bottom won’t be “sucked in” along the back of the neck opening. I found that marking my sc2tog stitches helped me keep better track of things. The 2 turning chains in this round do not count as stitches.
Round 25 (RS): 5dc cluster in first st, ch 1, *sk 2 sts, V-stitch in next, ch 1, sk 2 sts, 5dc cluster in next st, ch 1; repeat from * across, when you get to the end of the row skip the last st in the row and continue working down around corner, work 14 sc evenly along bottom edge, (place stitch marker in first sc made), sl st into first marked st, sk second marked sc st from round 14, sc in next 2 sts, [sc2tog, sc in next 2 sts] 5 times, sk 2 marked sts, evenly work 14 sts along bottom edge (place st marker in last sc made), you should now be at the beginning of the round, join with sl st to first 5dc cluster. (18 5dc clusters, 17 v-stitches, 40 sc, 5 sc2tog)
Row 26 (RS): ch 1, hdc in top of 5dc cluster, *sk 2 sts, (3 dc, ch 1, 3 dc) in ch-1 sp at center of v-stitch, sk 2 sts, hdc in top of 5dc cluster; repeat from * across, ch 1, turn. (18 hdc, 17 split shells)
Row 27 (WS): hdc in first st, ch 3, sk 3 sts, sc in ch-1 sp, ch 3, sk 3 sts, *BPdc around hdc from prev row, ch 3, sk 3 sts, sc in ch-1 sp, ch 3, sk 3 sts; repeat from * across, hdc in final st of row, ch 4 (counts as first dc+ch), turn. (34 ch-3 sps, 2 hdc, 17 sc, 16 BPdc)
Row 28 (RS): dc in same st (this completes the first V-stitch of row), ch 1, sk 3 sts, 5dc cluster in top of sc, ch 1, sk 3 sts, *V-stitch in top of BPdc, ch 1, sk 3 sts, 5dc cluster in top of sc, ch 1, sk 3 sts; repeat from * across, v-stitch in top of hdc at end of row. (18 V-stitches, 17 5dc clusters)
Fasten off, and weave in ends.
With right side of bonnet facing you, attach thread in ch-1 sp at center of first v-stitch in row 28,
Row 29 (RS): (dc, ch 1, 3 dc) in ch-1 sp at center of v-stitch, sk 2 sts, hdc in top of 5dc cluster, sk 2 sts, *(3 dc, ch 1, 3dc) in ch-1 sp at center of v-stitch, sk 2 sts, hdc in top of 5dc cluster, sk 2 sts; repeat from * across, (3 dc, ch 1, dc) in ch-1 sp at center of final v-stitch, ch 1, turn. (16 split shells, 2 half split shells, 17 hdc)
Row 30 (WS): sk st, sc in ch-1 sp, *ch 3, sk 3 sts, BPdc around hdc from prev row, ch 3, sk 3 sts, sc in ch-1 sp; repeat from * across, ch 1, turn. (34 ch-3 sps, 18 sc, 17 BPdc)
Row 31 (RS): hdc in top of sc, 3 hdc in first ch-3 sp, *sk st, 3 hdc in next ch-3 sp; repeat from * across, hdc in final sc st of row, ch 1, turn. (104)
Row 32 (WS): working in 3rd loop of hdc, sc in each st across, ch 1, turn. (104)
Row 33 (RS): sc in next 4 sts, ch 3, sc in next 3 sts, *ch 1, sc in next 3 sts, ch 3, sc in next 3 sts; repeat from * across, sc in final st of row. ch 1, continue working down around corner, work 12 sc evenly along bottom edge, join with sl st to marked sc from round 25. (116 sc, 17 ch-3 sps, 16 ch-1 sps)
Fasten off, and weave in ends.
In the following round you will create the flowery “shells” on the front of the bonnet. Count over approximately 45 sts from where you last fastened off and attach working thread next to second stitch marker placed in round 25,
Round 34 (RS): work 12 sc evenly along bottom edge, ch 1, turn corner and work this next row of flowery shells across the front of the bonnet (where you made the ch-3 and ch-1 sps in row 33), sc in first st, *ch 1, sk 3 sts, ([3tr cluster, ch 2] 3 times, 3tr cluster, ch 1), sk 3 sts, sc in ch-1 sp; repeat from * across, final sc will be worked in final st of row instead of in a ch-1 sp. (30 sc, 17 flowery shells)
Round 35 is essentially a continuation of round 34 and picks up immediately where that round stops. I have done it this way to hopefully make the instructions clearer. You will begin with what will be the left tie, then continue working around the bottom edge of the bonnet creating small picots, after which you will create the right tie, and finish up by adding the picots to the flowery shells.
Round 35 (RS): ch 1, continue working around corner of bonnet, sc in next 2 sts, ch 104, sk 4 sts, sl st in 5th ch from hook, [ch 2, sk 2 sts, sl st in next st] 33 times, sl st back into bonnet, this completes the first layer of your tie. You will now complete the second layer of the tie, ch 1, remove hook, pass ch-1 behind tie, insert hook, with RS facing you, sl st into first ch-2 sp, [(3 sc, sl st), move to next ch-2 sp] 33 times, 6 sc in ch-5 sp at end of tie, [(3 sc, sl st), move to next ch-2 sp] 33 times, sl st back into bonnet body, sc in next 3 sts, picot, [sc in next 5 sts, picot] 12 times, sc in next 3 sts, ch 104, sk 4 sts, sl st in 5th ch from hook, [ch 2, sk 2 sts, sl st in next st] 33 times, sl st back into bonnet, this completes the first layer of your tie. You will now complete the second layer of the tie, ch 1, remove hook, pass ch-1 behind tie, insert hook, sl st into first ch-2 sp, [(3 sc, sl st), move to next ch-2 sp] 33 times, 6 sc in ch-5 sp at end of tie, [(3 sc, sl st), move to next ch-2 sp] 33 times, sl st back into bonnet body, sc in next 2 sts, ch 1, you will now be working across the flowery shells you made in round 34, [(2 sc , picot) in ch-1 sp, [4 sc, picot in ch-3 sp] 3 times, 2 sc in ch-1 sp, sl st in sc] 17 times, join with sl st to first sc of round.
Fasten off, and weave in ends.
Optional beading and slip stitch details:
Using Fudge Brown or contrasting color of crochet thread, slip stitch around back of bonnet between rounds 7 and 8. Sew beads to the tops of the puff stitches in round 8 by running your sewing thread between the stitches in round 9. Sew more beads to the tops of the puff stitches in round 2 by running your sewing thread between the stitches in round 3. Beads can also be added to the cluster shells running across the front of the bonnet if you wish.
I used 2 strands of gold embroidery floss to accent my brown bonnet. Separating the strands out of an entire skein of floss is a bit time consuming, but that extra bit of sparkle is very pretty.
On my orange bonnet I slip stitched across the front, down the length of the ties, and around the bottom with brown thread.
Creating the Rosette for the Bonnet:
We will not create the rosette for the side of the bonnet. This is an optional embellishment and makes the bonnet extra special for baby pictures. For the 6-12 month and 3-6 month bonnets I used a 1.5mm hook for this part too but you can make it slightly smaller by using a 1.4mm hook. If you are making a smaller bonnet using #30, or #20 thread you will need to use the hook that you are using for the bonnet to size these embellishments down too.

The rosette is created in 3 layers: a layer of store-bought lace, a simple piece of crochet lace, and a flower. You may use the flower patterns I’ve included here in this post, or you may use a different flower of your choice. I have a variety of flower patterns over here. You can crochet any of them with #10 thread and a 1.5mm hook–even if the pattern calls for yarn.
Store-bought lace layer:
Cut 13” of 2″ wide lace. Using a sewing needle and heavy-duty thread, sew a running stitch through the top of the lace from one side to the other. Pull the ends of the thread to cinch the lace into a circle.
Knot the ends of the thread together
Fasten off securely.
Crochet lace accent layer:
This piece is not pretty by itself (especially the center), but it will make a nice base layer for the flower that you will sew on top of it.
With Fudge brown thread,
Ch 8, join to first ch with sl st forming a ring.
Round 1: ch 1, 12 sc in ring, join with sl st to first sc. (12)
Round 2: ch 7 (counts as first tr + ch-3 sp), *(tr, ch 3) in next st; join with sl st to 4th ch. (12 tr, 12 ch-3 sps)
Round 3: *ch 2, sk 3 chs, ([dc, ch 2] 4 times) in top of tr, sk 3 chs, sl st in next tr; repeat from * around, final sl st counts as join. (6 “open” shells)
Round 4: *working across shell: [3 sc in next ch-2 sp, sk st] 4 times, 3 sc in next ch-2 sp, sl st in sl st from prev round; repeat from * around, final sl st counts as join. (90 sc)
Your piece should start to ruffle/cup and will not lay flat by the end of the round. This is intentional gives it some “volume”.
Round 5: ch 1, *FPsc around tr from round 1, ch 3, sk st, 3dc cluster in next st, ch 3, sk 2 sts, [3tr cluster in next st, ch 4, sk 2 sts] 2 times, 3 tr cluster in next st, ch 3, sk 2 sts, 3dc cluster in next st, ch 3, sk st; rep from * around, join with sl st to first FPsc. (18 3tr clusters, 12 3dc clusters, 12 FPsc, 24 ch-3 sps, 12 ch-4 sps)
Round 6: *4 sc in ch-3 sp, sk st, (sc, [sc, picot] 3 times, sc) in next ch-sp, sk st, 4 sc in next ch-sp, sl st in top of FPsc; repeat from * around, final sl st counts as join.
Fasten off leaving 18” tail for sewing this piece to the lace rosette layer.
Optional: Run your sewing thread through the stitches in round 6 and sew beads to the top of each cluster from round 5.
Sunflower:
I used 2 different colors to create this flower. You may use the colors I did or choose your own. I’ve listed them as color A and color B for this reason. I used Fudge Brown and Natural for the orange bonnet, and Fudge Brown, and Aunt Lydia’s Metallic in Natural and Gold for the dark brown bonnet
With color A,
Ch 4, join to first ch with sl st
Round 1: 8 sc in ch-4 sp, join with sl st to first sc. (8)
Round 2: ch 1, *(small puff st, ch 2); repeat from * around, join with sl t to first puff. (8 small puff sts, 8 ch-2 sps)
Round 3: ch 1, *sk st, 3 hdc in ch-1 sp; repeat from * around, join with sl st to first hdc. (24)
Round 4: ch 1, working in 3rd loop of hdc, 2 sc in first st, sc in next st, *2 sc in next st, sc in next st; repeat from * around, join with sl st to first sc. (36)
Drop color A and fasten off.
With color B,
Round 5: ch 2, (dc, 2 tr, ch 2, sl st into first ch forming picot) in first st, (2 tr, dc, ch 2) in next st, sl st in next st, *ch 2, (dc, 2 tr, ch 2, sl st into first ch forming picot) in next st, (2 tr, dc, ch 2) in next st, sl st in next st; repeat from * around, final sl st counts as join. (12 petals)
Fasten off leaving 18” long tail for sewing flower to leaves, and completed piece to crochet lace layer. Weave in other end.
Pumpkin leaf (make 2):
With green thread,
Round 1: 8 hdc in magic circle, join with sl st to first hdc. (8)
Round 2: ch 1, 2 hdc in each st around, join with sl st to first hdc. (16)
Round 3: (hdc, 2 dc) in first st, 2 dc in next 4 sts, (dc, tr, picot, ch 3, sl st) in next st, ch 1, 2 dc in next st, (2 tr, picot) in next st, 2 tr in next st, 2 dc in next st, ch 1, sl st, ch 3, (tr, picot, dc) in next st, 2 dc in each of the next 4 sts, (dc, hdc, ch 1) in final st, sl st to beginning of round 2 to join.
Fasten off leaving 12” long tail for sewing leaf to hat, weave in other end.
Optional slip stitching: Using brown thread, slip stitch around edge of leaf.
Fasten off, and weave in ends.
Rose flower (optional):
Originally I was just going to put a rose in the center of the rosette, embellishment, but since this is a fall-themed bonnet I thought the sunflower might be more fitting. However, if you wish to crochet this baby bonnet for spring or summer you might wish to do the rose instead. Put a small button in the middle of the rose, or use beads to create a pretty center.
With Natural colored yarn,
Round 1: 6 sc in magic circle, join with sl st to first sc. (6)
Round 2: ch 1, 2 sc in first st, 2 sc in each st around, join with sl st to first sc. (12)
Round 3: (hdc, 2 dc, hdc) in first st, sl st in next st, *(hdc, 2 dc, hdc) in next st, sl st in next st; repeat from * around, final sl st counts as join. (6 petals)
Round 4: sl st to center back of first petal, *ch 3, sl st into center back of next petal; repeat from * around, join with sl st to first sl st. (6 ch-3 sps)
Round 5: sl st into first ch-3 sp, (hdc, 4 dc, hdc, sl st), sl st into next ch-3 sp *[hdc, 4 dc, hdc, sl st], sl st into next ch-3 space, repeat from * around, join with sl st to first sl st. (6 petals)
Round 6: sl st over to center back of first petal *ch 4, sl st into center back of next petal; repeat from * around, join with sl st to first ch of ch-4 sp. (6 ch-4 sps)
Round 7: sl st into first ch-4 space [hdc, 6 dc, hdc, sl st], *sl st into next ch-4 space, [hdc, 6 dc, hdc, sl st]; repeat from * around, join with sl st to first sl st. (6 petals)
Round 8: sl st over to center back of first petal *ch 5, sl st into center back of next petal; repeat from * around, join with sl st to first ch of ch-5 sp. (6 ch-5 sps)
Round 9: sl st into first ch-5 sp *(hdc, 3 dc, 4tr, 3 dc, hdc, sl st), move to next ch-5 sp; repeat from * around, join with sl st to first sl st. (6 petals)
Fasten off leaving 18″ tail for sewing the flower to the crochet lace layer. Weave in other end.
Assembling your rosette:
This rosette can also make a cute hair clip for toddlers and kids if you don’t want to add it to the bonnet. Just sew or glue a barrette to the back side instead for step 4.
- Sew the pumpkin leaves to the sunflower
- Sew the sunflower and pumpkin leaf combination to the crochet lace layer
- Sew the crochet lace layer to the store-bought lace layer
- Sew the completed rosette to the side of the bonnet.
Ok, go take some pictures of that precious baby in her new little bonnet, and then treasure them for years to come. 👶💕
.sdg.
Want more gorgeous crochet patterns, and a little encouragement for your day? Sign up for my newsletter here! That way you’ll never miss out on special events, or freebies I’m offering.
JOIN ME ON SOCIAL MEDIA
I would love to see a picture when you’re done, so please feel free to come by my Facebook group and show off your finished project! Be sure to tag @kirstenhollowaydesigns when you share pictures of your project on Instagram!
You can also follow me on Facebook, Pinterest, Instagram, and Ravelry for more beautiful crochet patterns.
PATTERN TERMS AND CONDITIONS:
You are welcome to share the link to this pattern, using one image of your choice, on your site, but please do not share the written patterns themselves, this includes my Ravelry downloads or translations of these patterns, or use additional images. You do not have permission to use my images by themselves to create pinnable graphics for Pinterest, however they may be included in a roundup pin if there are 4 or more other patterns. If you sell finished items online, please do not use my pictures for your listings. I’m positive that your work is of high enough quality for you to sell the finished piece. Have confidence in your abilities! <3 Thank you!
This pattern was made to be used by individuals and small business crocheters alike. Selling your finished pieces in boutiques, at farmer’s markets, craft shows, and other local events is encouraged! Please credit/link Kirsten Holloway Designs when selling finished products online. The only thing I require is that this pattern not be used commercially to produce hundreds of thousands of copies. If you enjoyed this pattern or found it useful, why not share a link to this post with your friends?


