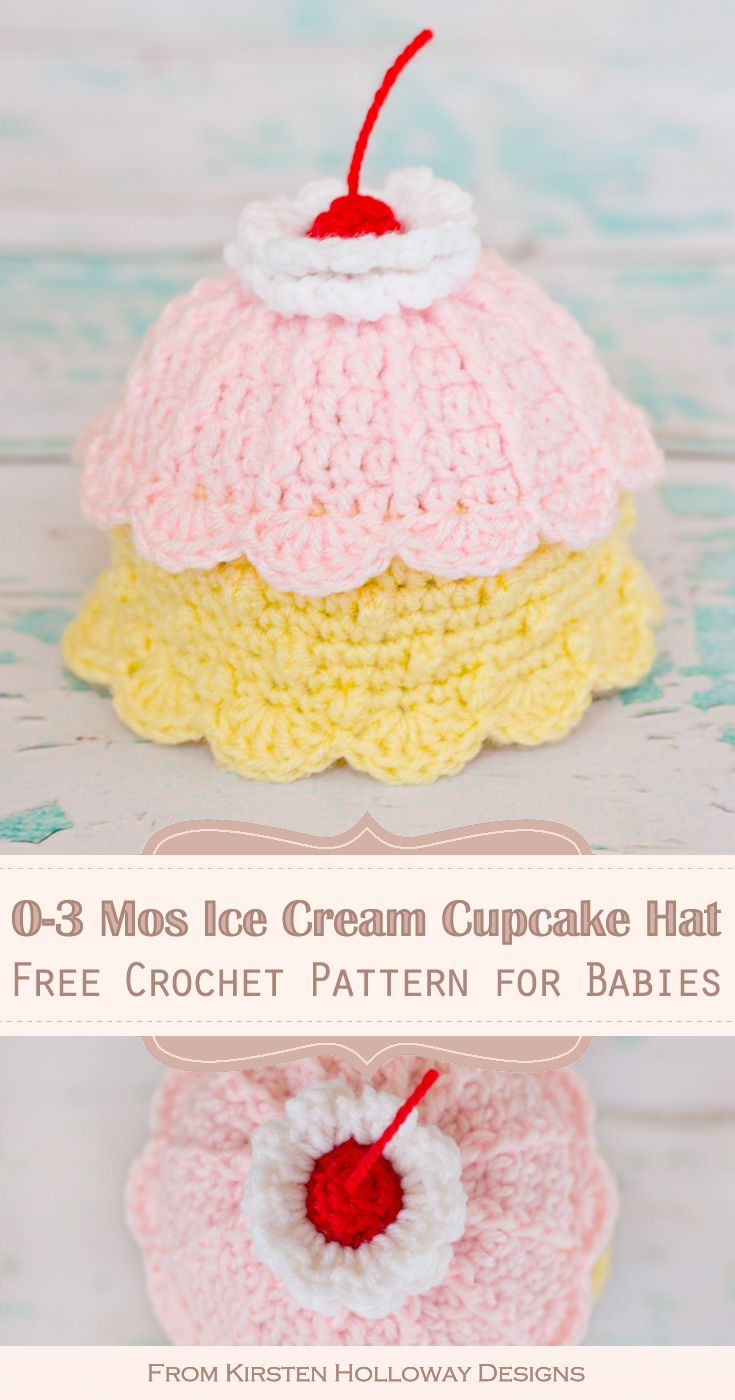
The free Strawberry and Banana Sundae (or cupcake) crochet baby beanie hat is heaped high with fun textures that make this a unique offering to the collection of ice-cream sundae or cupcake crochet hat patterns available. It should fit most 0-3 month old babies.
Click here to add this to your Ravelry queue!
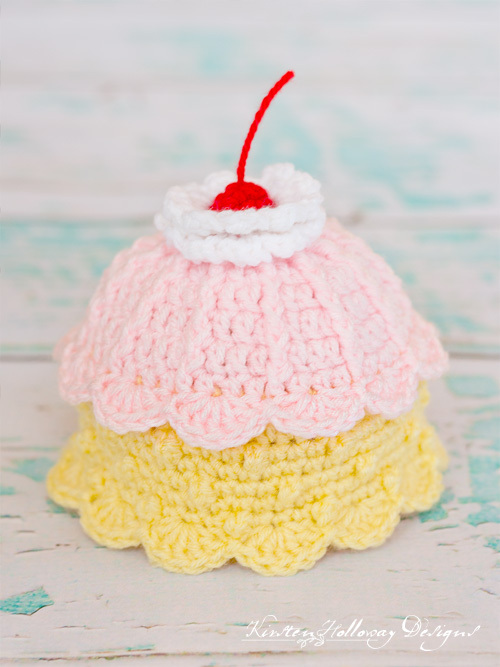
While I chose pink and yellow for this pattern, feel free to make a chocolate and mint hat, or a pumpkin and vanilla hat, really, the flavors–err, colors are limitless, and totally up to you!
This continues my stash-busting crochet patterns for the NICU series. Supporting a good cause and using up the last little pieces of a skein of yarn that’s been sitting around for months–now those are two things to get excited about!
Find another baby beanie pattern for the NICU here
Before you crochet this hat check with your NICU to see what kinds of yarn they would like. My local NICU wasn’t picky, but some are.
Alright, grab your hook, and some leftover yarn and let’s get started!
Difficulty:
- Easy/Intermediate
Materials Needed:
- 4mm (G) hook, or hook needed to obtain gauge
- Approximately 25-30 yards #4 worsted weight yarn in a light pink, 25-30 yards in a light yellow, 5 yards in a bright red, and 10 yards in white.
- Yarn needle for weaving in ends
- Scissors
Stitches Used:
- sc = single crochet
- dc = double crochet
- psc = picot single crochet
- sl st = slip stitch
- hdc = half double crochet
- FPdc = front post double crochet
- FPhdc = front post half double crochet
- FLO = front loop only
- BLO = back loop only
- beg = beginning
Special Stitches:
- Picot Single Crochet – psc (also known as the Granule Stitch): Insert hook, yo, pull up a loop, [yo, draw through 1 loop] 3 times to make a ch 3, then yo, and draw through both loops on the hook.
Additional terms:
- Stitching in the “3rd loop” of hdc. work all stitches in round in the 3rd loop of the hdc from previous row. Instructions: Look at the top of the stitch, and locate the sideways “V”, bend the stitch to look at the back, and you should see another “V”. You’ll be working into the back loop of that “V”, this is called the 3rd loop.
Measurements:
- 7” wide by 5” tall excluding cherry and whipped cream.
Gauge:
- 4” across after round 6.
Additional Notes:
- Ch 1 at beginning of round does not count as a stitch.
Strawberry and Banana Sundae Baby Beanie Hat Pattern (US Terms):
Using 4mm (G) hook, and pink yarn (or color of your choice),
Round 1: 12 dc in magic ring, join with sl st to first dc. (12)
Round 2: ch 1, FPdc around first dc, dc in next st, *FPdc around same st, dc in next st; repeat from * around. Note: Each dc from round 1 should have a FPdc around it and 1 dc stitch in the top, join with sl st to first FPdc. (24)
Round 3: ch 1, FPdc around first FPdc, dc in next 2 sts, *FPdc around FPdc, dc in next 2 sts; repeat from * around, join with sl st to first FPdc. (36)
Round 4: ch 1, FPdc around first FPdc, dc in next 2 sts *FPdc around FPdc, dc in next 2 sts; repeat from * around, join with sl st to first FPdc. (36)
Rounds 5-6: ch 1, FPdc around first FPdc, dc in next 3 sts *FPdc around next FPdc, dc in next 3 sts; repeat from * around, join with sl st to first FPdc. (48)
Round 7: ch 1, FPhdc around FPdc, hdc in next 3 sts *FPhdc around FPdc, hdc in next 3 sts; repeat from * around, join with sl st to first FPhdc. (48)
Round 8: sk st, 5 dc in next st, sk st, sl st in next st *sk st, 5 dc in next st, sk st, sl st in next st; repeat from * around, final sl st counts as join. (12 shells)
Drop pink yarn, and fasten off,
Round 9: join yellow yarn to first 3rd loop of hdc from round 7. Working in 3rd loop of hdc, hdc in each st around, join with sl st to first hdc. (48)
Round 10: ch 1, hdc in each st around, join with sl st to first hdc. (48)
Round 11: sc in next 3 sts, psc in the next stitch, *sc in next 3 sts, psc in next st; repeat from * around, join with sl st to first sc. (48) *Note: your picot single crochet stitches should be centered in between each scallop. If they are not, go back to round 9, and move your hdc stitches back or forward one space depending on where your picot is falling.
Round 12: ch 1, sc in same stitch as join and in each stitch around. DO NOT place the final stitch for the round in the join, or you’ll pick up an extra stitch, join with sl st to first sc. (48)
Round 13: note: do not work first psc in same st as join. ch 1, psc in first stitch, sc in next 3 sts *psc in next stitch, sc in next 3 sts; repeat from * around, join with sl st to first psc. (48)
Round 14: ch 1, sc in same st as join and in each st around, join with sl st to first sc. (48)
Round 15: note: do not work first sc in same st as join. ch 1, sc in next st, psc in next st *sc in next 3 stitches, psc in next; repeat from * around, working sc in the last 2 sts, join with sl st to first sc. (48)
Round 16: sl st in next st, sk st, 5 dc in next, sk st, sl st in next *sk st, 5 dc in next st, sk st, sl st in next; repeat from * around, final sl st counts as join. (12 shells)
Fasten off and weave in ends.
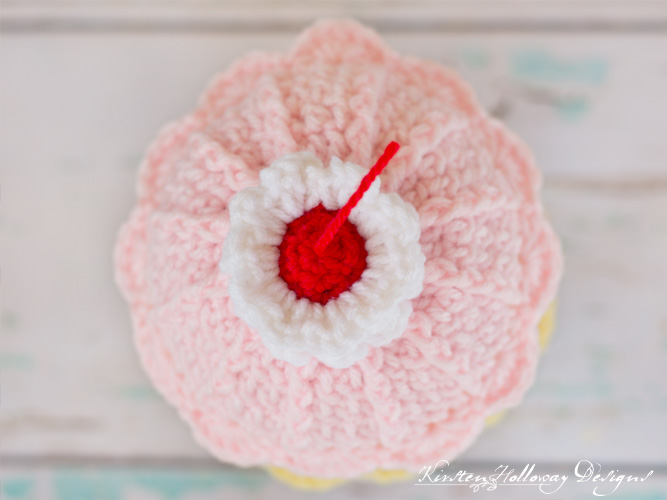
Cherry and Whipped Cream:
Leaving 6″ tail, with bright red yarn, and 4mm (G) hook,
Round 1: 6 sc in magic ring, join with sl st to first sc. (6) Note: The tail you leave here will need to be pulled through the center of round 1 to create the cherry “stem”.
Round 2: ch 1, 2 sc in first st, 1 sc in next 2 sts, 2 sc in next st, 1 sc in next 2 sts, Join with sl st to first sc. (8)
Round 3: ch 1, 2 sc in first st, 1 sc in next 3 st, 2 sc in next st, 1 sc in next 3 sts, join with sl st to first sc.
Drop bright red yarn and fasten off.
Join white yarn,
Round 4: ch 1, working in FLO, [dc, ch 2, sc] in each st around, join with sl st to beg ch.
Round 5: ch 1, working in BLO, [dc, ch 2, sc] in each st around, join with sl st beg ch.
Fasten off leaving a 12″ tail for sewing the cherry, and whipped cream to the top of the hat.
Thread the tail from round 1 through the center of the cherry to create the stem, trim stem to 1 1/5″ in length. Stiffen stem with craft glue if you wish.
Sew cherry and whipped cream to top of hat with 12″ tail from round 5.
Fasten off, and weave in ends.
I would love to see a picture when you’re done, so please feel free to come by my Facebook group and show off your project! Be sure to tag @kirstenhollowaydesigns when you share pictures of your finished hat on Instagram, and use #strawberrybananasundaehat!
You can also follow me on Facebook, Pinterest, Instagram, and Ravelry for more beautiful crochet patterns.
Pattern Terms and Conditions:
You are welcome to share the link to this pattern, using one image of your choice, on your site, but please do not share the written patterns themselves, or use additional images. You do not have permission to use my images by themselves to create pinnable graphics for Pinterest, however they may be included in a roundup pin if there are 4 or more other patterns. If you sell finished items online, please do not use my pictures for your listings. I’m positive that your work is of high enough quality for you to sell the finished piece. Have confidence in your abilities! <3 Thank you!
This pattern was made to be used by individuals, and small business crocheters alike. Selling your finished pieces in boutiques, at farmer’s markets, craft shows, and other local events is encouraged! The only thing I require is that this pattern not be used commercially to produce hundreds of thousands of copies.
If you enjoyed this pattern or found it useful, why not share a link to this post with your friends?


