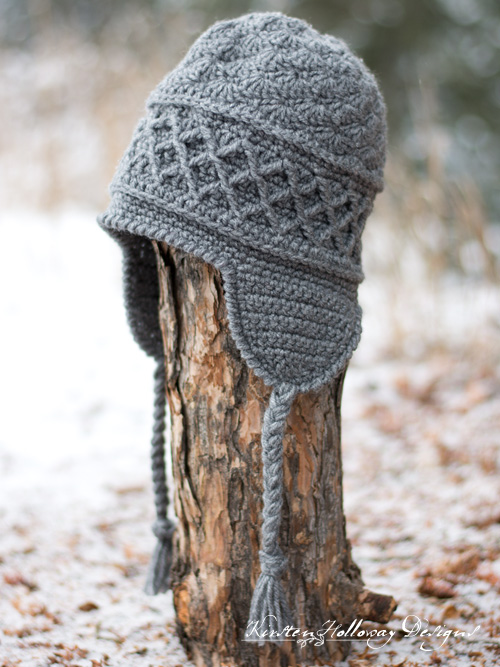
Keep cozy on the slopes this winter with this versatile crochet ski hat pattern! The double layer diamond pattern provides extra warmth, and if you use a larger hook, you could even line it with fleece or fur. There’s almost no end to the customization you can do to make the Snow Country Ski Hat uniquely yours! Find the free crochet pattern instructions below, or purchase a print-optimized, ad-free PDF by clicking here.
Click here to add this pattern to your Ravelry queue!
Like this design? Find the matching scarf pattern here.
Disclaimer: This post contains affiliate links. When you purchase something using these links a small amount of the sales price goes to me. However, you do not pay any extra for the item you purchase.
Difficulty:
Intermediate/Advanced
Materials Needed:
5mm (H) hook, or hook needed to obtain gauge
225-250 yards of #4 worsted weight Red Heart Super Saver yarn in “Grey Heather” <–Click here to purchase some
yarn needle for weaving in ends
scissors
Stitches Used:
sc = single crochet
sc2tog = single crochet 2 together
hdc = half-double crochet
dc = double crochet
sl st = slip stitch
FPtr = front post treble crochet
FPtr2tog = front post treble crochet 2 together
rsc = reverse single crochet (crab stitch)
st/sts = stitch/stitches
prev = previous
Additional Terms:
hdc in the 3rd loop = Look at the top of the stitch, and locate the sideways “V”, bend the stitch to look at the back, and you should see another “V”. You’ll be working into the back loop of that “V”, this is called the 3rd loop.
Gauge:
14 dc stitches in 4″
Measurements:
8.5” tall and 10.5″ wide (excluding ear flaps/ties), and should fit a teen or adult. If your hat is coming out small go up a hook size or two.
Additional Notes:
-To work this pattern you must be familiar with the Diamond Stitch, the Shell Stitch, and the Reverse Single Crochet, or Crab Stitch. Click on the links to view some excellent tutorials from Moogly, and Hopeful Honey on how to work these stitches. You must also be familiar with working in the 3rd loop of an hdc stitch.
-ch-1 at beginning of round does not count as a stitch.
-FPtr2tog counts as a stitch. Don’t forget to skip that spot in your round when making the stitch
Snow Country Ski Hat Pattern (US Terms):
Click here to purchase an ad-free, print-optimized PDF of this pattern on LoveCrafts
Round 1: working in magic circle, [sc, 5 dc] 4 times, join with sl st to first sc. (4 5-dc shells, 4 sc)
Your piece will take on a square appearance after completing this round. Don’t be alarmed–this hat will change shape many times over the course of the next few rounds, and will not start to look circular until after finishing a couple rounds with no increases.
Round 2: sl st over 2 sts to top of first shell, ch 1, *sc in next st (this will be the 3rd stitch of your 5-dc shell), sk 2 sts, (3 dc, ch 1, 3 dc) in sc, sk 2 sts; repeat from * around, join with sl st to first sc. (4 split shells, 4 dc)
Round 3: sl st over 1 st, ch 1, *sc in next st (this will be the center st of split shell), sk st, 5 dc in ch-1 sp, sk st, sc in next st, sk st, 5 dc in sc, sk st; repeat from * around, join with sl st to first sc. (8 5-dc shells, 8 sc)
Round 4: sl st over 2 sts to top of first shell, ch 1, *sc in next st, sk 2 sts, 5 dc in next st, sk 2 sts; repeat from * around, join with sl st to first sc. (8 shells, 8 sc)
Round 5: sl st over 2 sts to top of first shell, ch 1, *sc in next st (this will be the 3rd stitch of your 5-dc shell), sk 2 sts, work (3 dc, ch 1, 3 dc) in sc, sk 2 sts, sc in next st, sk 2 sts, 5 dc in next st, sk 2 sts; repeat from * around, join with sl st to first sc.
Round 6: sl st over 1 st, ch 1, *sc in next st (this will be the center st of split shell), sk st, 5 dc in ch-1 sp, sk st, sc in next st, sk st, 5 dc in next st, sk 2 sts, sc in next st, sk 2 sts, 5dc in next st, sk st; repeat from * around, join with sl st to first sc. (12 5-dc shells)
Rounds 7-10: sl st over 2 sts to top of first shell, ch 1, *sc in next st, sk 2 sts, 5 dc in next st, sk 2 sts; repeat from * around, join with sl st to first sc. (12 5-dc shells)
**Your hat should measure at least 10” from side to side, after you finish this top part of the hat. From the crown of the hat to where the shells end, should measure at least 5”**
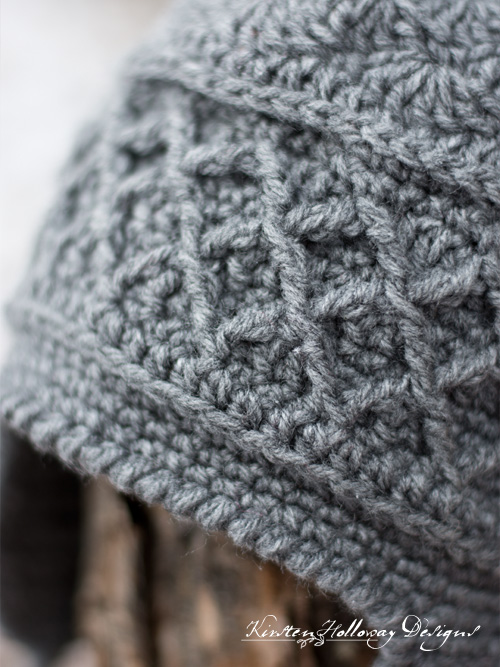
Round 11: ch 1, hdc in each st around, join with sl st to first hdc. (72)
Round 12: ch 1, working all sts of round in 3rd loop of hdc, sc in each st around, join with sl st to first sc. (72)
Round 13: ch 1, dc in each st around, join with sl st to first dc. (72)
Round 14: ch 1, FPtr around the 2nd sc of round 12, sc in next 3 sts, FPtr2tog, placing first leg around same sc in round 12 that you just worked the first FPtr around, move forward 3 sts in round 12 and place second leg of the FPtr2tog around the 4th sc, sc in next 3 sts of current round, *FPtr2tog, placing first leg around same sc in round 12 that you put the last leg of the previous FPtr2tog, skip forward 3 sts in round 12, and place second leg of the FPtr2tog around the 4th sc, sc in next 3 sts of current round; repeat from * across, When you get to the last stitch in your round, FPtr around the last FPtr2tog leg you made, before you finish the FPtr, when there are 2 loops left on your hook, insert hook into last st of round, YO, and pull through all remaining loops, join with sl st to first FPtr. (72)
Round 15: ch 1, dc in each st around, join with sl st to first dc. (72)
Round 16: ch 1, sc in same st as join, sc in next st, FPtr2tog, placing first leg around the top of the first AND last FPtr in round 14 (this will pull them together to look like they are one stitch), put the second leg around the next FPtr2tog from round 14. *sc in each of the next 3 sts, FPtr2tog placing first leg around the top of the FPtr2tog in round 14 that you just came off of, place the second leg of the FPtr2tog around the next FPtr2tog from round 14; repeat from * around, (Note: The final leg of the final FPtr2tog will be worked around the same stitches as the first leg of the first FPtr2tog in the round), sc in final st of round, join with sl st to first sc. (72)
Round 17: ch 1, dc in same st as join and each st around, join with sl st to first dc. (72)
Round 18: ch 1, FPtr around next post stitch of round 16, sc in next 3 sts. FPtr2tog, placing first leg around same post stitch in round 16 that you just did the first FPtr around, move forward 3 stitches in round 16 and place second leg of the FPtr2tog around the next post stitch, sc in next 3 sts of current round *FPtr2tog, placing first leg around same post stitch in round 16 that you put the last leg of the previous FPtr2tog, skip forward 3 sts in round 16, and place second leg of the FPtr2tog around the next post stitch, sc in next 3 sts of current round; repeat from * around, when you get to the last stitch in your round, FPtr around the last FPtr2tog leg you made, before you finish the FPtr, when there are 2 loops left on your hook, insert hook through that last stitch, YO, and pull up a loop, insert your hook under the first FPtr, and then pull that loop through all remaining loops. This will join the round. (72)
Round 19: ch 1, hdc in each st around, join with sl st to first hdc. (72)
Round 20: ch 1, working all sts of round in 3rd loop of hdc, sc in each st around, join with sl st to first sc. (72)
Rounds 21-22: ch 1, sc in each st around, join with sl st to first sc. (72)
Earflap:
Note: I tend to use a bit more tension on these so the stitches are tighter to better keep out the wind.
Row 1: ch 1, sc in first stitch and next 13 sts, ch 1, turn. (14)
Rows 2-4: sc in each st across, ch 1, turn. (14)
Row 5: sc2tog, sc in next 10 sts, sc2tog, ch 1, turn. (12)
Rows 6-7: sc in each st across, ch 1, turn. (12)
Row 8: ch 1, sc2tog, sc in next 8 sts, sc2tog, ch1, turn. (10)
Row 9: sc in each st across, ch 1, turn. (10)
Row 10: sc2tog, sc in next 6 sts, sc2tog, ch 1, turn. (8)
Row 11: sc2tog, dc in next 4 sts, sc2tog. (6)
Fasten off, and weave in ends.
Count over 27 stitches, attach yarn, begin second earflap. If you want a wider opening for your face, count over 28 or 29 stitches. Your earflaps should be somewhat close together in the back so they cover your ears without blocking your view. 😉
Earflap 2:
Row 1: ch 1, sc in first stitch and next 13 sts, ch 1, turn. (14)
Rows 2-4: sc in each st across, ch 1, turn. (14)
Row 5: sc2tog, sc in next 10 sts, sc2tog, ch 1, turn. (12)
Rows 6-7: sc in each st across, ch 1, turn. (12)
Row 8: ch 1, sc2tog, sc in next 8 sts, sc2tog, ch1, turn. (10)
Row 9: sc in each st across, ch 1, turn. (10)
Row 10: sc2tog, sc in next 6 sts, sc2tog, ch 1, turn. (8)
Row 11: sc2tog, dc in next 4 sts, sc2tog. (6)
Edging:
Round 1: sc evenly around the edge of the hat, join with sl st to first sc.
Round 2: Working in the opposite direction, ch 1, rsc (or crab stitch) around the edge of the hat, join to first rsc.
Fasten off, and weave in ends.
Hat ties:
Cut 9, 24″ lengths of yarn for each tie. Thread through the bottom of each earflap, braid, and knot off.
Top tassel (Optional):
Cut 6, 24″ lengths of yarn for a tassel. Thread through the top of the hat and braid. Knot at the end.
Want more gorgeous crochet patterns, and a little encouragement for your day? Sign up for my newsletter here! That way you’ll never miss out on special events, or freebies I’m offering.
JOIN ME ON SOCIAL MEDIA
I would love to see a picture when you’re done, so please feel free to come by my Facebook group and show off your finished project! Be sure to tag @kirstenhollowaydesigns when you share pictures of your items on Instagram.
You can also follow me on Facebook, Pinterest, Instagram, and Ravelry for more beautiful crochet patterns.
PATTERN TERMS AND CONDITIONS:
You are welcome to share the link to this pattern, using one image of your choice, on your site, but please do not share the written patterns themselves, this includes my Ravelry downloads or translations of these patterns, or use additional images. You do not have permission to use my images by themselves to create pinnable graphics for Pinterest, however they may be included in a roundup pin if there are 4 or more other patterns. If you sell finished items online, please do not use my pictures for your listings. I’m positive that your work is of high enough quality for you to sell the finished piece. Have confidence in your abilities! <3 Thank you!
This pattern was made to be used by individuals, and small business crocheters alike. Selling your finished pieces in boutiques, at farmer’s markets, craft shows, and other local events is encouraged! The only thing I require is that this pattern not be used commercially to produce hundreds of thousands of copies.
If you enjoyed this pattern or found it useful, why not share a link to this post with your friends?
When it says to crochet around the edge of the hat does that mean the earflaps too
Yes, you’ll work a round of sc all around the edge of the hat including the earflaps. 😊
I’ve made this pattern a few times and could have sworn there was a video that showed the top shell part of the hat. Am I remembering wrong? If there is a video I don’t see a link.
Thanks,
Laurie
There was a video a while back that showed how to work the shells but it was from a different designer that has left the community and removed the video.
I love this pattern and liked it so much I bought it but now I’m having problems with row 14. I recently had a bad fall and I think I’m stil having memory issues. Is there a video I could watch for that row?
Hi Jamie,
I don’t have a video tutorial for this hat, but if you look in the additional notes section of the pattern there should be a link to a YouTube video that shows how to work the Diamond Stitch. I hope that helps. 🙂
Hello I am confused with round one when I make the magic circle, do I only do 1 set of sc and 5dc? It says to do this 4 times so i end up with 20 dc and 4 sc? Thank you
This is the beginning of your shell stitch. This round has 4 shells and 4 sc. Each shell stitch is made up of 5 dc. Between each shell there will be 1 sc. I hope that helps! 😊
Duh! I figured it out. Thanks so much.
You’re welcome! 😊
I’m struggling with round 6. With my understanding of it, I end up with 16 shells instead of the 12 that it’s supposed to be. With how I’m working the round, I end up with one in each single crochet between shells from the round before, as well as one in each of the chain spaces in the split shells from the round before. Could you please help me understand what I am doing wrong? Thank you!
Hi Corey,
It sounds like you may have increased too many times. Do you have 4 split shells from round 5, or do you have 8? The split shells are your increases. You should only increase 4 times, not 8 times. If you have too many of those split shells (8 instead of 4) then that could be what is throwing you off in round 6. I hope that helps!
That’s exactly what I did! Thank you so much!
You’re welcome! 😊
My stitch gauge was correct but the hat is 2 inches too small after finishing the dc shells. Should I start again with a bigger crochet hook, or can I make it bigger by adding more rows after the initial ten?
Yes, try going up a hook size or two if you’re using the recommended yarn for this project but are still coming up that short.
Okay, so I went up to a 6.5mm hook and it’s still too small. Do I just keep increasing the hook size until I find one that works?
What yarn are you using? Is it the Red Heart Super Saver or Red Heart With Love? If so then keep increasing your hook size. If not it may be that the yarn you are using is too thin.
I’m not using the same brand yarn, but the weight is the same.
Different brands sometimes have different widths Your yarn sounds like it is probably a lot thinner than the kind I used. You will probably have better results with a thicker yarn.
In round 6, why do I skip 1 st for the first shells and then skip 2 sets for the next shells? Love the hat!
This is the second round of your shell increases. you should be working a normal shell into the ch-1 sp of the split shell and tacking it down in the 2nd dc of the split shell made with 3 dc on each side. It’s the same idea as what you did in round 3, but you are working between regular shells and split shells.
I made this pattern, but found when doing the diamond part, that I would end up with too many extra stitches and had to decrease the double crochet rows in order to come out with 72 stitches. I don’t know what I did wrong. I did watch a video.
Did you leave a space for the tr2tog to sit when working that round with the sc and tr2tog stitches? That’s a common problem with the stitch. You have to skip the stitch or else you have stitches left over at the end.
Hello,
I love your patterns. They look really professionnal. I already did two La Vie En Rose Ski hat for my son and another kid and my brother asked me one two, so I’m doing the Snow Country Ski Hat for him. I’ve learned a lot of new techniques thanks to your patterns.
I really appreciate that you provide instructions for variations ( earflap or band etc.), I usually don’t find such possibilities and have to improvise but it’s not always as successful.
Thank you for your beautiful work !
Sophie
You’re welcome, Sophie! I’m so glad you have enjoyed crocheting these hat patterns!
How do I enlarge the pattern? I’m using a size 5 hook, and the right yarn. I’m (finally 😂) on row 7, but I’m worried it won’t be big enough for my older brother.
You can do another increase round with 4 split shells in it if you are worried it’s too small. 🙂
It has an issue loading on mobile devices. Load the link on a desktop or laptop computer and the link should work.
You may try bringing this up on your desktop computer. I am also having issues on my cell phone, but it works on my computer. I hope that solves the issue!
This is my my favorite pattern! I love it! Thanks for sharing!
You’re welcome, Elva! I’m glad you are enjoying it!
I have to say thanks for your pattern. This hat is now my go-to for hats.
I tend to only do a pattern once because I get bored with them. I love to make this over and over. I have done it in stripes, solids and variegated. Thank you again.
That’s awesome, Lori Dawn! I’m glad you’ve been enjoying this pattern so much!
My friend made this hat and I fell in love with it immediately and had to make one for myself. I enjoyed learning new stitches, the crab, working in the third loop only of the hdc to produce patterning on row below and especially the diamond pattern. Had tried to get to grips with forward post stitches before but not successful. The patterns were complicated for a first try but this was a nice introduction to doing them. Looking forward to doing the finishing touches on my hat this morning then adding to my blog. Will be sure to send everyone over to your site when I mention you in my post.
So glad you were able to learn some fun new stitches while making this pattern! Your hat looks nice. 🙂
Just made this hat, thanks so much for the pattern!! tagged you on instagram 🙂
Great! I’ll keep an eye out for it. 🙂
Thank you for sharing.Love this hat.
You’re welcome! Happy crocheting!
This is very beautiful, thank you for sharing, Kirsten!
You’re welcome, Mihaela!
You’re very welcome! Since the top part of the pattern is borrowed from another designer, I won’t ever be able to do a full tutorial, but both the video and instructions for that section are linked. I have also included video links to the other stitches used. You may find it’s easier than you think after watching the stitch tutorial videos a few times. Rows 14-18 are the diamond stitch, and that is probably the most tricky part. 🙂
This is a beautiful pattern but I have trouble with row 14, i dont know where to place my crochet hook. Any advice?
Thank you! You will be working stitches around round 12, two rows down so to begin you’ll find where you joined round 12, count forward two stitches, and begin your first front post treble crochet around that stitch.
It may be helpful to watch a video on working the diamond stitch before beginning this section. I believe I linked one up in the notes section. I hope that helps! 🙂
Thank You!
You’re welcome!
thank you kirsten for being so kind as to share this beautiful hat. Your creativity is amazing.
You’re very welcome, Paula! ?
Hello,
Will this pattern fit an adult man? Would any alterations be required to make it fit?
I’d go up a hook size or two, as I have very loose tension. 🙂
Thanks!
You’re working on 2 separate rounds in tbis round. Watching a video may ne helpful to understand whats supposed to be happening.
Here is one that was helpful to me when I first learned this stitch. 🙂 https://youtu.be/wI7aCGgbyD4
that video doesn’t take me to the stitch video but a quick books video. Is there a tutorial video ?
Hi Pat, I’m not sure which link you are referring to. I clicked on them this morning and they all took me to the correct videos.
How would you make this smaller for a 12 month?
You could try using 3.25mm hook and a light weight (#3) yarn and see if that ends up being close. 🙂
Thanks, I didn’t know if you could decrease by so many stitches and still come out right. Made the La Vie en Rose Earflap Hat and it is absolutely adorable!
Hi. I’m so pleased to find this pattern. I have 3 sons and there are not too many male patterns that I am sure they would like. This one is great for my son in Canada, plus I have a fisherman son who needs a hat with ear and neck cover. So I can just continue the ear flap around the neck. Thank you very much
I’m glad you’re finding this hat so versatile! Originally it was intended as a ladies hat, but many have been making it for the men in their lives. It’s good to know your sons will approve! 🙂 Happy crocheting!
I made this for my youngest son and he loves it! Thanks so much for the creative pattern. I have been looking for a pattern for an earflap hat for months for him and this was the one. I am starting a second hat for my 30 year old daughter, I am going to convert the pattern to a messy bun hat. I have started the pattern on row 3 and am crocheting the 8 shells on a hair elastic. Can’t wait to see the finished project. I will have to make a matching one for my 2 year old grandson. Love love love, from Kamloops bc!!
Thanks again Kirsten
Glad you both got it figured out! I plan to do a video tutorial for this hat in the next few weeks,so hopefully that will better explain things. It's difficult to write out the split of working in two different rounds at once!
I think I got it, thanks. Turns out I ended up with the wrong video for doing this stitch. No idea how that happened but its so simple after watching a doing a couple stitches. Happy to move forward ?
I’d like to make this for a child. I have never really tried to down-size a pattern. Any tips on how I can make this hat smaller?
Try using a size smaller hook than what the pattern calls for (or whatever hook you need to use to meet gauge). 🙂
I'm struggling with 14 as well. Do you have a video of these steps for your hat? I tried the video you suggested but it isn't helping with your steps.
Struggling with round 14. Not quite getting where to put the second part of the FPTC2tog..
ch 1, FPTC around the 2nd sc of round 12, sc in next 3 stitches. FPTC2tog around same sc in round 12 that you just did the FPTC around#####this where I'm confused— I get where to put the 1st part but does the 2nd part go in the 4th sc over?#####, sc in next 3 stitches of current round, skip forward 3 stitches in round 12, and FPTC around the 4th sc *FPTC2tog around same sc in round 12 that you just did the FPTC around, sc in next 3 stitches of current round, skip forward 3 stitches in round 12, and FPTC around the 4th sc *
I'll check my hat in the morning to make sure, but I believe you're correct. You'll skip 3 stitches from round 12, and work the second part of the stitch around the 4th sc.
Yes, the second part of a FPTC2tog should go around the 4th sc over.
I am a huge pinner, I have to say I was so thrilled to find this free pattern and it is my FAVORITE hat pin. So a huge Thank You , hope to see more of your posts!
So a huge thank you! Keep up the good work!!
Thank you for the kind words! I'm so glad you found something you like! 🙂
Hi Kirsten,
I have a question on rnd 14…is there supposed to be 3 sc between each FPTC2tog?
Yes, looks like that was missed in my update this morning. I'll go fix it!
Are the instructions for row 12 cut off? I can't figure out what I'm supposed to do.
No, they are correct. You'll ned to put all stitches for the round in the 3rd loop of the hdc from the previous round. Here is a video by Moogly that shows what to do: https://www.youtube.com/watch?v=d2nyqJZBfvA
I hope that helps! 🙂
It did thanks so much!
Wonderful! You're welcome!
LOVE LOVE LOVE! Thank you! ?
You're most welcome, Diane! I'm glad you love it. 😀
That is soooo cute, love it, thanks
You're very welcome!
Gorgeous hat, can't wait to try it.
Thank you! Have fun!
Thank you!
You're welcome!
Thank you for sharing such a beautiful pattern!!
You're very welcome! Happy stitching! 🙂