Lace, and warmth combine to make this feminine cowl a great winter accessory you can quickly crochet yourself! The stitch pattern is interesting, yet easy for the advanced beginner. Who says you can’t look dainty in winter? Find the free crochet pattern instructions below, or purchase a print-optimized, ad-free PDF by clicking here.
Click here to add this pattern to your Ravelry queue!
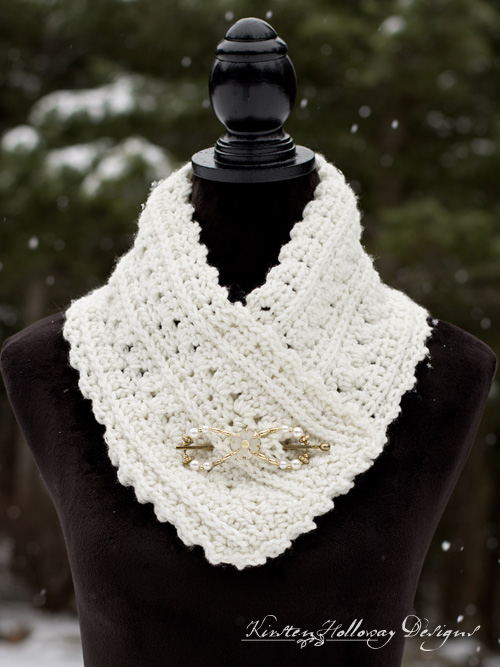
So many of you have asked about the shawl pin I used on this cowl. It’s actually the “Dogwood” hair clip from Lilla Rose! If you want to order one of your own to decorate your Primrose and Proper cowl just follow this link
The crochet pattern includes the Primrose stitch and rows of half-double crochet worked in the 3rd loop to create its delicate but warm texture. If you know the basics: single crochet, half-double crochet and double crochet you’ll have this pattern down in no time!
Red Heart With Love is a soft, warm acrylic yarn, and just what you need for crocheting a cozy winter accessory! I chose “Aran” because I love off-white accessories for winter! If you’d rather pick another color to crochet this in, go for it! Red Heart With Love comes in so many beautiful hues I’m sure you’ll find something to fit your style. Acrylic yarn is also nice because it is easy to care for.
Make it a gift set with the addition of these matching crochet patterns:
Disclaimer: This post contains affiliate links. When you purchase something using these links a small amount of the sales price goes to me to help keep this site, and the patterns on it free. You do not pay any extra for the item you purchase.
Difficulty:
Easy
Materials needed:
5.5mm (I) hook, or hook needed to obtain gauge
200-225 yards of #4 worsted weight Red Heart With Love in “Aran”
Yarn needle
Scissors
Stitches used:
ch = chain
sc = single crochet
hdc = half double crochet
dc = double crochet
sl st = slip stitch
st/sts = stitch/stitches
sp/sps = space/spaces
Additional terms:
hdc in the 3rd loop: After turning, work all stitches for that row in the 3rd loop of the hdc from previous row (it will be in the front). Instructions: Look at the top of the stitch, and locate the sideways “V”, bend the stitch to look at the back*, and you should see another “V”. You’ll be working into the back loop of that “V”, this is called the 3rd loop. *The textured portion of this cowl created by working hdc in the 3rd loop should always be facing you when beginning a new row where working in the 3rd loop is called for. If you get stuck, watch this video.
Gauge:
12 hdc sts in 4″ row. Each hdc st should be 3/4″ tall.
Measurements:
30″ long, by approximately 6″ wide.
Additional Notes:
-ch-2, or ch 3 at beginning of row counts as a stitch.
-mark first and last st of row if you find your project is taking off diagonally so you don’t miss those stitches. That is what causes the pattern to distort.
-If you want some additional tips for working this stitch pattern I share the details in this video:
Primrose and Proper Cowl Pattern (US terms):
Click here to purchase an ad-free, print-optimized PDF of this pattern on LoveCrafts
Row 3: (sc, ch 2, sc) in 2nd st, *sk 2 sts, (sc, ch 2, sc) in next; repeat from * across, Note: final hdc of row is worked in top of ch-2 from prev row, ch 3 (counts as first dc of next row), turn. (32 bumps)
Row 4: turn, 2 dc in first ch-2 sp, *3 dc in next ch 2-sp; repeat from * across, in the final ch 2-sp put 2 dc, dc in top of ch-2 from prev row, ch 2 (counts as first hdc of next row), turn. (96)
Row 5: hdc in each stitch across, ch 2, (counts as first hdc), turn. (96)
Row 6: working in 3rd loop of hdc, hdc in each remaining st across, ch 2 (counts as first hdc of next row) Note: final hdc of row is worked in top of ch-2 from prev row, ch 2 (counts as first hdc), turn. (96)
Repeat rows 3-6 until your cowl is as wide as you want it. Move on to the edging when done. I’ve seen some people do 1 repeat, and others do two. The cowl pictured in this post has 1 repeat of rows 3-6.
Edging:
After finishing row 6 repeat, ch 1, turn, sl st over into 2nd st of row, (sc, ch 2, sc) in same st, *sk 2 sts, (sc, ch 2, sc) in next st; Repeat from * around the outside of the cowl. When you get to corners you should have 1 stitch left, sl st into it and start your next (sc, ch 2, sc) group in the first stitch along the edge. With 2 repeats, and the edging added, my cowl measured a bit over 6″ wide.
Fasten off, and weave in ends.
Assembling your cowl:
Place the ends so they are at 90 degree angles, forming a point. Sew together along the edges, and add buttons to the end if you desire, or leave it as is and pin with a shawl pin.
Join me on social media
I would love to see a picture when you’re done, so please feel free to come by my Facebook group and show off your project! Be sure to tag @kirstenhollowaydesigns when you share pictures of your finished cowl on Instagram!
You can also follow me on Facebook, Pinterest, Instagram, and Ravelry for more beautiful crochet patterns.
Pattern Terms and Conditions:
You are welcome to share the link to this pattern, using one image of your choice, on your site, but please do not share the written patterns themselves, this includes my Ravelry downloads or translations of these patterns, or use additional images. You do not have permission to use my images by themselves to create pinnable graphics for Pinterest, however they may be included in a roundup pin if there are 4 or more other patterns. If you sell finished items online, please do not use my pictures for your listings. I’m positive that your work is of high enough quality for you to sell the finished piece. Have confidence in your abilities! <3 Thank you!
This pattern was made to be used by individuals, and small business crocheters alike. Selling your finished pieces in boutiques, at farmer’s markets, craft shows, and other local events is encouraged! The only thing I require is that this pattern not be used commercially to produce hundreds of thousands of copies.
If you enjoyed this pattern or found it useful, why not share a link to this post with your friends?


