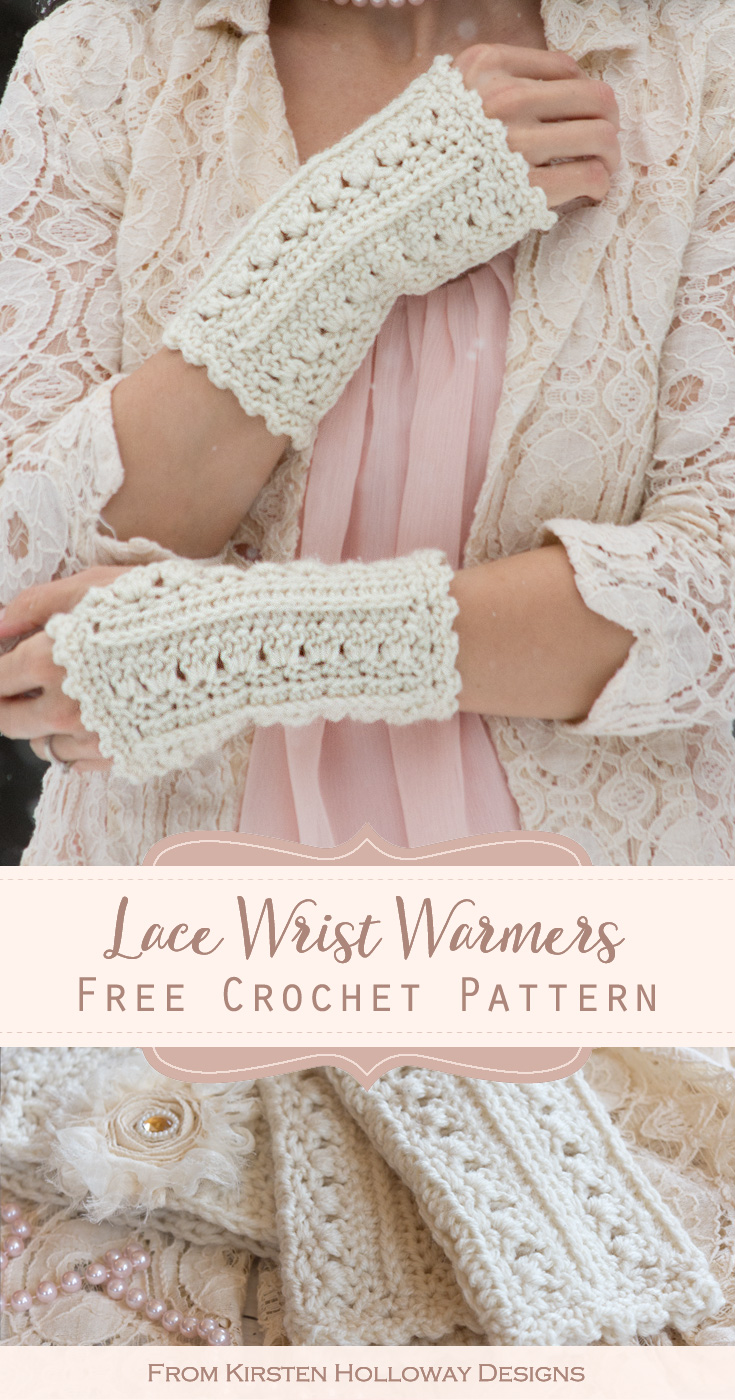
These cute, lacy fingerless gloves are a quick, easy crochet project that will keep your hands warm this winter. The pattern is worked flat, then sewed together along the side after the edging is added to both ends. Crochet these wrist warmers wider or narrower to fit women or kids! Find the free crochet pattern instructions below, or purchase a print-optimized, ad-free PDF by clicking here.
Easy Lace Fingerless Gloves Crochet Pattern
I’m scrambling to get those last minute Christmas gifts together this week, and thought you might be doing the same, so this quick and easy crochet pattern is something that works up in an hour or two and is sure to keep those wrists warm this winter.
The simple fingerless gloves pattern is worked sideways to begin, then you will fold the rectangle in half, put the edging on both ends, and then sew up the sides leaving room for the thumb hole. It’s pretty easy, and once you crochet the first glove the second should go very quickly. If you are concerned about them both turning out he right size, crochet the main body of both your fingerless gloves first, then add the edging.
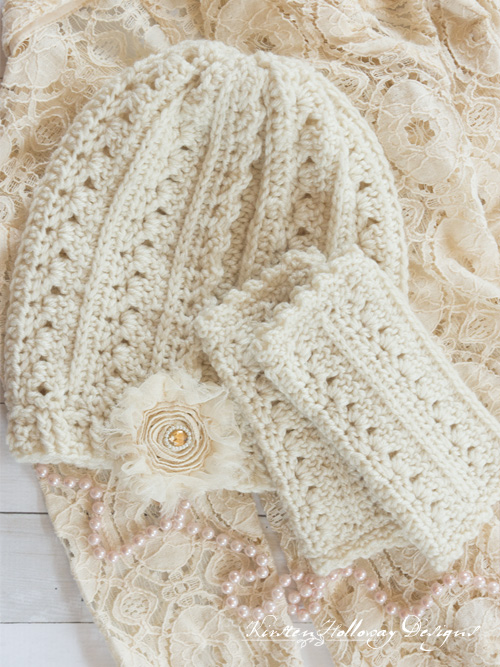
Use the following patterns to crochet a complete gift set for that special person, or charity:
Click here to add this to your Ravelry Queue!
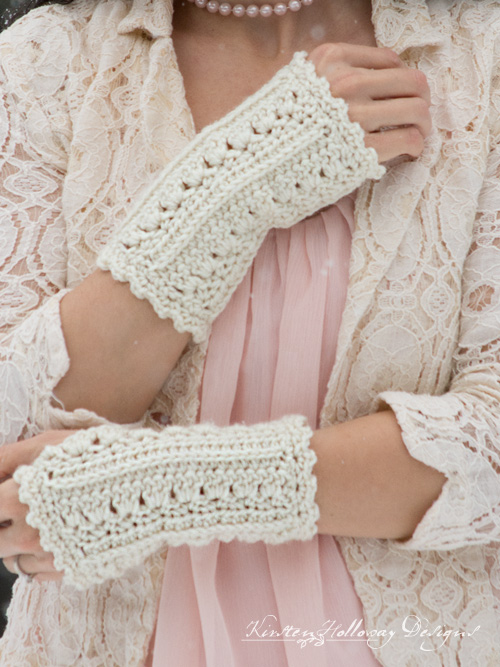
See how pretty the stitches on these fingerless gloves look? Lacy but still nice and warm for cold weather.
Disclaimer: This post may contain affiliate links. When you purchase something using these links a small amount of the sales price goes to me to help keep this site, and the patterns on it free. You do not pay any extra for the item you purchase.
Difficulty:
Easy
Materials Needed:
5mm (H) hook, or hook needed to obtain gauge
80-100 yards Red Heart Super Saver in Aran or color of your choice
Yarn needle
Scissors
Stitches Used:
ch = chain
sl st = slip stitch
sc = single crochet
hdc = half double crochet
dc = double crochet
Additional Terms:
Stitching in the “3rd loop” of hdc. After turning, work all stitches for that row in the 3rd loop of the hdc from previous row (it will be in the front). Instructions: Look at the top of the stitch, and locate the sideways “V”, bend the stitch to look at the back*, and you should see another “V”. You’ll be working into the back loop of that “V”, this is called the 3rd loop. *When working in rows, this loop will be facing you!
st/sts = stitch/stitches
sp/sps = space/spaces
Here is a video tutorial that explains how to work in the 3rd loop of a hdc if you don’t know how:
Gauge:
15 hdc stitches in 4″
Measurements:
When finished, 3 1/4″ wide, by 7 1/4″ long.
Additional Notes:
-ch-2, and ch-3 at beginning of row counts as a stitch
-This pattern is worked in multiples of 3+1
-Mark first and last st of row if you find your project is taking off diagonally so you don’t miss those stitches. That is what causes the pattern to distort.
Primrose and Proper Fingerless Gloves Crochet Pattern (US Terms):
Click here to purchase an ad-free, print-optimized PDF of this pattern on LoveCrafts
OR
Pick up the printable version of this pattern on Etsy instead
Ch 25,
Row 1: hdc in 3rd ch from hook (skipped chains count as first hdc), hdc in each st across, ch 2 (counts as first hdc of next row), turn. (24)
Row 2: working in 3rd loop of hdc, hdc in each st across, ch 2 (counts as first hdc of next row), turn. Note: final hdc of row will be worked in top of ch-2 from prev row. (24)
Row 3: (sc, ch 2, sc) in next st, *sk 2 sts, (sc, ch 2, sc) in next st; repeat from * across, hdc in top of ch-2 from prev row, ch 3 (counts as first dc of next row), turn. (8 ch-2 sps)
Row 4: 2 dc in first ch-2 sp, *3 dc in next ch-2 sp; repeat from * across, 2 dc in final ch-2 sp, dc in top of ch-2 from prev row, ch 2, turn (counts as first hdc of next row). (24)
Row 5: hdc in each st across, ch 2 (counts as first hdc of next row), turn. (24)
Row 6: working in 3rd loop of hdc, hdc in each st across, ch 2 (counts as first hdc of next row), turn. Note: final hdc of row will be worked in top of ch-2 from prev row. (24)
Repeat rows 3-6 three more times for a total of 4 pattern repeats*. then fold your rectangle in half and work the next rows around the end of the rectangle.
*If your hand is wider or narrower you can adjust the number of repeats here, You will need to increase or decrease the number of stitches in the edging as well so the fingerless glove lays smoothly. Make sure your stitch count is an even number.
Edging:
Row 1: evenly space 24 sc along the edge of the piece, join with sl st to first sc. (24)
Row 2: ch 1, (sc, ch 2, sc) in first st, sk st, *(sc, ch 2, sc) in first st, sk st; repeat from * across, join with sl st to first sc. (12 bumps)
Fasten off, and weave in ends.
Attach yarn to other end of glove, and repeat rows 1 and 2.
Fasten off, and weave in ends.
Cut 15″ length of yarn and sew up the side of the glove leaving an opening about 1″ long for your thumb to slip through.
For the second glove sew up the open side from the opposite end-this way your stitches will match on both gloves when you wear them.
Fasten off, and weave in ends.
JOIN ME ON SOCIAL MEDIA
I would love to see a picture when you’re done, so please feel free to come by my Facebook group and show off your wrist warmers! Be sure to tag @kirstenhollowaydesigns when you share pictures of your finished project on Instagram, and use #primroseandproperfingerlessgloves
You can also follow me on Facebook, Pinterest, Instagram, and Ravelry for more beautiful crochet patterns.
PATTERN TERMS AND CONDITIONS:
You are welcome to share the link to this pattern, using one image of your choice, on your site, but please do not share the written patterns themselves, this includes my Ravelry downloads or translations of these patterns, or use additional images. You do not have permission to use my images by themselves to create pinnable graphics for Pinterest, however they may be included in a roundup pin if there are 4 or more other patterns. If you sell finished items online, please do not use my pictures for your listings. I’m positive that your work is of high enough quality for you to sell the finished piece. Have confidence in your abilities! <3 Thank you!
This pattern was made to be used by individuals, and small business crocheters alike. Selling your finished pieces in boutiques, at farmer’s markets, craft shows, and other local events is encouraged! The only thing I require is that this pattern not be used commercially to produce hundreds of thousands of copies.
If you enjoyed this pattern or found it useful, why not share a link to this post with your friends?


Hi! I’m just curious, because I think I may been doing this wrong. It looks great,but because of the hdcs, its not a perfect rectangle – the edge of the glove looks like it has scalloped edging, instead of straight lines. Not sure if you know what’s happening there?
Hi Kali,
One edge may take on a slightly rippled or “bumpy” look because of the ch-3 for the beginning of row 4. So long as your piece is still going straight in the other areas you should be fine. If you make really lose chains then you may wish to chain 2 instead of 3 in that spot to cut down on the little bit of ripple. I hope that helps!
Thank you for such a pretty pattern, although i have a problem which is that in looking stitches without knowing how. Im marking the first and last stitch of every row and making sure i catch it, yet my piece is becoming more and more narrow
Hi Ella,
You will want to make sure you are not dropping any stitches as you work along the rows. The 3rd loop of a hdc is not every 3rd stitch, it’s the yarn over at the back of the hdc stitch. Sometimes if people don’t work into each stitch of the row that can cause their counts to come up short and the piece to shrink. This video might help if you’re not sure about the location of the 3rd loop on a hdc. 🙂 https://www.youtube.com/watch?v=_JmxYkB4ca8&feature=youtu.be
Thank you for this lovely pattern. I have made a pair and as a beginner crocheter it took me a little while to get started but once I had completed the pattern a couple of times I found it quite easy. My two gloves are not completely symmetrical i.e. thumb holes slightly different sizes and more than 24 stitches around the edges but that’s down to my technique not the pattern and I’m happy with them and I’m sure if I make them again they will come out better. Thanks again : )
You’re most welcome, Kate!
I am having trouble with row 5 on the written pattern that I purchased – on here it is row 4. It just doesn’t come out right and I feel like I have tried everything. Would you please explain the beginning of this row better and then the end of it.
Hi Debby,
This is the second row of the Primrose stitch. Each ch-2 sp gets 3 dc worked into it, except for the very first ch-2 sp and the very last ch-2 sp of the row. The first and last ch-2 sps only get 2 dc worked into them. The very first stitch of the row will get a dc worked into it and so will the very last stitch of the row. This keeps the stitch counts going in multiples of 3.
I hope that helps!
Thank you – I was on right track but somehow it wasn’t looking right. I will go back and try it again.
I just purchased this pattern. And how you have it printed compared to the pattern on your site that explains it. It is not the same. Rows are different.
Can I get a corrected download to print out.
Thank you
Juanita Lundquist
Hi Juanita,
Where did you purchase the pattern from? If you purchased it from Ravelry you should be able to redownload the corrected PDF from your library now. 🙂
Could you please explain, what the sk st from row 2 of the edging on here? I don’t know that abbreviation and how to do that stitch yet.
Merry x-mas✨️
Sk stands for skip, so you’ll just skip a stitch if you see “sk st” and continue with the next part of the row. 😊
For putting the glove together how would I do that? And make room for my thumb
There should be instructions for sewing the sides together at the bottom of the pattern. You’ll just use a basic whip stitch for that process and leave an opening big enough for your thumb to go through. 😊
Beautiful pattern. I have lots of niece’s. Would you say this pattern is a women’s medium? Best and thanks.
It’s probably fairly close, but it has plenty of stretch and fits my size Large hands too. 😊
Hello, beautiful pattern, thank you. My question is re the beginning row of hdc in the front loop.. Are we doing the hdc front loop in the first stitch or the ch 3 at beginning? Thanks
It’s hdc in the 3rd loop which is the yarn over, not the front loop. https://kirstenhollowaydesigns.com/2021/01/how-to-crochet-in-the-3rd-loop-of-a-half-double-crochet-stitch.html If you are chaining 2 to turn then you will skip the very first stitch of the row since the ch-2 stands in for the first hdc.
Beautiful. I love the texture and design. Easy to follow instructions. Thank you so much!
You’re welcome, Katy! I’m glad you like the crochet pattern! 😀
Absolutely gorgeous pattern. I just learned to crochet so I’m struggling with it. Mostly seeing the 3rd loop in hdc. I’ll try buying a solid colored yarn to see if that helps. My piece ended up curving so I’m thinking I probably dropped a bunch of stitches and also adding a bunch because some parts popped up. Maybe I’ll see if I can buy them on Etsy, I saw someone in the comments talk about selling them. LOL. Or try again when I’ve been crocheting a lot longer.
Try this tutorial that shows how to work in the 3rd loop: https://kirstenhollowaydesigns.com/2021/01/how-to-crochet-in-the-3rd-loop-of-a-half-double-crochet-stitch.html
I recommend using a solid color yarn for most of my designs because variegated yarn completely hides the texture. 😆
i put a stich marker in that stich so i can find it
Lovely set and the sweater just completes the look. Any chance to a link to the gorgeous sweater?
I picked up the lace blazer years ago at a thrift shop, so I have no idea what company originally sold it. 😆 I’m glad you like the wrist warmer pattern!
Hi, thank you for the pattern, it is lovely. Can you tell me how I would make it bigger? How many stitches do I need?
Thanks, Marianne
Hi Marianne,
If you want the gloves to be longer then add additional chains in multiples of 3. If you want it larger around then do another row repeat. 🙂
So for the gloves am I to understand to make them longer you would cast on to add 25+3+3 and so on?
The gloves are worked in multiples of 3+1, so yes, 25+3+3 would work since a chain of 31 fits that same pattern of “multiple of 3+1”. 😊
This is a really lovely design. I’m making gloves for my daughter’s and a friend. I’m sure they will love them.
Thank you, Ouidette! I’m sure they will too! 😀
Just to clarify, I can make these and sell on Etsy? Do I need to put your link on there if I make them? Thanks, Melissa
You sure can! I’d appreciate a link back here as well. 🙂
I just recently got into crocheting and my sister wanted a set of pretty knitwear – this primrose and proper set has been amazing, even for a beginner like me, and they are crocheting up beautifully. Thanks so much for the patterns!
That’s wonderful to hear! I’m so glad you’ve been enjoying the designs made with this stitch pattern!
Hi Kristen,
Thank you for this gorgeous set. This is what I have been looking for to make for my daughters and myself. I cannot wait to start making them for Christmas presents. I only hope I can get them done in time. Merry Christmas to you and your family.
Merry Christmas, Darlene! I’m glad you like them, and hope you can get them done in time too! 😀
This set looks very pretty and delicate. Thank you for sharing it with us. ?
You’re welcome, Cindy! It’s my pleasure!
Thank you for your pattern? I am confused by this instruction on the edging: ” evenly space 24 sc along the edge of the piece. Join to first sc (24)”. What edge are you referring to? Any how do we join to the first SC? Do you have any photos to show us your meaning? Thanks!
You will work the single crochet stitches along the edge of the rectangle, and then join with a slip stitch, just like if you were working in the round. If you have never joined with a slip stitch before it’s really simple, and there should be plenty of tutorials on YouTube that can show you how! 🙂
I’m confused here too. It says to fold the rectangle in half and THEN sc around the edge. That would close it up completely. And if you just do the 24 sc around the whole rectangle and slip stitch to 1st sc, wpuodnt that be a lot more than 24 sc? I’m confused on this part.
I’m sorry the wording confused you. Yes, you will be working single crochets around the end of the rectangle, forming a tube and then joining to the first stitch with a slip stitch. 24 stitches works out to roughly 1 stitch in the side of every row in the section you just completed. I hope that clarifies!
Is this around the end that your hand/wrist goes through; so closing the tube at the ends, working the stitches, then sew the open side edge closed?
You’ll put an edging on both the top and bottom edges, then you will sew the “long-sides” of the rectangle leaving a small opening for your thumb. If you prefer to sew up the long-sides of the rectangle first then add the top and bottom trim you are welcome to do that as well–just don’t forget to leave space for the thumb-hole!
Thx for the lovely free pattern
You’re welcome!