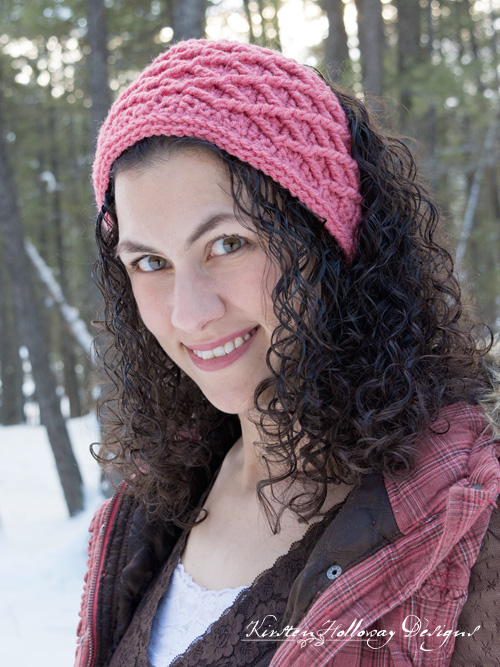
This free crochet headband pattern is double-layered and extra warm for winter on account of the diamond stitch. It’s also fairly wide, so there’s more there keeping the chill out. Easy stitch repeats mean it’s simple to adjust this head wrap to fit women, teens and kids. Find the free crochet pattern instructions below, or purchase a print-optimized, ad-free PDF by clicking here.
Click here to add this pattern to your Ravelry queue!
Disclaimer: This post contains affiliate links. When you purchase something using these links a small amount of the sales price goes to me to help keep this site, and the patterns on it free. You do not pay any extra for the item you purchase.
Difficulty: Intermediate
Materials Needed:
5mm (H) hook, or hook needed to obtain gauge
5.5mm (I) hook (for slip stitches around edging)
Approximately 100 yards Red Heart Super Saver in Light Raspberry
Yarn needle for weaving in ends
Scissors
1 1/8” La Mode Tan Wood Round Button
Stitches Used:
ch= chain
sl st = slip stitch
sc = single crochet
sc2tog = single crochet 2 together
dc = double crochet
FPtr = front post treble crochet
FPtr2tog = front post treble crochet 2 together
Gauge:
12 dc stitches to 4″
Measurements:
Finished headband should measure 4 ¾” wide by about 22” long, with good stretch to it.
Additional Notes:
-ch 1 does not count as a stitch
-When working the diamond stitch, work the post stitches around the entire FPtr2tog from 2 rows below—not just one leg of it.
-Except for the first row, the FPtr or FPtr2tog sts are always worked around the FPtr or FPtr2tog sts you made two rows below.
Diamond Stitched Headband Pattern (US Terms):
Click here to purchase an ad-free, print-optimized PDF of this pattern on LoveCrafts
Row 1: ch 6, sc in second ch from hook, and in each ch across, ch 1, turn. (5)
Rows 2-8: sc in each st across, ch 1, turn. (5)
Row 9: 2 sc in first st, sc in next 3 sts, 2 sc in final stitch, ch 1, turn. (7)
Row 10: ch 1, turn, sc in each st across, ch 1, turn. (7)
Row 11: 2 sc in first st, sc in next 5 sts, 2 sc in final st, ch 2, turn. (9)
Row 12: dc in each st across, ch 1, turn. (9)
Row 13: 2 sc in first st, sc in next st, FPtr around 5th st from row 11, sc in next 3 sts of current row, FPtr around same sc st that you just worked around in row 11 (2 rows below), sc in next st of current row, 2 sc in final st of current row, ch 2, turn. (11)
Row 14: dc in each st across, ch 1, turn. (11)
Row 15: 2 sc in first st, FPtr around first FPtr from row 13, sc in next 3 sts, FPtr2tog placing first leg around FPtr that you just worked around, place second leg around next FPtr from row 13 (2 rows below), sc in next 3 sts, FPtr around last FPtr from row 13 (2 rows below) 2 sc in final st, ch 2, turn. (13)
Row 16: dc in each st across, ch 1, turn. (13)
Row 17: FPtr around FPtr from row 15, sc in next 3 sts, FPtr2tog placing first leg around FPtr that you just worked around, place second leg around next FPtr from row 15 (2 rows below), sc in next 3 sts, FPtr2tog placing first leg around FPtr that you just worked around, place second leg around FPtr from row 15 (2 rows below), sc in next 3 sts, FPtr around the FPtr you just worked around, When there are two loops left on your hook from that last FPtr, yo and pull up a loop in the final st of row, pull loop through the last two loops on hook, ch 2, turn. (13)
Row 18: dc in each st across, ch 1, turn. (13)
Row 19: sc in next 2 sts, FPtr2tog around first FPtr from row 17 (2 rows below), place second leg around next FPtr from row 17 (2 rows below), sc in next 3 sts, FPtr2tog placing first leg around next FPtr2tog from row 17 (2 rows below), place second leg around next FPtr2tog from row 17 (2 rows below), sc in next 3 sts, FPtr2tog around FPtr2tog from row 17 (2 rows below) that you just worked around, place second leg around the last FPtr from row 17 (2 rows below), sc in next 2 sts, ch 2, turn. (13)
Row 20: dc in each st across, ch 1, turn. (13)
Repeat rows 17-20 until your headband is approximately 14″ long, for adults, or 12″ long for older children/teens, then begin working on the decrease rows below.
Decrease rows:
Row 1: sc2tog, sc in next 2 sts, FPtr2tog placing first leg around FPtr2tog from 2 rows below, place second leg around next FPtr2tog from 2 rows below, sc in the next 3 sts, FPtr2tog placing first leg around same FPtr2tog from 2 rows below that you just worked around, place second leg around around the last FPtr2tog from 2 rows below, sc in next 2 sts, sc2tog, ch 2, turn. (11)
Row 2: dc in each st across, ch 1, turn. (11)
Row 3: sc2tog, sc in next 3 sts, FPtr2tog placing first leg around FPtr2tog from 2 rows below, place second leg around next FPtr2tog from 2 rows below, sc in next 3 sts, sc2tog, ch 1, turn. (9)
Row 4: sc in each st across, ch 1, turn. (9)
Row 5: sc2tog, sc in next 5 sts, sc2tog, ch 1, turn. (7)
Row 6: sc in each st across (7)
Row 7: ch 1, turn, sc2tog, sc in next 3 sts, sc2tog. ch 1, turn. (5)
Note: it is possible to but a second button hole in at rows 11-12. Simply follow the instructions for rows 16 and 17, at the 11 and 12th rows, then continue as written.
Rows 8-15: sc in each st across, ch 1, turn. (5)
Row 16: sc in first st, ch 3, sk 3 sts, sc in final st of row, ch 1, turn. (5)
Row 17-18: sc in each st across, ch 1, turn. (5)
Row 19: sc in first st, hdc in next 3 sts, sc in final st of row. (5)
Edging:
Turn headband sideways and sc evenly around the outside of headband. Put 2 sc in each corner, and 2 at the top of the button hole end so it doesn’t pucker. Work a second row of sc around the headband, increasing in the corners, and top of button hole end.
Fasten off, and weave in ends.
Using a 5.5mm (I) hook, and working on the front side of the headband: attach yarn between first and second rows of sc edging, sl st using loose tension around entire headband.
Fasten off and weave in ends.
Sew button to end of headband, and weave in ends.
Would you like to add a flower to this headband? There is a lovely flower pattern included in the Cover Story Cloche add-on that would be perfect!
Want more gorgeous crochet patterns, and a little encouragement for your day? Sign up for my newsletter here!
JOIN ME ON SOCIAL MEDIA
I would love to see a picture when you’re done, so please feel free to come by my Facebook group and show off your project! Be sure to tag @kirstenhollowaydesigns when you share pictures of your finished hat on Instagram!
You can also follow me on Facebook, Pinterest, Instagram, and Ravelry for more beautiful crochet patterns.
PATTERN TERMS AND CONDITIONS:
You are welcome to share the link to this pattern, using one image of your choice, on your site, but please do not share the written patterns themselves, this includes my Ravelry downloads or translations of these patterns, or use additional images. You do not have permission to use my images by themselves to create pinnable graphics for Pinterest, however they may be included in a roundup pin if there are 4 or more other patterns. If you sell finished items online, please do not use my pictures for your listings. I’m positive that your work is of high enough quality for you to sell the finished piece. Have confidence in your abilities! <3 Thank you!
This pattern was made to be used by individuals, and small business crocheters alike. Selling your finished pieces in boutiques, at farmer’s markets, craft shows, and other local events is encouraged! The only thing I require is that this pattern not be used commercially to produce hundreds of thousands of copies.
If you enjoyed this pattern or found it useful, why not share a link to this post with your friends?


Do you have this pattern in child’s size? Looking to make one for my 5 yr old. She has a lot of hair and this would be perfect.
This pattern is worked in rows so it should be pretty easy to adjust the length shorter for a preschooler. Take the child’s instructions and try leaving off a repeat and see if that works. 😊
The only issue i could see would be that the headband might be a bit too wide using the origional hook and yarn that I did. You are welcome to try going down a hook size and using a #3 yarn if the pattern is too wide with following the suggestions above.
This is adorable, I live in Florida and still can use this headband. KUDOS
That’s great! I’m glad you’ll be able to use it. 😊
I love these patterns. So pretty. I hope I will be able to do them.
Thank you, Michelle! Good luck with them! 🙂
This is lovely, thank you for the pattern! :))
You’re very welcome! 🙂
Please translate the text in persian
I don’t know of anyone that can do that at this time. You are welcome to try Google Translate on this page to see if it helps:
https://translate.googleusercontent.com/translate_c?depth=1&nv=1&rurl=translate.google.com&sl=en&sp=nmt4&tl=fa&u=https://kirstenhollowaydesigns.com/&usg=ALkJrhihZ9GSabpzTqirlt6lfwpTQI7m5g
Thank you for the pattern.
You’re welcome!