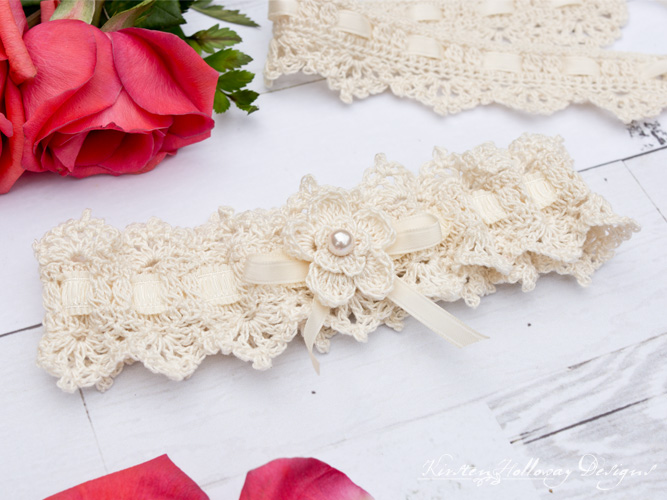
The Wrapped in Lace garter is a beautiful, free crochet pattern for the bride on her special day! Weddings can be expensive, but they don’t have to cost as much if you crochet your own bridal accessories! This easy crochet wedding garter matches the Wrapped in Lace Choker, and Fingerless Gloves crochet patterns to make this a complete bridal set.
Click here to add this to your Ravelry queue!
Delicate lace details, and a simple flower with pearl center give this set a vintage or Victorian era feel that’s perfect for country, or romantic style weddings. While I’ve displayed these pieces with a cream ribbon, it can be swapped out to match the bride’s colors if you prefer. As written this pattern fits a XS-M, but additional notes are provided so you can adjust the pattern up as much as you need. Find the free crochet pattern instructions below, or purchase a print-optimized, ad-free PDF by clicking here.
I don’t know if it’s just me, or if this is common among little girls, but when I was very young I always enjoyed looking through a small treasure box of things my mom had saved over the years. One of those items was her wedding garter. It was lacy with a blue satin ribbon and I was always impressed by how beautiful it was (I have loved beauty as long as I can remember). I knew that some day when I was old enough to get married, I wanted a beautiful garter like that!
While this garter does look quite a bit different from the one my mom had, I’ve tried to capture some of the same wonder and grace in this pattern. I hope this brings out the dreamer in your heart on your big day, and becomes a treasured heirloom for you and your family for years to come.
Disclaimer: This post contains affiliate links. When you purchase something using these links a small amount of the sales price goes to me. However, you do not pay any extra for the item you purchase.
Materials Needed:
1.5mm steel hook. I suggest trying Clover Amour Hooks for a comfortable crochet experience.
75 yards Aunt Lydia’s #10 crochet thread in Ecru, or color of your choice
Yarn needle
Scissors
1 yd sewing thread
Sewing needle
1 yd 1/2″ ruched elastic band by Dritz
12″ satin ribbon
pearl bead
1 Flower from my free Delicate Flower Clip pattern <–click to be taken to the page
Stitches Used:
ch = chain
sl st = slip stitch
sc = single crochet
hdc = half double crochet
dc = double crochet
3dc cluster = dc3tog in same stitch
st/sts = stitch/stitches
sp/sps = space/spaces
sk = skip
Gauge:
31 hdc stitches in 4”
Measurements:
XS-M: 18” around before elastic band is added. See “Additional Notes” for increasing the size.
Additional Notes:
-You may substitute ribbon for the elastic band if you prefer.
-This garter fits up to a 18” leg (measuring circumference 1″ above the knee) as written.
-Pattern may be made larger as long as you keep the loops in round 5 in multiples of 3. For instance, if you wanted to make the pattern approximately 4″ longer, you would need to increase your beginning stitch count by 27, which should give you 9 extra loops in round 5 (57, instead of 48 as is written. This should give you 19 fans instead of 16.)
Wrapped in Lace Crochet Bridal Garter Pattern (US terms):
Click here to purchase an ad-free, print-optimized PDF of this pattern on LoveCrafts
Round 1: Ch 144, join with sl st making a circle. Be careful not to twist the chain!
Round 2: ch 1, hdc in each st around, join with sl st to first hdc. (144)
Round 3: ch 1, *3dc cluster, ch 1, sk st; repeat from * around, join with sl st to first 3dc cluster. (72 3dc clusters, 72 ch-1 sps)
Round 4: ch 1, hdc in each st around, join with sl st to first hdc. (144)
Round 5: *ch 3, sk 2 sts, sl st in next st; repeat from * around, final sl st counts as join. (48 ch-3 sps)
You will now create the fans for the edging. If you get stuck there is a short picture tutorial showing some of these steps at the bottom of this post.
Round 6: sl st in first 2 ch sts from prev round, ([dc, ch 1] 4 times, dc) in next ch-3 sp forming a fan, sl st into next ch-3 sp, ch 3, *sl st in next ch-3 sp, ([dc, ch 1] 4 times, dc) in next ch-3 sp forming a fan, sl st into next ch-3 sp, ch 3; repeat from * around, join with sl st to 2nd sl st of round (16 fans, 16 ch-3 sps)
In the following round you will be working the lace details over the top of the fans you created in the previous round.
Round 7: *ch 3, sl st into ch-1 sp, ch 3, sl st into next ch-1 sp, ch 4, sl st into same ch-1 sp, ch 3, sl st into next ch-1 sp, ch 3, sl st into final ch 1 sp, move to next ch-3 sp, sc, ch 3, sl st back into sc creating a picot, sl st into first dc of next shell; repeat from * around, final sl st counts as join.
Fasten off.
Attach crochet thread to other side of garter.
Repeat rounds 5-7 one more time.
Fasten off and weave in ends.
Block the lace if you wish.
Measure your leg circumference 1″ above your knee. Cut length of elastic 1″ shorter than your leg circumference. Weave elastic (or ribbon) through round 3. Sew ends together securely with needle and thread. You’ll need about 3/4″ of overlap when you sew the elastic ends together.
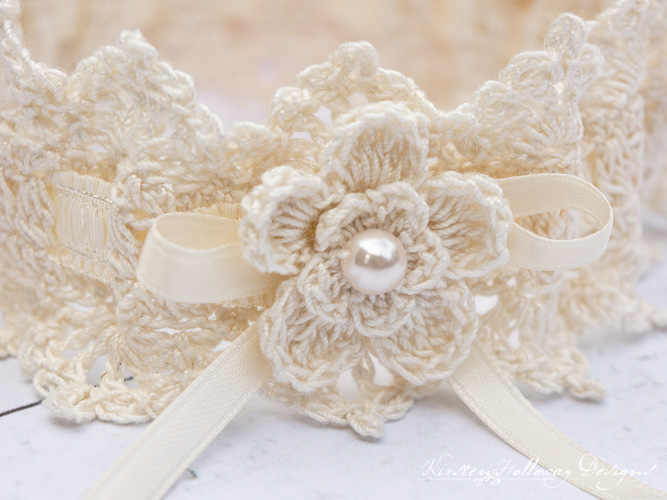
Thread ribbon around 2 clusters and tie in a bow. Take your needle and thread and secure bow with a stitch or two so it doesn’t untie.
Sew delicate flower on top of bow. Feel free to use a different flower, or replace it with a cameo embellishment if you prefer.
And that’s it! Congratulations on your upcoming wedding! I wish you well as you begin your journey as a married couple!
Friends, if you enjoyed this pattern, don’t forget to sign up for my newsletter! That way you’ll never miss out on special events, or freebies I’m offering.
JOIN ME ON SOCIAL MEDIA
I would love to see a picture when you’re done, so please feel free to come by my Facebook group and show off your project! Be sure to tag @kirstenhollowaydesigns when you share pictures of your finished hat on Instagram!
You can also follow me on Facebook, Pinterest, Instagram, and Ravelry for more beautiful crochet patterns.
PATTERN TERMS AND CONDITIONS:
You are welcome to share the link to this pattern, using one image of your choice, on your site, but please do not share the written patterns themselves, this includes my Ravelry downloads or translations of these patterns, or use additional images. You do not have permission to use my images by themselves to create pinnable graphics for Pinterest, however they may be included in a roundup pin if there are 4 or more other patterns. If you sell finished items online, please do not use my pictures for your listings. I’m positive that your work is of high enough quality for you to sell the finished piece. Have confidence in your abilities! <3 Thank you!
This pattern was made to be used by individuals, and small business crocheters alike. Selling your finished pieces in boutiques, at farmer’s markets, craft shows, and other local events is encouraged! The only thing I require is that this pattern not be used commercially to produce hundreds of thousands of copies.
If you enjoyed this pattern or found it useful, why not share a link to this post with your friends?
This is a beautiful garter…love this pattern. It has been a challenge since I’ve never really worked much with this type crochet thread and such a small hook but other than taking me longer to complete it’s turning out pretty well. However, I am at the point where I’m ready to add the elastic. I’m not sure how to “weave” the elastic through round 3. I don’t have any “loop like stitches” to weave it through unless I’ve done something wrong. Thank you.
You’ll weave it over-under fashion, 2 cluster stitches at a time, in round 3. There should be a picture in the post where the garter is laid flat and if you zoom in a little you can see how that looks. Its very simple and a bit like weaving a pot holder from nylon loops. 😊 I hope that helps!
Just finished the garter and I am very pleased with the way it turned out. Thank you.
You’re welcome! I’m so glad to hear that, Judy! 😊
Thank you for this lovely pattern.
Finally managed to finish it & it’s absolutely gorgeous 👍. Like many others I struggled with Round 7 until I realised you slst into the first DOUBLE CROCHET & not the first ch1 space. After that it was a doddle (almost!)
Many thanks x
I’m glad you got it figured it out!
As it’s a small item, it would be worth spending a bit more monies and using a silk yarn and ribbon and a real pearl salvaged from an old piece of jewelry
That would be gorgeous, and such a treasure! 😍
Hi!
I’m making this from my best friends’ wedding but on round 6, I’ve read the comments where others have got stuck but I’m still confused as the patten mentions you should have 16 shells and 16 spaces however, this only equals 32 rather than 48 which I have from round 5.
Could you help?!
Each shell takes up more than 1 ch-3 space. Take the pattern 1 comma at a time and hopefully it will make more sense as you work it. 😊
Can this be made with silk thread such as
Listed below?
Revolution Fibers – (1 Skein) Undyed Lace Weight Mulberry Silk Yarn 20/2 – 100% Pure Mulberry Silk Undyed, 100 Grams & Approximately 1,000 Yards per Skein https://www.amazon.com/dp/B08GV94FVC/ref=cm_sw_r_cp_api_glt_fabc_DFBKE5PY9JNZS1P747J2?_encoding=UTF8&psc=1
I’m not familiar with this yarn, but you could certainly try it and see. 😊
It looks like Dritz has discontinued the ruched elastic, as I’ve searched online and can’t find it anywhere. Any suggestions for alternate methods? I’m bummed because I’m not the greatest sewer, and the elastic you used looks so beautiful!
You might try looking on Etsy or eBay for some. 🙂
I did. Nothing but pink, which is not an option, unfortunately. Any suggestions about alternatives?
You can try an elastic ribbon and see if that works.
I was able to find the dritz elastic on Joann fabric website & hobby lobby ! Goodluck!!
Hello
I am making this for my sister as a surprise for her wedding
So confused on step 6.
Slip stitched into first 2 and get the double crochet chain x4 bit. But then get lost on this bit.
“ ([dc, ch 1) 4 times, dc) in next ch-3 sp, sl st into next ch-3 sp, ch 3; repeat from * around, join with sl st to 2nd sl st of round. “
Is it slip stich into next 3 spaces, chain 3 then go back to double crochet chain x4
Hi Megan,
The “([dc, ch 1) 4 times, dc)” creates lacy shells. You’ll slip stitch into the next ch-3 space, not the next 3 chains, to tack your shell down. 🙂
I purchased the correct 1.5mm crochet hook and the #10 Aunt Lydia’s crochet thread and chained 144 stitches. The circle made is huge 27.5 inches. This doesn’t seem right. I ripped it out and started 4 more times thinking I needed to make my stitch smaller with the same result. How many inches is the circle supposed to be if u follow the pattern?
Hi Diane,
I’m sorry you are having trouble with this pattern! The notes say that the circle should be 18″ around as written before the elastic band is added. Sometimes the chain will be quite large, but once you work the stitches into it the piece will shrink a bit. Did you make a gauge swatch out of hdc stitches before beginning? The information listed says you should have 31 hdc in 4″ of width. 🙂 I hope those tips help!
I’m wanting to make this as a head band for my niece as a diaper and headband photo . How can I make this a sizwm13 rather than an 18 ? Thank you
Hi Laura,
Using the gauge information listed in the pattern: 31 hdc sts to 4″, divide 31 by 4 and you’ll get 7.75 stitches per inch. I’ll round up to 8 for the purpose of keeping this easy. Now that you know you have roughly 8 stitches per inch, if you want to have a 13″ headband multiply 8 x 13 to get 104. The pattern is written in multiples of 12, but 104 is not a multiple of 12 so you’ll go to the closest number that is: 108. Use 108 as your starting chain and then follow the pattern as written keeping in mind that you will not have as many ch-sps or lacy shells. I hope that helps!
I am making this garter for my granddaughter’s wedding. I am stuck on Round 6..2 sl st UP ch from previous round. I know its 2 slip stitches but not sure what the UP is. If you can explain please. Thank you
Hi Terri,
You will slip stitch into the first 2 chains of the ch-3 space you made in the previous round. This puts you near to the top of the ch-3 space, and makes the fans lay a little nicer at the join.
I’m also stuck on this round. Would this be the beginning chain 3 of the previous row?
Yes, you will slip stitching in the first two chains to get you to the top of the ch-3 space.
I am making this for my daughters wedding. On Round 3 is it truly crocheting 3 stitches together (as a decrease) or is it making a 3 double crochet cluster in one stitch? If I crochet 3 stitches together, I end up with 36 clusters. If I do a cluster in one stitch with chains in between then I get 72 clusters. Just want to make sure I’m doing this correctly. Thank you.
You will be making 3dc clusters. 🙂
Beautiful Garter, trying my best to understand also.
If I am counting stitchches after row 3, based on the 3DC clusters, then, in Round 4 count of stitches is alot more than (144) because of the fan stitches.
Because Round 4 says to make 1 HDC in EACH stitch, . . . At the end of Round 4 there is alot more than (144) stitch count!
Can you explain, I dont understand?
Hi Barbara,
Are you doing a 3-dc cluster stitch or 3 separate dc stitches in the same stitch? That would drastically increase your stitch count if that was the case!
How do you do a 3 DC cluster? I thought it was 3 DC stitches in each st to form cluster.
A 3dc cluster is like a dc3tog but worked in only 1 stitch. This way you only end up with 1 stitch at the top of the cluster instead of 3. 🙂
Making this for my sister-in-law. I’m on round 3 now, but it seems much too small for 1/2” elastic to fit. What am I doing wrong?
Your gauge may be too tight. Try going up a hook size or making your stitches taller.
Will you be doing a bridal wrap in this style?
At this point I don’t have plans to, but maybe at some point in the future I can figure out something. 🙂
I am creating this for a friend as a keepsake as well as a beautiful present. I am just waiting for the cotton to come through and I am hoping I may be able to do the choker for her too.
How sweet! I’m sure she will love it!
Oh, how absolutely gorgeous! While it is rather ahead of time, I think I will make and put away for my grandsons’ brides for when the time comes for them to be married. When I was married we threw the garter to the bachelor guests on the same premise as throwing the bride’s bouquet. Wish I’d got duplicates of both to keep. Thank you.
You’re welcome! The garters you make will be treasured at the right time, I’m sure. How thoughtful of you to crochet these precious keepsakes! ????
My daughter is getting married in April and found a picture of the garter online and sent it to me with the usual question of “can you make this?” I just finished making it. Thank you for the pattern ????
That’s wonderful! You’re welcome!
Can the pattern be worked flat, in rows, as opposed to in rnds ?? Then sewen ?
Yes it can be. You can follow my Wrapped in Lace Choker and add the lace portion to both sides instead of only one. https://kirstenhollowaydesigns.com/2017/07/lace-crochet-bridal-choker-pattern.html
I love this garter! I have been looking for a specialness for my sister-in-law to be to given in her wedding day and this is perfect!!!
Imma making it up in ivory and blush pink as those are her colours and during a rose quartz bead instead of the pearl.
Will be a challenge though as I have never worked with so fine a thread before and have not used uk terminology too,but as I love this so much in giving it a go!
What a sweet gesture of kindness from you! I hope your sister-in-law loves it!
The pattern is written in US terms, not UK terms.
Lovely and delicate pattern. Listed it on our blog 🙂
Thank you for the feature!