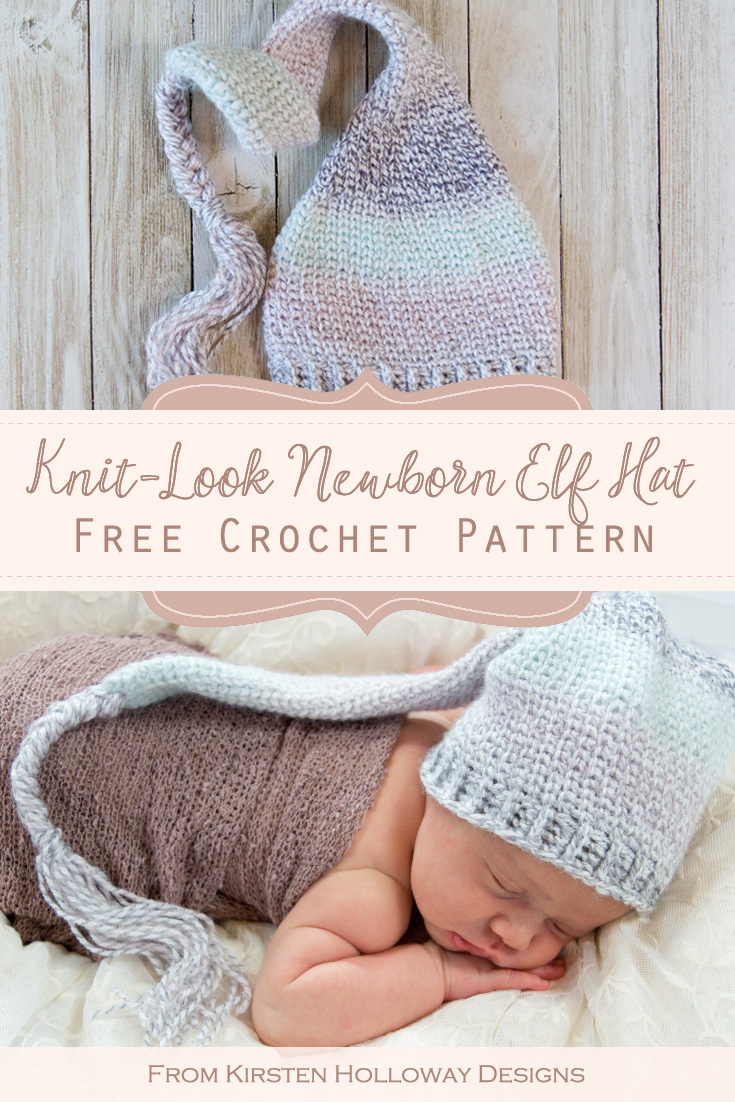
This precious newborn stocking cap crochet pattern is the epitome of understated elegance and baby sweetness. Your little “Sugar Plum” will stay cute and cozy for Christmas wearing this soft, knit-look, but entirely crocheted baby hat! Find the free crochet pattern instructions below, or purchase a print-optimized, ad-free PDF by clicking here.
Click here to add this hat to your Ravelry queue!

If you’ve never crocheted the knit-stitch, also referred to as “center single crochet”, or the “crochet waistcoat stitch”, have no fear! It is easy to pick up provided you keep your tension loose. I’ve included a tutorial video I did for a different project that was worked in rows (scroll to the “Special Stitches” section). The idea is the same when worked in the round, and this elf hat will end up looking just like a knit piece because of the way it is constructed.
Soft stretchy yarn is a must for this hat, and I picked up a beautifully squishy yarn at Michael’s to accomplish the project. The crochet knit-stitch tends to make a thick fabric, but I wanted this elf hat to feel comfortable on little heads, so I went with a #3, light weight baby yarn. Loops and Threads makes an gorgeous, long-striping yarn labeled “Kai”, and the colorway “Mint Chip” instantly caught my eye–I knew it would be perfect for this project! There are several other colorways of “Kai” offered, but this one embodies the sweet stillness of sleeping babies lost to dreamland for me. It slowly changes color from aqua, to lavender, grey, then dark purple.

The simplicity of this hat means it easily lends itself to a variety of customization options! Cross-stitch the motif or lettering of your choice across the lower part of the hat, or, if you’re comfortable with “tapestry” or “fair-isle” crochet, work a custom design into the stitches themselves! This is the ultimate, DIY creators hat as it is a blank canvas for all your dreams to be realized! Let your creativity soar as you customize this project! Here is a link to a round-up of free, cross-stitch alphabet patterns that The Spruce has put together. Also, there are plenty of free cross-stitch motifs available if you search Google.
This hat is part of the Christmas Hat CAL hosted by Salty Pearl Crochet, and The Unraveled Mitten. There are several other designers taking part, so be sure to check out the link if you need some new hats for Christmas gifts!
Disclaimer: This post contains affiliate links. When you purchase something using these links a small amount of the sales price goes to me to help keep this site, and the patterns on it free. You do not pay any extra for the item you purchase.
Difficulty:
Easy/Intermediate
Materials Needed:
5.5 mm (I) hook, or hook needed to meet gauge
200-300 yards #3 light weight yarn, Loops and Threads Kai in “Mint Chip” <–Click here to buy this yarn online.
Yarn needle
Scissors
Stitch marker
Measuring tape or stick
(Optional) Pom-pom maker for finishing, if you don’t want to create a tassel.
Stitches Used:
ch = chain
sl st = slip stitch
sc = single crochet
hdc = half double crochet
FPsc = front post single crochet
BPsc = back post single crochet
Special stitches:
Knit stitch, referred to as a center single crochet or “center sc” in this pattern: Place hook through post of sc, pull up a loop. Complete the stitch as you would a regular single crochet.
Here is a video that demonstrates this stitch on my Waterlily Waltz Headband. The idea is still the same, and ultimately, because this is worked in the round, your hat will look even more “knit” than this headband does!
Gauge:
16 center sc in 4” horizontally
Approx. 11 rows in 2” vertically
Measurements:
Newborn – 6″ wide, by 16” long, excluding tassel or Pom-Pom
Additional Notes:
–This hat is *not* a toy. Please do not leave babies or children unattended with this hat. Pom-poms and tassels can be pulled apart no matter how securely you tie them off, and could pose a choking hazard.
-Loose tension is a must for this hat to be successful! If you are struggling to get your hook through the post of the stitch your tension is too tight. Stretchy yarn can help some, but tension will make this process go a lot faster.
-Crocheting with a “lift” will make the center of the stitch looser, which will make getting the hook through it on the next round easier. If you’re not sure what a “lift” is, head on over to this site and watch the tutorial video (skip to 6:50 to watch the part about crocheting with a “lift”).
-Long striping yarn will look best on this hat. It is a very basic stitch repeated over and over, and the color variegation is what makes this design so special!
-It would be very easy to cross-stitch lettering, or a cute design across the front of the hat, Many free diagrams can be found online.
Sugar Plum Dreams Newborn Elf Hat Crochet Pattern (US terms):
Click here to purchase an ad-free, print-optimized PDF of this pattern on LoveCrafts
Round 1: 12 hdc in magic circle, join with sl st to first hdc. (12)
Round 2: ch 1, sc in each hdc around, join with sl st to first sc. (12)
Round 3-50: ch 1, center sc (knit stitch) in each st around, join to first center sc with sl st. (12)
Note: 50 rounds made my tail about 9 1/2″ long. If you want a shorter “tail” feel free to do fewer than 50 rounds, if you want a longer tail, keep repeating round 3 until it’s the length you desire.
Round 51: ch 1, 2 center sc in first st, center sc in next st *2 center sc in next st, center sc in next st; repeat from * around, join with sl st to first center sc. (18)
Rounds 52-54: ch 1, center sc in each st around, join with sl st to first center sc. (18)
Round 55: ch 1, 2 center sc in first st, center sc in next 2 sts *2 center sc in next st, center sc in next 2 sts; repeat from * around, join with sl st to first center sc. (24)
Rounds 56-58: ch 1, center sc in each st around, join with sl st to first center sc. (24)
Round 59: ch 1, 2 center sc in first st, center sc in next 3 sts *2 center sc in next st, center sc in next 3 sts; repeat from * around, join with sl st to first center sc. (30)
Rounds 60-62: ch 1, center sc in each st around, join with sl st to first center sc. (30)
Round 63: ch 1, 2 center sc in first st, center sc in next 4 sts *2 center sc in next st, center sc in next 4 sts; repeat from * around, join with sl st to first center sc. (36)
Rounds 64-66: ch 1, center sc in each st around, join with sl st to first center sc. (36)
Round 67: ch 1, 2 center sc in first st, center sc in next 5 sts *2 center sc in next st, center sc in next 5 sts; repeat from * around, join with sl st to first center sc. (42)
Rounds 68-70: ch 1, center sc in each st around, join with sl st to first center sc. (42)
Round 71: ch 1, 2 center sc in first st, center sc in next 6 sts *2 center sc in next st, center sc in next 6 sts; repeat from * around, join with sl st to first center sc. (48)
Rounds 72-74: ch 1, center sc in each st around, join with sl st to first center sc. (48)
End increasing here for Newborn size. Place stitch marker, and keep repeating rounds 72-74 for another 2”, then continue with ending.
If you want a longer hat feel free to continue repeating rounds 72-74 until it’s 3/4″ shorter than the length you like, then continue with ending. A longer hat will allow for a larger space to put lettering or motifs, especially on smaller sizes.
Want to make this hat in a different size? It’s easy! Larger sizes follow the same increasing pattern as demonstrated above. Try increasing to 54 sts for 0-3 mos, 60 sts for 3-6 mos, 66 sts for 6-12 mos, 72 sts for toddler, 80 sts for preschooler, 86 sts for child, then repeat rounds without increasing 3-4” for baby sizes, and at least 4-5” for toddler and child sizes.
Ending:
Round 1: ch 1, FPsc in first st, BPsc in the next *FPsc around next st, BPsc around next; repeat from * around, join with sl st to first FPsc.
Rounds 2-4: ch 1, FPsc around first FPsc, sc in next st *FPsc around next FPsc, sc in next st; repeat from * around, join with sl st to first FPsc.
Fasten off, and weave in ends.

I’ve included 3 options for finishing this hat. Pictured is the braided tassel, but since this is your creative project, pick the one you like best that fits your vision for this hat!Braided Tassel:
Cut 12 24” lengths of yarn. Pull through the very end of the hat so the yarn is centered through the end of the hat with 12″ hanging down on each side. Braid strands together half way, and tie off with a separate piece of yarn, leaving the ends free. Trim off the bottom ends of the tassel to even them up.
Tassel:
Cut 20 12” lengths of yarn. Pull through the end of the hat. Tie length of yarn around tassel ends and fasten off securely. Trim off the bottom ends of the tassel to even them up.
Pom-pom:
Using large Pom-Pom maker make Pom-Pom for end of hat. Attach securely to the end.
I would love to see a picture when you’re done, so please feel free to come by my Facebook group and show off your hat! Be sure to tag @kirstenhollowaydesigns when you share pictures of your finished hat on Instagram, and use hashtag #SugarPlumDreamsElfHat
You can also find me on Facebook, Pinterest, Instagram, and Ravelry.
Pattern Terms and Conditions:
You are welcome to share the link to this pattern, using one image of your choice, on your site, but please do not share the written patterns themselves, or use additional images. You do not have permission to use my images by themselves to create pinnable graphics for Pinterest, however they may be included in a roundup pin if there are 4 or more other patterns.
This pattern was made to be used by individuals, and small business crocheters alike. Selling your finished pieces in boutiques, at farmer’s markets, craft shows, and other local events is encouraged! The only thing I require is that this pattern not be used commercially to produce hundreds of thousands of copies. Also, if you sell finished items online, please do not use my pictures for your listings. I’m positive that your work is of high enough quality for you to sell the finished piece. Have confidence in your abilities! <3 Thank you!
Sharing a link to this post with your friends is also always appreciated!


