
As the weather cools off I am always in a hurry to find accessories to help keep me warm! This gorgeous crochet scarf pattern creates a luxurious piece inspired by bare tree branches, and the cool, crisp air of the mountains. Large fluffy pom-poms are sewn to the ends to complete that wintery feel. Find the free crochet pattern instructions below, or purchase a print-optimized, ad-free PDF by clicking here.
So many of you fell in love with the November Twilight crochet hat pattern I shared last year that I knew as soon as cold weather came again I would have to make a matching scarf! But even though this scarf is designed to compliment the hat, it is lovely enough to be worn as a stand-alone piece and will dress up any fall outfit!
Click here to add this pattern to your Ravelry queue!
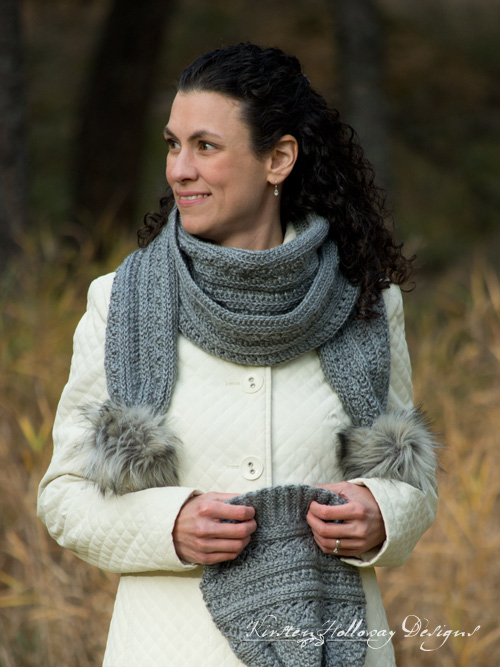
Up north the fall leaves have already passed their prime, and chilly days are here to stay. The misty, silvery color I used fits in with way the landscape is starting to look late at night and early in the morning. Brrr! Don’t worry however, because though this crochet scarf may be inspired by the cold, it is anything but!
One of my favorite things about this scarf is how warm and cozy it is! Caron Simply Soft yarn is true to its name, and one of my go-to comfort yarns. It’s light and easy to wear while also adding that warmth that this time of year calls for. I don’t know about you, but hats, scarves, and mittens seem warmer to me the softer they are! The color I crocheted it with was Grey Heather, but the Caron Simply Soft line has many other wonderful hues that will work well with this design too.

This crochet winter scarf is put together a bit differently than the hat pattern. My original design was made in the round, but this scarf is crocheted in rows. Because of that there is some of cutting and re-attaching of the yarn to make sure the design looks right on the front. Don’t let that scare you though–it’s an easy technique to master. The important thing is to always have the front of the scarf facing you when you start a new row after cutting/reattaching the yarn.
Difficulty:
Intermediate
Materials Needed:
5mm (H) hook, or hook needed to obtain gauge
490-500 yards (2 skeins) #4 worsted weight Caron Simply Soft in “Grey Heather” for 7 ft long scarf
Yarn needle
Scissors
¼ yard piece of light grey faux fur fabric
Heavy-duty button thread <– I love this stuff! Click on the link to purchase a spool of your own.
2 golf-ball sized pieces of polyester stuffing (I used Poly-fil brand.)
Sharp, sturdy sewing needle
Stitches Used:
ch = chain
sl st = slip stitch
sc = single crochet
hdc = half double crochet
dc = double crochet
st/sts = stitch/stitches
prev = previous
Additional Terms:
Cross Stitch: sk st, dc in next st, cross back in front and dc in skipped stitch.
To work this pattern you will need to be comfortable stitching in the “3rd loop” of a hdc. Directions: After turning, work all stitches for that row in the 3rd loop of the hdc from previous row (it will be in the front). Instructions: Look at the top of the stitch, and locate the sideways “V”, bend the stitch to look at the back*, and you should see another “V”. You’ll be working into the back loop of that “V”, this is called the 3rd loop. *For this scarf the textured portion created by working hdc in the 3rd loop should always be facing you when beginning a new row where hdc stitches are called for.
RS = Right Side
WS = Wrong Side
Gauge:
17 hdc in 4″
Measurements:
Approximately 5, 6, or 7 ft long by 6″ wide.
Additional Notes:
-ch 1 does not count as stitch.
-This scarf’s “3rd loop” texture will only be visible from the front side. When the pattern asks you to cut your working yarn and attach it to the opposite end, please make sure you are still working with the front of the scarf facing you!
-A simple tutorial video for creating your own pom-pom is shared at the bottom of this post.
-Scarf pictured is 7 ft long.
-I have added “right side” and “wrong side” notes to the pattern to help you figure out which rows should be facing the front once the scarf is completed. That is why the pattern starts out with the “wrong side”.
240+2 + 1 for 5 ft scarf, beg chain 243
288+2 + 1 for 6 ft scarf, beg chain 291
336+2 + 1 for 7 ft scarf beg chain 339
November Twilight Scarf Pattern (US Terms):
Click here to purchase an ad-free, print-optimized PDF of this pattern on LoveCrafts
Ch 243,(291, 339)
Row 1 (WS): sc in 2nd ch from hook, sc in each st across, ch 1, turn. (242 [290, 338])
Row 2 (RS): hdc in each st across.
*Cut yarn and attach to opposite end of scarf*
Row 3 (RS): working in 3rd loop of hdc, hdc in each st across, ch 1, turn.
Row 4 (WS): working in 3rd loop of hdc, sc in each st across, ch 3 (counts as first dc of row), turn.
Row 5 (RS): (dc, ch 2, sc) in next st, *sk 3 sts, (2 dc, ch 2, sc) in same st; repeat from * across, ch 1, turn.
Row 6 (WS): sl st into ch-2 sp, ch 3 (counts as first dc), [dc, ch 2, sc] in ch-2 sp from prev round *skip to next ch-2 sp, (2 dc, ch 2, sc); repeat from * across, when you get to the final half-shell place sc in final dc of row, ch 1, turn. (61, [73, 85]) bumps or half shells)
Row 7 (RS): hdc in first st, hdc in ch-2 sp, hdc in next 2 dc sts *hdc in sc st, hdc in ch-2 sp, hdc in next 2 dc sts; repeat from * across, ch 1, turn. (242 [290, 338])
*Cut yarn and attach to opposite end of scarf*
Row 8 (RS): working in 3rd loop of hdc, hdc in each st across. (242 [290, 338])
Row 9 (WS): working in 3rd loop of hdc, sc in each st across, ch 3 (counts as first dc of next row) turn. (242 [290, 338])
Row 10 (RS): *cross stitch across next 2 sts; repeat from * across, dc in final st. (242 [290, 338])
*Cut yarn and attach to opposite end of scarf*
Row 11 (RS): hdc in each st across. (242 [290, 338])
*Cut yarn and attach to opposite end of scarf*
Row 12 (RS): working in 3rd loop of hdc, hdc in each st across, ch 1, turn. (242 [290, 338])
Row 13 (WS): working in 3rd loop of hdc, sc in each st across, ch 3 (counts as first dc of next row), turn.
Row 14 (RS): (dc, ch 2, sc) in next st, *sk 3 sts, (2 dc, ch 2, sc) in same st; repeat from * across, ch 1, turn.
Row 15 (WS): sl st into ch-2 sp, ch 3 (counts as first dc), [dc, ch 2, sc] in ch-2 sp from prev round *skip to next ch-2 sp, (2 dc, ch 2, sc); repeat from * across, when you get to the final half-shell place sc in final dc of row, ch 1, turn. (61, [73, 85]) bumps or half shells)
Row 16 (RS): hdc in first st, hdc in ch-2 sp, hdc in next 2 dc sts *hdc in sc st, hdc in ch-2 sp, hdc in next 2 dc sts; repeat from * across. (242 [290, 338])
*Cut yarn and attach to opposite end of scarf*
Row 17 (RS): working in 3rd loop of hdc, hdc in each st across. (242 [290, 338])
Row 18 (WS): working in 3rd loop of hdc, hdc in each stitch across, ch 1, turn. (242 [290, 338])
Row 19 (RS): sc in each st across.
Fasten off and weave in ends.
Once you have woven in the ends of each scarf take a short, 12″ length of yarn and sew it through the ends of the scarf. Cinch your scarf ends tight and tie them together, then weave in those ends.

Make 2 5″ pom-poms, following this video tutorial.
Faux Fur Pom-Pom Written Tutorial:
1. Trace a circle around a small bowl or cup using a marker, on the back side of the fabric. My circle was 5″ across.
2. Cut out the circle. Only cut the fabric backing–not the fur itself! I recommend an Exact-o or similar craft knife.
3. With your needle and thread, sew a loose running stitch near the edge of the circle
4. Take a small, golf-ball-sized amount of polyester stuffing and put it in the middle of the circle.
5. Tug on the ends of the thread to cinch the circle into a ball. It should be snug so the fiber fill doesn’t come out.
6. Tie off securely, and then sew the pom-pom to your project.
Once they are complete, sew one pom-pom securely to each of your cinched scarf ends.
Want more gorgeous crochet patterns, and a little encouragement for your day? Sign up for my newsletter here! That way you’ll never miss out on special events, or freebies I’m offering.
JOIN ME ON SOCIAL MEDIA
I would love to see a picture when you’re done, so please feel free to come by my Facebook group and show off your project! Be sure to tag @kirstenhollowaydesigns when you share pictures of your finished scarf on Instagram.
You can also follow me on Facebook, Pinterest, Instagram, and Ravelry for more beautiful crochet patterns.
PATTERN TERMS AND CONDITIONS:
You are welcome to share the link to this pattern, using one image of your choice, on your site, but please do not share the written patterns themselves, this includes my Ravelry downloads or translations of these patterns, or use additional images. You do not have permission to use my images by themselves to create pinnable graphics for Pinterest, however they may be included in a roundup pin if there are 4 or more other patterns. If you sell finished items online, please do not use my pictures for your listings. I’m positive that your work is of high enough quality for you to sell the finished piece. Have confidence in your abilities! <3 Thank you!
This pattern was made to be used by individuals, and small business crocheters alike. Selling your finished pieces in boutiques, at farmer’s markets, craft shows, and other local events is encouraged! Please credit/link Kirsten Holloway Designs when selling finished products online. The only thing I require is that this pattern not be used commercially to produce hundreds of thousands of copies.
If you enjoyed this pattern or found it useful, why not share a link to this post with your friends?


