
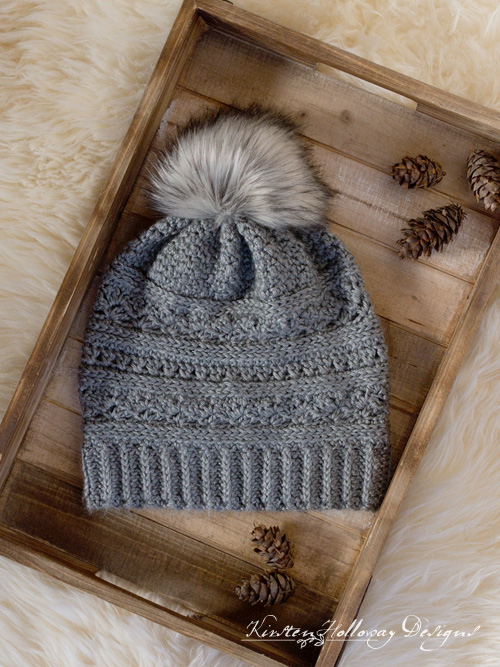
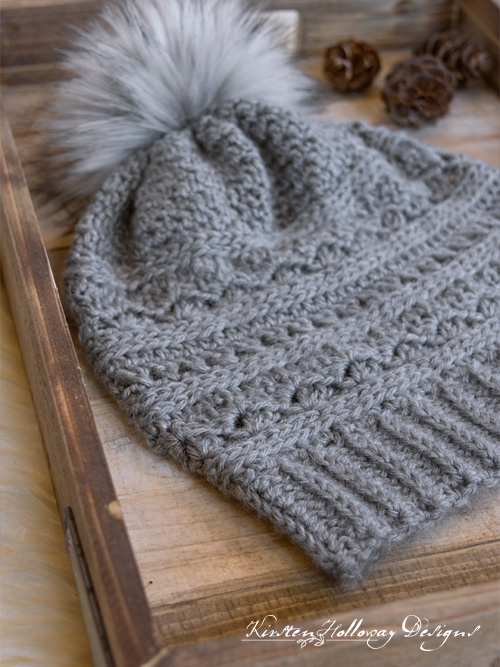
Crochet a soft, warm, winter slouch hat that’s rustic, but still feminine with this easy pattern! Frost and snow are in the air, and this slouch hat would make a great Christmas gift because of how simple it is to crochet! Textured stitches create interest–silvery shadows of trees and mountains–and keep the project fun, while a fur pom-pom adds that extra special touch. I’ve tucked the pom-pom tutorial instructions the bottom of the pattern so you can make one just like it! Find the free crochet pattern instructions below, or purchase a print-optimized, ad-free PDF by clicking here.
Make it a set:
Click here to add this pattern to your Ravelry Queue!
This pattern started out as a joint design project with my 12 year old son for a long-requested winter hat (he’s the one who asked if I could alternate single crochet and double crochet stitches which you’ll see on the crown of the hat). But since he had to be gone for a couple hours part way through the design process it accidentally morphed into a ladies slouch hat instead. Oops. Old habits die hard. He states emphatically if he had been here for the whole process “it would have been a guy hat”. Needless to say I still owe him one.
But since this post is about a beautiful crochet slouch hat pattern and not mom guilt, let’s get back on subject, shall we?
(Keep scrolling down for the free crochet slouch hat pattern)
Hats have been one of my go-to designs for the last couple of years. Over that time I’ve used a lot of different yarns, but Caron Simply Soft remains one of my favorites for soft, snuggly crochet pieces that are warm, as well as incredibly comfortable to wear. I chose a neutral grey for making this pattern, but the hat would look good in a wide variety of colors, so don’t feel held back by my color choices.
An extra special feature of this hat is its faux fur pom-pom. In my humble opinion, faux fur pom-poms give a touch of elegance and class to any crochet hat that a basic yarn pom-pom cannot. Buying faux fur pom-poms from other stores can be expensive, but if you can learn to make your own with a piece of faux fur fabric, stuffing, and a needle and thread, then you don’t have to spend a fortune to create a high-end look! I’ve included a link to instructions on how to make a pom-pom at the bottom of this pattern. It takes 10 minutes–tops.
If you love hats with pom-poms, you may also like the pattern for my Cranberry Twist crochet slouch hat.
Since I can’t stand anything tight around my head the band is very loose and stretchy. If you have a smaller head, or prefer a tighter fit for your hat, then you will want to omit a few rows from the band. This is very easy to do just as long as you maintain the same stitch count number the pattern calls for in the first round, worked along the edge of the band rows.
Disclaimer: This post contains affiliate links. When you purchase something using these links a small percentage of the sales price goes to me. However, you do not pay any extra for the item you purchase.
Difficulty:
Easy
Materials Needed:
4mm (G) hook, or hook needed to obtain gauge – band
5mm (H) hook, or hook needed to obtain gauge – hat body
300 yards #4 worsted weight Caron Simply Soft in “Grey Heather”
Yarn needle
Scissors
¼ yard piece of light grey Fashion Faux Fox Fur Fabric in “Silver”
Heavy-duty button thread <– I love this stuff! Click on the link to purchase a spool of your own.
Golf-ball sized piece of polyester stuffing (I used Poly-fil brand.)
Sharp, sturdy sewing needle
Stitches Used:
ch = chain
sl st = slip stitch
sc = single crochet
hdc = half double crochet
dc = double crochet
Additional Terms:
Cross Stitch: sk st, dc in next st, cross back in front and dc in skipped stitch.
Working in the 3rd Loop of hdc – Instructions: Look at the top of the stitch, and locate the sideways “V”, bend the stitch to look at the back and you should see another “V” made by the “yarn over”. You’ll be working into the back loop of that “V”. This is called the 3rd loop. When you are working in rows, this 3rd loop will be facing you after you turn! Here is a video that explains where this is if you get stuck.
Gauge:
16 hdc in 4″ using 5mm hook.
Measurements:
Adult: 10” wide at widest point x 11” tall, excluding pom-pom
Additional Notes:
-ch 1 does not count as stitch.
-The hat body of this pattern is worked in multiples of 4. The size can be increased or decreased based on that number. Be sure to adjust your band longer or shorter to match.
November Twilight Crochet Slouch Hat Pattern (US terms):
Click here to purchase an ad-free, print-optimized PDF of this pattern on LoveCrafts
OR
Pick up the printable version of this pattern on Etsy instead
Band:
Using 4mm (G) hook,
Row 1: Leaving a 10″ tail, ch 11, hdc in 3rd ch from hook (skipped sts count as first hdc), hdc in each stitch across, ch 2 (counts as first hdc), turn. (10)
Rows 2-60: working in 3rd loop of hdc from previous row, hdc in each st across, ch 2 (counts as first hdc), turn. (10)
The band should wrap comfortably around your head at this point. If it seems too big you are welcome to leave off some of the final rows, but be sure to adjust your stitches in round 1 below to maintain the same stitch count as the pattern calls for.
Drop working yarn, but do not fasten off.
Sew ends of band together with 10” tail left over from row 1.
Crochet Slouch Hat Body (Rounds 1-6):
Pick up working yarn.
Using 5mm (H) hook, crochet this next section along the side of the band:
Round 1: ch 1, 2 hdc in first hdc, hdc in each of the next 2 hdc sts, *2 hdc in next hdc, hdc in next 2 hdc sts; repeat from * around, join with sl st to first hdc. (80 hdc)
Round 2: ch 1, working in 3rd loop of hdc, hdc in each stitch around, join with sl st to first hdc. (80 hdc)
Round 3: ch 1, working in 3rd loop of hdc, sc in each st around, join with sl st to first sc. (80 sc)
Round 4: ch 3 (counts as first dc of round), [dc, ch 2, sc] in same st, sk 3 sts *[2 dc, ch 2, sc] in same st, sk 3 sts; repeat from * around, join with sl st to top of ch-3. (20 bumps or half shells)
Round 5: ch 1, turn, and work back the way you came from: sl st into first ch-2 sp, [ch 3 (counts as first dc), dc, ch 2, sc], *skip to next ch-2 sp [2 dc, ch 2, sc]; repeat from * around, join with sl st to top of ch-3, turn. (20 bumps or half shells)
Round 6: ch 1, hdc in first st, hdc in ch-2 sp, hdc in next 2 dc sts *hdc in sc st, hdc in ch-2 sp, hdc in next 2 dc sts; repeat from * around, join with sl st to first hdc. (80 hdc)
Round 7: ch 1, working in 3rd loop of hdc, hdc in each st around, join with sl st to first hdc. (80 hdc)
Round 8: ch 1, working in 3rd loop of hdc, sc in each st around, join with sl st to first sc. (80 sc)
Round 9: ch 1, *cross stitch across next 2 sts; repeat from * around, join with sl st to first dc. (80)
Round 10: ch 1, hdc in each st around, join with sl st to first hdc. (80 hdc)
Round 11: ch 1, working in 3rd loop of hdc, hdc in each stitch around, join with sl st to first hdc. (80 hdc)
Round 12: ch 1, working in 3rd loop of hdc, sc in each st around, join with sl st to first sc. (80 sc)
Round 13: ch 3 (counts as first dc of round), [dc, ch 2, sc] in same st, sk 3 sts *[2 dc, ch 2, sc] in same st, sk 3 sts; repeat from * around, join with sl st to top of ch-3. (20 bumps or half shells)
Round 14: ch 1, turn, and work back the way you came from: sl st into first ch-2 sp, [ch 3 (counts as first dc), dc, ch 2, sc], *skip to next ch-2 sp [2 dc, ch 2, sc]; repeat from * around, join with sl st to top of ch-3, turn. (20 bumps or half shells)
Round 15: ch 1, hdc in final sc from prev round, hdc in ch-2 sp, hdc in next 2 dc sts *hdc in sc st, hdc in ch-2 sp, hdc in next 2 dc sts; repeat from * around, join with sl st to first hdc. (80 hdc)
Round 16: ch 1, working in 3rd loop of hdc, hdc in each st around, join with sl st to first hdc. (80 hdc)
Round 17: ch 1, working in 3rd loop of hdc, sc in each st around, join with sl st to first sc. (80 sc)
Switch to 4mm hook,
Round 18: ch 1, dc in first st, sc in next st *dc in next st, sc in next; repeat from * around, join with sl st to first dc. (80)
Round 19: ch 1, sc in dc, dc in sc; repeat from * around, join with sl st to first sc.
(See alternate “decrease” ending below)
Repeat rounds 18-19 5 more times. Fasten off.
Alternate “decrease” ending – If you wish you may decrease on the 5th (final) repeat of rounds 18-19 by following these instructions:
Round 28: ch 1, sc in each dc around skipping the sc sts, join with sl st to first sc (40)
Round 29: ch 1, sc in every other sc from prev round, join with sl st to first sc. (20)
You should have a large, round tube at this point. Turn it inside out to complete the next part.
Cut 18” length of yarn and string half-way through large-eyed yarn needle. Go through every other stitch all the way around the top of the hat, and then cinch it closed. Knot the ends together securely with a square knot. Weave in ends.
Turn hat right-side out again.
Create a Faux Fur Pom-Pom:
Click here and scroll down the page to view a short picture tutorial on making a faux fur pom-pom. I used a 5″ circle for the hat’s pom-pom.
Sew pom-pom securely to hat.
If your local Joann’s craft store does not carry faux fur fabric, or if you don’t want to make your own pom-pom as described above, then you can use a large pom-pom maker to create a yarn pom-pom instead.
Want more gorgeous crochet patterns, and a little encouragement for your day? Sign up for my newsletter here! That way you’ll never miss out on special events, or freebies I’m offering.
JOIN ME ON SOCIAL MEDIA
I would love to see a picture when you’re done, so please feel free to come by my Facebook group and show off your project! Be sure to tag @kirstenhollowaydesigns when you share pictures of your finished hat on Instagram, and use #novembertwilightslouchhat!
You can also follow me on Facebook, Pinterest, Instagram, and Ravelry for more beautiful crochet patterns.
PATTERN TERMS AND CONDITIONS:
You are welcome to share the link to this pattern, using one image of your choice, on your site, but please do not share the written patterns themselves, this includes my Ravelry downloads or translations of these patterns, or use additional images. You do not have permission to use my images by themselves to create pinnable graphics for Pinterest, however they may be included in a roundup pin if there are 4 or more other patterns. If you sell finished items online, please do not use my pictures for your listings. I’m positive that your work is of high enough quality for you to sell the finished piece. Have confidence in your abilities! <3 Thank you!
This pattern was made to be used by individuals, and small business crocheters alike. Selling your finished pieces in boutiques, at farmer’s markets, craft shows, and other local events is encouraged! The only thing I require is that this pattern not be used commercially to produce hundreds of thousands of copies.
If you enjoyed this pattern or found it useful, why not share a link to this post with your friends?


Hi Kirsten. I really like the look of your November Twilight Slouch Hat. Do you have a picture of the hat on someone’s head to see just how it sits?
Ellen,
You can see some pictures of people wearing this hat in the Ravelry projects page: https://www.ravelry.com/patterns/library/november-twilight-slouch-hat/people?page=11&view=large It should be pretty roomy and slouchy. 😊
Hi Kirsten, I’m in love with this product. I was looking for a gift for my boyfriend, and I was thrilled knowing this hat was intended for a man hat, so is there any way I could adjust this pattern so it would look good for a man? thank you xoxo
This actually is a women’s hat pattern, but I have another beanie design that you might like for the guys: https://kirstenhollowaydesigns.com/2018/12/simple-seed-stitch-beanie-crochet-hat-pattern-for-men-women-and-kids.html
It comes in several sizes and even has a matching scarf pattern. 😁 It’s what I came up with after this design idea took on a more feminine flavor. 🤣
Hi Kirsten,
I’m stuck on round 19. How does it start to decrease?
Thanks a mill, Kerry
Hi Kerry,
Round 19 doesn’t decrease, but there is a note immediately below the round to let you know there is an alternate ending that does have decreases. If you want to do the decrease ending you will work rounds 18 and 19 4 more times and on the 5th time substitute rounds 28 and 29 (which have the decreases) for rounds 18 and 19. I hope that helps!
Ahhh,thanks heaps Kirsten. I’d totally confused myself. Thanks for such a lovely pattern ❤️
You’re welcome! 😊
some please enlighten me, I actually don’t understand the decreasing part.
I’m sorry youre having trouble with the pattern. What about the decreases do you not understand?
Hey Kirsten! I’m loving this pattern, but I’m having some trouble. For the first few rounds of the body of the hat, the pattern calls for a sl st into the first st of the previous round (either a hdc or sc), rather than the ch of the previous round. Is that correct? My seam is starting to go crooked, so I wanted to double check before I continued. Thanks for your time!
Hi Kierstin,
Yes, you will join into the first stitch of the round. Also, be sure to start the first stitch of the next round in the same stitch as the join wherever possible. Tug your slip stitch joins snug and that should also help reduce the seam. 😊 I hope that helps!
Hi Kirsten. I have admired this pattern for a long time. It is lovely. Would you have recommendations to adapt this pattern for a child. Dimensions, stitch count, gauge. Thanks in advance for any help.
Because of the repeating pattern on the lower part and the need for some “slouch” at the top to make the hat lay right I have not adapted this to children’s sizes. You could try crocheting the adult hat with a baby yarn and smaller hook and see if that works out for you. 😊
Thank you for sharing this pattern. It was a joy to make!
You’re welcome! I’m so happy to hear you enjoyed crocheting it. 😊
I must be really doing something wrong here because I’m at row 52 of the band and I still need a solid 5” for it to wrap around my head comfortably. Just to confirm, the band is made using a 4mm hook, with a worsted weight yarn, yes?
That is correct. You may have tighter tension than I do. You can do more than 60 rows for the hat band, but you will need to adjust your stitch counts accordingly when you get to the hat body.
Ok, thank you for getting back to me!!
You’re welcome!
How do you adjust the rows for the body if you need more?
The pattern is worked in multiples of 4 so you can increase the stitch count by 4 or 8 if you want your hat to be more roomy. It should fit up to a 23″ head the way it’s written and using the recommended yarn and gauge instructions. 😊
I’m on row 5 but I’m so confused. I’m trying to do the second set of “bumps”. Where do they go? Are they to be on top of the row 4 ones, or in the spaces in between? do you have any close up pics?
They will be worked in the ch-2 sps that you made in the previous round. You’ll begin by slip stitching into that very first ch-2 sp, then chaining 3 (which counts as the first dc of the round), then you’ll work everything in the brackets: [dc, ch 2, sc] in that ch-2 sp. After that you’ll move to the next ch-2 sp and repeat what’s in the brackets: [2 dc, ch 2, sc]. I hope that helps!
Oh my gosh Kirsten, I love your designs!!! They are BEAUTIFUL. I especially love this hat. It has such lovely stitching and works up so nicely. I’m working on my second one and was planning on doing a few more until I began perusing your site and found several other beautiful patterns I would like to try. Thanks so much for making these available to fellow crocheters. Your’s is my go to site for patterns. ❤️
You’re welcome, Meagan! I’m glad you’re finding lots of fun patterns here to crochet!
Hi again Kirsten, thought I had everything figured out, but obviously I don’t.
Okay so, as I mentioned in my previous previous comment, I chained 50 instead of 60, because 60 was too big. So after completing the brim I had a total of 50 rows.
Now, the tutorials that I watched about crocheting along the edge of an HDC brim, said that for 2 rows of HDC’s we can get approximately 3 sts.,
As per round 1 of the beanie body,
“ch 1, 2 hdc in first hdc, hdc in each of the next 2 hdc sts, *2 hdc in next hdc, hdc in next 2 hdc sts; repeat from * around, join with sl st to first hdc. (80 hdc)”, so basically 4 HDC’s in 3 sts.(because of the increase).
okay, so as confusing as this next part is, please go with me. 3sts in 2 rows, if we group together 2 rows, we get 25 groups (50/2). Now, in these 25 groups, each group has 4HDC’s (2HDC same st. + 1HDC + 1HDC in the next 2 sts.), so now, instead of 80 HDC’s as per your pattern, I have 100 which is my whole problem.
Im sure the whole problem was the number of sts. that I made along the edge of the brim, please help 😢
Im really determined to get this pattern done.
Thanks xx
P.S. anyone who did a chain 50 in the start as per head size, please please share your math with me, or simply tell me how you went about this beautiful pattern.
Thanks xx
The #1 rule of crochet patterns is: if the designer says to place the stitches in a certain place then you’ll follow the designers instructions no matter what else anybody says. 😅 Even if you start out with 50 stitches the instructions here tell you to put 1 hdc in each hdc stitch when not increasing. This means you need to spread 30 more hdc stitches out along the edge. 30 does not divide evenly into 50 like it does into 60, so you’ll need to work your increases a little more frequently in certain parts. Try *2 hdc in next st, hdc in next 2 sts, 2 hdc in next st, sc in next st; repeat from * around.
Hopefully that works!
Hey Kirsten, great pattern!!
I am however struggling a bit with starting the beanie body after the brim. For your pattern, instead of sewing the brim ends together, I’m gonna slip stitch the ends together with the working yarn itself.
I find it hard crocheting along the edge of a brim because it is so hard to find where to put the hook?!, anyway, I’m gonna try and do single crochet all around the edge and then start with round 1, any tips for crocheting along the edge of a brim Kirsten, to make it a little easier?
Also, I have 50 rows instead of 60 for my brim, and it does stretch out quite a bit as well, do I still need 80 HDC in this case?
Thanks xx
Hi Angelina, You can do fewer stitches (as long as they are a multiple of 4), but having it balloon out like that will give it a slouchier look.
I don’t really have any special tips for working along the sides of the stitches. 😅 I just try to work my stitches into the same part of each stitch for consistency’s sake.
Hey Kirsten,
Thanks for your response, I figured out the whole brim edge thing :). Yeah, I probably will drop a few stitches, while keeping it a multiple of 4.
Thanks xx
You’re welcome! I hope the rest of the project goes smoothly. 😊
Hello, and thank you for sharing! I just finished the hat, but my rows in between the shell rows look nothing like yours. Instead, it looks rather flat and not a noticeable pattern shift like yours. Any thoughts?
Hi Rebecca,
Did you crochet in the 3rd loop? Working in that 3rd loop (at the back of the stitch) should push the top forward to give you those pretty ridges.
Hi there! Teaching myself crochet and fell in love with these new-to-me scallop-looking stitches! So far, mostly good on my end. For the 2dc ch 2 sc rows that form those beautiful scallops, I always have a big gap where I start the row off, and again where I slip stitch the row together. Is there a name for this particular stitch so I can look up tutorials on how to do this in the round? Thank you so much for sharing this pattern! It’s been so much fun to learn!
It’s called the Tulip Stitch, and may have a few other names. I can hardly tell where the join is for those rounds on my hat, so perhaps try making your chains tighter at the beginning of the round to minimize any gaps. 🙂
I’m so glad you are enjoying the patterns!
Beautiful hat pattern!!!! Was very easy to read/follow and my hat turned out great. Thanks so much for sharing!
You’re most welcome, Meagan! 😊
Love the hat but they look terrible on me!! Do you have a pattern with a firmer style head design, for a cap style hat with a brim ?? I love the Pom Pom on it too!!
You could try my Simple Seed Stitch hat. It’s a beanie, and doesn’t have as much texture and detail as this design, but you could definitely add a pom-pom. 🙂 https://kirstenhollowaydesigns.com/2018/12/simple-seed-stitch-beanie-crochet-hat-pattern-for-men-women-and-kids.html
I just wanted to let you know that this is my absolute FAVORITE pattern. It’s so delicate and beautiful and I will be making a lot. It is the hat I wear most and the one i make for gifts. I don’t make it as a slouch but I do prefer it will simply soft or soft secret from HL. All your designs are delicate and girly. I just needed to let you know because every time I make one I think to myself, “this is just the most beautiful hat”. Thank you for sharing your talent!
Aww, thank you so much for your sweet compliments, Jenny! 😊
I love this hat, I’m trying to get the first few rows figured out though. For Round 1, are you holding the band as if the hat is inside out or right-side out?
For Round 2, do you turn, or treat it as a traditional round and keep going? Same for Round 3. I’m having a hard time getting the ribbed effect on the outside of the hat for both rows.
Lastly, if I need to make a bigger band, can I increase the starting number of stitches for the hat part by increments of 4? So instead of 80, do 84 or 88 or so on.
Thank you!
Hi Mikala,
It really doesn’t matter which direction you’re holding the ribbing when your work round 1 along the edge. It should look the same on both sides. For round 2 you will keep working in rounds. The only place in the hat body you switch back and forth is when you’re doing the tulip stitch in round 5. The instructions tell you to turn both at the beginning and at the end of the round. You should be heading the same direction you were in rounds 1-4 after you’re done with round 5’s turns. Multiples of 4 shoudl work if you need to increase the size. 🙂
Good luck!
In the 1st, 2nd, 3rd row of the body…are you supposed to crochet in the front or back loop only all the way around? I’m wondering how you got the V on the outside of the hat with those few rows.
It’s made by crocheting in the 3rd loop of the hdc. The pattern and notes explain all of that if you read through it. 🙂
Love this pattern! Having difficulties sizing it correctly though. I find that 60 rows is not enough for the band using the suggested hook size and yarn. I went up to a 5mm hook, and still the band is not wide enough. If i added ( which i would have to) more rows to the band, how do i go about figuring out how many extra sets of 4 sts i’d need to add to the first row of the body? I tried to just add the 80 sts, but the band was obviously wider than the body of the hat and looked ridiculous. Any help you can provide would be appreciated. Thanks 🙂
I’m sorry you’re having trouble. Try going up in hook size again and see if that does it. The band should be about 2″ wide by roughly 20″ long.
Hi Kirsten, I’ve watched your video on crocheting into the 3rd loop. It is helpful for the beginning of the row where you skip the first stitch. I am having trouble finding the third loop at the end of the row however and I find that there is a very noticeable gap due to the ch2 at the beginning of the previous row. I’ve tried searching videos but no-one seems to show how to complete the row. Can you help? Thanks!
Hi Gillian,
It takes a bit of practice to find that last 3rd loop. One thing that has helped me find it is remembering that the 3rd loop is created by the yarn-over when making the hdc. If the row ends with a ch-2, put the final st into the top of that ch-2. If you wish, you can make a hdc in place of the ch 2 at the beginning of the row: simply ch 1 instead to turn, and then hdc into that first st. Hope that helps!
Can you please explain this round? I am not sure how to find the ch-2 space.
Round 5: ch 1, turn, and work back the way you came from: sl st into ch-2 sp, ch 3 (counts as first dc), [dc, ch 2, sc] in ch-2 sp from previous round *skip to next ch-2 sp [2 dc, ch 2, sc]; repeat from * around, join with sl st to top of ch-3, turn. (20 bumps or half shells)
You will be working into the ch-2 sps you created in the previous round. Take a look at the previous round and you should see them. 🙂
When you did the chain 5 did you find there was a noticeable hole between the chain 3 and double crochet at the start?
Where are you seeing a ch 5 in the pattern?
Just completed this hat for my sister. She requested no ppm ppm, so I skipped that. She will wear it for a 5K in December! This was my first bottom up hat. Thank you for a great pattern!!
You’re welcome! That sounds great!
I’m working on the body of the hat and have just finished rounds 2 and 3. I’m new to working in the 3rd loop of an hdc. The video you linked to earlier in the comments was really helpful and I feel like my band came out right. On these rounds though, since there’s not an instruction to turn, but just to keep working on the round, it seems like the cute ribbed effect is happening on the inside of the hat. Am I missing something ….?
The hat is adorable!
When you switch to working in the round your ribs should be facing outward, so work in the 3rd loop at the back of the stitch. It won’t be facing you like it did in the band since you are not working in rows anymore. I hope that helps!
Thanks for your response! It was awkward to stitch that way, but totally works to make the cute ribbed effect. Thanks!
You’re welcome! I’m glad you are happy with how it turned out!
Thank you for asking this question. I was having a heck of a time on this too! I knew the pattern didn’t say to turn but I couldn’t figure out how to find that 3rd loop without turning or turning inside out. Thank you, Kristen, for clarifying! Working out great now!
This is a beautiful pattern. Thank you so much for sharing it.
I’m making one for a friend, but I do have a couple of questions, all having to do with transitioning between certain rows.
Do you chain between rows 6, 7 & 8, and between rows 15, 16 & 17?
Thank you.
You can ch 1 when starting all of those rounds. 🙂
I’m having a hard time figure out where to put my stitches in Row 1. I understand that I’m doing increases but crocheting into the side of the band doesn’t give me obvious places to do the “2 hdc in first hdc, hdc in each of the next 2 hdc sts”. The photos I’ve seen here and on ravelry are pretty far from the work, so it’s hard to use them as a guide. Thanks for the help!
Hi Alyssa,
The band is also made of hdc stitches. Look at the band and work the designated number of stitches the side of each hdc stitch. 🙂 If you have never worked a hat from the bottom up with a band like this it may take a time or two to really feel comfortable making it, but hopefully this info helps!
I am struggling with where this stick goes so you have a picture ?
Hi Barb,
I’m not sure what stick you are referring to? Could you explain, please?
So sorry that was supposed to say stitch.
Ok! That makes more sense! ???? Are you meaning the stitches around the hat band? Or working in the 3rd loop of a hdc?
Yes Around the band
The pattern instructions should say how frequently you are to place stitches around the band. You’ll be crocheting into the sides of the hdc stitches along the “long” edge of the band.
I made this as a gift for my adult niece. I enjoyed following the pattern and love the end result! Here’s a tip for those people having a hard time finding faux fur fabric: I couldn’t find faux fur, and didn’t want to wait for an online order to arrive , so I visited my local thrift shop and found a coat with a hood that was lined with a beautiful faux fur! The purchase only cost me $7! I ended up with enough fur for about 12 pom poms!
Thank you for sharing your idea, Mara! I’m glad you enjoyed making the hat!
I tried putting a yarn pom pom on my finished hat, not the same! So i took it off and put the faux fur one on it. MUCH BETTER! love it!
Yes, the fur pom-pom is really what makes it! 😀 So glad you like your new hat!
I love how this pattern turned out. Thanks
You’re welcome, Sharon!
I think this pattern looks beautiful but I started doing the ribbing and ive never worked in the 3rd loop in rows, im finding that my ribbing lays more flat than it appears in your pictures. Are you supposed to approach the loop from the top or go underneath?
Hi Gracie,
You will be working in the back of the stitch to make the ribbing “pop” forward toward the front. 🙂
I love this pattern, but I don’t like slouchy hats, where wold be the best place to take rows out to make a regular beanie? Thank, Bobbie
Unfortunately, because of the way it is designed omitting rows won’t really help. It will make the hat lumpy and not lay right.
I shared this on Pinterest and it was removed for copyright violation..
It probably was shared from a source that did not lead directly to my page. There are quite a few scraper sites out there that steal my images in order to get traffic to their site first. I report them as copyright violations as often as I see them. My site is the original site for this hat pattern. If the pin says it’s from Kirsten Holloway Designs but does not send you directly here to this site it is one of those scraper sites.
I see. Ok. I will share from here.
Your patterns are wonderful, btw!
Thank you so much! ????
I am impossible. I cannot follow written instructions. Can you do this hat in a video form for those like me? I can follow video usually… See it on FB?
Hi Darla,
I don’t have a video at this time, but if you struggle with written instructions there are some great YouTube video tutorials that teach you how to read written crochet patterns. I also have an article that explains how to read crochet patterns here: https://kirstenhollowaydesigns.com/2018/04/how-to-read-crochet-patterns-terms-for-beginners.html
For those people who are NOT against using REAL fur, may I suggest using rabbit fur? Rabbits molt, or “shed” their fur 4 times a year. If you have one, or know someone who does, you can collect the molted fur, hand wash it and comb it out when dry. I have a pet rabbit, a Lion Head for those who know rabbits, and he’s a “house bunny”, which means he is free to roam the house when we are home. I typically use his fur when a fur pom is called for. If I have a need for a larger amount, I have a friend who breeds pet rabbits and she will collect some for me. Just an option for those who are interested.
That’s a neat idea! Thank you for sharing the information!
Can you elaborate more on how you make the pom pom or provide a website or video on how to make the fur poms from rabbit fur? I live in a farming community and I bet I could get some rabbit fur!
This my second hat pattern that I have done from you. You have such great patterns and I like how you give your instruction. I am not finished with my hat yet, but so far it looks beautiful.
Awesome! I’m glad you’re enjoying the patterns, Berlin! 😀
Hi. Haven’t crocheted in a long while and have always been terrible at modifying patterns myself. If I do 56 rows for the band, I’m assuming I don’t do 80 hdc, correct? Help!
Thanks so much
Hi Susan,
Yes, you will still need to do 80 hdc. 😉 You will need to space them along the edge a bit differently than I have mine written out, and that will be the part you’ll have to play with. I’m sure you’ll get it though!
Hi Kristen,
I really enjoy your pattern! I will certainly crochet the corresponding scarf.
I just finished crocheting the band. I have a big head, I had to make 72 rows to fit 🙂
What do you mean by “space them along the edge a bit differently”? Should I skip some increase? I’m a bit confused about what I should do to start crocheting the hat part.
Thanks in advance for your help. I can’t wait to wear my beanie 🙂
Reply to myself:
I think I figured it out: I have 72 rows in my band, in which I need to fit 80 hdc.
Then I should crochet 2 hdc in the same hdc, every 9 hdc. I should do that 8 times :
8×9=72. The 1st row of the hat will give me 10 hdc for 9 hdc of the band x 8 times
–> I’ll have my 80 stitches.
Enough maths for tonight!
Hope it might help somebody else.
Glad you got it figured out!
My uncle just gave me twenty dollars for this hat ???? I loved making this though and plan on checking out your other patterns!
Awesome! Always nice to get those surprise sales haha! 😀
I love this new pattern,I want to try it,but I have avoided using caron simply soft. I made my cousin fingerless gloves,they came out beautiful,but when I saw her a month later,they were a mass of fuzz. Do you hand wash your items made with this yarn.
Joan,
Yes, I handwash all of my pieces. That helps them stay nice longer. 🙂
For round 6 do you turn again and start doing it in the round? The stitches aren’t lining up with round 5, skipping a lot of stitches if that makes sense? Or do I keep doing it from the back until it says turn again?
Thank you
It should say to turn at the end of the row too so you’re working back in the original direction. 🙂
On the brim, I know it says 60 rows but I am at 39 at it will already go around my head. I do not have a small head lol Am I stitching way to loose?
You might be, but I did design this to have a somewhat loose band. If it’s fitting around your head in the same way you like your hats to fit, then feel free to start working on the next part of the hat. You will need to keep the stitch counts the same as what the pattern calls for.
This has me so confused. I’m on row 15, but I’m supposed to go all the way down to row 5?
Round 15: hdc in final sc from round 5, hdc in ch-2 sp, hdc in next 2 dc sts *hdc in sc st, hdc in ch-2 sp, hdc in next 2 dc sts; repeat from * around, join with sl st to first hdc. (80 hdc)
Please help! I’m anxious to finish this beautiful pattern!!!
Not entirely sure where that “round 5” came from. It should reference the “previous round” instead. I’ll get that updated right away! 🙂
I am confused about the brim. I don’t understand what you mean by”working in 3rd loop of hdc from previous row.” What is the “3rd loop”? I was expecting to be doing front/back loop only from the pictures. Is this what you mean by 3rd loop? Or is this a reference to wher eyou say to skip the first stitch of each row?
Hi Allegra,
The notes at the beginning of the pattern describe what the 3rd loop of a hdc is and how to find it, but you may find this video more helpful. It’s from a different pattern, but the same concept:
https://facebook.com/kirstenhollowaydesigns/videos/1884031391814874/
I hope that makes things clear! 🙂
Oh I’m sorry, I guess I scrolled right past those notes! Thanks for pointing them out and directing me to a video! I feel silly haha.
No worries! It’s easy to do. I’m glad they helped!
I don’t even have local Joann’s…lol. I checked in Walmart but they have no faux fur so will have to try HL when I go to that part of town.Thanks for the pattern. The hat is wonderful and the fur pom pom really makes it special
You’re welcome, Ruth! Good luck at Hobby Lobby! I think I’ve seen some faux fur there too. 😀
The sell them on Amazon, pre-made, but making them yourself is fun too.
If I chain 11. HDC in 3rd chain from hook, how can I end up with 10 stiches. I get 9.
The 2 chains that you skipped counts as your first stitch, then there should be nine stitches after that. 🙂