
If you’re looking for an easy, beginner-friendly pattern that doesn’t take a lot of thought, yet turns out classy and elegant, the easy Double Seed Stitch crochet slouch hat is perfect for you! It has light texturing all over that runs in a diagonal direction just like the double seed stitch in knitting, but this version is for crocheters. Did I mention this hat pattern doesn’t take a lot of concentration? Just what we need during this often hectic time of year! The instructions come in 3 sizes to fit toddlers, kids, and women. Find the free crochet pattern instructions below, or purchase a print-optimized, ad-free PDF by clicking here.
Click here to add this pattern to your Ravelry queue!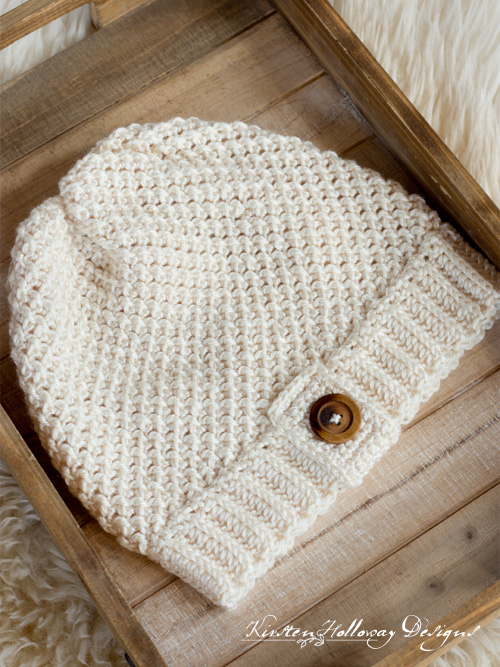
White is becoming more of a popular color to wear during the winter, but any neutral color will retain the elegance factor of this hat. Or, if you prefer, crochet it in a bright, bold hue to make it a statement piece! Because the design of this slouch hat is so clean and uncluttered it fits in almost anywhere. It can be worn every day, and look just as “in place” when attending special events.
One of my favorite things about this slouch hat is that it is so soft, and has nice drape thanks to the beautiful Red Heart “Soft” yarn I used. <–Click here to get your hands on some of your own. The reason why I keep returning to this yarn is because it has the feel of a natural silk blend yarn, but is much more affordable. It also does not require as much special care to stay looking nice. (I still recommend hand-washing all of my designs though.)
I’ve always been a fan of knitted accessories, but knitting is not my gift–yet, so the next best thing to do is design crochet patterns that have a similar look and feel. This pattern primarily uses 2 stitches: the single crochet and front post double crochet. These create the double seed stitch in the body of the hat. The band is made of half double crochet worked in the 3rd loop which I have extra instructions for in the “Stitches Used” section of the pattern. These stitches are very easy to learn, and this hat gives you plenty of practice! And I mean, look at that texture!:

The best thing about the double seed stitch crochet slouch hat is that there are an infinite number of ways to customize this beyond the 3 sizes I have included. I just know you’ll get a lot of use from this pattern! The hat is crocheted in rounds from bottom to top so you can make it as slouchy (or not) as you want. The band can be made smaller or larger depending on how many rows you crochet before joining so it perfectly fits your head size. On the adult and child versions of this hat the band is about 2″ wide, and about 1″ wide for toddlers. If you want a narrower band for adults and kids, simply follow the band stitch counts for toddlers, but make as many rows as the child or adult hats call for. See? So many options for this beautiful hat!
If you want a chunky yarn version of this hat click over here.
Let’s get started!
Disclaimer: This post contains affiliate links. When you purchase something using these links a small amount of the sales price goes to me. You do not pay any extra for the item you purchase.
Difficulty:
Advanced Beginner/Easy
Materials Needed:
4mm (G) hook, or hook needed to obtain gauge – band
5mm (H) hook, or hook needed to obtain gauge – hat body
270-280 yards #4 worsted weight Red Heart Soft in “Off-white” <–Click here to pick up some of your own!
Yarn needle
Scissors
Adults and Children: 1″ round wooden button
Toddlers: 7/8″ round wooden button
Stitches Used:
sl st = slip stitch
ch = chain
sc = single crochet
FPdc = front post double crochet
Additional Terms:
hdc in the 3rd loop = Look at the top of the stitch, and locate the sideways “V”, bend the stitch to look at the back*, and you should see another “V”. You’ll be working into the back loop of that “V”, this is called the 3rd loop. *For this hat band the textured portion created by working hdc in the 3rd loop should always be facing you when beginning a new row.
Gauge:
Hat Body: 16 FPdc/sc stitches in 4” with 5mm hook
Band: 10 hdc stitches in 2″ with 4mm hook
Measurements:
Finished teen/adult hat measures approximately 10 1/2” tall by 11” wide, but can be made taller, or shorter depending on your preference.
Finished child hat measures approximately 8 1/2-9 1/2” tall by 10” wide, but can be made taller, or shorter depending on your preference.
Finished toddler hat measures approximately 6 1/2-7 1/2″ tall by 8-9″ wide but can be made taller, or shorter depending on your preference.
Additional Notes:
-Ch-1 at beginning of row does not count as stitch
Double Seed Stitch Slouch Hat Pattern (US Terms):
Click here to purchase an ad-free, print-optimized PDF of this pattern on LoveCrafts
Teen/Adult Size:
Hat band
Using 4mm (G) hook, or hook needed to obtain gauge,
Row 1: Leaving a 10″ tail, ch 11, hdc in 3rd ch from hook (skipped sts count as first hdc), hdc in each stitch across. (10)
Rows 2-60: ch 2* (counts as first hdc), turn, working in 3rd loop of hdc from previous row, hdc in each stitch across. *Remember to skip the very first stitch of the row each time. (10)
The band should measure 20” long by 2″ wide and wrap comfortably around your head at this point. If it seems too big, or you want a tighter hat you are welcome to leave off some of the final rows, but be sure to adjust your stitches in round 1 below to maintain the same stitch count as the pattern calls for.
Drop working yarn, but do not fasten off.
Sew ends of band together with 10” tail left over from row 1.
Hat body:
Pick up working yarn.
Using 5mm (H) hook, or hook needed to obtain gauge, crochet this next section along the side of the band:
Round 1: ch 1, 2 sc in first hdc, sc in each of the next 2 hdc sts, *2 sc in next hdc, sc in next 2 hdc sts; repeat from * around, join with sl st to first hdc. (80 hdc)
Round 2: ch 1, FPdc around first st, sc in next, * FPdc around next st, sc in next st; repeat from * around, join with sl st to first FPdc. (40 FPdc, 40 sc)
Round 3: ch 1, *sc in FPdc, FPdc around sc; repeat from * around, join with sl st to first sc. (40 sc, 40 FPdc)
Round 4: ch 1, FPdc around sc, sc in FPdc; repeat from * around, join with sl st to first FPdc. (40 FPdc, 40 sc)
Repeat rounds 3 and 4 until your hat measures 10” long, then begin decrease rounds.
Decreases:
Round 1: ch 1, sc in each FPdc skipping the sc sts, join with sl st to first sc. (40)
Round 2: ch 1, sc in every other sc from prev round, join with sl st to first sc. (20)
You should have a large, round tube with a tapered end at this point. Turn it inside out to complete the next part.
Cut 18” length of yarn and string half-way through yarn needle so you’re working with a double strand of yarn. Go through every other stitch all the way around the top of the hat, and then cinch it tightly closed. Knot the ends together securely with a square knot. Weave in ends.
Turn hat right-side out again. Then continue with the button tab instructions at the bottom of the post.
Child Size Hat:
Hat band
Using 4mm (G) hook, or hook needed to obtain gauge,
Row 1: Leaving a 10″ tail, ch 11, hdc in 3rd ch from hook (skipped sts count as first hdc), hdc in each stitch across. (10)
Row 2: ch 2* (counts as first hdc), turn, working in 3rd loop of hdc from previous row, hdc in each stitch across. *Remember to skip the very first stitch of the row each time. (10)
Repeat row 2 until your hat measures 18″ long.
The band should measure 18” long by 2″ wide and wrap comfortably around your child’s head with plenty of stretch at this point. If it seems too big, or you want a tighter hat you are welcome to leave off some of the final rows.
Drop working yarn, but do not fasten off.
Sew ends of band together with 10” tail left over from row 1.
Pick up working yarn.
Using 5mm (H) hook, or hook needed to obtain gauge, crochet this next section along the side of the band:
Round 1: ch 1, evenly place 72 sc along edge of hat band, join with sl st to first hdc. (72 sc)
Round 2: ch 1, FPdc around first st, sc in next, * FPdc around next st, sc in next st; repeat from * around, join with sl st to first FPdc. (36 FPdc, 36 sc)
Round 3: ch 1, *sc in FPdc, FPdc around sc; repeat from * around, join with sl st to first sc. (36 sc, 36 FPdc)
Round 4: ch 1, FPdc around sc, sc in FPdc; repeat from * around, join with sl st to first FPdc. (36 FPdc, 36 sc)
Repeat rounds 3 and 4 until your hat measures 8-9” long, then begin decrease rounds.
Decreases:
Round 1: ch 1, sc in each FPdc skipping the sc sts, join with sl st to first sc. (36)
Round 2: ch 1, sc in every other sc from prev round, join with sl st to first sc. (18)
You should have a large, round tube with a tapered end at this point. Turn it inside out to complete the next part.
Cut 18” length of yarn and string half-way through yarn needle so you’re working with a double strand of yarn. Go through every other stitch all the way around the top of the hat, and then cinch it tightly closed. Knot the ends together securely with a square knot. Weave in ends.
Turn hat right-side out again. Then continue with the button tab instructions at the bottom of the post.
Toddler Size Hat:
Hat band
Using 4mm (G) hook, or hook needed to meet gauge,
Row 1: Leaving a 10″ tail, ch 6, hdc in 3rd ch from hook (skipped sts count as first hdc), hdc in each stitch across. (5)
Row 2: ch 2* (counts as first hdc), turn, working in 3rd loop of hdc from previous row, hdc in each stitch across. *Remember to skip the very first stitch of the row each time. (5)
Repeat row 2 until your hat measures 16-17″ long.
The band should measure 16-17” long by 1″ wide and wrap comfortably around your toddler’s head with plenty of stretch at this point. If it seems too big, or you want a tighter hat you are welcome to leave off some of the final rows.
Drop working yarn, but do not fasten off.
Sew ends of band together with 10” tail left over from row 1.
Pick up working yarn.
Using 5mm (H) hook, or hook needed to meet gauge, crochet this next section along the side of the band:
Round 1: ch 1, evenly place 64 sc along edge of hat band, join with sl st to first hdc. (64 sc)
Round 2: ch 1, FPdc around first st, sc in next, * FPdc around next st, sc in next st; repeat from * around, join with sl st to first FPdc. (32 FPdc, 32 sc)
Round 3: ch 1, *sc in FPdc, FPdc around sc; repeat from * around, join with sl st to first sc. (32 sc, 32 FPdc)
Round 4: ch 1, FPdc around sc, sc in FPdc; repeat from * around, join with sl st to first FPdc. (32 FPdc, 32 sc)
Repeat rounds 3 and 4 until your hat measures 6-7” long, then begin decrease rounds.
Decreases:
Round 1: ch 1, sc in each FPdc skipping the sc sts, join with sl st to first sc. (32)
Round 2: ch 1, sc in every other sc from prev round, join with sl st to first sc. (16)
You should have a large, round tube with a tapered end at this point. Turn it inside out to complete the next part.
Cut 18” length of yarn and string half-way through yarn needle so you’re working with a double strand of yarn. Go through every other stitch all the way around the top of the hat, and then cinch it tightly closed. Knot the ends together securely with a square knot. Weave in ends.
Turn hat right-side out again. Then continue with the button tab instructions at the bottom of the post.
Button Tab:
Use 4mm (G) hook for all sizes, or hook needed to meet gauge,
Adults and Children:
With 4mm hook,
Ch 6,
Row 1: sc in second ch from hook, sc in each remaining chain across, ch 1, turn. (5)
Row 2: sc in each st across, ch 1, turn. (5)
Repeat row 2 18 more times or until tab measures just under 4” long.
Round 1: working along outside edge of tab, sc evenly around entire tab.
You may fasten off here leaving an 18″ tail for sewing the tab to the hat, or continue with adding a more decorative edging (this will make the tab a little bit wider):
Round 2: using tight tension, ch 1, rsc (crab stitch) in each stitch around.
With front side facing,
Round 3: sl st loosely around entire tap between rounds 1 and 2.
Fasten off leaving an 18″ tail for sewing the tab to the hat.
Wrap button tab around the brim with half inside, half outside, and sew it onto the hat, then sew on 1″ button.
Toddlers:
Ch 4,
Row 1: sc in second ch from hook, sc in each remaining chain across, ch 1, turn. (3)
Row 2: sc in each st across, ch 1, turn. (3)
Repeat row 2 8 more times or until tab measures a little over 2” long.
Round 1: working along outside edge of tab, sc evenly around entire tab.
You may fasten off here leaving an 18″ tail for sewing the tab to the hat, or continue with adding a more decorative edging (this will make the tab a little bit wider):
Round 2: using tight tension, ch 1, rsc (crab stitch) in each stitch around.
With front side facing,
Round 3: sl st loosely around entire tap between rounds 1 and 2.
Fasten off leaving an 18″ tail for sewing the tab to the hat.
Wrap button tab around the brim with half inside, half outside, and sew it onto the hat, then sew on 7/8″ button.
Want more gorgeous crochet patterns, and a little encouragement for your day? Sign up for my newsletter here! That way you’ll never miss out on special events, or freebies I’m offering.
JOIN ME ON SOCIAL MEDIA
I would love to see a picture when you’re done, so please feel free to come by my Facebook group and show off your finished project! Be sure to tag @kirstenhollowaydesigns when you share pictures of your project on Instagram!
You can also follow me on Facebook, Pinterest, Instagram, and Ravelry for more beautiful crochet patterns.
PATTERN TERMS AND CONDITIONS:
You are welcome to share the link to this pattern, using one image of your choice, on your site, but please do not share the written patterns themselves, this includes my Ravelry downloads or translations of these patterns, or use additional images. You do not have permission to use my images by themselves to create pinnable graphics for Pinterest, however they may be included in a roundup pin if there are 4 or more other patterns. If you sell finished items online, please do not use my pictures for your listings. I’m positive that your work is of high enough quality for you to sell the finished piece. Have confidence in your abilities! <3 Thank you!
This pattern was made to be used by individuals and small business crocheters alike. Selling your finished pieces in boutiques, at farmer’s markets, craft shows, and other local events is encouraged! Please credit/link Kirsten Holloway Designs when selling finished products online. The only thing I require is that this pattern not be used commercially to produce hundreds of thousands of copies. If you enjoyed this pattern or found it useful, why not share a link to this post with your friends?


